

Rsam Platform Documentation
2
Contents
Setting up SQL Server Database .................................................................. 3
Pre-Installation Requirements ............................................................................... 3
Copying Rsam Database Files .............................................................................. 3
Creating and Setting up the RSAM_APP Account .................................................. 4
Enabling SQL Authentication ................................................................................ 5
Enabling CLR Integration...................................................................................... 5
Installing and Setting up Your Rsam Software ............................................... 6
Pre-Installation Requirements ............................................................................... 6
Setting up Role Services on Windows 2008/2012 Server ....................................... 6
Setting up Request Filtering ................................................................................. 7
Enabling MSMQ for Syslog ................................................................................... 8
Enable Message Queuing for Windows Server .............................................................. 8
Enable Message Queuing for Windows 7 ...................................................................... 11
Running the Rsam Installer................................................................................... 11
Trusted Connection Configuration ................................................................................ 17
Reports ....................................................................................................... 20
Install Crystal Reports 2013 ................................................................................. 20
Enabling Rapid Reports ........................................................................................ 20
Setting up Rsam Web URLs .......................................................................... 21
Configure LDAP settings ...................................................................................... 21
LDAP Server configuration screen: ............................................................................... 22
LDAP Domain configuration screen: ............................................................................. 22
Enable web server-based Email Notification .......................................................... 24
Special Instructions for Enabling Single Sign-on ................................................... 26
Rsam Configuration for Tivoli Access Manager (TAM) ................................................... 27
Rsam Configuration ..................................................................................................... 27
Special Instructions for Email Listener .................................................................. 27
Enabling New Questionnaire Interface .................................................................. 29
Importing the Migration File .......................................................................................... 29
Running the Store Procedure and Script files ................................................................ 29

Rsam Platform Documentation
3
Setting up SQL Server Database
Rsam Web Services require access to a live Rsam database. The Rsam database resides on a SQL
2008/2008 R2, 2012/2012 R2, or 2014 (32 and 64-bit) Server. Configuring a SQL server to use the
Rsam database should take 20-30 minutes when using the following simple steps.
Pre-Installation Requirements
Before attaching / restoring the Rsam database files on the database server, make sure the server
meets Rsam’s minimum requirements.
• An instance of SQL Server 2008, 2008 R2, 2012, 2012 R2, or 2014 has been installed.
Note: For SQL Server 2014, the Compatibility level must be set to SQL Server 2012.
• Collation has been set to
SQL_Latin1_General_CP1_CI_AS
.
• The latest SQL Service packs have been applied.
• SQL Authentication (mixed mode) has been enabled. For step-by-step instructions on how to
enable SQL Authentication, please refer to the Enabling SQL Authentication section.
• Enable CLR Integration. For more information, please refer to the
Enabling CLR Integration
section.
Copying Rsam Database Files
1. Create a custom directory for the Rsam database to reside in, or use SQL’s default data
directory:
\Program Files\Microsoft SQL Server\MSSQL.3\MSSQL\Data\
.
2. Copy the RSAM.mdf and RSAM.ldf files into the directory.
3. Create a sub-directory for Rsam data backups called \backups.
4. Attach the Rsam Database to the SQL Service
5. Launch SQL Server Management Studio by navigating to Start > Program Files > Microsoft
SQL Server 2008 > SQL Management Studio.
6. Expand the navigation tree to locate your Rsam server instance.
7. Expand your server instance.
8. Right-click on Databases and select Attach.
9. In the Attach Databases window, click the “Add…” button to browse for the file RSAM.mdf.

Installation Guide (Installer Method)
Rsam Platform Documentation
4
10. Once the RSAM.mdf file has been selected, make sure that the following entries are correct:
• Original File Names: RSAM.mdf and RSAM.ldf
• Attach as RSAM
• Owner: Username of the database owner account (or sa)
11. Click OK.
Creating and Setting up the RSAM_APP Account
1. Expand the navigation tree to access the Security options for the Server instance of RSAM.
• Expand your Server Instance
• Expand Security
2. Right-click Logins and select New Login.
3. Complete the following information:
• Name:
RSAM_APP
• Authentication:
SQL Server Authentication
• Password: Enter a strong password
• Databases:
RSAM
4. Click User Mapping on the left side.
5. Select the check box (under Map column) for the RSAM entry.
6. In the Database role membership for RSAM box, make the following selections:
•
public
•
db_datareader
•
db_datawriter
•
rsam_client
7. Click OK.
8. Add the view and alter schema permissions for the RSAM Database.
a. Right-click the RSAM database and select Properties.
b. Click Permissions.
c. Select Create Views and Alter any schema permission for the RSAM_APP user.
d. Click OK.

Installation Guide (Installer Method)
Rsam Platform Documentation
5
Enabling SQL Authentication
These instructions will walk you through enabling SQL Authentication via the Management Studio GUI,
if it has not already been enabled.
1. Launch
SQL Server Management Studio
.
2. Right-click on the designated server instance for RSAM and select Properties.
3. In the SQL Server Properties menu, click Security.
4. Click SQL Server and Windows Authentication mode.
5. Click OK.
Enabling CLR Integration
Some features in Rsam such as Redlining uses CLR integration for exporting redlined values to PDF.
In order to use all the capabilities of Redlining feature successfully, you must enable CLR integration
using the clr enabled option of the sp_configure stored procedure in SQL Server Management Studio.
sp_configure 'show advanced options', 1;
GO
RECONFIGURE;
GO
sp_configure 'clr enabled', 1;
GO
RECONFIGURE;
GO
For more information, visit the following URL:
https://msdn.microsoft.com/en-us/library/ms131048.aspx

Rsam Platform Documentation
6
Installing and Setting up Your Rsam
Software
If you cannot use the automated installer (preferred method), please refer to the Rsam 9.2
Installation Guide (Manual Method).
Pre-Installation Requirements
Before attempting to install the RSAM Web Interface on a server make sure that the server meets
Rsam’s minimum requirements, and that the following tasks have been completed:
• IIS v7.5 or higher has been installed on Windows Server 2008/R2, Windows Server 2012/R2, or
Windows 7.
• Microsoft’s .NET 4.5.2 Framework has also been installed.
• Crystal Reports 2013 Runtime Files have been installed for Web Reporting. A license key is not
needed. Click ‘Next’ button through the screens to finish.
• The latest Windows and IIS Security patches / updates have been installed.
• A SQL server hosting the Rsam database has been installed and configured.
• Microsoft Access Database engine 2010 or higher has been installed.
Note: It is recommended to use HTTPS protocol for Rsam installation for security purposes.
Setting up Role Services on Windows 2008/2012 Server
1. Install the required Roles by using the Server Manager tool.
2. Click Start > Administrative Tools > Server Manager.
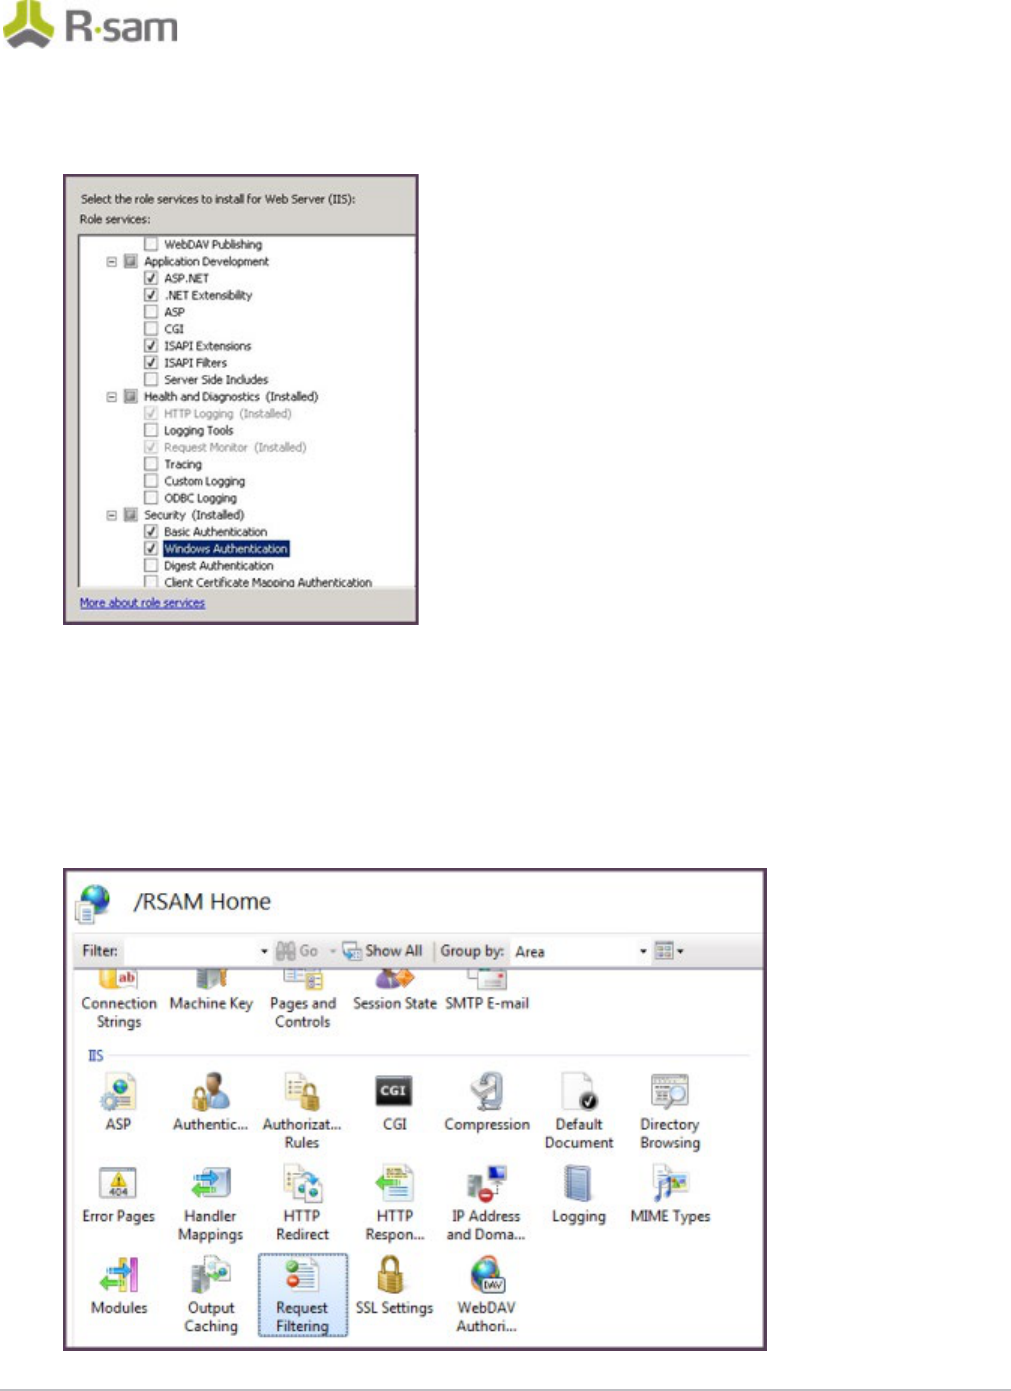
3. In the navigation pane, expand Roles, right-click Web Server (IIS), and then click Add Role
Services.
4. Scroll to Security and select the check boxes for ‘Basic Authentication’ and ‘Windows
Authentication’. (Do NOT uncheck any already checked selections.)
5. Also scroll to ‘Application Development’ and make sure the check box is set for 'ASP.NET', '.NET
Extensibility', 'ISAPI Extensions' and 'ISAPI Filters'. (Do NOT uncheck any already checked
selections.)
6. In the Select Role/Services pane, click Next, and then click Install at the Confirm Installations
Selections pane.
Installation Guide (Installer Method)
Rsam Platform Documentation
7
7. Click Close to exit the Add Role Services wizard.
Setting up Request Filtering
If planning to import large files on a Win2012/Win2008/IIS7 server, it will require adjusting the
“Request Filtering” property of IIS to allow larger files. In some cases the option is not available, if so
- http://www.iis.net/download/AdministrationPack needs to be installed.
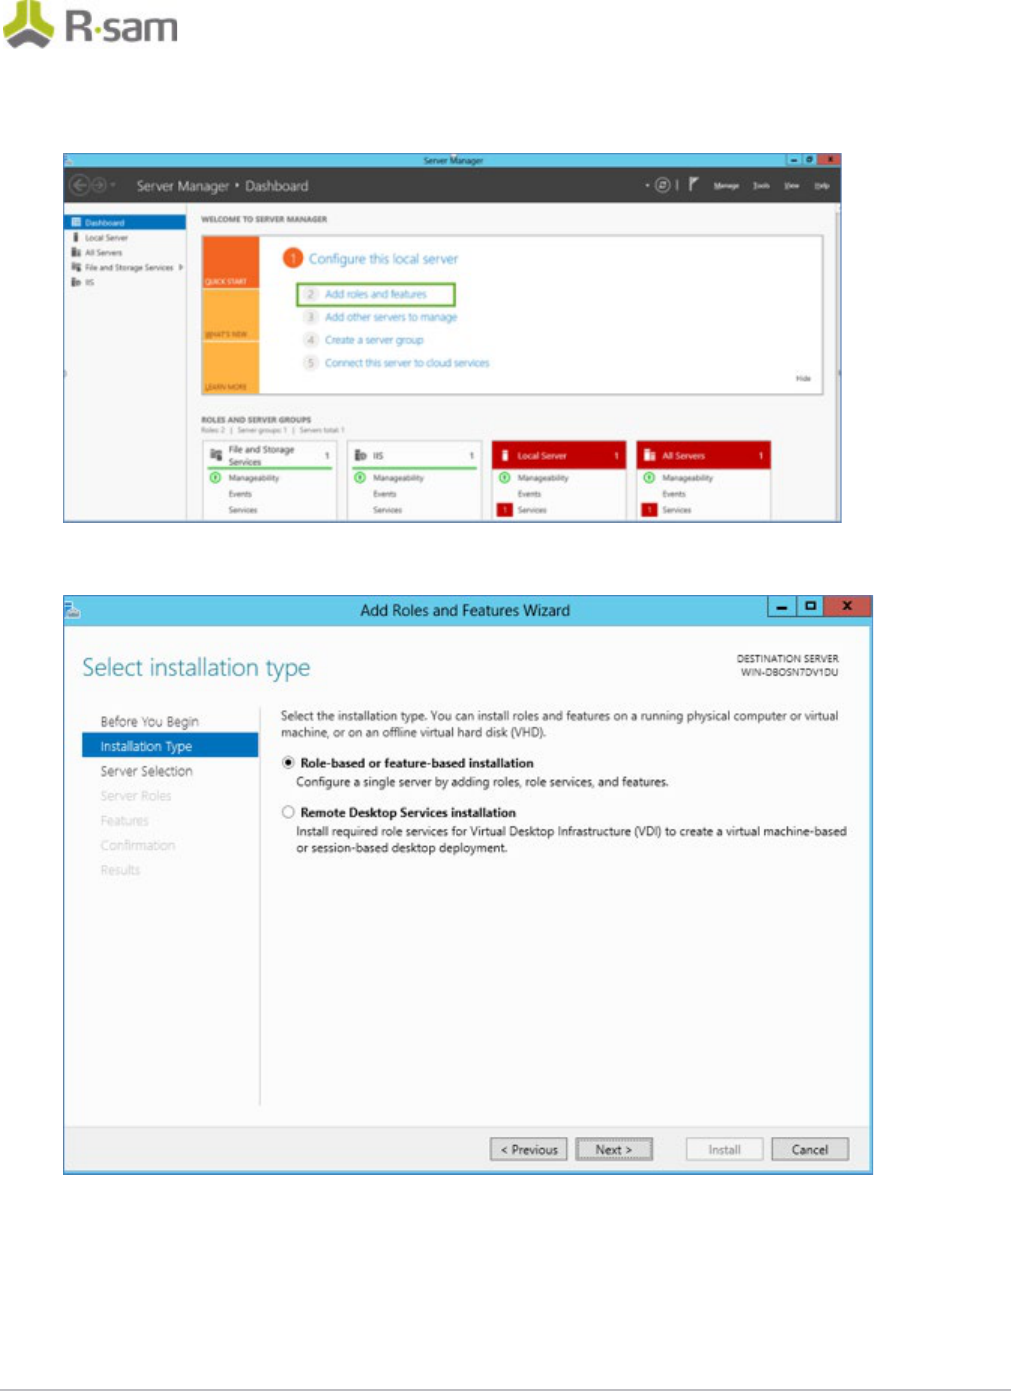
1. In IIS Manager, highlight the Server.
2. Double-click on Request Filtering.

Installation Guide (Installer Method)
Rsam Platform Documentation
8
3. Click Edit Feature Settings.
4. Set ‘Maximum allowed content length (Bytes):’ to 4000000000 and click OK.
5. Navigate to C:\Inetpub\wwwroot\RSAM_FINDINGS.
6. Open web.config in Notepad.
7. Edit requestLengthDiskThreshold="30000" to requestLengthDiskThreshold="1000000" and save.
Enabling MSMQ for Syslog
Enable Message Queuing for Windows Server
1. Start > Control Panel > Programs > Turn Windows feature on or off.
Installation Guide (Installer Method)
Rsam Platform Documentation
9
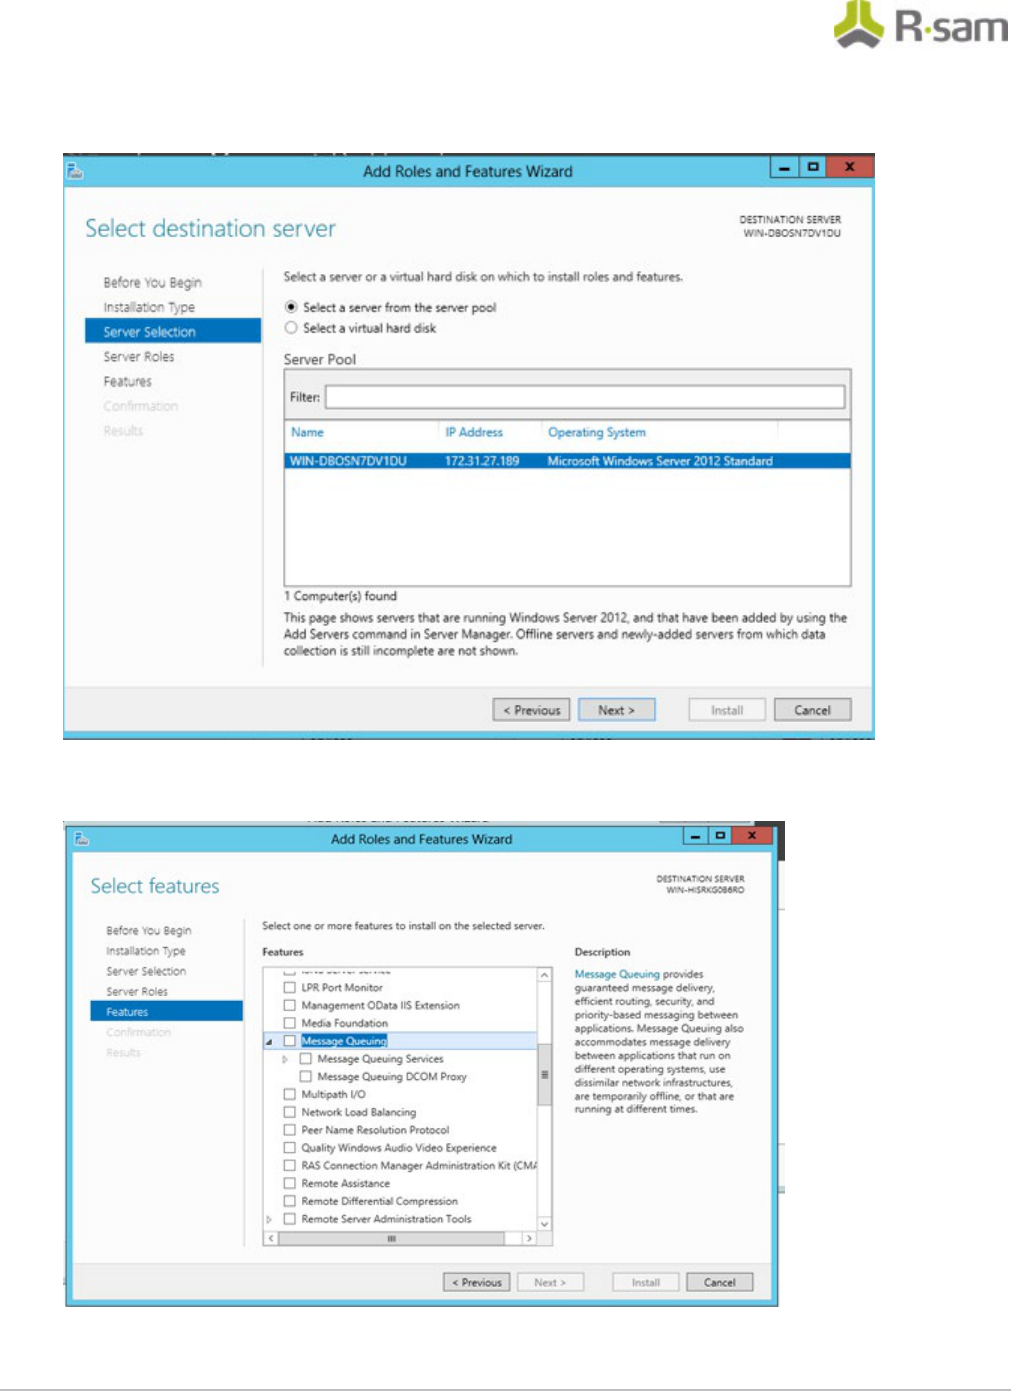
2. In the Server Manager Dashboard, click Add roles and features.
3. In the Add roles and features wizard, under the Installation Type, select Role based or feature-
based installation and click Next.
Installation Guide (Installer Method)
Rsam Platform Documentation
10
4. Select a Server from the Server pool and click Next.
5. From the Features list select Message Queuing and click Next. Ensure all the options under
Message Queuing Services are enabled.
Installation Guide (Installer Method)
Rsam Platform Documentation
11
Enable Message Queuing for Windows 7
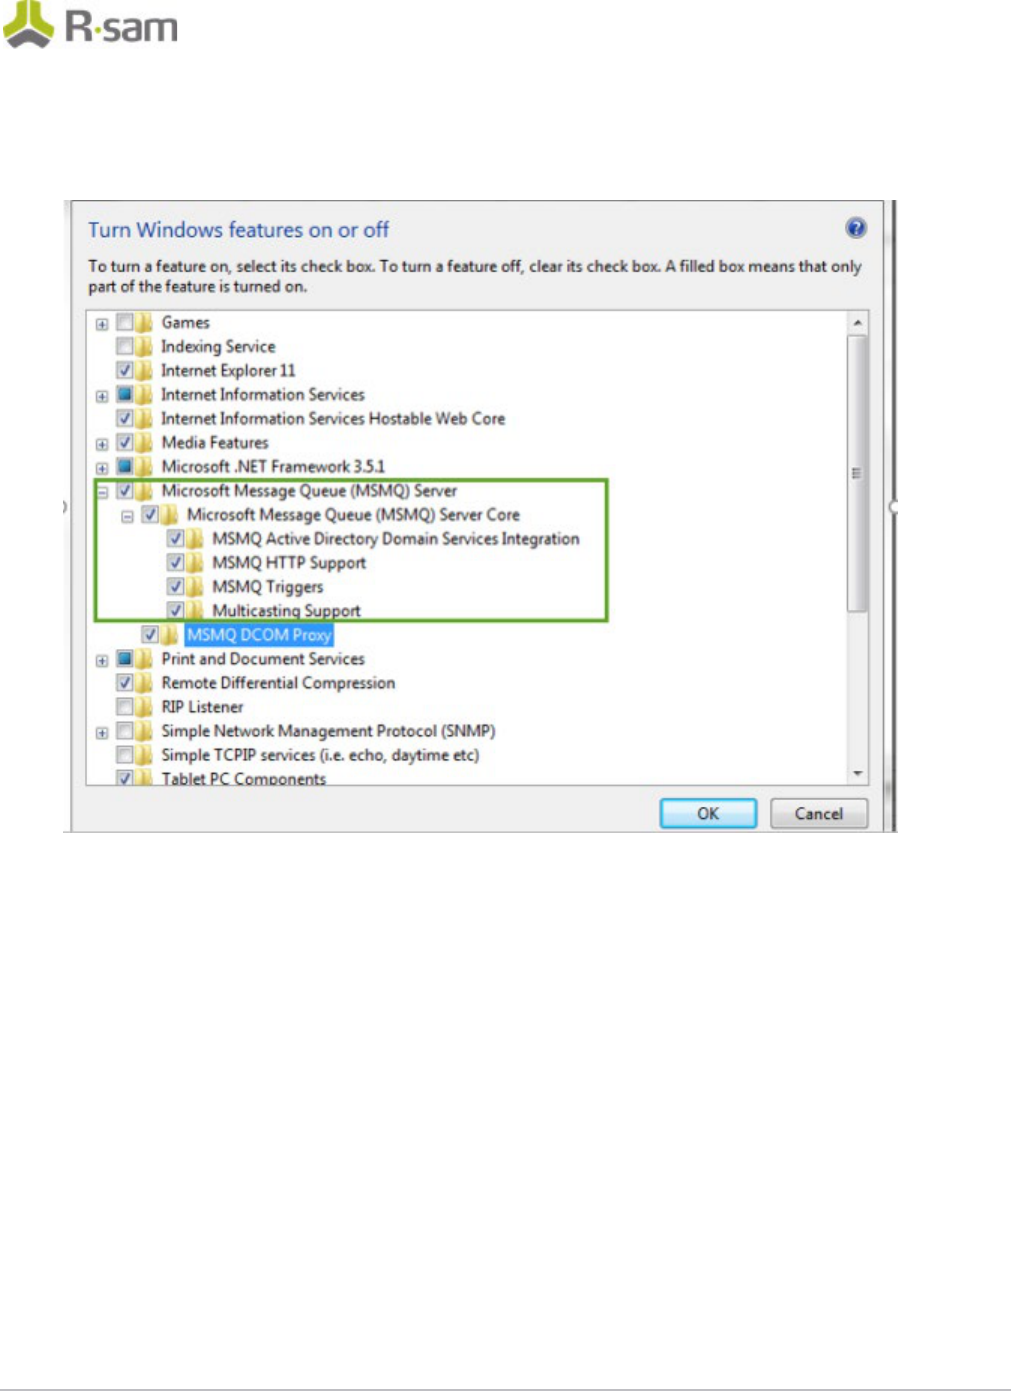
1. Start > Control Panel > Programs > Turn Windows feature on or off
2. Select the MSMQ Server feature and Click OK.
Running the Rsam Installer
The Rsam Web application includes an automated installer. The goals of this installer are to:
• Check to ensure the system meets the minimum system requirements.
• Create the required physical directories, and transfer the proper files.
• Create and configure the required IIS virtual directories.
• Set the necessary database and LDAP connection settings.
• Greatly simplify the application of future updates.
It is recommended that customer utilize this installer for rapid deployment of Rsam. Customer may
also elect to perform a “Manual Install” described in the Rsam 9.0 Installation Guide (Manual
Method).
You ONLY need to perform EITHER a manual or an automated install. Not Both.
Installation Guide (Installer Method)
Rsam Platform Documentation
12
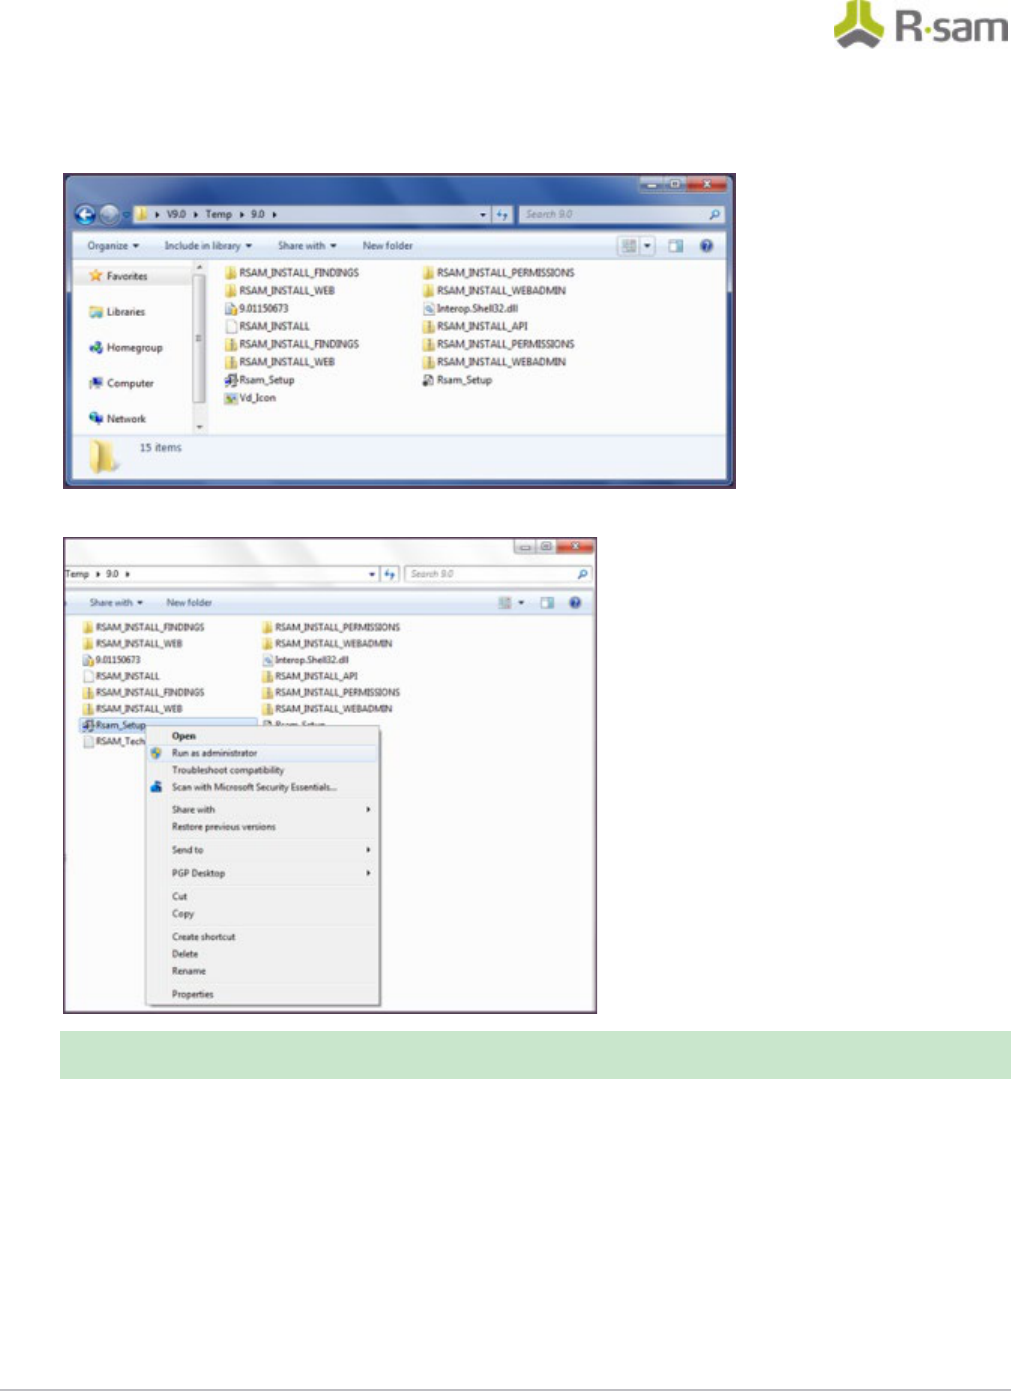
1. Create a temporary folder to hold the Rsam installer files. Extract the Rsam module files (.zip)
and the Rsam_Setup (.exe) file into this directory.
2. Double-Click on the file Rsam_Setup.exe to launch the Rsam Web Installer.
Note: If using Windows Server 2008/2012, or Windows 7, right click Rsam_Setup.exe
and choose ‘Run as Administrator'.
3. Click Next on the front screen.
4. Click Accept on the License Screen.
5. Click Continue.
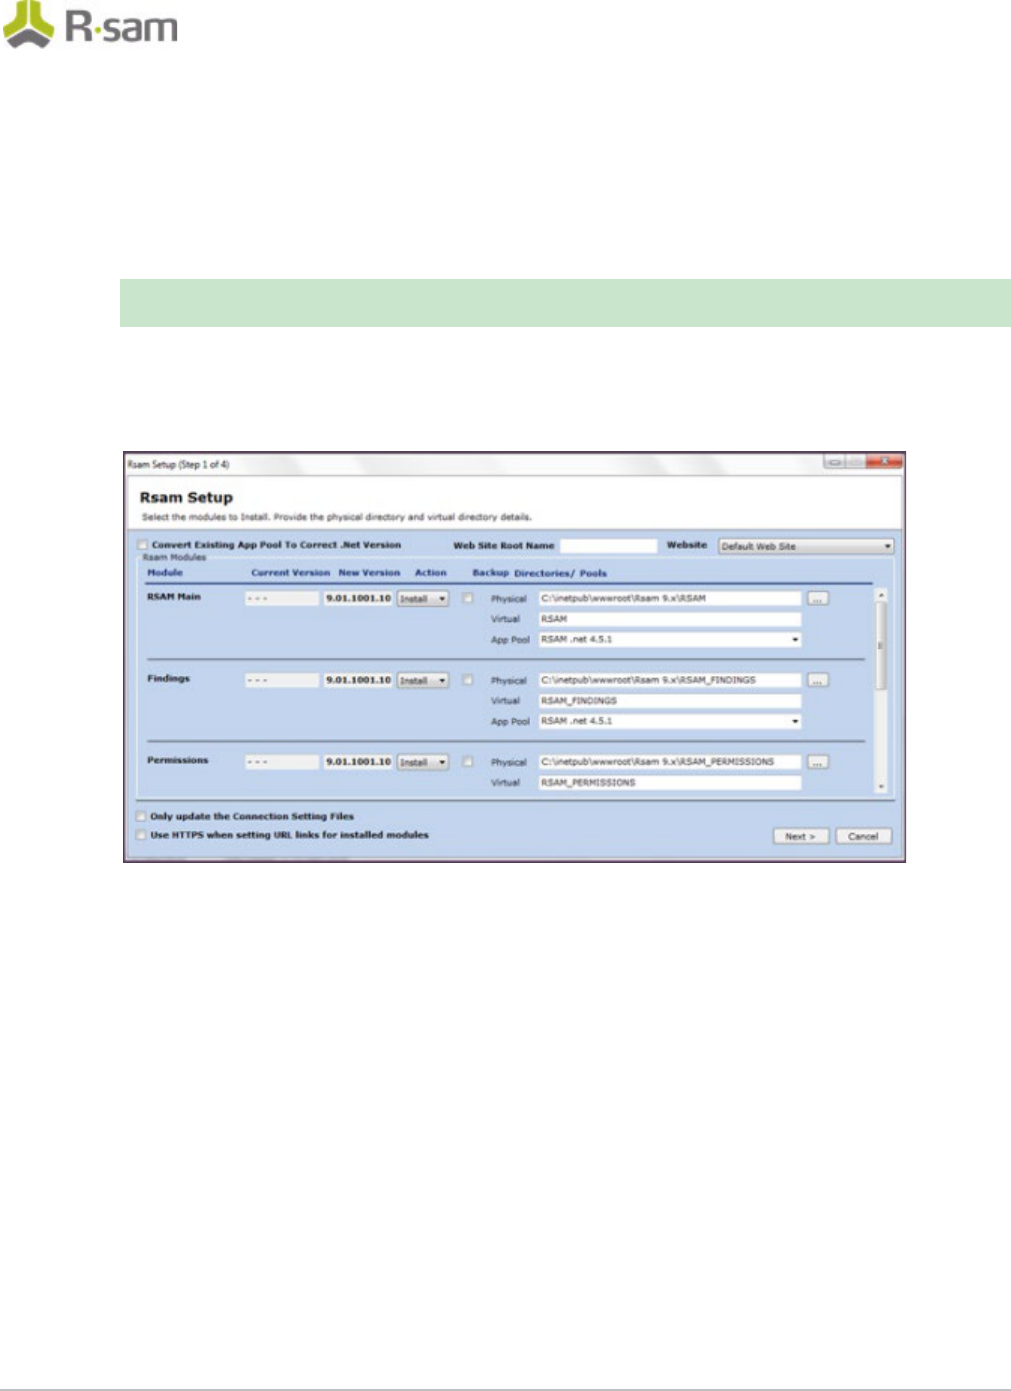
6. Select the Installation Destination
a. Select the destination for your installation. Here you will choose the Physical Directory,
Virtual Directory, and Application Pool to use.
b. For each module you wish to install, select “Install” from the drop-down-list.
Installation Guide (Installer Method)
Rsam Platform Documentation
13
c. For the easiest install experience, it is recommended that you keep the defaults for:
• Physical directory
• Virtual Directory
• Application Pool
Note: Rsam will auto-create any physical directory, virtual directory and
application pool that does not exist.
d. If you elect to install the Single Sign-on module, you will be asked to select the type of
Single Sign-on in the combo-box below.
e. Click Next to continue.
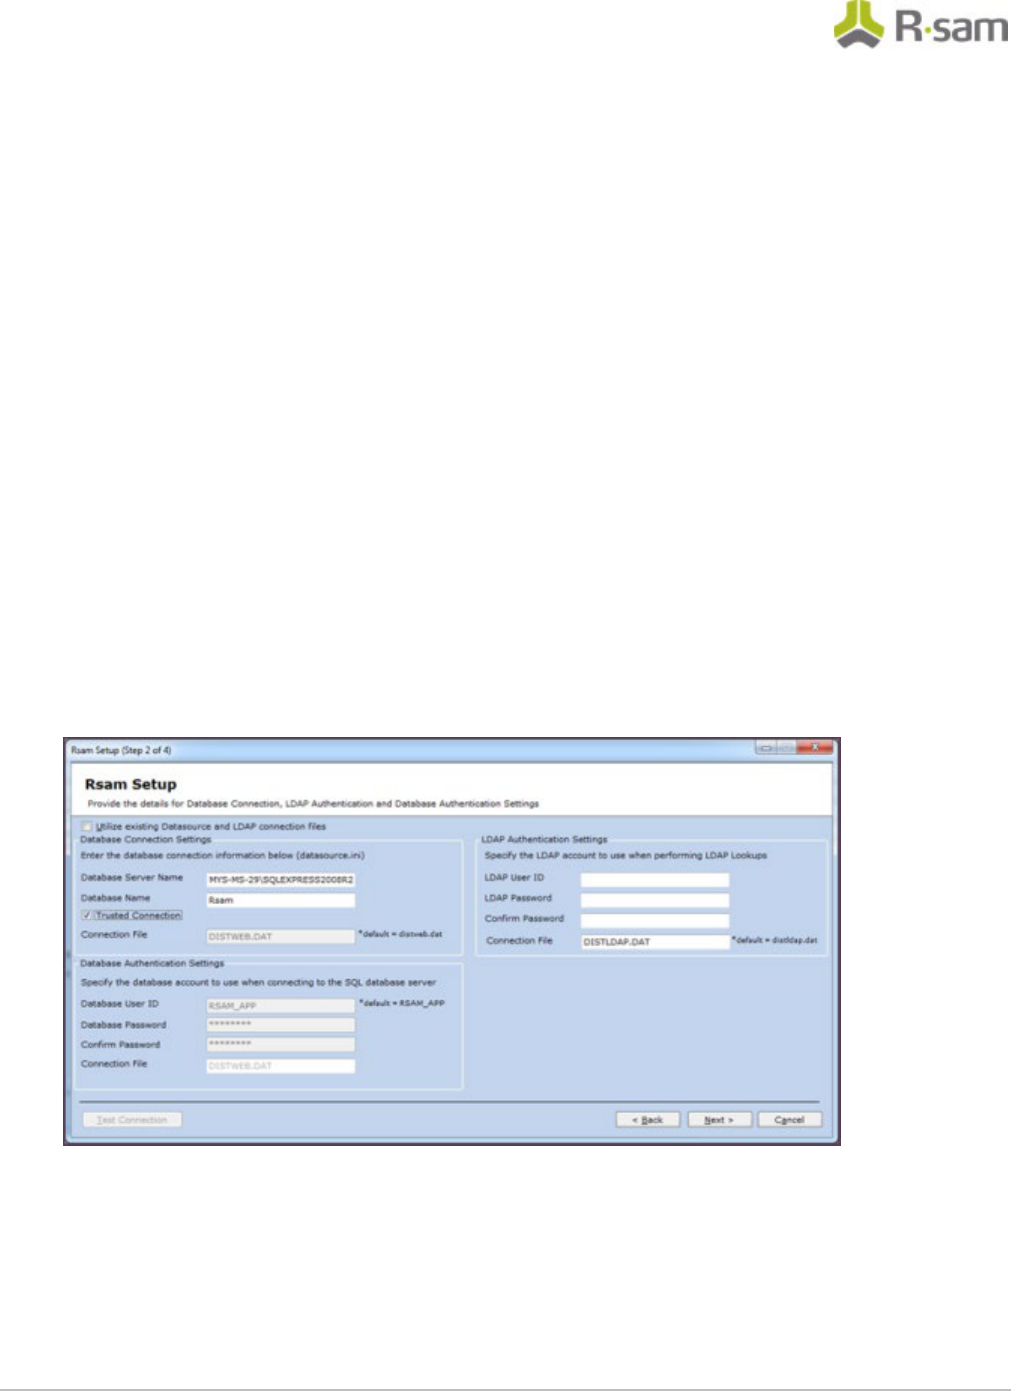
7. Select the Connection Settings
For SQL authentication:
a. Select the appropriate connection settings. Here you will choose the SQL access account,
LDAP access account, and database connection path.
b. Database Connection Settings
• Database Sever name: Enter the fully qualified name of the Rsam database server.
Include the \instance name if this is a named instance.
• Database Name: Enter the name of the SQL database to use (default = “RSAM”).
• Connection File: Specify the name of the file to store the connection information.
c. Database Authentication Settings
• Database User ID: Enter the Database User ID (default = “RSAM_APP”).
• Database Password: Enter and Confirm the password given during the Database
User ID setup.
Installation Guide (Installer Method)
Rsam Platform Documentation
14
• LDAP Authentication Settings: (OPTIONAL) LDAP User ID: Enter the LDAP User ID
given during LDAP setup.
• LDAP Password: Enter and Confirm the LDAP password given during the LDAP
setup.
• Connection File: Specify the name of the file to store the connection information.
d. Click Test Connection button to verify correct information is given.
e. Click Next to continue.
For Trusted connection – This is the recommended method to have the Web Server
authenticate to the Database Server.
a. Select the appropriate connection settings. Here you will choose the SQL access account,
LDAP access account, and database connection path.
b. Database Connection Settings
• Database Sever name: Enter the fully qualified name of the Rsam database server.
Include the \instance name if this is a named instance.
• Database Name: Enter the name of the SQL database to use (default = “RSAM”).
c. Select the Trusted Connection checkbox. For more information on Trusted Connection,
refer to the Trusted Connection Configuration section.
d. Click Next to continue.
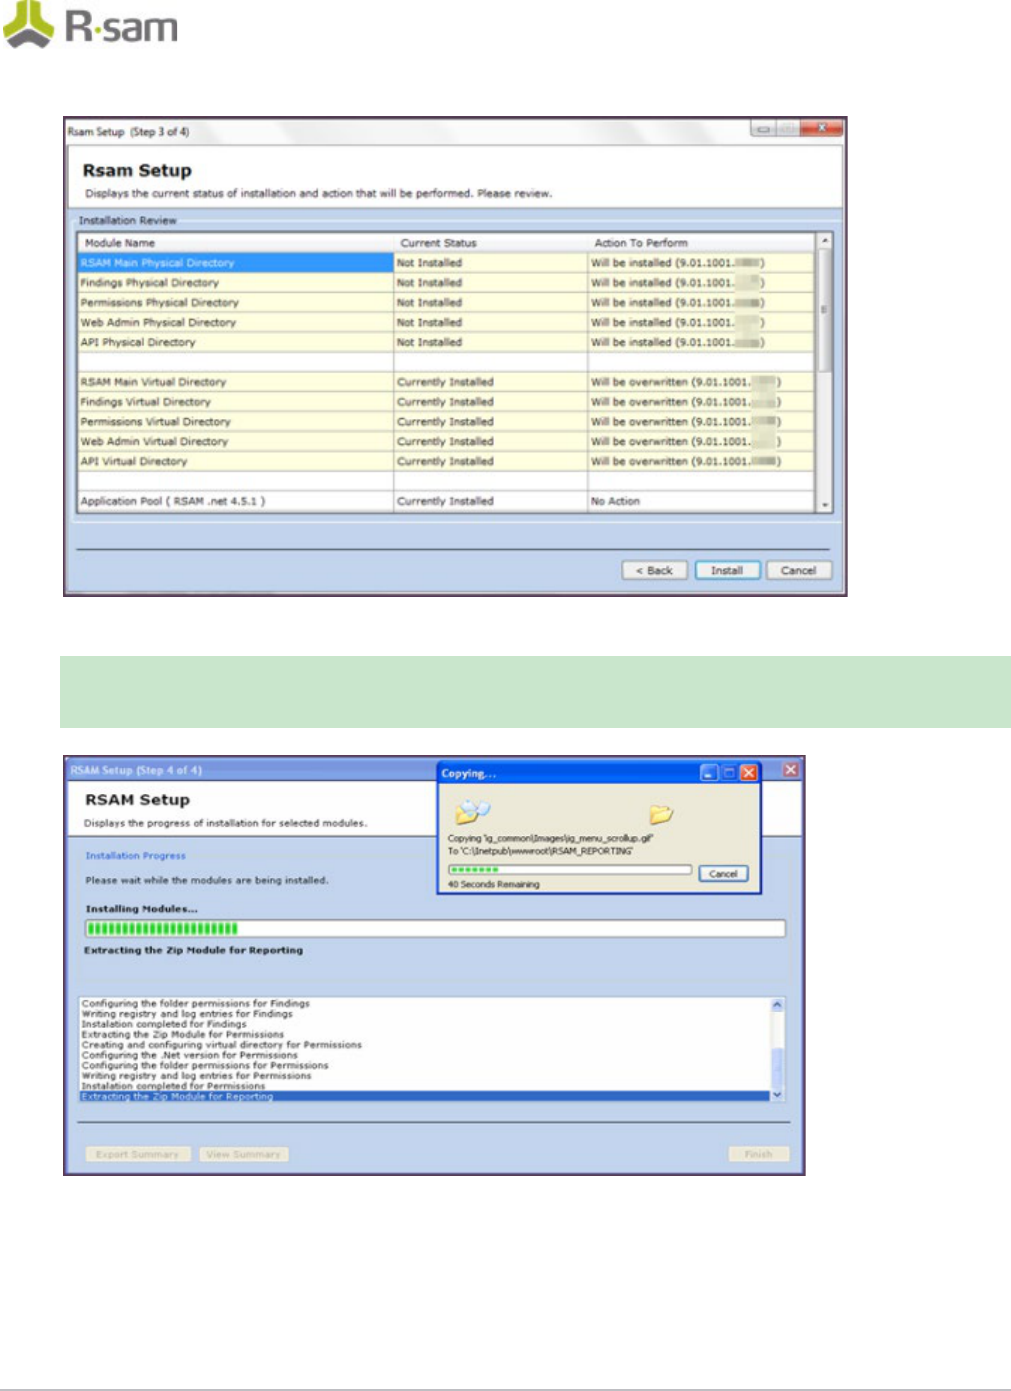
8. Review Installation Choices
a. Review “Current Status” and “Action to Perform” for each Rsam module.
b. Click Install to continue.
Installation Guide (Installer Method)
Rsam Platform Documentation
15
9. Installation Status
Note: Backup check box in Rsam Setup Step 1 will create a backup of your current virtual
directory and store it in a .zip file. When selecting this option it will increase the time to
perform the installation.
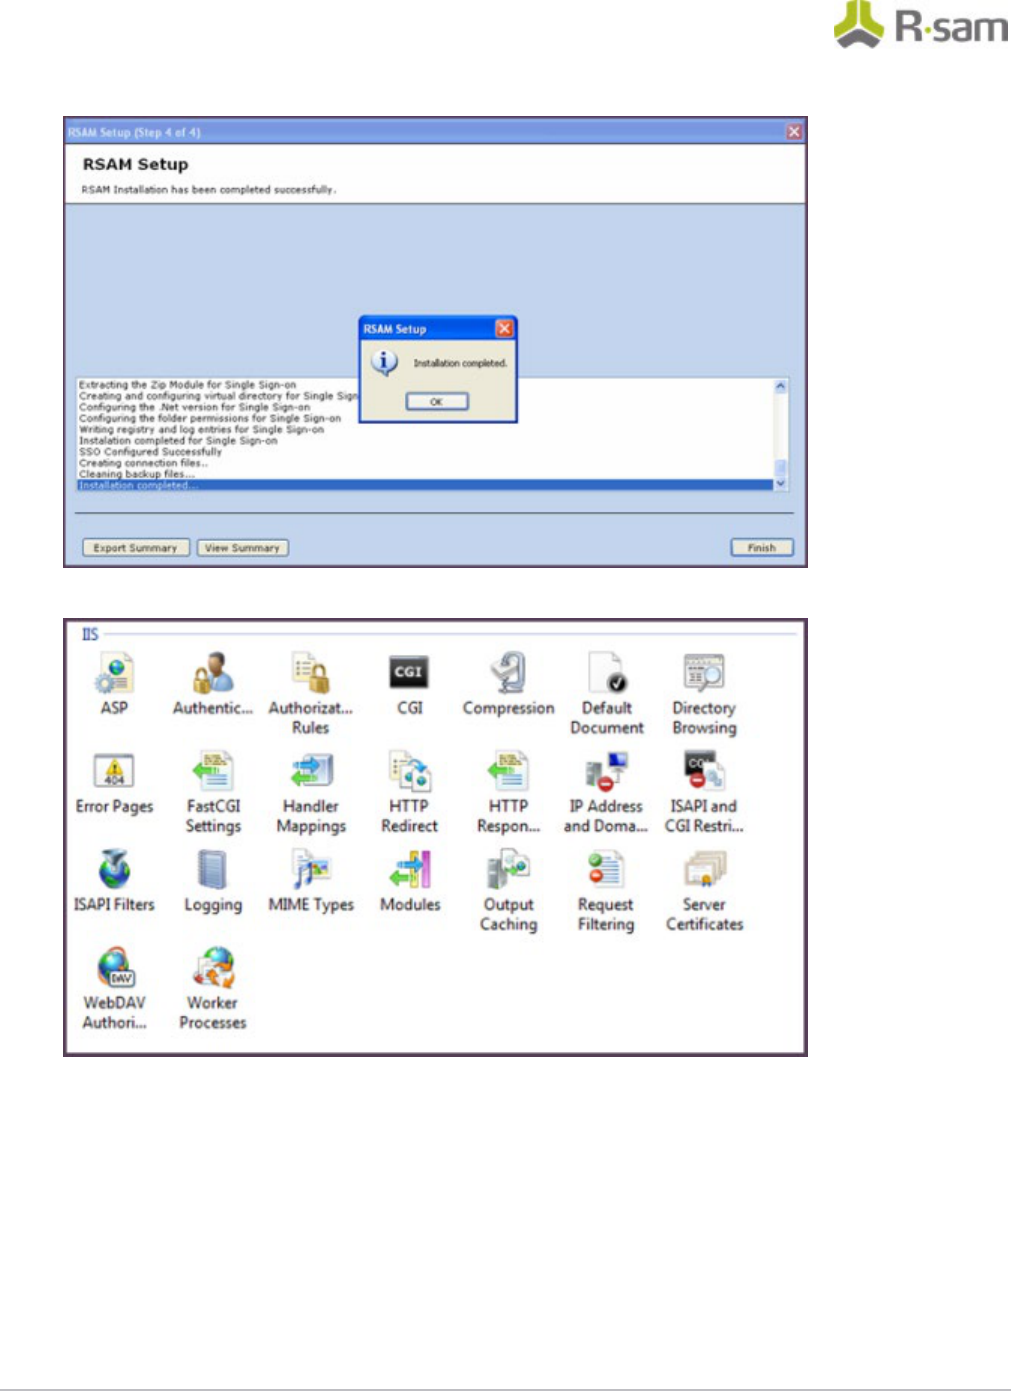
10. Installation Completed
a. View or Export a summary of installation activities.
b. Click OK.
c. Click Finish.
Installation Guide (Installer Method)
Rsam Platform Documentation
16
11. On the web server, please check the ISAPI and CGI restrictions.
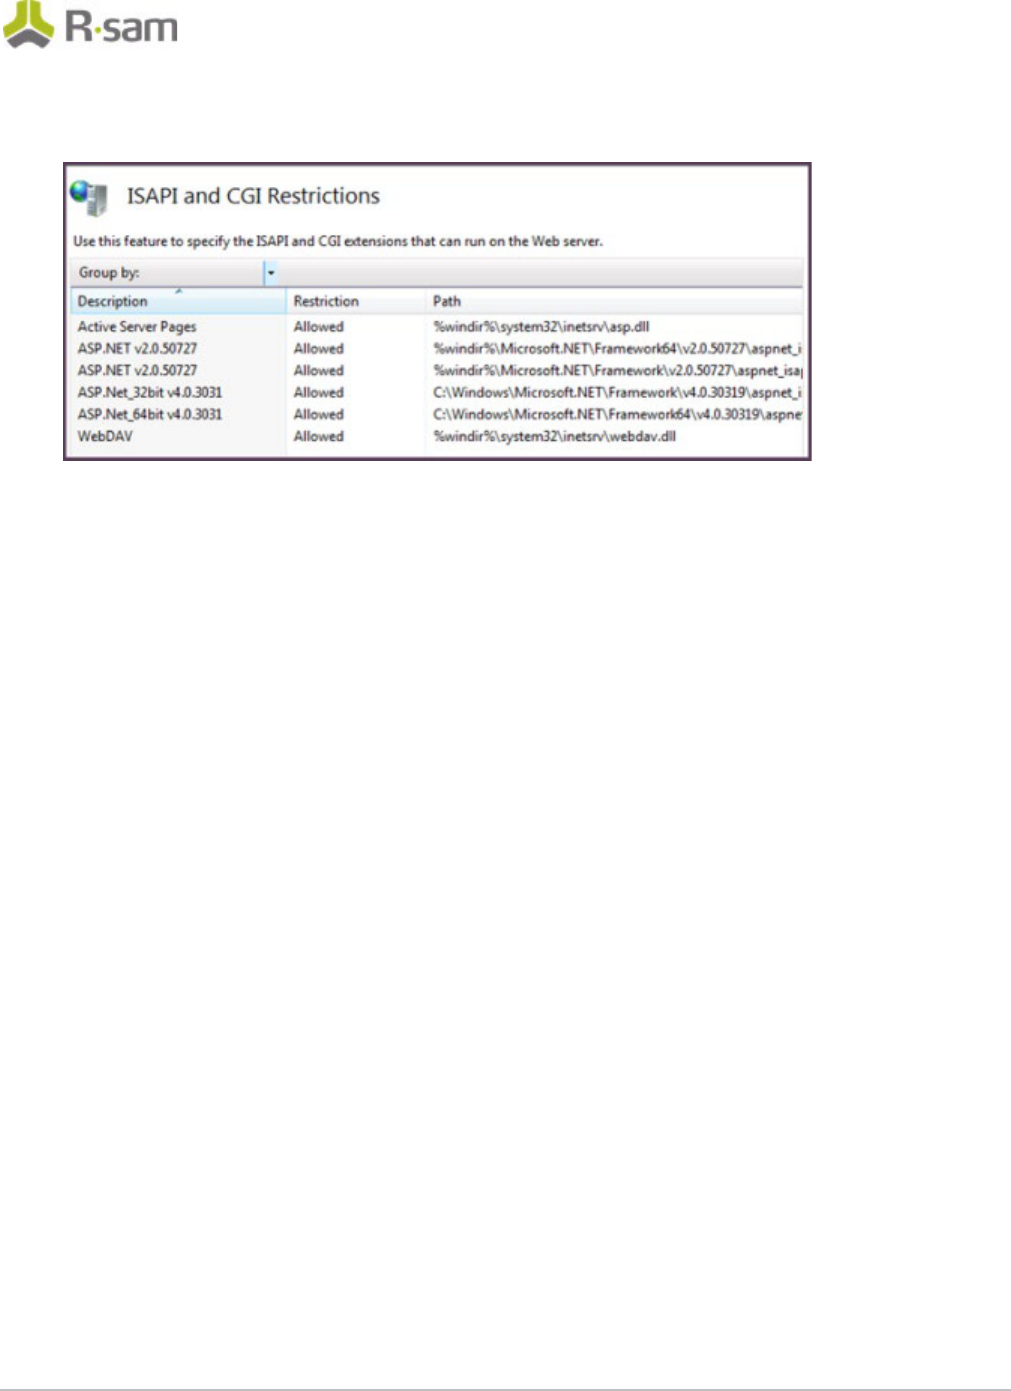
Installation Guide (Installer Method)
Rsam Platform Documentation
17
12. All the ASP.net v4.0.x should be set to Allowed.
Trusted Connection Configuration
Rsam supports the ability to use a Domain account for the Rsam application to authenticate to the
SQL server. This method is more secure and therefore Rsam recommends this method over creating a
local authentication. The following steps will allow Rsam to use the trusted connection configuration:
1. On the web server navigate to the RSAM main folder (i.e. C:\inetpub\wwwroot\RSAM). Right-
click on datasouce.ini and select Edit. Update the Rsam datasouce.ini to contain only the
following line. Change the highlighted sections accordingly.
CONNECTION_STRING_01:
Server=localhost;Database=rsam;Trusted_Connection=True;
2. Copy the updated datasouce.ini file into all Rsam folders under wwwroot.
3. Use a domain account on your SQL Server and application pool.
a. Set your domain account to have the following database role membership on your Rsam
database.
• db_datareader
• db_datawriter
• public
• rsam_client

Installation Guide (Installer Method)
Rsam Platform Documentation
18
b. Set the same domain account to be the identity for the Rsam application pool.
4. Navigate to the Rsam Scheduler folder (i.e. C:\inetpub\wwwroot\RSAM_SCHEDULER), right-click
on MAKE_DISTWEB_LDAP.exe and select Run as Administrator. The Connection file name
should be Trusted.dat. Enter the same credentials for trusted connection and click on Create
Connection.
Installation Guide (Installer Method)
Rsam Platform Documentation
19
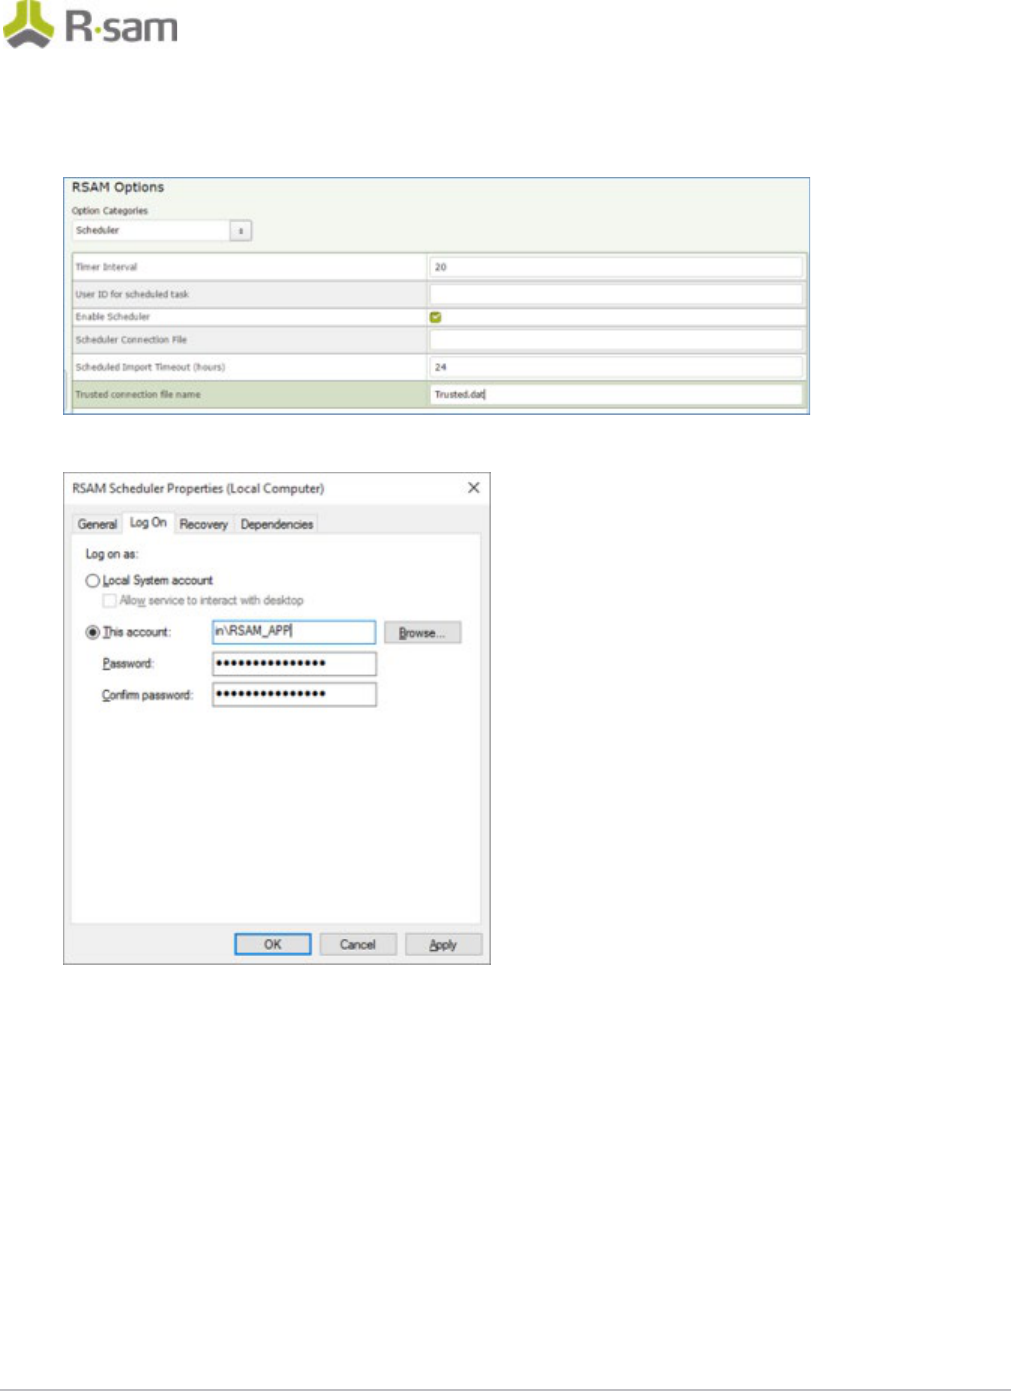
5. In Rsam, click on Mange > Administration > Rsam Options > Scheduler and specify the file
name (Trusted.dat) under ‘Trusted connection file name’.''
6. Specify the Scheduler service to run using the same trusted credentials.
Rsam Platform Documentation
20
Reports
Install Crystal Reports 2013
1. Run the Crystal Reports MSI Package (CRRuntime_64bit_13_0_8.msi) using the FTP link.
2. Copying crystalreportviewers13 sub folder to root of WebSite that Rsam is installed if not
default.
By default the Crystal MSI package installs the aspnet_client folder in the root location of the WebSite
that hosts Rsam (C:\inetpub\wwwroot). If the root location of the WebSite that hosts Rsam is not
C:\inetpub\wwwroot, then you will need to copy the aspnet_client folder into the corresponding
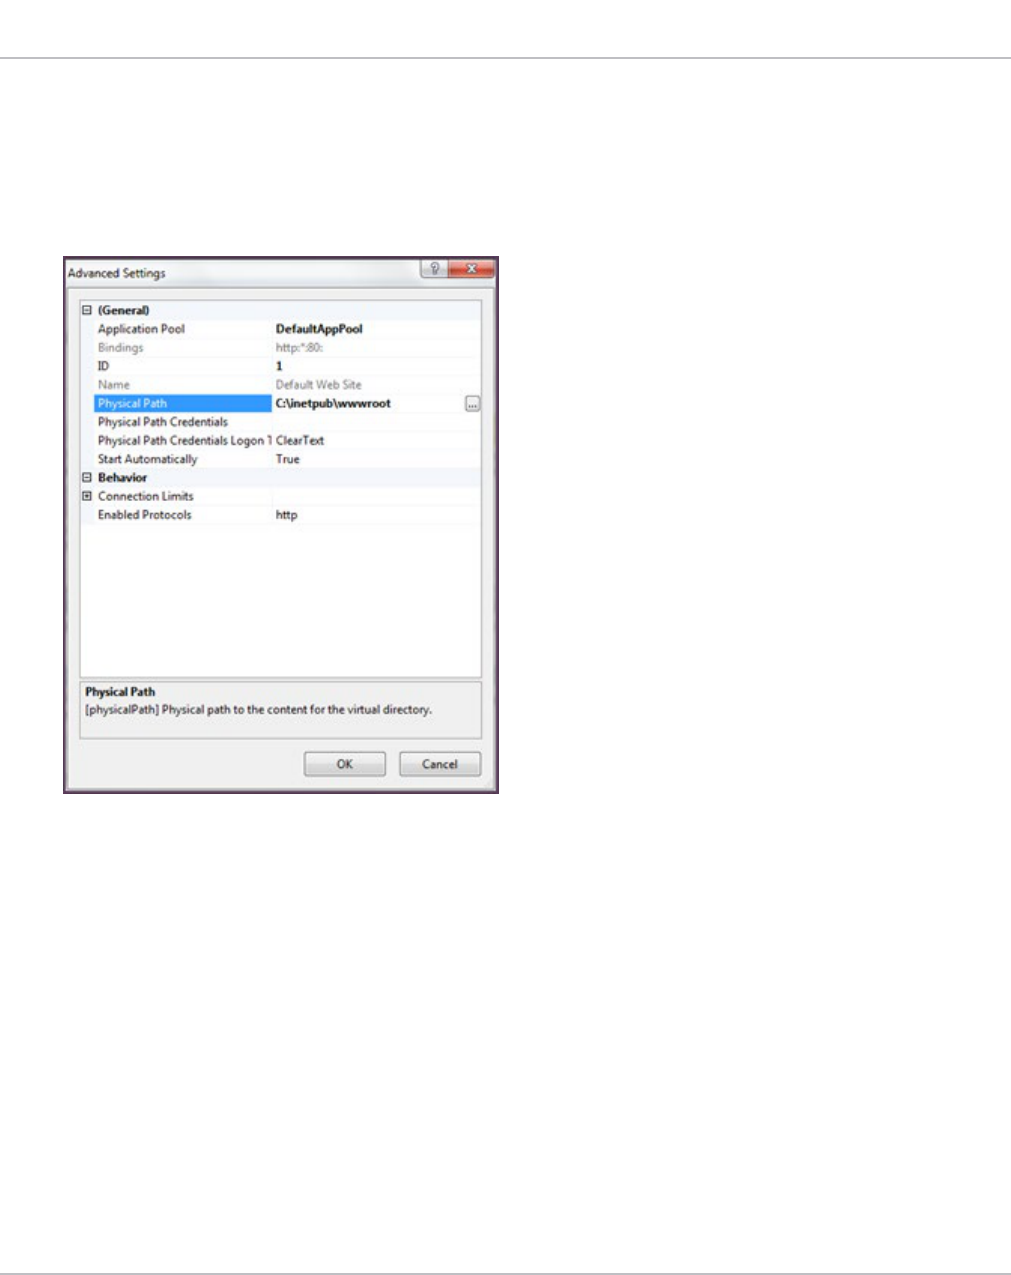
location. To determine the root of the WebSite where RSAM_REPORTING virtual directory is under,
right click Default Web Site, choose Manage Web Site > Advanced Settings and note the ‘Physical
Path’.
Enabling Rapid Reports
To enable Rapid Reports in your Rsam instance, use the RDL files available in the RapidReports.zip.

Rsam Platform Documentation
21
Setting up Rsam Web URLs
1. Log in with an administrator account.
2. Click Manage > Administration > Options > RSAM Options > URL Links on the right panel.
3. Provide the proper URL links for the specific Rsam Web components configured in your
environment on the web server.
4. Log into the Rsam Web using an Account Administrator (or higher) account. Then click Manage
> Users/Groups check if there is already an account named ‘scheduler’ otherwise add one and
set the User Privilege to ‘Data Admin’ and uncheck the option ‘Force User to change password
on next login’.
5. Then click Manage > Administration > Options > RSAM Options and choose Scheduler for the
‘Option Category’ on the right panel.
6. Enter a number (indicates seconds) for the ‘Timer Interval’ (by default it is 20).
7. Type the account (Rsam user id) which will be used to schedule the task by typing in the ‘User
ID for scheduled task’ option. By default, the account name should be set to ‘scheduler’.
8. Finally check the box for ‘Enable Scheduler’ option.
Configure LDAP settings
The LDAP User ID should be a service account created by the LDAP Administrator. If you have
multiple LDAP Domains specified in the Rsam Web Admin ‘LDAP Admin - Domain’ option, additional
DISTLDAP files need to be created matching the name defined in the ‘LDAP Domain – Server’
configuration.
This can be accessed by logging into Rsam Web using a user that has Administrator access (Data
Administrator or Account Administrator), then click Manage > Administration > Options. An option will
be available to configure ‘LDAP Admin – Server’ and ‘LDAP Admin – Domain’. Just double click the
LDAP Server to configure the DISTLDAP file name.
Installation Guide (Installer Method)
Rsam Platform Documentation
22
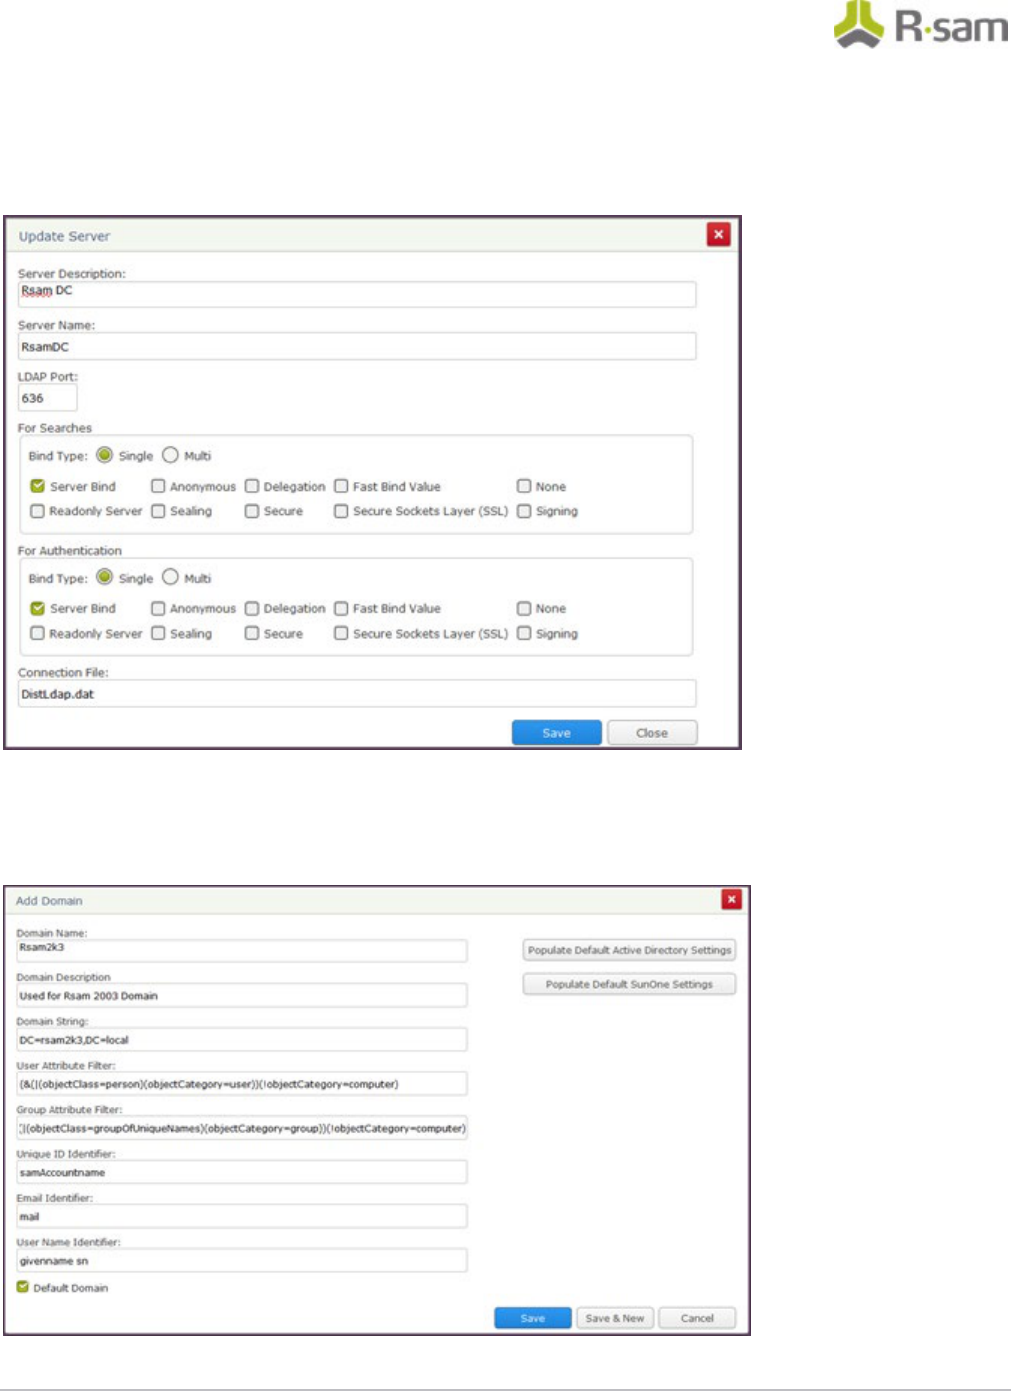
LDAP Server configuration screen:
If there is more than one LDAP server just add additional servers by clicking Add.
LDAP Domain configuration screen:
Make sure to enter the Domain String in the format like dc=…,dc=… or o=… (do not enter it like
Rsam2k3.local).
Installation Guide (Installer Method)
Rsam Platform Documentation
23
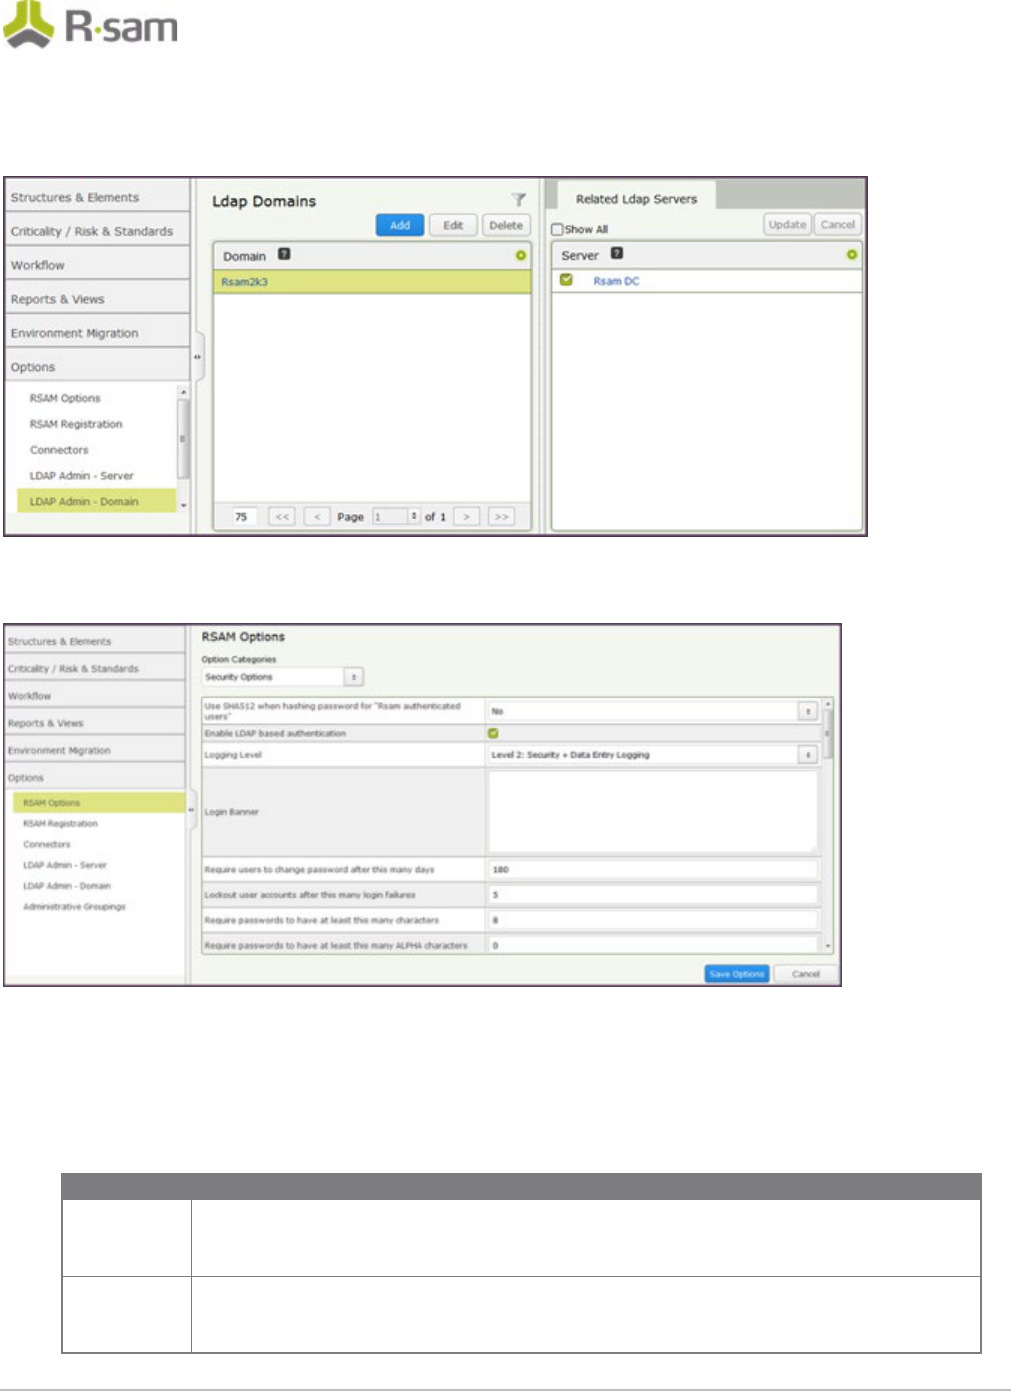
Make sure to associate to the ‘Related LDAP Domain’ on the right panel after creating the LDAP server
configuration and LDAP Domain configuration.
Enable the LDAP based authentication under Manage > Administration > Options > RSAM Options >
Security Options by checking the box for ‘Enabled LDAP based authentication.’
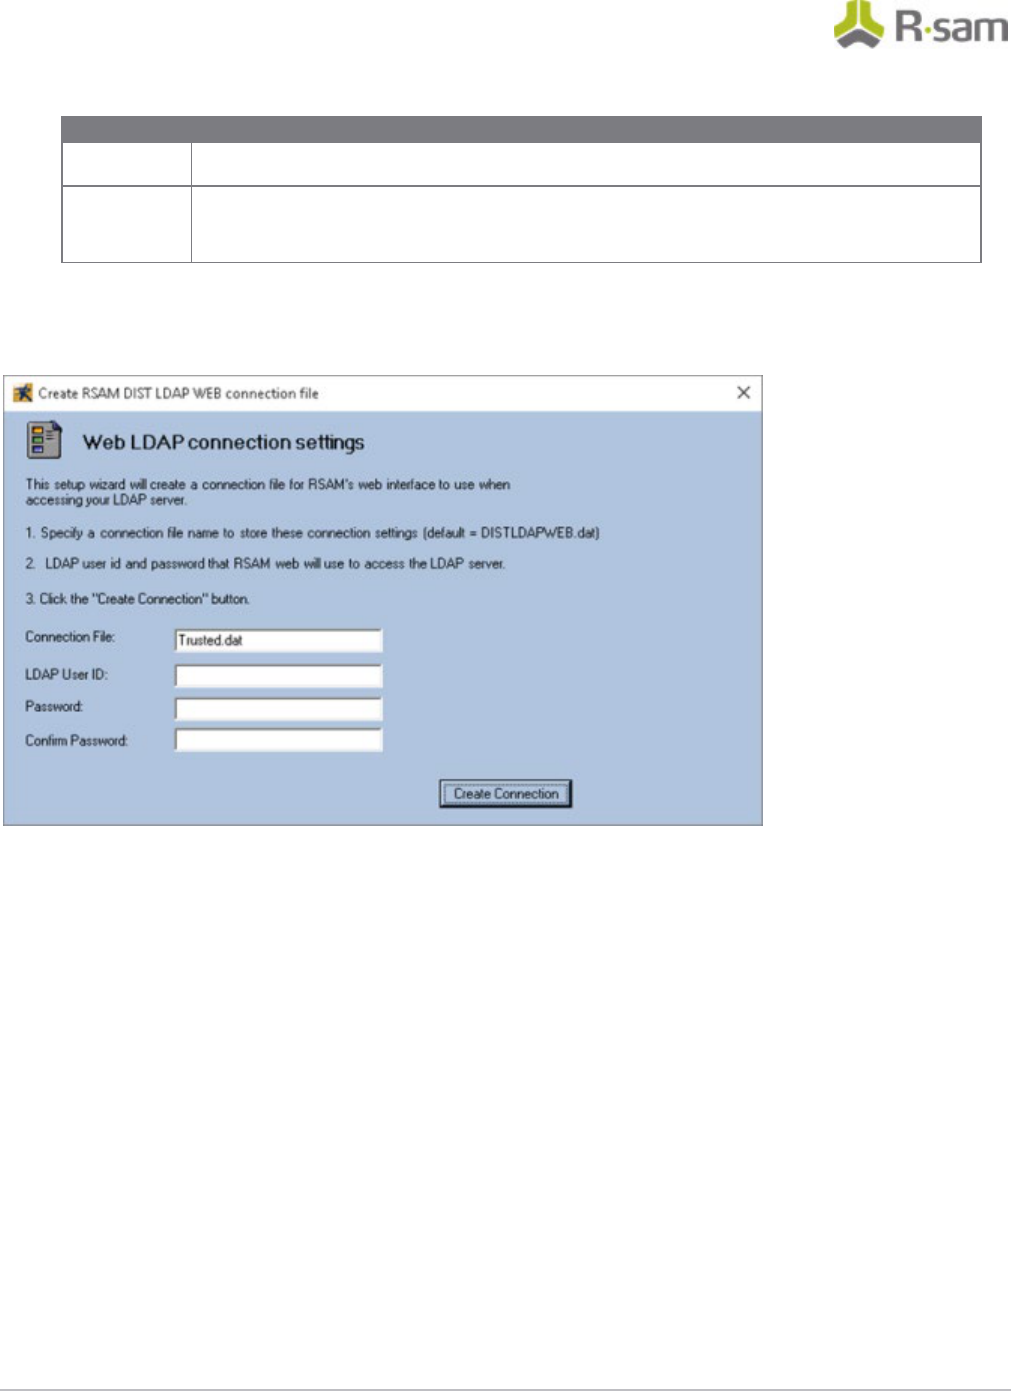
Complete the following two steps on the web server (to create the DISTLDAP.dat file which has the
credentials for the Domain configured above).
• In the X:\inetpub\wwwroot\RSAM, launch the application “MAKE_DISTWEB_LDAP.exe” (right
click and choose ‘Run as Administrator’ if the web server is Windows Server 2008).
• You will be prompted for the following information.
Prompt
Required Information
Connection
File
The name of the file to store SQL connection information into (the default of
DISTLDAP.dat is preferred).
LDAP User
ID
The name of the LDAP user account Rsam Web should use when querying the
LDAP Server. [Note: Do not use format ‘DOMAIN\LDAP name’. Just provide the
Installation Guide (Installer Method)
Rsam Platform Documentation
24
Prompt
Required Information
LDAP name. If that fails try the fully qualified LDAP name (CN=…).
LDAP
Password
The password to use when querying the LDAP Server.
Once this information has been entered, click on the “Create Connection” button to finish the setup
process. Copy the DISTLDAP.dat file into RSAM_FINDINGS, RSAM_PERMISSIONS, RSAM_WEBADMIN,
RSAM_SSO (optional), and also into the RSAM_SCHEDULER folder.
Enable web server-based Email Notification
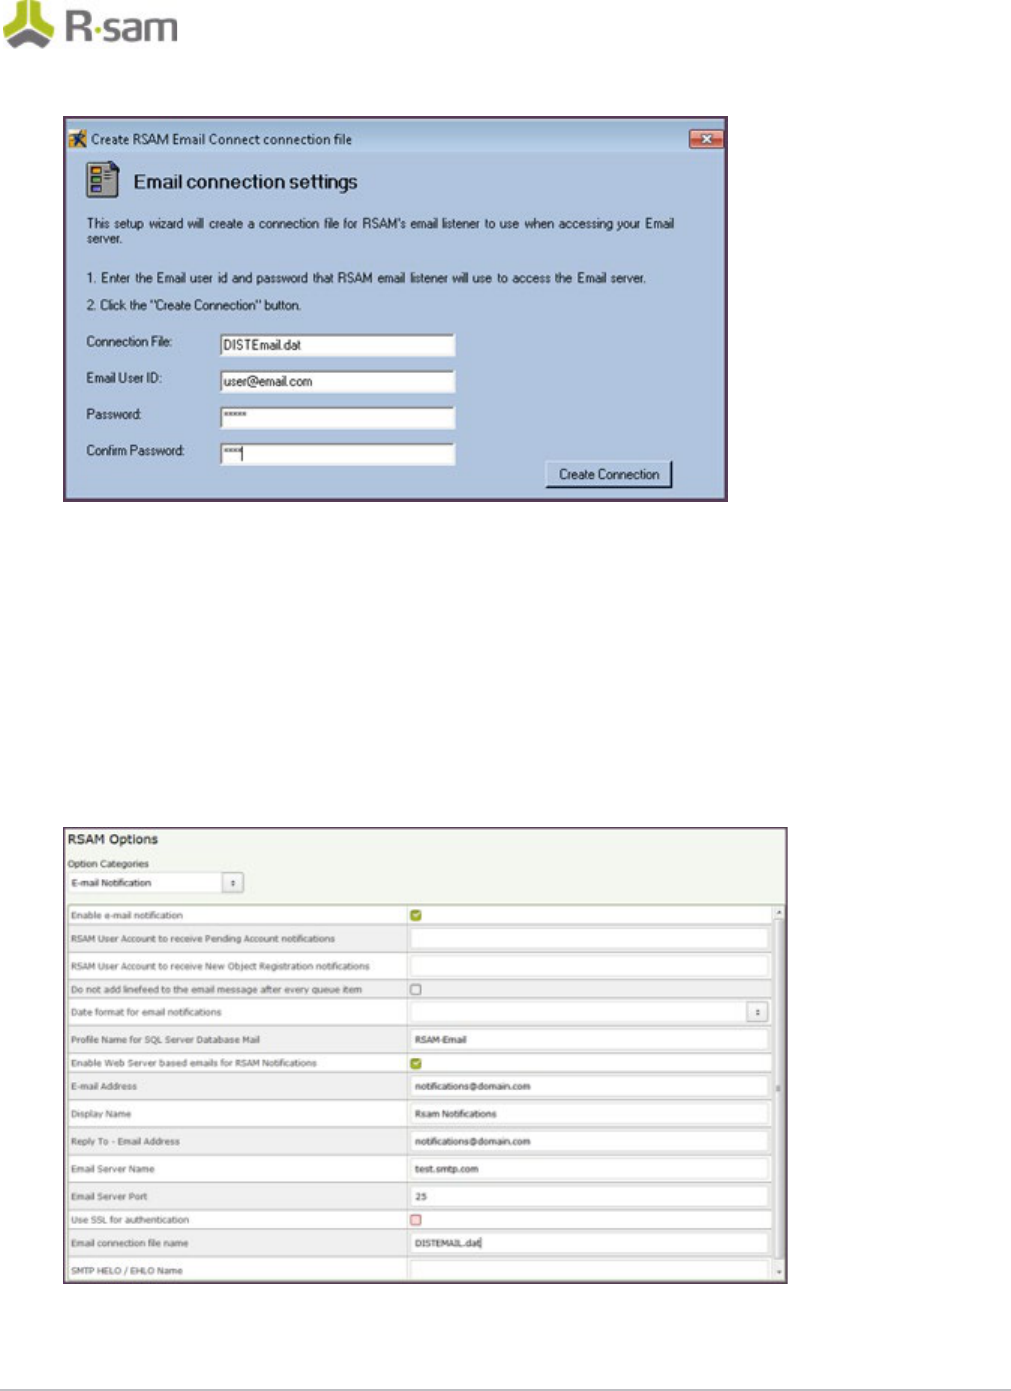
1. Navigate to the RSAM Scheduler Service folder.
2. Right click MAKE_EMAIL_CONNECT.exe and choose ‘Run as Administrator’.
3. Type DISTEmail.dat for the ‘Connection File’. Then type in the email address for the ‘Email User
ID’ from which the email notifications will be sent. Also provide the password.
Installation Guide (Installer Method)
Rsam Platform Documentation
25
4. Log into the Rsam Web using an Account Administrator (or higher) account. Click Manage >
Administration > Options > Email Notification.
5. Check off the option ‘Enable e-mail notification’ and ‘Enable Web Server based emails for RSAM
Notification.’
6. Make sure to set the 'E-mail Address' and 'Reply E-mail Address' (typically the same Email
address set in the DISTEmail.dat). Set the desired 'Display Name' to show in the Email.
7. Set the Email Server Name (or IP address) and the Port.
8. Set the 'Use SSL for authentication' if SSL is required.
9. Set the 'Email connection file name' to DISTEmail.dat
Installation Guide (Installer Method)
Rsam Platform Documentation
26
Special Instructions for Enabling Single Sign-on
If you wish to use Rsam’s Single Sign-on functionality, please perform the following steps:
1. Log into the Rsam Web with an administrator account.
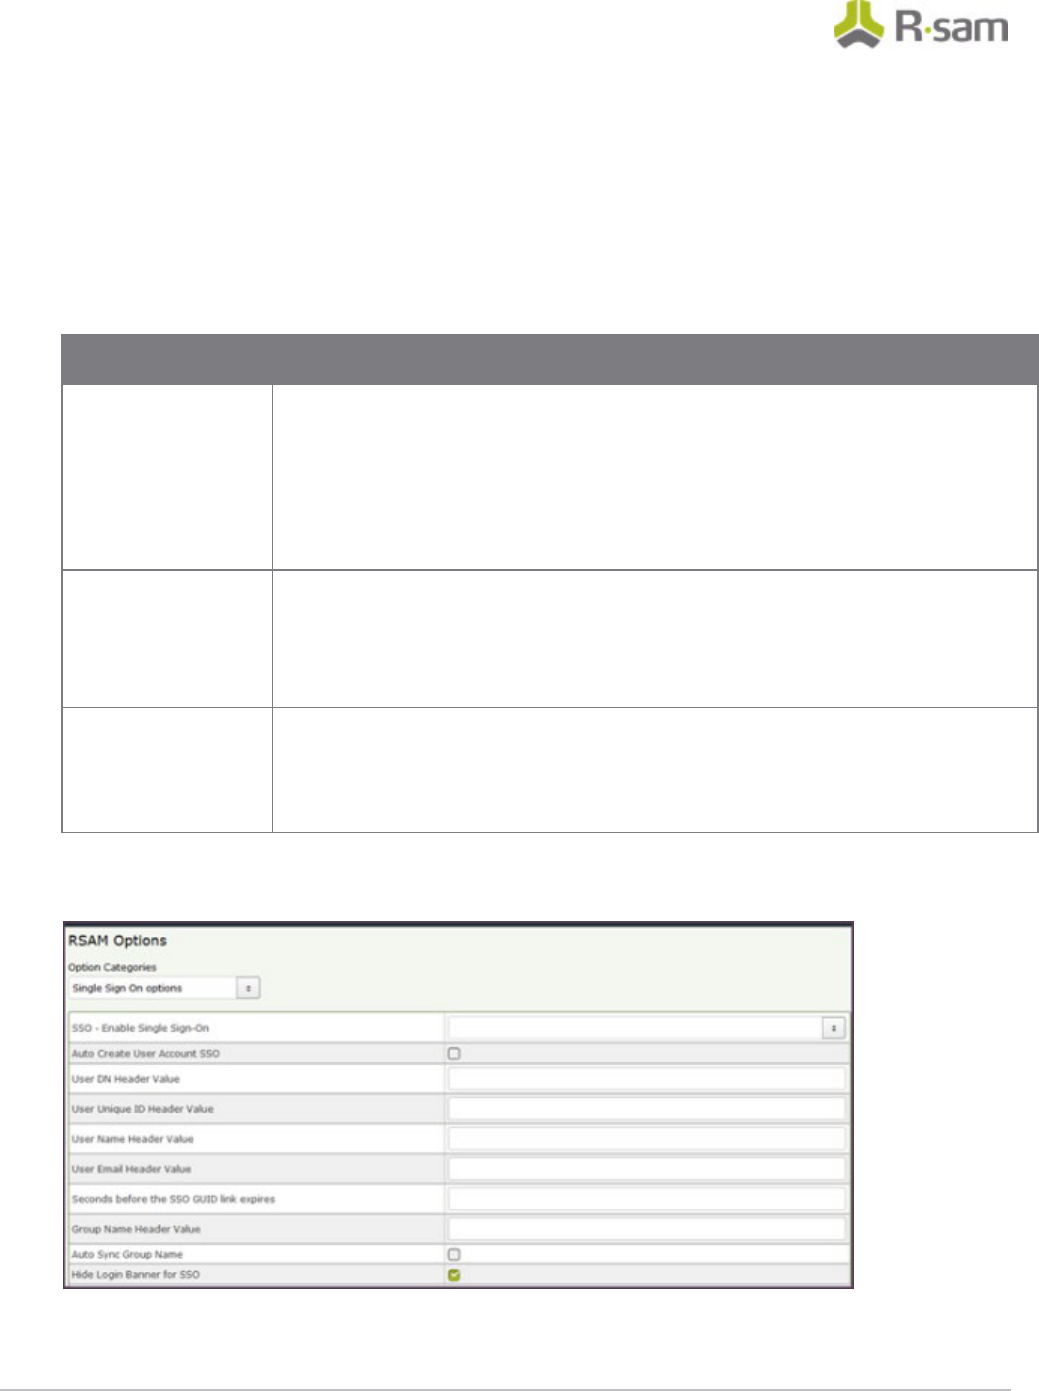
2. Click Manage -> Administration -> Options – RSAM Options -> Single Sign On Options.
3. Choose an option for the option ‘SSO – Enable Single Sign On’ depending on which of the
following applies to your situation:
Single Sign-on
Option
Description
Windows
Authentication
Select this option if users login to an Active Directory Domain, and you wish
Rsam to utilize their same AD login automatically. Then leave the
‘User…Header Value’ fields all to blank.
Please note that this will only work for users logged into the AD domain.
Users outside of the domain can still gain access through the normal login /
password prompt.
Other SSO Select this option if you plan to use a Single Sign-on tool, such as Tivoli
Access Manager, SiteMinder, or CoSign.
Then set the ‘User…Header Value’ field to the value provided by your SSO
administrator (see screenshot below).
Other SSO (Non
LDAP)
This option is used in special cases with more custom methods of Single
Sign-on. Please contact Customer Support if Windows Authentication or
Other SSO do not work. Then set the ‘User…Header Value’ field to the value
provided by your SSO administrator (see screenshot below).
4. Set the “User DN Header” value if using either ‘Other SSO’ or ‘Other SSO (Non-LDAP)’ option.
This value is variable depending on the SSO technology. It is a value that is configured by your
SSO administrator.

Installation Guide (Installer Method)
Rsam Platform Documentation
27
Rsam Configuration for Tivoli Access Manager (TAM)
The following steps will enable Rsam to utilize the TAM single sign-on feature. Please make sure the
following steps are completed prior to using TAM:
1. Rsam web and administrative console are operational.
2. Rsam can authenticate a user using the LDAP directory.
3. A TAM Junction has been setup for the Rsam server.
Rsam Configuration
1. Log into the Rsam Web with an administrator account.
2. Click Manage -> Administration > Options -> RSAM Options -> Single Sign On Options.
3. Select the following settings:
• SSO Enable Single Sign On = Other SSO
• User DN Header value = iv-user.
Enter the name of the header variable providing the distinguished name of the user.
• User Unique ID header value = iv-user-l
Enter the name of the header variable providing the unique ID name.
• User Name Header value = XXXX (Optional)
Enter the name of header variable providing the name of the user.
• User Email Header value = XXXX (Optional)
Enter the name of header variable providing the email address of the user.
Now, using the same user account that was previously able to authenticate on the LDAP, attempt the
single sign-on by simply loading the Rsam login page again.
Example TAM Configuration
The following example TAM statement will provide http header information back to Rsam web server.
server task default-webseald-tamwebseal.tamver1.com create -t tcp -c iv-user,iv-user-l -f -x –
h\www.tamver1.com /
Special Instructions for Email Listener
If you purchased the Email Listener module and would like to use this functionality, please perform
the following steps:
1. Make sure the Email Listener module has been registered the database.
To verify this log in to Rsam Web as an administrator, click Manage > Administration >
Workflow and check if ‘Email Listeners’ appears in blue (if it is gray then it is not been
registered - in which case contact the Support department to provide a new license key if this
module was purchased).
Installation Guide (Installer Method)
Rsam Platform Documentation
28
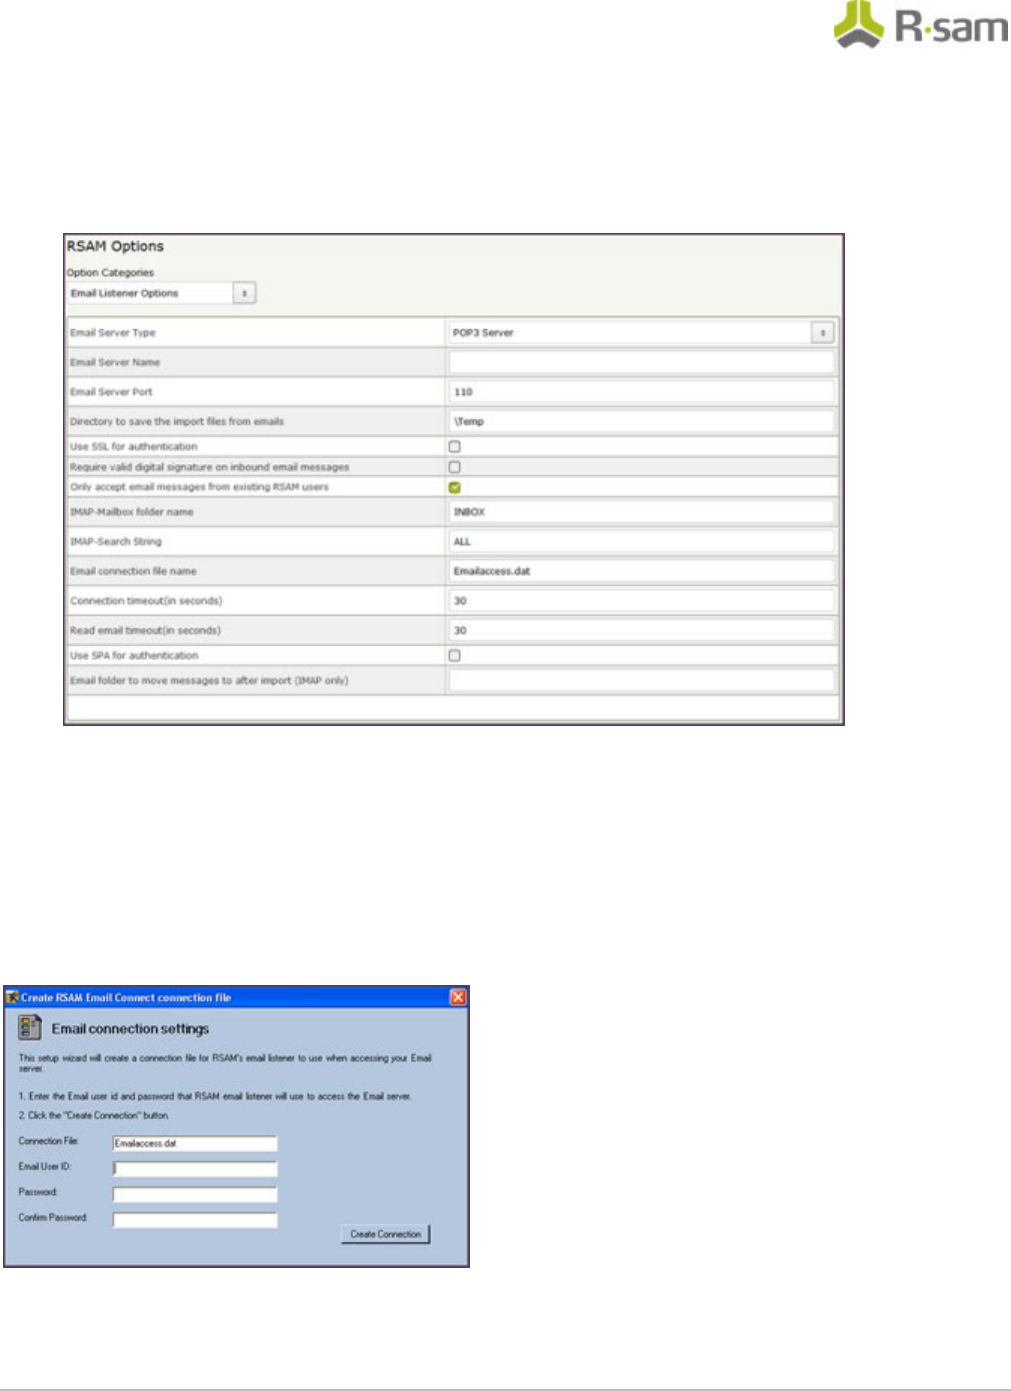
2. Make sure to enable the Email Listener.
Log in to Rsam Web as an administrator, click Manage > Administration > Options > Rsam
Options > Email Listener Options and set the ‘Email Server Type’, ‘Email Server Name’ and
modify other options as needed.
How to create the email connection file on web server
The email connection file is created by using the MAKE_EMAIL_CONNECT.exe. This file can be found
in the Rsam Scheduler Service folder (typically either in
C:\Program Files\RSAM_SCHEDULER_SERVICE
or C:\inetpub\wwwroot\RSAM_SCHEDULER_SERVICE. If unsure check the path by opening Services
console under Start > Administrative Tools > Service, right click ‘Rsam Scheduler’, choose Properties
and note the Path to executable value.
Please enter Email User ID / password user to access your mailbox and click Create Connection
button.
Installation Guide (Installer Method)
Rsam Platform Documentation
29
Enabling New Questionnaire Interface
Importing the Migration File
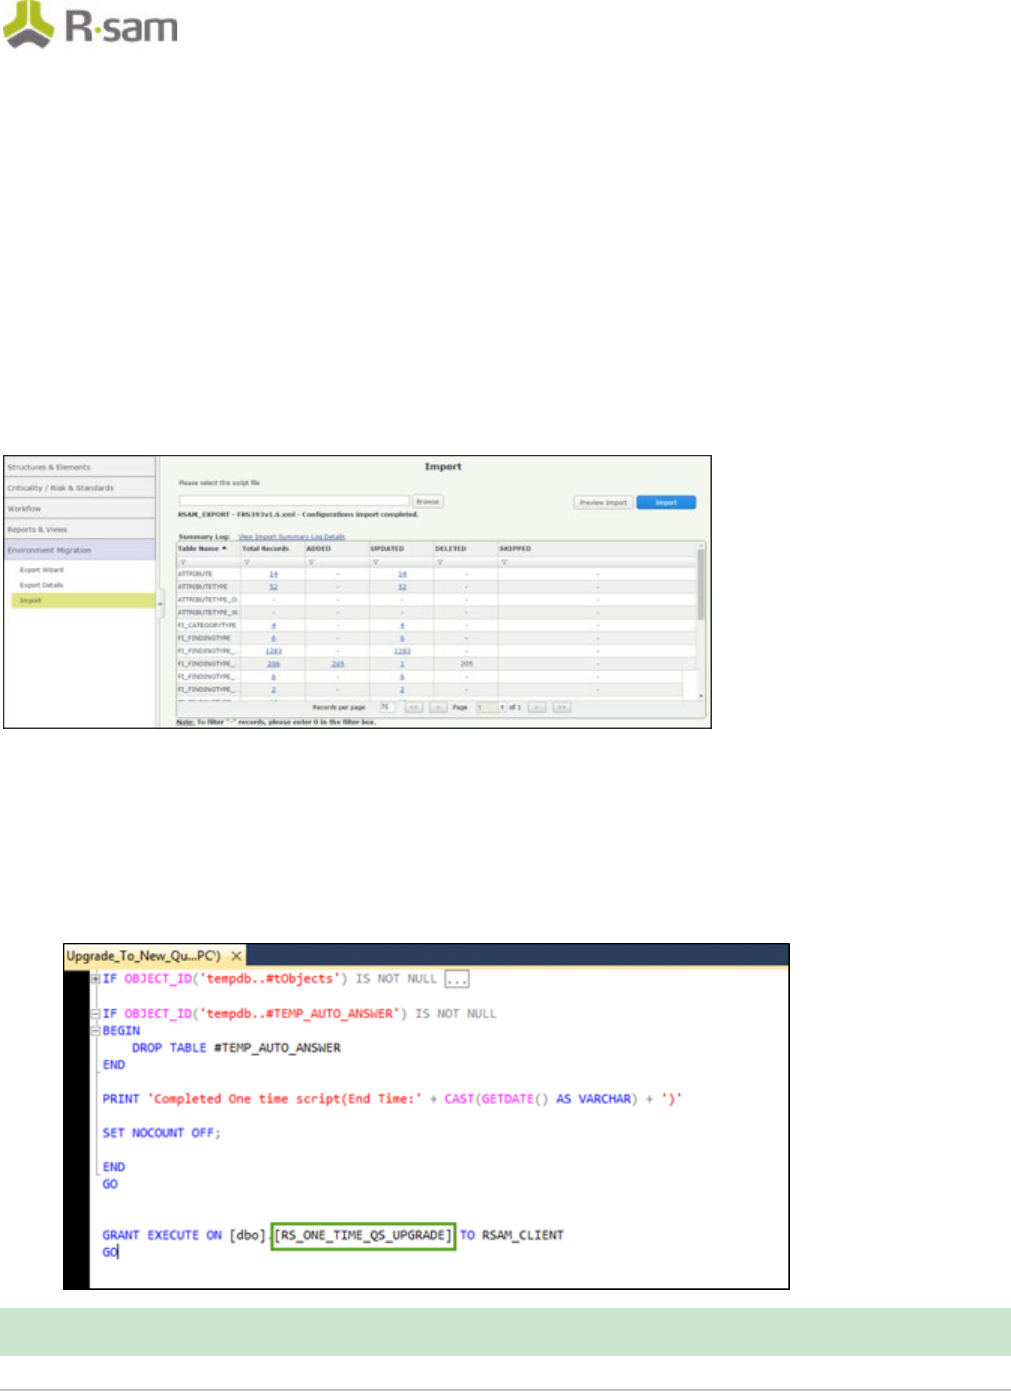
To import the migration xml file, perform the following steps:
1. Log into the Rsam Web as an RSAM Administrator.
2. Click Manage > Administration > Environment Migration > Import.
3. Click Browse to locate the “MigratationFileName.xml” script file and click Import.
On successful importing of the xml file, the corresponding data is migrated to the DB for that
instance.
Running the Store Procedure and Script files
1. In the Build folder locate and open the “Upgrade_To_New_Questionnaire.sql” and run the db
script file.
2. Scroll to the end of the script file and execute the “RS_ONE_TIME_QS_UPGRADE” stored
procedure.
Note: Running the Store Procedure will take substantial amount of time depending on the data
volume.
