
User Guide
AWS Schema Conversion Tool
Version 1.0.672
Copyright © 2024 Amazon Web Services, Inc. and/or its affiliates. All rights reserved.

AWS Schema Conversion Tool User Guide
AWS Schema Conversion Tool: User Guide
Copyright © 2024 Amazon Web Services, Inc. and/or its affiliates. All rights reserved.
Amazon's trademarks and trade dress may not be used in connection with any product or service
that is not Amazon's, in any manner that is likely to cause confusion among customers, or in any
manner that disparages or discredits Amazon. All other trademarks not owned by Amazon are
the property of their respective owners, who may or may not be affiliated with, connected to, or
sponsored by Amazon.

AWS Schema Conversion Tool User Guide
Table of Contents
What is AWS SCT ............................................................................................................................. 1
Schema conversion overview ..................................................................................................................... 5
Giving feedback ............................................................................................................................................ 6
Installing and Configuring AWS SCT .............................................................................................. 7
Installing AWS SCT ....................................................................................................................................... 7
Validating installation .................................................................................................................................. 9
Verifying the checksum of the AWS SCT file .................................................................................... 9
Verifying the AWS SCT RPM files on Fedora .................................................................................. 10
Verifying the AWS SCT DEB files on Ubuntu .................................................................................. 10
Verifying the AWS SCT MSI file on Microsoft Windows ................................................................ 11
Installing JDBC drivers .............................................................................................................................. 11
Installing JDBC drivers on Linux ........................................................................................................ 15
Storing driver paths in the global settings ..................................................................................... 16
Updating AWS SCT .................................................................................................................................... 17
AWS Schema Conversion Tool CLI .......................................................................................................... 18
AWS SCT user interface ................................................................................................................ 19
Project window ........................................................................................................................................... 19
Starting and Managing projects ............................................................................................................. 21
Using the Wizard ........................................................................................................................................ 22
Saving projects ............................................................................................................................................ 25
Adding database servers .......................................................................................................................... 26
Offline mode ............................................................................................................................................... 27
Tree filters .................................................................................................................................................... 28
.................................................................................................................................................................. 29
Importing a file list for the tree filter .............................................................................................. 31
Hiding schemas ........................................................................................................................................... 32
Assessment report ..................................................................................................................................... 33
Converting schemas ................................................................................................................................... 37
Applying converted schemas ................................................................................................................... 40
Managing profiles ...................................................................................................................................... 41
Storing AWS credentials ...................................................................................................................... 41
Setting the default profile for a project .......................................................................................... 43
Permissions for using the AWS service profile ............................................................................... 44
Configuring Secrets Manager .................................................................................................................. 45
Version 1.0.672 iii

AWS Schema Conversion Tool User Guide
Storing database passwords .................................................................................................................... 46
UNION ALL view ......................................................................................................................................... 46
Keyboard shortcuts .................................................................................................................................... 47
Getting started .............................................................................................................................. 49
Connecting to source databases ................................................................................................... 51
Connecting to encrypted Amazon RDS and and Aurora .................................................................... 52
Connecting to Apache Cassandra ........................................................................................................... 55
Connecting to Apache Cassandra as a source ............................................................................... 55
Connecting to Apache Hadoop ............................................................................................................... 57
Prerequisites for using Apache Hadoop as a source ...................................................................... 57
Permissions for Hive as a source ....................................................................................................... 58
Permissions for HDFS as a source ..................................................................................................... 59
Permissions for HDFS as a target ...................................................................................................... 59
Connecting to Apache Hadoop as a source .................................................................................... 59
Connecting to Hive and HDFS ........................................................................................................... 61
Connecting to Amazon EMR as a target .......................................................................................... 64
Connecting to Apache Oozie ................................................................................................................... 67
Prerequisites ........................................................................................................................................... 67
Connecting to Apache Oozie as a source ........................................................................................ 68
Permissions for AWS Lambda ............................................................................................................ 70
Connecting to AWS Step Functions as a target ............................................................................. 72
Connecting to Azure SQL ......................................................................................................................... 73
Privileges for Azure SQL Database ................................................................................................... 73
Connecting to Azure SQL Database as a source ........................................................................... 74
Connecting to IBM DB2 for z/OS ........................................................................................................... 75
Prerequisites for Db2 for z/OS .......................................................................................................... 76
Privileges for Db2 for z/OS ................................................................................................................ 76
Connecting to Db2 for z/OS as a source ......................................................................................... 77
Privileges for MySQL as a target ....................................................................................................... 79
Privileges for PostgreSQL as a target .............................................................................................. 81
Db2 for z/OS to PostgreSQL conversion settings .......................................................................... 81
IBM Db2 LUW databases .......................................................................................................................... 83
Privileges for Db2 LUW ....................................................................................................................... 83
Connecting to Db2 LUW as a source ................................................................................................ 86
Db2 LUW to PostgreSQL ..................................................................................................................... 88
Db2 LUW to MySQL ............................................................................................................................. 90
Version 1.0.672 iv

AWS Schema Conversion Tool User Guide
Using MySQL as a source ......................................................................................................................... 92
Privileges for MySQL ............................................................................................................................ 92
Connecting to MySQL as a source .................................................................................................... 92
Privileges for PostgreSQL as a target .............................................................................................. 95
Oracle databases ........................................................................................................................................ 96
Privileges for Oracle ........................................................................................................................... 96
Connecting to Oracle as a source ..................................................................................................... 97
Oracle to PostgreSQL ........................................................................................................................ 100
Oracle to MySQL ................................................................................................................................ 106
Oracle to Amazon RDS for Oracle .................................................................................................. 116
PostgreSQL databases ............................................................................................................................ 123
Privileges for PostgreSQL ................................................................................................................ 123
Connecting to PostgreSQL as a source ........................................................................................ 123
Privileges for MySQL as a target .................................................................................................... 126
SAP databases .......................................................................................................................................... 127
Privileges for SAP ASE ..................................................................................................................... 128
Connecting to SAP ASE as a source .............................................................................................. 128
Privileges for MySQL as a target .................................................................................................... 130
SAP ASE to MySQL conversion settings ........................................................................................ 132
Privileges for PostgreSQL as a target ............................................................................................ 132
SAP ASE to PostgreSQL conversion settings ................................................................................ 133
SQL Server databases ............................................................................................................................. 134
Privileges for Microsoft SQL Server ............................................................................................... 135
Using Windows Authentication with Microsoft SQL Server ....................................................... 136
Connecting to SQL Server as a source ........................................................................................... 138
SQL Server to MySQL ........................................................................................................................ 141
SQL Server to PostgreSQL ............................................................................................................... 145
SQL Server to Amazon RDS SQL Server ...................................................................................... 180
Data warehouses ...................................................................................................................................... 182
Amazon Redshift ................................................................................................................................ 182
Azure Synapse Analytics as a source .............................................................................................. 188
BigQuery as a source ......................................................................................................................... 193
Greenplum databases ........................................................................................................................ 198
Netezza databases .............................................................................................................................. 204
Oracle data warehouse ..................................................................................................................... 213
Snowflake ............................................................................................................................................. 221
Version 1.0.672 v

AWS Schema Conversion Tool User Guide
SQL Server Data Warehouses .......................................................................................................... 229
Teradata databases ............................................................................................................................ 235
Vertica databases ................................................................................................................................ 251
Data type mapping ..................................................................................................................... 258
New data type mapping ........................................................................................................................ 259
Editing data type mappings .................................................................................................................. 259
Virtual target mapping ........................................................................................................................... 260
Data type mapping limitations ............................................................................................................. 261
Reports ......................................................................................................................................... 263
Assessment report ................................................................................................................................... 263
Create assessment report ................................................................................................................. 264
Viewing assessment report .............................................................................................................. 265
Saving the assessment report ......................................................................................................... 269
Configuring an assessment report .................................................................................................. 271
Multiserver assessment report ........................................................................................................ 275
Converting schemas .................................................................................................................... 284
Applying migration rules ........................................................................................................................ 286
Creating migration rules ................................................................................................................... 287
Exporting migration rules ................................................................................................................. 289
Converting schemas manually .............................................................................................................. 289
Converting schema ............................................................................................................................. 289
Editing converted schema ................................................................................................................ 291
Clearing a converted schema ........................................................................................................... 292
Manually converting schemas ............................................................................................................... 293
Modifying your source schema ........................................................................................................ 293
Modifying your target schema ........................................................................................................ 293
Updating and refreshing schemas ....................................................................................................... 294
Saving and applying converted schemas ............................................................................................ 295
Saving your converted schema ........................................................................................................ 295
Applying your converted schema .................................................................................................... 296
The extension pack schema ............................................................................................................. 296
Comparing schemas ................................................................................................................................ 297
Viewing related transformed objects .................................................................................................. 298
Converting data warehouse schemas ......................................................................................... 300
Permissions for Amazon Redshift ........................................................................................................ 301
Choosing optimization strategies and rules ....................................................................................... 303
Version 1.0.672 vi

AWS Schema Conversion Tool User Guide
Collecting or uploading statistics ......................................................................................................... 304
Creating migration rules ........................................................................................................................ 306
Creating migration rules ................................................................................................................... 306
Exporting migration rules ................................................................................................................. 308
Converting your schema ........................................................................................................................ 309
Converting schema ............................................................................................................................. 309
Editing converted schema ................................................................................................................ 311
Clearing a converted schema ........................................................................................................... 312
Managing and customizing keys .......................................................................................................... 313
Related topics ...................................................................................................................................... 313
Creating and using the assessment report ......................................................................................... 314
Creating a database migration assessment report ...................................................................... 314
Summary .............................................................................................................................................. 315
Action items ......................................................................................................................................... 316
Saving the assessment report ......................................................................................................... 317
Handling manual conversions ............................................................................................................... 318
Modifying your source schema ........................................................................................................ 318
Modifying your target schema ........................................................................................................ 318
Updating and refreshing your converted schema ............................................................................. 319
Saving and applying your converted schema .................................................................................... 319
Saving your converted schema to a file ........................................................................................ 320
Applying your converted schema .................................................................................................... 320
The extension pack schema ............................................................................................................. 321
Python libraries ................................................................................................................................... 322
Converting Amazon Redshift data ....................................................................................................... 322
Optimizing your Amazon Redshift database ................................................................................ 322
Converting Data Using ETL ......................................................................................................... 324
ETL processes ............................................................................................................................................ 325
Prerequisites ........................................................................................................................................ 326
AWS Glue Data Catalog .................................................................................................................... 327
Limitations ............................................................................................................................................ 327
Step 1: Create a new project ........................................................................................................... 329
Step 2: Create an AWS Glue job ..................................................................................................... 330
ETL processes using Python .................................................................................................................. 331
Step 1: Create a database ................................................................................................................ 331
Step 2: Create a connection ............................................................................................................. 332
Version 1.0.672 vii

AWS Schema Conversion Tool User Guide
Step 3: Create an AWS Glue crawler .............................................................................................. 333
Informatica ETL scripts ........................................................................................................................... 336
SSIS packages ........................................................................................................................................... 341
Supported SSIS components ........................................................................................................... 345
SSIS to AWS Glue Studio ....................................................................................................................... 347
Prerequisites ........................................................................................................................................ 347
Adding SSIS packages to your AWS SCT project ......................................................................... 349
Converting SSIS packages ................................................................................................................ 350
Creating AWS Glue Studio jobs ....................................................................................................... 351
Creating an SSIS conversion assessment report .......................................................................... 352
Supported SSIS components ........................................................................................................... 353
Teradata BTEQ scripts ............................................................................................................................. 354
Adding BTEQ scripts to your AWS SCT project ............................................................................ 356
Configuring substitution variables in BTEQ scripts ..................................................................... 356
Converting BTEQ scripts ................................................................................................................... 357
Managing BTEQ scripts ..................................................................................................................... 358
Creating a BTEQ script conversion assessment report ............................................................... 359
Editing and saving your converted BTEQ scripts ......................................................................... 359
Shell scripts ............................................................................................................................................... 360
Adding shell scripts to your AWS SCT project .............................................................................. 361
Configuring substitution variables in shell scripts ....................................................................... 362
Converting shell scripts ..................................................................................................................... 362
Managing shell scripts ....................................................................................................................... 363
Creating a shell script conversion assessment report ................................................................. 364
Editing and saving your converted shell scripts ........................................................................... 365
FastExport scripts ..................................................................................................................................... 365
Adding FastExport job scripts to your AWS SCT project ............................................................ 366
Configuring substitution variables in FastExport job scripts ..................................................... 367
Converting FastExport job scripts ................................................................................................... 368
Managing FastExport job scripts ..................................................................................................... 369
Creating a FastExport job script conversion assessment report ............................................... 369
Editing and saving your converted FastExport job scripts ......................................................... 370
FastLoad scripts ........................................................................................................................................ 371
Adding FastLoad job scripts to your AWS SCT project ............................................................... 371
Configuring substitution variables in FastLoad job scripts ........................................................ 372
Converting FastLoad job scripts ...................................................................................................... 374
Version 1.0.672 viii

AWS Schema Conversion Tool User Guide
Managing FastLoad job scripts ........................................................................................................ 375
Creating a FastLoad job script conversion assessment report .................................................. 375
Editing and saving your converted FastLoad job scripts ............................................................ 376
MultiLoad scripts .................................................................................................................................... 377
Adding MultiLoad job scripts to your AWS SCT project ............................................................. 377
Configuring substitution variables in MultiLoad job scripts ...................................................... 378
Converting MultiLoad job scripts .................................................................................................... 379
Managing MultiLoad job scripts ...................................................................................................... 380
Creating a MultiLoad job script conversion assessment report ................................................ 381
Editing and saving your converted MultiLoad job scripts .......................................................... 382
Migrating big data frameworks .................................................................................................. 383
Migrating Hadoop workloads ................................................................................................................ 383
Overview ............................................................................................................................................... 384
Step 1: Connect to your Hadoop clusters ..................................................................................... 385
Step 2: Set up the mapping rules .................................................................................................. 385
Step 3: Create an assessment report ............................................................................................. 386
Step 4: Migrate your Apache Hadoop cluster to Amazon EMR ................................................. 388
Running your CLI script ..................................................................................................................... 389
Managing your migration project ................................................................................................... 389
Converting Oozie workflows; ................................................................................................................ 391
Overview ............................................................................................................................................... 392
Step 1: Connect to your source and target services ................................................................... 393
Step 2: Set up the mapping rules .................................................................................................. 394
Step 3: Configure parameters .......................................................................................................... 394
Step 4: Create an assessment report ............................................................................................. 396
Step 5: Convert your Apache Oozie workflows to AWS Step Functions .................................. 398
Running your CLI script ..................................................................................................................... 400
Supported nodes ................................................................................................................................ 401
Integrating with AWS DMS ......................................................................................................... 402
Using an AWS SCT replication agent with AWS DMS ...................................................................... 402
Using an AWS SCT data extraction agent with AWS DMS .............................................................. 402
Increasing logging levels when using AWS SCT with AWS DMS ................................................... 402
Migrating from a data warehouse .............................................................................................. 404
Prerequisites .............................................................................................................................................. 406
Amazon S3 settings ........................................................................................................................... 407
Assuming IAM roles ............................................................................................................................ 408
Version 1.0.672 ix

AWS Schema Conversion Tool User Guide
Security settings ................................................................................................................................. 409
Configuration settings ....................................................................................................................... 410
Installing agents ....................................................................................................................................... 410
Configuring agents .................................................................................................................................. 412
Installing and configuring dedicated copying agents ................................................................. 414
Starting agents ................................................................................................................................... 415
Registering agents ................................................................................................................................... 416
Hiding and recovering information for an AWS SCT agent ............................................................ 417
Creating data migration rules ............................................................................................................... 418
Changing extractor and copy settings for data migration .............................................................. 419
Sorting data .............................................................................................................................................. 422
Creating, running, and monitoring an AWS SCT task ...................................................................... 424
Exporting and importing a data extraction task ............................................................................... 427
Data extraction using an AWS Snowball Edge device ...................................................................... 428
Step-by-step procedures for migrating data using AWS SCT and AWS Snowball Edge ....... 428
Data extraction task output .................................................................................................................. 432
Using virtual partitioning ....................................................................................................................... 433
Limits when creating virtual partitioning ...................................................................................... 434
RANGE partition type ........................................................................................................................ 434
LIST partition type ............................................................................................................................ 435
DATE AUTO SPLIT partition type .................................................................................................... 436
Using native partitioning ....................................................................................................................... 437
Working with LOBs .................................................................................................................................. 438
Best practices and troubleshooting ..................................................................................................... 439
Converting application SQL ........................................................................................................ 441
Overview of converting application SQL ............................................................................................ 441
SQL code .................................................................................................................................................... 442
Creating generic application conversion projects ........................................................................ 442
Managing application conversion projects .................................................................................... 446
Analyzing and converting your SQL code ..................................................................................... 447
Creating and using the assessment report ................................................................................... 448
Editing and saving your converted SQL code ............................................................................... 449
SQL code in C# applications ................................................................................................................. 449
Creating C# application conversion projects ................................................................................ 450
Converting your C# application SQL code .................................................................................... 451
Saving your converted application code ....................................................................................... 453
Version 1.0.672 x

AWS Schema Conversion Tool User Guide
Managing C# application conversion projects .............................................................................. 453
Creating a C# application conversion assessment report .......................................................... 454
SQL code in C++ ...................................................................................................................................... 455
Creating C++ application conversion projects .............................................................................. 455
Converting your C++ application SQL code .................................................................................. 457
Saving your converted application code ....................................................................................... 458
Managing C++ application conversion projects ............................................................................ 459
Creating a C++ application conversion assessment report ........................................................ 460
SQL code in Java ..................................................................................................................................... 461
Creating Java application conversion projects ............................................................................. 462
Converting your Java application SQL code ................................................................................. 464
Saving your converted application code ....................................................................................... 465
Managing Java application conversion projects ........................................................................... 465
Creating a Java application conversion assessment report ....................................................... 467
SQL code in Pro*C ................................................................................................................................... 468
Creating Pro*C application conversion projects ........................................................................... 468
Converting your Pro*C application SQL code ............................................................................... 470
Editing and saving your converted application code .................................................................. 471
Managing Pro*C application conversion projects ......................................................................... 472
Creating a Pro*C application conversion assessment report ..................................................... 473
Extension packs ........................................................................................................................... 475
Permissions for using the extension pack .......................................................................................... 476
Using the extension pack schema ........................................................................................................ 477
Custom libraries for extension packs .................................................................................................. 478
Applying the extension pack ............................................................................................................ 478
Using the Lambda functions from the AWS SCT extension pack .................................................. 481
Using AWS Lambda functions to emulate database functionality ........................................... 481
Applying the extension pack to support Lambda functions ...................................................... 481
Configuring extension pack functions ................................................................................................. 483
Best practices ............................................................................................................................... 485
Configuring additional memory ........................................................................................................... 485
Default project folder ............................................................................................................................. 485
Increasing the data migration speed ................................................................................................... 486
Increasing logging information ............................................................................................................. 486
Troubleshooting ........................................................................................................................... 489
Cannot load objects from an Oracle source database ..................................................................... 489
Version 1.0.672 xi

AWS Schema Conversion Tool User Guide
Warning message ..................................................................................................................................... 489
CLI Reference ............................................................................................................................... 491
Prerequisites .............................................................................................................................................. 491
Interactive mode ...................................................................................................................................... 491
Examples ............................................................................................................................................... 493
Getting CLI scenarios .............................................................................................................................. 493
Examples ............................................................................................................................................... 497
Editing CLI scenarios ............................................................................................................................... 497
Script mode ............................................................................................................................................... 498
Examples ............................................................................................................................................... 499
Reference material ................................................................................................................................... 499
Release notes ............................................................................................................................... 500
Release notes – 676 ................................................................................................................................ 500
Release notes – 675 ................................................................................................................................ 505
Release notes – 674 ................................................................................................................................ 507
Release notes – 673 ................................................................................................................................ 514
Release notes – 672 ................................................................................................................................ 519
Release notes – 671 ................................................................................................................................ 527
Release notes – 670 ................................................................................................................................ 536
Release notes – 669 ................................................................................................................................ 541
Release notes – 668 ................................................................................................................................ 545
Release notes – 667 ................................................................................................................................ 552
Release notes – 666 ................................................................................................................................ 556
Release notes – 665 ................................................................................................................................ 561
Release notes – 664 ................................................................................................................................ 564
Release notes – 663 ................................................................................................................................ 568
Release notes – 662 ................................................................................................................................ 571
Release notes – 661 ................................................................................................................................ 576
Release notes – 660 ................................................................................................................................ 580
Release notes – 659 ................................................................................................................................ 583
Release notes – 658 ................................................................................................................................ 588
Release notes – 657 ................................................................................................................................ 593
Release notes – 656 ................................................................................................................................ 597
Release notes – 655 ................................................................................................................................ 600
Release notes – 654 ................................................................................................................................ 603
Release notes – 653 ................................................................................................................................ 606
Version 1.0.672 xii

AWS Schema Conversion Tool User Guide
Release notes – 652 ................................................................................................................................ 609
Release notes – 651 ................................................................................................................................ 611
Release notes – 650 ................................................................................................................................ 613
Release notes – 649 ................................................................................................................................ 615
Release notes – 648 ................................................................................................................................ 617
Release notes – 647 ................................................................................................................................ 619
Release notes – 646 ................................................................................................................................ 621
Release notes – 645 ................................................................................................................................ 622
Release notes – 644 ................................................................................................................................ 624
Release notes – 642 ................................................................................................................................ 626
Release notes – 641 ................................................................................................................................ 627
Release notes – 640 ................................................................................................................................ 628
Release 1.0.640 Oracle changes ...................................................................................................... 628
Release 1.0.640 Microsoft SQL Server changes ........................................................................... 634
Release 1.0.640 MySQL Changes .................................................................................................... 638
Release 1.0.640 PostgreSQL changes ............................................................................................ 639
Release 1.0.640 Db2 LUW changes ................................................................................................ 642
Release 1.0.640 Teradata changes .................................................................................................. 643
Release 1.0.640 changes for other engines .................................................................................. 644
Document history ........................................................................................................................ 647
Earlier updates .......................................................................................................................................... 661
Version 1.0.672 xiii

AWS Schema Conversion Tool User Guide
What is the AWS Schema Conversion Tool?
You can use the AWS Schema Conversion Tool (AWS SCT) to convert your existing database schema
from one database engine to another. You can convert relational OLTP schema, or data warehouse
schema. Your converted schema is suitable for an Amazon Relational Database Service (Amazon
RDS) MySQL, MariaDB, Oracle, SQL Server, PostgreSQL DB, an Amazon Aurora DB cluster, or an
Amazon Redshift cluster. The converted schema can also be used with a database on an Amazon
EC2 instance or stored as data on an Amazon S3 bucket.
AWS SCT supports several industry standards, including Federal Information Processing Standards
(FIPS), for connections to an Amazon S3 bucket or another AWS resource. AWS SCT is also
compliant with Federal Risk and Authorization Management Program (FedRAMP). For details about
AWS and compliance efforts, see AWS services in scope by compliance program.
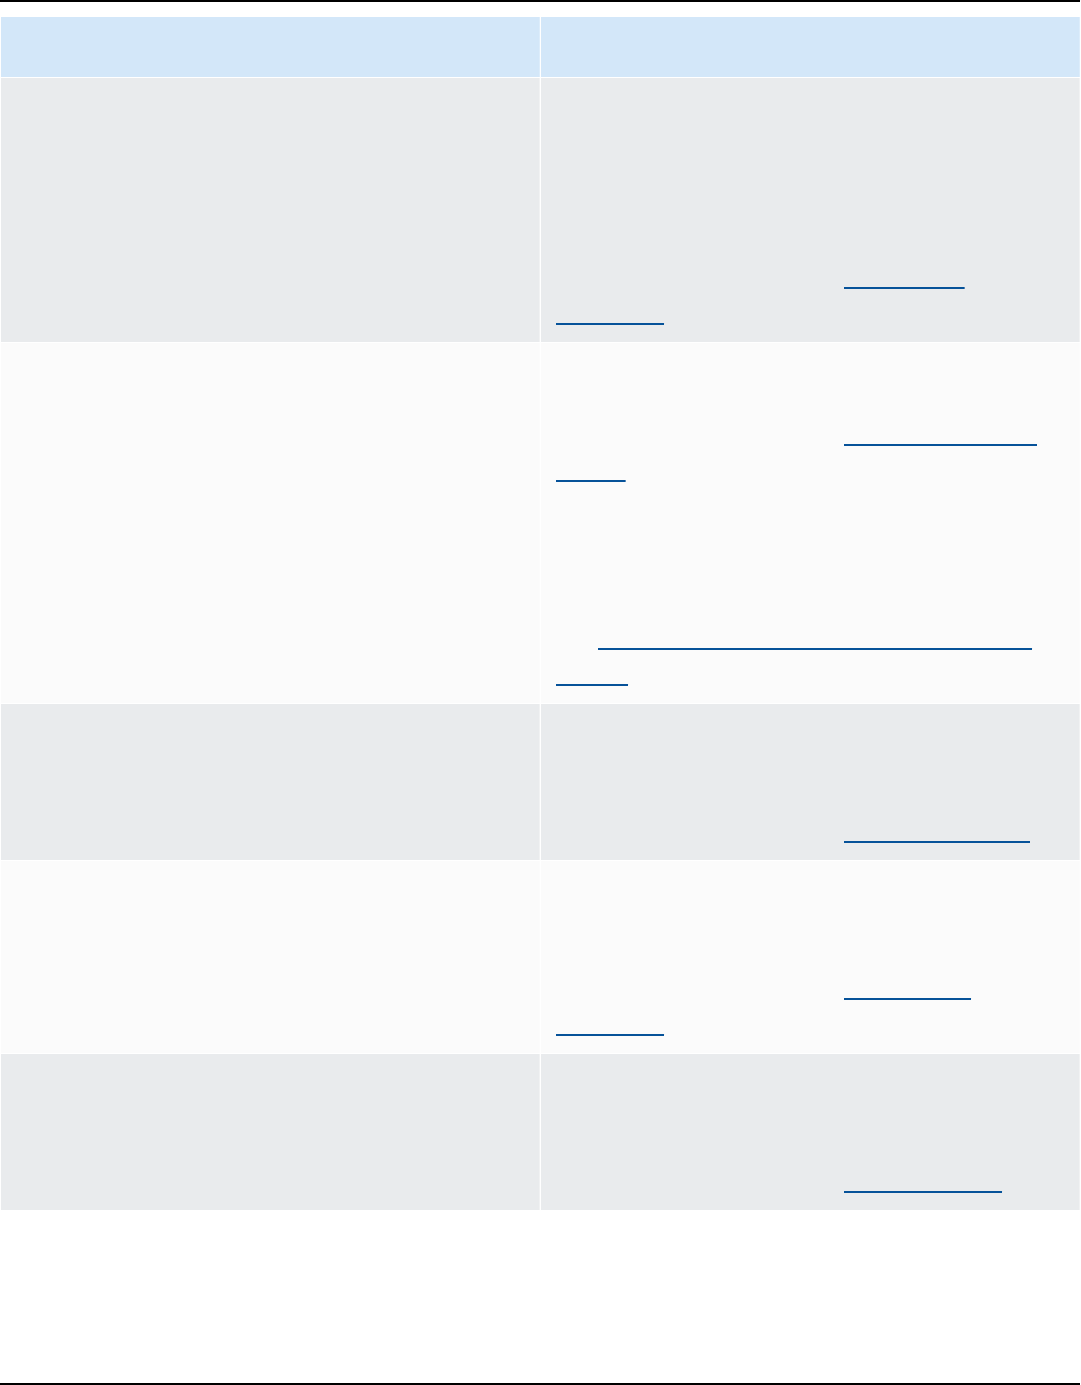
AWS SCT supports the following OLTP conversions.
Source database Target database
IBM Db2 for z/OS (version 12) Amazon Aurora MySQL-Compatible Edition
(Aurora MySQL), Amazon Aurora PostgreSQ
L-Compatible Edition (Aurora PostgreSQL),
MySQL, PostgreSQL
For more information, see Connecting to IBM
DB2 for z/OS.
IBM Db2 LUW (versions 9.1, 9.5, 9.7, 10.5,
11.1, and 11.5)
Aurora MySQL, Aurora PostgreSQL, MariaDB,
MySQL, PostgreSQL
For more information, see IBM Db2 LUW
databases.
Microsoft Azure SQL Database Aurora MySQL, Aurora PostgreSQL, MySQL,
PostgreSQL
For more information, see Connecting to
Azure SQL.
Version 1.0.672 1
AWS Schema Conversion Tool User Guide
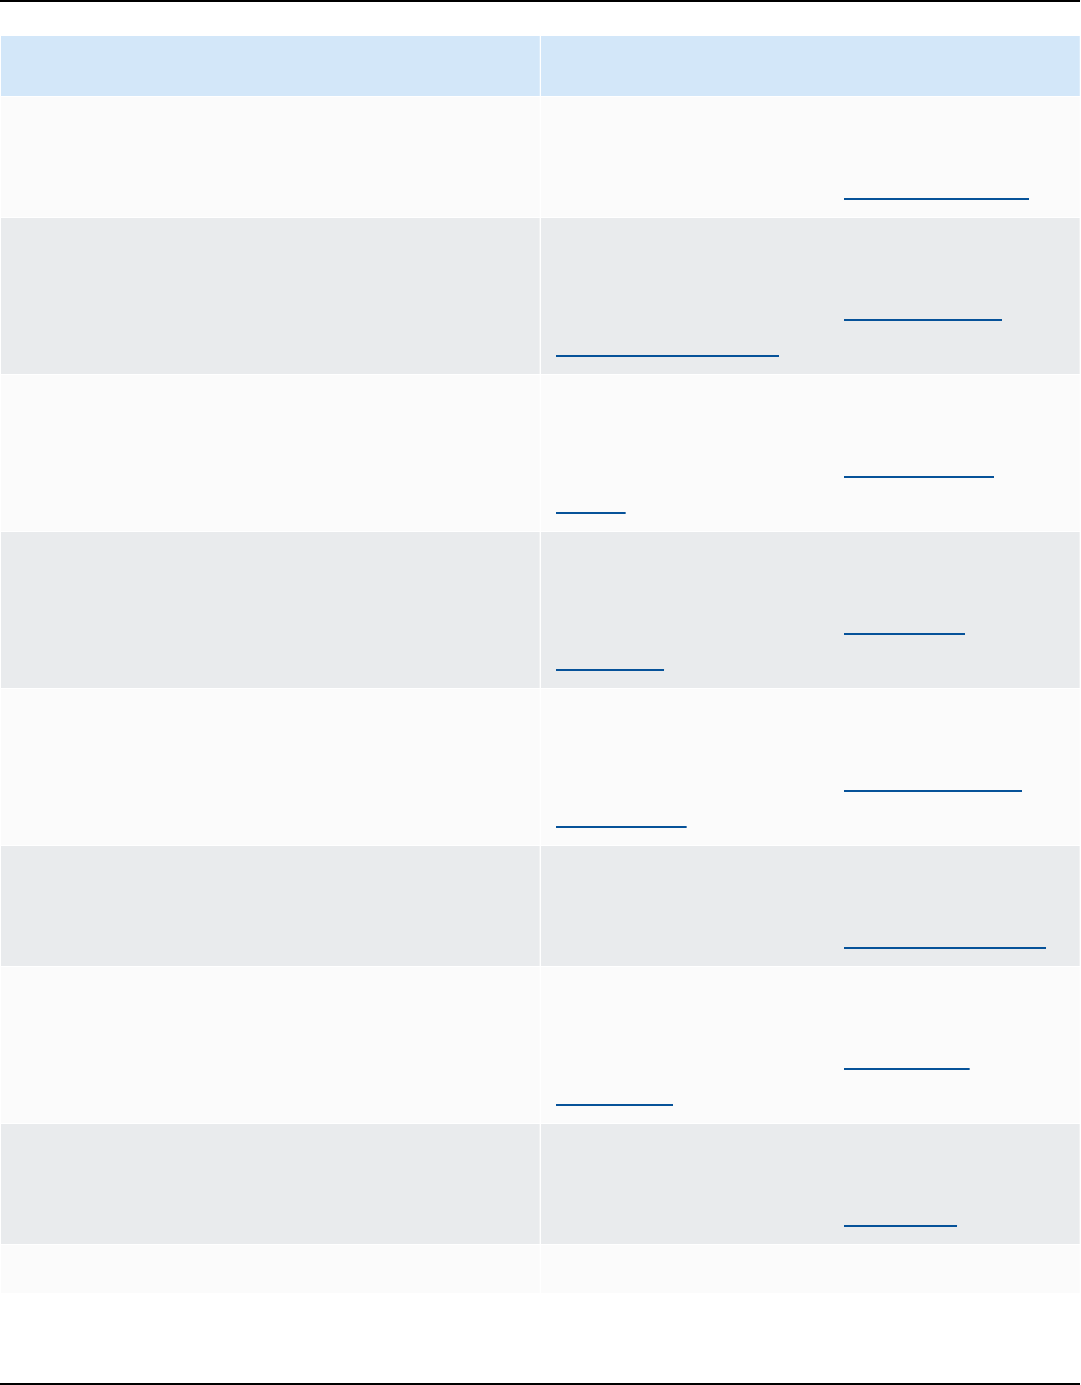
Source database Target database
Microsoft SQL Server (version 2008 R2, 2012,
2014, 2016, 2017, 2019, and 2022)
Aurora MySQL, Aurora PostgreSQL, Babelfish
for Aurora PostgreSQL (only for assessmen
t reports), MariaDB, Microsoft SQL Server,
MySQL, PostgreSQL
For more information, see SQL Server
databases.
MySQL (version 5.5 and higher) Aurora PostgreSQL, MySQL, PostgreSQL
For more information, see Using MySQL as a
source.
You can migrate schema and data from
MySQL to an Aurora MySQL DB cluster
without using AWS SCT. For more information,
see Migrating data to an Amazon Aurora DB
cluster.
Oracle (version 10.1 and higher) Aurora MySQL, Aurora PostgreSQL, MariaDB,
MySQL, Oracle, PostgreSQL
For more information, see Oracle databases.
PostgreSQL (version 9.1 and higher) Aurora MySQL, Aurora PostgreSQL, MySQL,
PostgreSQL
For more information, see PostgreSQL
databases.
SAP ASE (versions 12.5.4, 15.0.2, 15.5, 15.7,
and 16.0)
Aurora MySQL, Aurora PostgreSQL, MariaDB,
MySQL, PostgreSQL
For more information, see SAP databases.
AWS SCT supports the following data warehouse conversions.
Version 1.0.672 2
AWS Schema Conversion Tool User Guide
Source data warehouse Target data warehouse
Amazon Redshift Amazon Redshift
For more information, see Amazon Redshift.
Azure Synapse Analytics Amazon Redshift
For more information, see Azure Synapse
Analytics as a source.
BigQuery Amazon Redshift
For more information, see BigQuery as a
source.
Greenplum Database (versions 4.3 and 6.21) Amazon Redshift
For more information, see Greenplum
databases.
Microsoft SQL Server (version 2008 and
higher)
Amazon Redshift
For more information, see SQL Server Data
Warehouses.
Netezza (version 7.0.3 and higher) Amazon Redshift
For more information, see Netezza databases.
Oracle (version 10.1 and higher) Amazon Redshift
For more information, see Oracle data
warehouse.
Snowflake (version 3) Amazon Redshift
For more information, see Snowflake.
Teradata (version 13 and higher) Amazon Redshift
Version 1.0.672 3
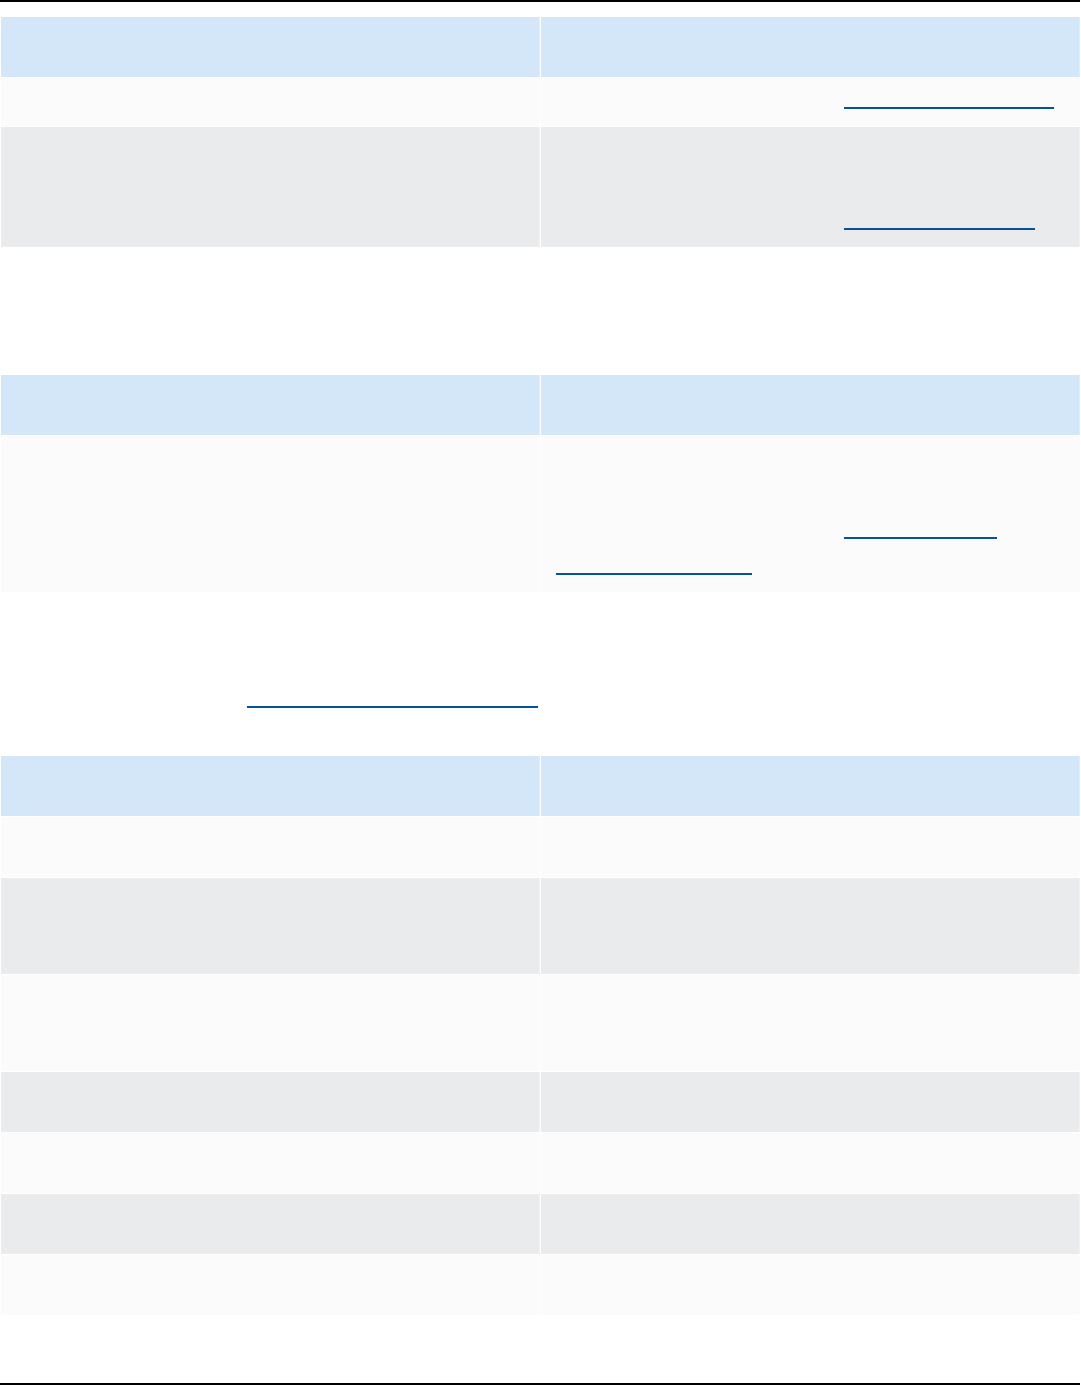
AWS Schema Conversion Tool User Guide
Source data warehouse Target data warehouse
For more information, see Teradata databases.
Vertica (version 7.2.2 and higher) Amazon Redshift
For more information, see Vertica databases.
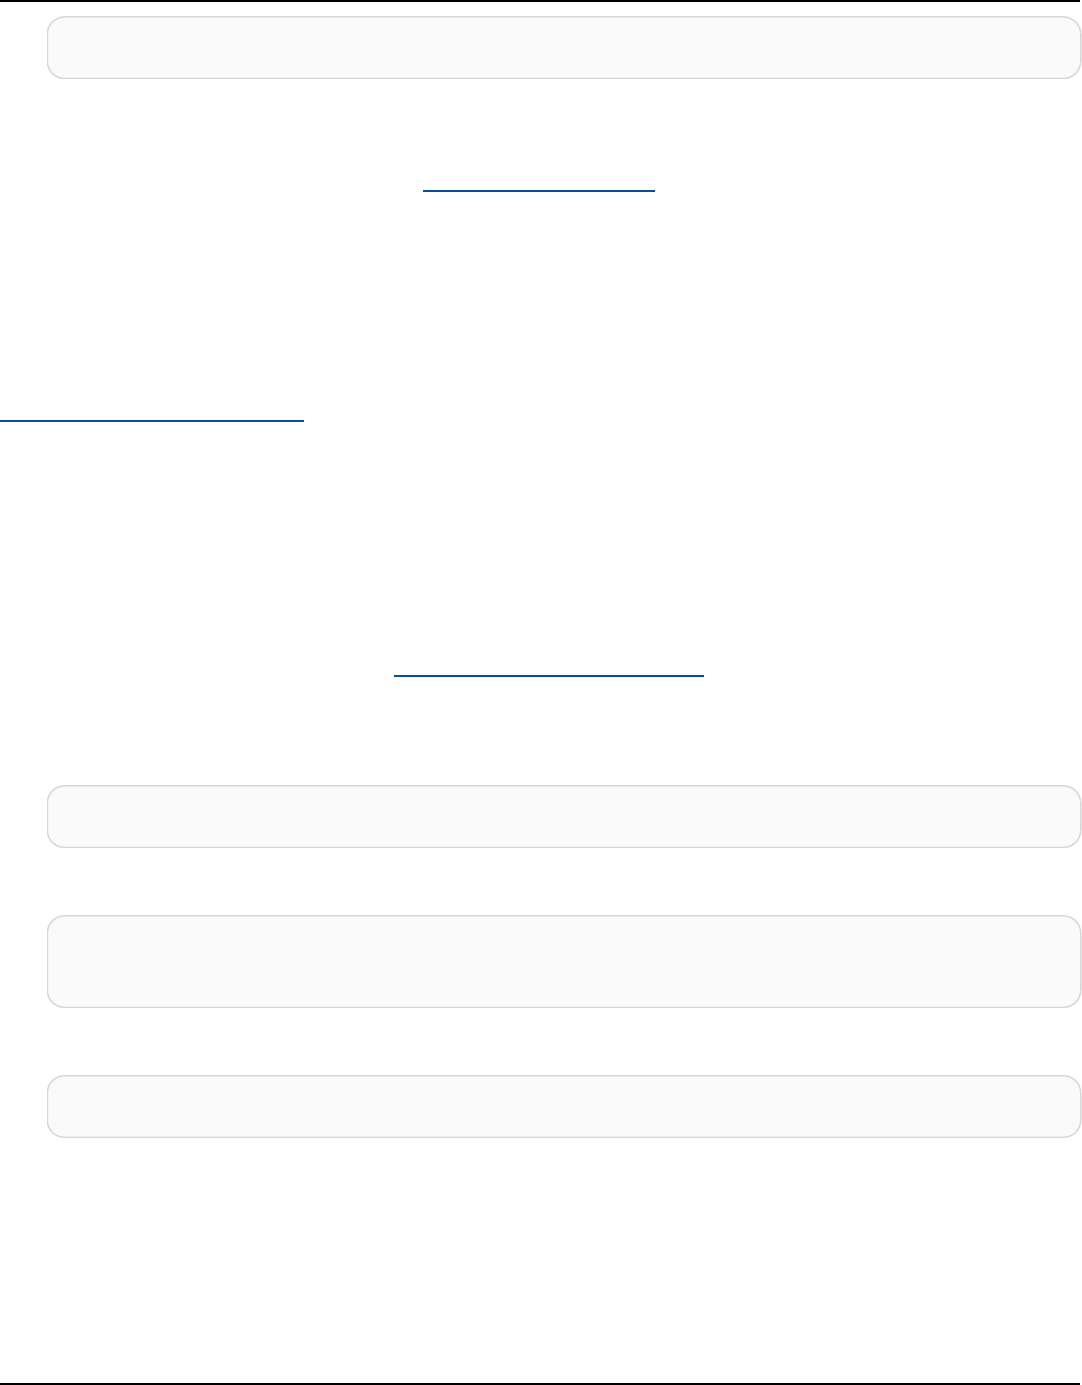
AWS SCT supports the following data NoSQL database conversions.
Source database Target database
Apache Cassandra (versions 2.1.x, 2.2.16, and
3.11.x)
Amazon DynamoDB
For more information, see Connecting to
Apache Cassandra.
AWS SCT supports conversions of the following extract, transform, and load (ETL) processes. For
more information, see Converting Data Using ETL.
Source Target
Informatica ETL scripts Informatica
Microsoft SQL Server Integration Services
(SSIS) ETL packages
AWS Glue or AWS Glue Studio
Shell scripts with embedded commands from
Teradata Basic Teradata Query (BTEQ)
Amazon Redshift RSQL
Teradata BTEQ ETL scripts AWS Glue or Amazon Redshift RSQL
Teradata FastExport job scripts Amazon Redshift RSQL
Teradata FastLoad job scripts Amazon Redshift RSQL
Teradata MultiLoad job scripts Amazon Redshift RSQL
Version 1.0.672 4

AWS Schema Conversion Tool User Guide
AWS SCT supports the following big data framework migrations. For more information, see
Migrating big data frameworks.
Source Target
Apache Hive (version 0.13.0 and higher) Hive on Amazon EMR
Apache HDFS Amazon S3 or HDFS on Amazon EMR
Apache Oozie AWS Step Functions
Schema conversion overview
AWS SCT provides a project-based user interface to automatically convert the database schema of
your source database into a format compatible with your target Amazon RDS instance. If schema
from your source database can't be converted automatically, AWS SCT provides guidance on how
you can create equivalent schema in your target Amazon RDS database.
For information about how to install AWS SCT, see Installing and Configuring AWS Schema
Conversion Tool.
For an introduction to the AWS SCT user interface, see Navigating the user interface of the AWS
SCT.
For information on the conversion process, see Converting database schemas in AWS Schema
Conversion Tool.
In addition to converting your existing database schema from one database engine to another,
AWS SCT has some additional features that help you move your data and applications to the AWS
Cloud:
• You can use data extraction agents to extract data from your data warehouse to prepare to
migrate it to Amazon Redshift. To manage the data extraction agents, you can use AWS SCT. For
more information, see Migrating data from on-premises data warehouse to Amazon Redshift
with AWS Schema Conversion Tool.
• You can use AWS SCT to create AWS DMS endpoints and tasks. You can run and monitor these
tasks from AWS SCT. For more information, see Integrating AWS Database Migration Service with
AWS Schema Conversion Tool.
Schema conversion overview Version 1.0.672 5

AWS Schema Conversion Tool User Guide
• In some cases, database features can't be converted to equivalent Amazon RDS or Amazon
Redshift features. The AWS SCT extension pack wizard can help you install AWS Lambda
functions and Python libraries to emulate the features that can't be converted. For more
information, see Using extension packs with AWS Schema Conversion Tool.
• You can use AWS SCT to optimize your existing Amazon Redshift database. AWS SCT
recommends sort keys and distribution keys to optimize your database. For more information,
see Converting data from Amazon Redshift using AWS Schema Conversion Tool.
• You can use AWS SCT to copy your existing on-premises database schema to an Amazon RDS DB
instance running the same engine. You can use this feature to analyze potential cost savings of
moving to the cloud and of changing your license type.
• You can use AWS SCT to convert SQL in your C++, C#, Java, or other application code. You can
view, analyze, edit, and save the converted SQL code. For more information, see Converting
application SQL using AWS SCT.
• You can use AWS SCT to migrate extraction, transformation, and load (ETL) processes. For more
information, see Converting Data Using ETL Processes in AWS Schema Conversion Tool.
Providing feedback
You can provide feedback about AWS SCT. You can file a bug report, submit a feature request, or
provide general information.
To provide feedback about AWS SCT
1. Start the AWS Schema Conversion Tool.
2. Open the Help menu and then choose Leave Feedback. The Leave Feedback dialog box
appears.
3. For Area, choose Information, Bug report, or Feature request.
4. For Source database, choose your source database. Choose Any if your feedback is not specific
to a particular database.
5. For Target database, choose your target database. Choose Any if your feedback is not specific
to a particular database.
6. For Title, type a title for your feedback.
7. For Message, type your feedback.
8. Choose Send to submit your feedback.
Giving feedback Version 1.0.672 6

AWS Schema Conversion Tool User Guide
Installing and Configuring AWS Schema Conversion Tool
The AWS Schema Conversion Tool (AWS SCT) is a standalone application that provides a project-
based user interface. AWS SCT is available for Microsoft Windows, Fedora Linux, and Ubuntu Linux.
AWS SCT is supported only on 64-bit operating systems.
To ensure that you get the correct version of the AWS SCT distribution file we provide verification
steps after you download the compressed file. You can verify the file using the steps provided.
AWS SCT is available as both a standalone application and a command-line tool. For information
about the command line tool, see AWS Schema Conversion Tool CLI.
Topics
• Installing AWS Schema Conversion Tool
• Validating the AWS Schema Conversion Tool insttallation
• Installing JDBC drivers for AWS Schema Conversion Tool
• Updating AWS Schema Conversion Tool
• AWS Schema Conversion Tool CLI
Installing AWS Schema Conversion Tool
You can install AWS SCT on the following operating systems:
• Microsoft Windows 10
• Fedora Linux 36 and higher
• Ubuntu Linux 18 and higher
To install AWS SCT
1. Download the compressed file that contains the AWS SCT installer, using the link for your
operating system. All compressed files have a .zip extension. When you extract the AWS SCT
installer file, it will be in the appropriate format for your operating system.
• Microsoft Windows
• Ubuntu Linux (.deb)
Installing AWS SCT Version 1.0.672 7

AWS Schema Conversion Tool User Guide
• Fedora Linux (.rpm)
2. Extract the AWS SCT installer file for your operating system, shown following.
Operating system File name
Fedora Linux
aws-schema-conversion-tool-1.0. build-num
ber .x86_64.rpm
Microsoft Windows
AWS Schema Conversion Tool-1.0. build-number .msi
Ubuntu Linux
aws-schema-conversion-tool-1.0. build-number .deb
3. Run the AWS SCT installer file extracted in the previous step. Use the instructions for your
operating system, shown following.
Operating system Install instructions
Fedora Linux Run the following command in the folder that you downloaded the
file to:
sudo yum install aws-schema-conversion-tool-
1.0. build-number .x86_64.rpm
Microsoft Windows Double-click the file to run the installer.
Ubuntu Linux Run the following command in the folder that you downloaded the
file to:
sudo dpkg -i aws-schema-conversion-tool-
1.0. build-number .deb
4. Download the Java Database Connectivity (JDBC) drivers for your source and target database
engines. For instructions and download links, see Installing JDBC drivers for AWS Schema
Conversion Tool.
Now, you have completed the setup of the AWS SCT application. Double-click the application icon
to run AWS SCT.
Installing AWS SCT Version 1.0.672 8

AWS Schema Conversion Tool User Guide
Validating the AWS Schema Conversion Tool insttallation
There are several ways you can verify the distribution file of AWS SCT. The simplest is to compare
the checksum of the file with the published checksum from AWS. As an additional level of security,
you can use the procedures following to verify the distribution file, based on the operating system
where you installed the file.
This section includes the following topics.
Topics
• Verifying the checksum of the AWS SCT file
• Verifying the AWS SCT RPM files on Fedora
• Verifying the AWS SCT DEB files on Ubuntu
• Verifying the AWS SCT MSI file on Microsoft Windows
Verifying the checksum of the AWS SCT file
In order to detect any errors that could have been introduced when downloading or storing the
AWS SCT compressed file, you can compare the file checksum with a value provided by AWS. AWS
uses the SHA256 algorithm for the checksum.
To verify the AWS SCT distribution file using a checksum
1. Download the AWS SCT distribution file using the links in the Installing section. For more
information, see Installing AWS Schema Conversion Tool.
2. Download the latest checksum file, called sha256Check.txt. This file includes the checksums
for the latest AWS SCT version. For example, the file can appear as follows:
Fedora b4f5f66f91bfcc1b312e2827e960691c269a9002cd1371cf1841593f88cbb5e6
Ubuntu 4315eb666449d4fcd95932351f00399adb6c6cf64b9f30adda2eec903c54eca4
Windows 6e29679a3c53c5396a06d8d50f308981e4ec34bd0acd608874470700a0ae9a23
3. Run the SHA256 validation command for your operating system in the directory that contains
the distribution file. For example, run the following command in Linux.
Validating installation Version 1.0.672 9
AWS Schema Conversion Tool User Guide
shasum -a 256 aws-schema-conversion-tool-1.0.latest.zip
4. Compare the results of the command with the value shown in the sha256Check.txt file. If the
checksums match, then it is safe to run the distribution file. If the checksums don't match, then
don't run the distribution file, and contact AWS Support.
Verifying the AWS SCT RPM files on Fedora
AWS provides another level of validation in addition to the distribution file checksum. All RPM
files in the distribution file are signed by an AWS private key. The public GPG key can be viewed at
amazon.com.public.gpg-key.
To verify the AWS SCT RPM files on Fedora
1. Download the AWS SCT distribution file using the links in the Installing section.
2. Verify the checksum of the AWS SCT distribution file.
3. Extract the contents of the distribution file. Locate the RPM file you want to verify.
4. Download GPG public key from amazon.com.public.gpg-key
5. Import the public key to your RPM DB (make sure you have the appropriate permissions) by
using the following command:
sudo rpm --import [email protected]
6. Check that the import was successful by running the following command:
rpm -q --qf "%{NAME}-%{VERSION}-%{RELEASE} \n %{SUMMARY} \n" gpg-pubkey-
ea22abf4-5a21d30c
7. Check the RPM signature by running the following command:
rpm --checksig -v aws-schema-conversion-tool-1.0.build number-1.x86_64.rpm
Verifying the AWS SCT DEB files on Ubuntu
AWS provides another level of validation in addition to the distribution file checksum. All DEB files
in the distribution file are signed by a GPG detached signature.
Verifying the AWS SCT RPM files on Fedora Version 1.0.672 10

AWS Schema Conversion Tool User Guide
To verify the AWS SCT DEB files on Ubuntu
1. Download the AWS SCT distribution file using the links in the Installing section.
2. Verifying the checksum of the AWS SCT distribution file.
3. Extract the contents of the distribution file. Locate the DEB file you want to verify.
4. Download the detached signature from aws-schema-conversion-tool-1.0.latest.deb.asc.
5. Download the GPG public key from amazon.com.public.gpg-key.
6. Import the GPG public key by running the following command:
gpg --import [email protected]
7. Verify the signature by running the following command:
gpg --verify aws-schema-conversion-tool-1.0.latest.deb.asc aws-schema-conversion-
tool-1.0.build number.deb
Verifying the AWS SCT MSI file on Microsoft Windows
AWS provides another level of validation in addition to the distribution file checksum. The MSI file
has a digital signature you can check to ensure it was signed by AWS.
To verify the AWS SCT MSI file on Windows
1. Download the AWS SCT distribution file using the links in the Installing section.
2. Verifying the checksum of the AWS SCT distribution file.
3. Extract the contents of the distribution file. Locate the MSI file you want to verify.
4. In Windows Explorer, right-click the MSI file and select Properties.
5. Choose the Digital Signatures tab.
6. Verify that the digital signature is from Amazon Services LLC.
Installing JDBC drivers for AWS Schema Conversion Tool
For AWS SCT to work correctly, download the JDBC drivers for your source and target database
engines. If you use a virtual target database platform, you don't need to download the JDBC driver
Verifying the AWS SCT MSI file on Microsoft Windows Version 1.0.672 11
AWS Schema Conversion Tool User Guide
for your target database engine. For more information, see Mapping to virtual targets in the AWS
Schema Conversion Tool.
After you download the drivers, you give the location of the driver files. For more information, see
Storing driver paths in the global settings.
You can download the database drivers from the following locations.
Important
Download the latest version of the driver available. The following table includes the lowest
version of database driver supported by AWS SCT.
Database
engine
Drivers Download location
Amazon
Aurora
MySQL-
Compatible
Edition
mysql-connector-ja
va-5.1.6.jar
https://www.mysql.com/products/connector/
Amazon
Aurora
PostgreSQL-
Compatible
Edition
postgresql-42.2.19
.jar
https://jdbc.postgresql.org/download/postg
resql-42.2.19.jar
Amazon EMR
HiveJDBC42.jar
http://awssupportdatasvcs.com/bootstrap-act
ions/Simba/latest/
Amazon
Redshift
redshift-jdbc42-2.
1.0.9.jar
https://s3.amazonaws.com/redshift-
downloads/drivers/jdbc/2.1.0.9/redshift-j
dbc42-2.1.0.9.zip
Amazon
Redshift
Serverless
redshift-jdbc42-2.
1.0.9.jar
https://s3.amazonaws.com/redshift-
downloads/drivers/jdbc/2.1.0.9/redshift-j
dbc42-2.1.0.9.zip
Installing JDBC drivers Version 1.0.672 12
AWS Schema Conversion Tool User Guide
Database
engine
Drivers Download location
Apache Hive
hive-jdbc-2.3.4-st
andalone.jar
https://repo1.maven.org/maven2/org/apache
/hive/hive-jdbc/2.3.4/hive-jdbc-2.3.4-sta
ndalone.jar
Azure SQL
Database
mssql-jdbc-7.2.2.j
re11.jar
https://docs.microsoft.com/en-us/sql/conn
ect/jdbc/release-notes-for-the-jdbc-driver?
view=sql-server-ver15#72
Azure
Synapse
Analytics
mssql-jdbc-7.2.2.j
re11.jar
https://docs.microsoft.com/en-us/sql/conn
ect/jdbc/release-notes-for-the-jdbc-driver?
view=sql-server-ver15#72
Greenplum
Database
postgresql-42.2.19
.jar
https://jdbc.postgresql.org/download/postg
resql-42.2.19.jar
IBM Db2 for
z/OS
db2jcc-db2jcc4.jar
https://www.ibm.com/support/pages/db2-
jdbc-driver-versions-and-downloads-db2-zos
IBM Db2
LUW
db2jcc-db2jcc4.jar
https://www.ibm.com/support/pages/node/3
82667
MariaDB
mariadb-java-clien
t-2.4.1.jar
https://downloads.mariadb.com/Connectors/
java/connector-java-2.4.1/mariadb-java-clien
t-2.4.1.jar
Microsoft
SQL Server
mssql-jdbc-10.2.jar
https://docs.microsoft.com/en-us/sql/conn
ect/jdbc/download-microsoft-jdbc-driver-for-
sql-server?view=sql-server-ver15
MySQL
mysql-connector-ja
va-8.0.15.jar
https://dev.mysql.com/downloads/connector/
j/
Installing JDBC drivers Version 1.0.672 13
AWS Schema Conversion Tool User Guide
Database
engine
Drivers Download location
Netezza
nzjdbc.jar
Use the client tools software.
Download driver version
7.2.1, which is backwards
compatible with data
warehouse version 7.2.0.
http://www.ibm.com/support/knowle
dgecenter/SSULQD_7.2.1/com.ibm.nz.
datacon.doc/c_datacon_plg_overview.html
Oracle
ojdbc8.jar
Driver versions 8 and higher
are supported.
https://www.oracle.com/database/technologi
es/jdbc-ucp-122-downloads.html
PostgreSQL
postgresql-42.2.19
.jar
https://jdbc.postgresql.org/download/postg
resql-42.2.19.jar
SAP ASE
(Sybase ASE)
jconn4.jar
The jConnect JDBC driver
Snowflake
snowflake-jdbc-3.9
.2.jar
For more information, see
Downloading / Integrating the
JDBC Driver.
https://repo1.maven.org/maven2/net/
snowflake/snowflake-jdbc/3.9.2/snowflake-
jdbc-3.9.2.jar
Teradata
terajdbc4.jar
tdgssconfig.jar
For Teradata JDBC driver
version 16.20.00.11 and
higher, you don't need the
tdgssconfig.jar file.
https://downloads.teradata.com/download/
connectivity/jdbc-driver
Installing JDBC drivers Version 1.0.672 14
AWS Schema Conversion Tool User Guide
Database
engine
Drivers Download location
Vertica
vertica-jdbc-9.1.1
-0.jar
Driver versions 7.2.0 and
higher are supported.
https://www.vertica.com/client_drivers/9.1.x/
9.1.1-0/vertica-jdbc-9.1.1-0.jar
Installing JDBC drivers on Linux
You can use the following steps to install the JDBC drivers on your Linux system for use with AWS
SCT.
To install JDBC drivers on your Linux system
1. Create a directory to store the JDBC drivers in.
PROMPT>sudo mkdir –p /usr/local/jdbc-drivers
2. Install the JDBC driver for your database engine using the commands shown following.
Database engine Installation commands
Amazon Aurora
(MySQL compatible)
PROMPT> cd /usr/local/jdbc-drivers
PROMPT> sudo tar xzvf /tmp/mysql-connector-java-X
.X.X.tar.gz
Amazon Aurora
(PostgreSQL
compatible)
PROMPT> cd /usr/local/jdbc-drivers
PROMPT> sudo cp -a /tmp/postgresql-X.X.X.jre7.tar .
Microsoft SQL
Server
PROMPT> cd /usr/local/jdbc-drivers
PROMPT> sudo tar xzvf /tmp/sqljdbc_X.X.X_enu.tar.gz
MySQL
PROMPT> cd /usr/local/jdbc-drivers
Installing JDBC drivers on Linux Version 1.0.672 15
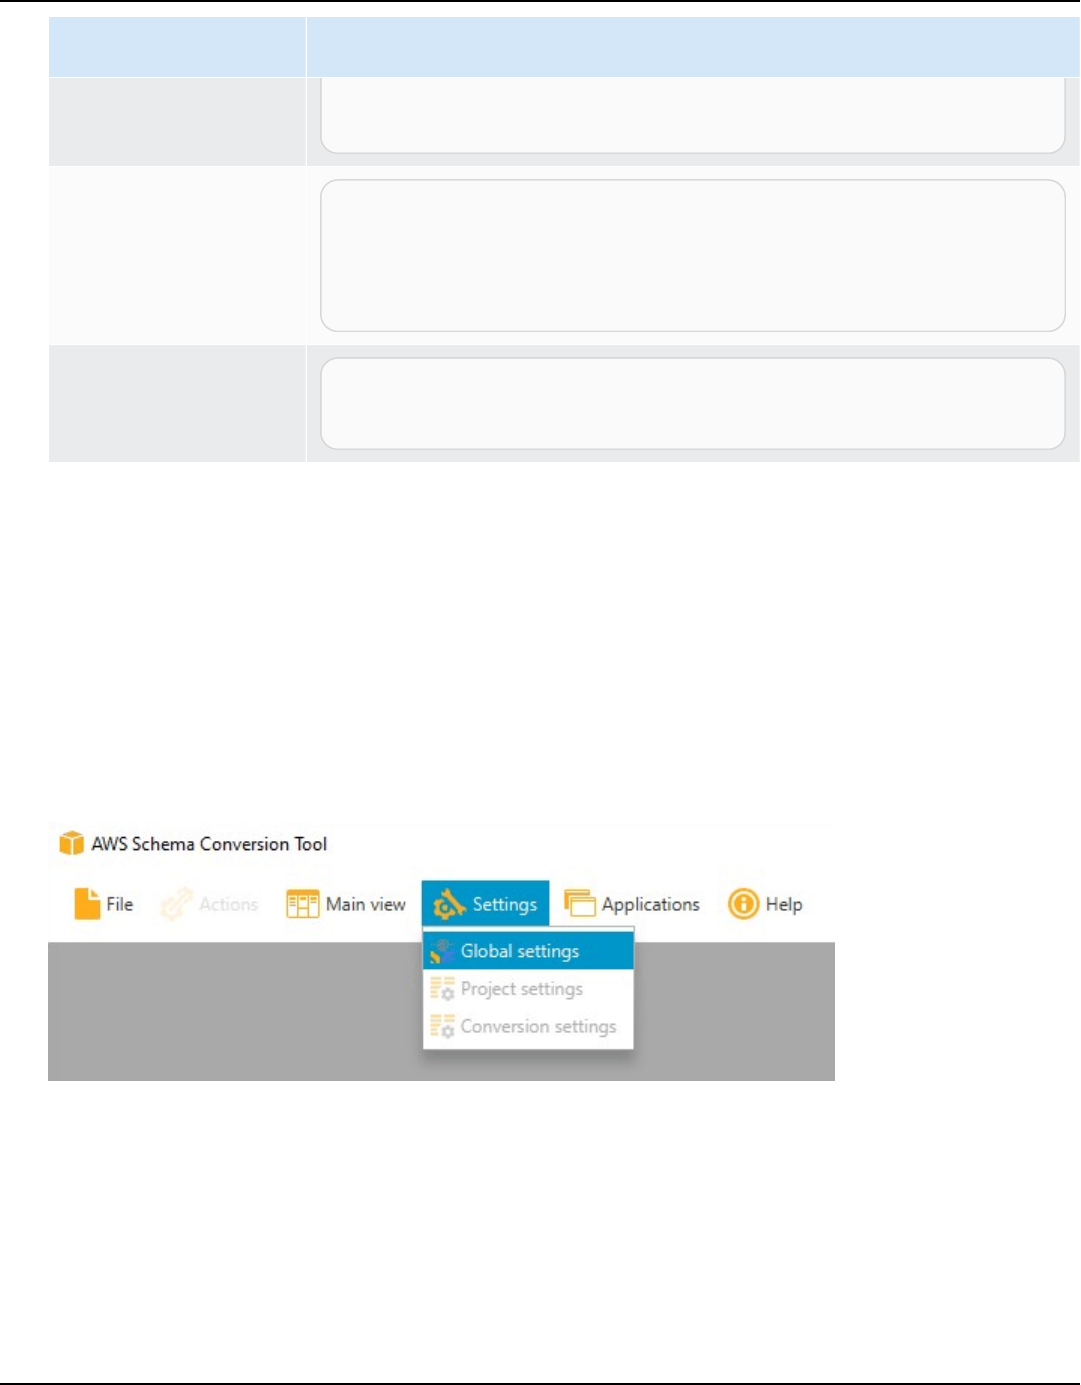
AWS Schema Conversion Tool User Guide
Database engine Installation commands
PROMPT> sudo tar xzvf /tmp/mysql-connector-java-X
.X.X.tar.gz
Oracle
PROMPT> cd /usr/local/jdbc-drivers
PROMPT> sudo mkdir oracle-jdbc
PROMPT> cd oracle-jdbc
PROMPT> sudo cp -a /tmp/ojdbc8.jar .
PostgreSQL
PROMPT> cd /usr/local/jdbc-drivers
PROMPT> sudo cp -a /tmp/postgresql-X.X.X.jre7.tar .
Storing driver paths in the global settings
After you have downloaded and installed the required JDBC drivers, you can set the location of the
drivers globally in the AWS SCT settings. If you don't set the location of the drivers globally, the
application asks you for the location of the drivers when you connect to a database.
To update the driver file locations
1. In AWS SCT, choose Settings, and then choose Global Settings.
2. For Global settings, choose Drivers. Add the file path to the JDBC driver for your source
database engine and your target Amazon RDS DB instance database engine.
Storing driver paths in the global settings Version 1.0.672 16
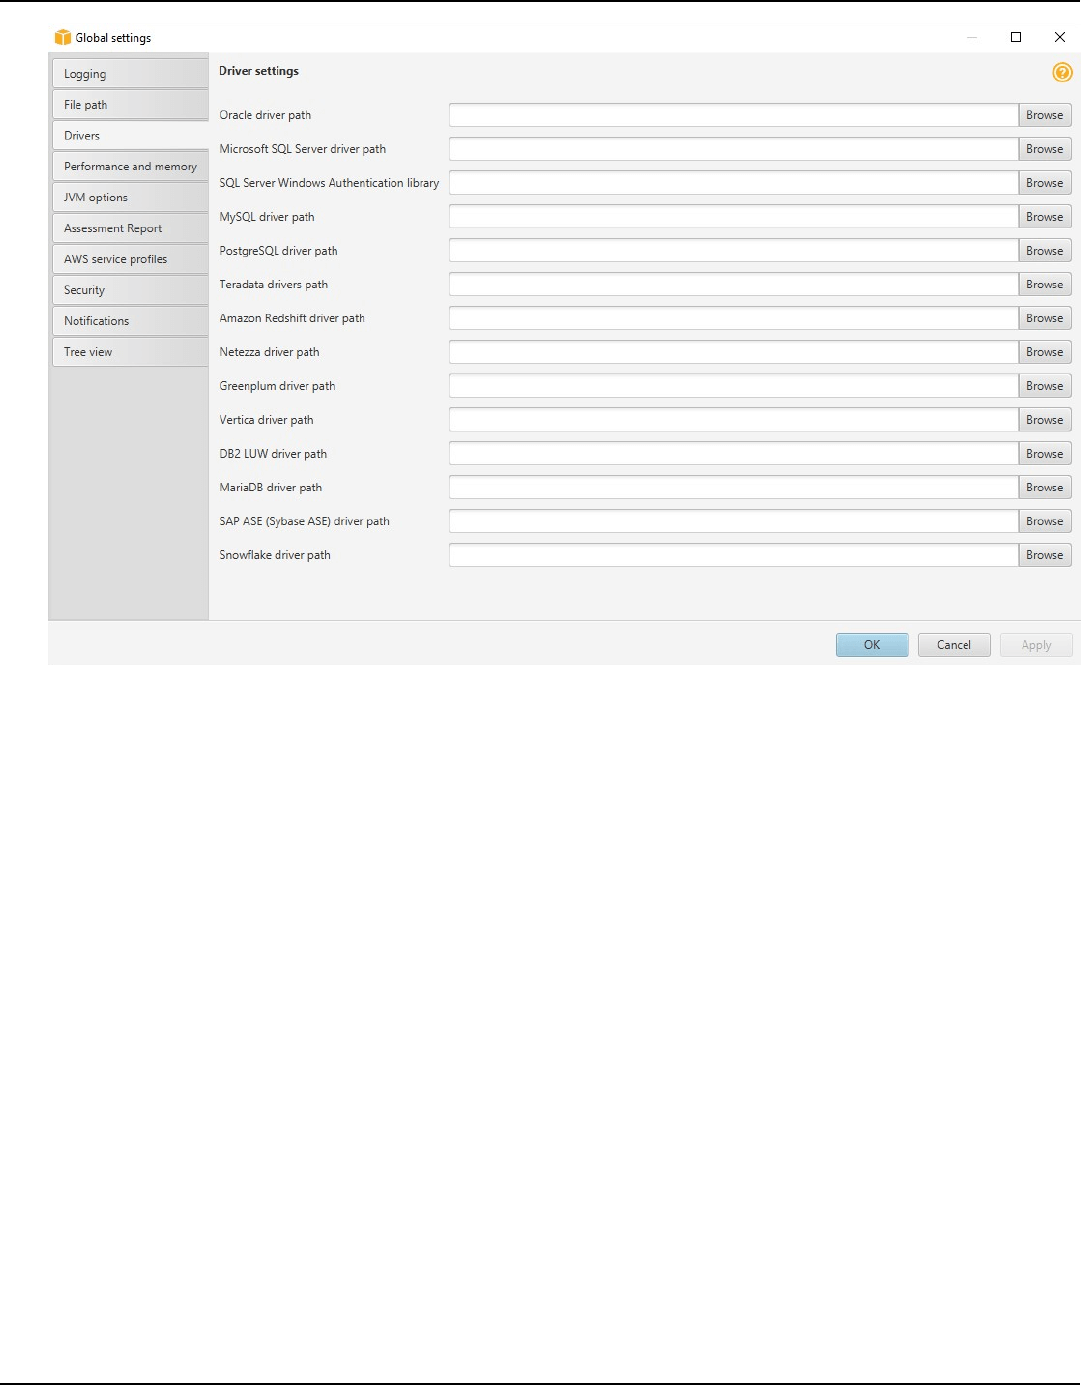
AWS Schema Conversion Tool User Guide
3. When you are finished adding the driver paths, choose OK.
Updating AWS Schema Conversion Tool
AWS periodically updates AWS SCT with new features and functionality. If you are updating from a
previous version, create a new AWS SCT project and reconvert any database objects you are using.
You can check to see if updates exist for AWS SCT.
To check for updates to AWS SCT
1. When in AWS SCT, choose Help and then choose Check for Updates.
2. In the Check for Updates dialog box, choose What's New. If the link does not appear, you
have the latest version.
Updating AWS SCT Version 1.0.672 17


AWS Schema Conversion Tool User Guide
Navigating the user interface of the AWS SCT
Use the following topics to help you work with the AWS SCT user interface. For information on
installing AWS SCT, see Installing and Configuring AWS Schema Conversion Tool.
Topics
• Viewing the Project Window in AWS SCT
• Starting and managing Projects in AWS SCT
• Using the AWS SCT Wizard
• Saving projects in AWS SCT
• Adding servers to project in AWS SCT
• Using offline mode in AWS Schema Conversion Tool
• Using tree filters in AWS Schema Conversion Tool
• Hiding schemas in AWS Schema Conversion Tool
• Viewing the Assessment Report in AWS Schema Conversion Tool
• Converting Schemas in AWS Schema Conversion Tool
• Applying the converted schemas in AWS Schema Conversion Tool
• Managing Profiles in the AWS Schema Conversion Tool
• Configuring AWS Secrets Manager in the AWS Schema Conversion Tool
• Storing passwords in the AWS Schema Conversion Tool
• Creating UNION ALL view in the AWS Schema Conversion Tool
• Using Keyboard Shortcuts in the AWS Schema Conversion Tool
Viewing the Project Window in AWS SCT
The illustration following is what you see in AWS SCT when you create a schema migration project,
and then convert a schema.
1. In the left panel, the schema from your source database is presented in a tree view. Your
database schema is "lazy loaded." In other words, when you select an item from the tree view,
AWS SCT gets and displays the current schema from your source database.
Project window Version 1.0.672 19
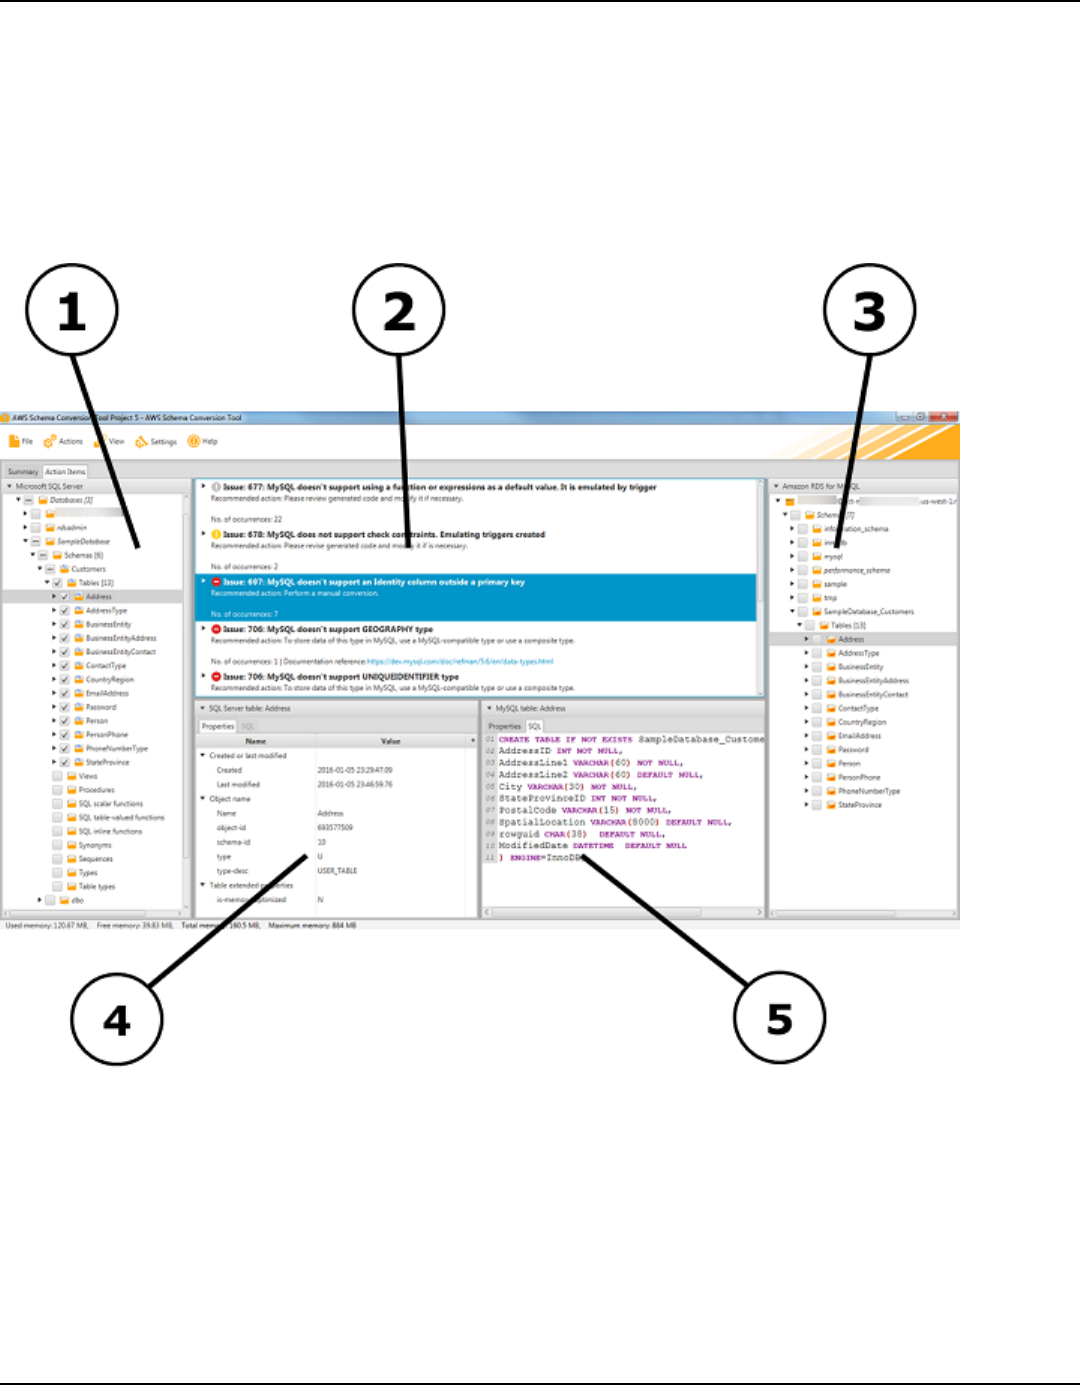
AWS Schema Conversion Tool User Guide
2. In the top middle panel, action items appear for schema elements from the source database
engine that couldn't be converted automatically to the target database engine.
3. In the right panel, the schema from your target DB instance is presented in a tree view. Your
database schema is "lazy loaded." That is, at the point when you select an item from the tree
view, AWS SCT gets and displays the current schema from your target database.
4. In the lower left panel, when you choose a schema element, properties are displayed. These
describe the source schema element and the SQL command to create that element in the source
database.
5. In the lower right panel, when you choose a schema element, properties are displayed. These
describe the target schema element and the SQL command to create that element in the target
database. You can edit this SQL command and save the updated command with your project.
Project window Version 1.0.672 20
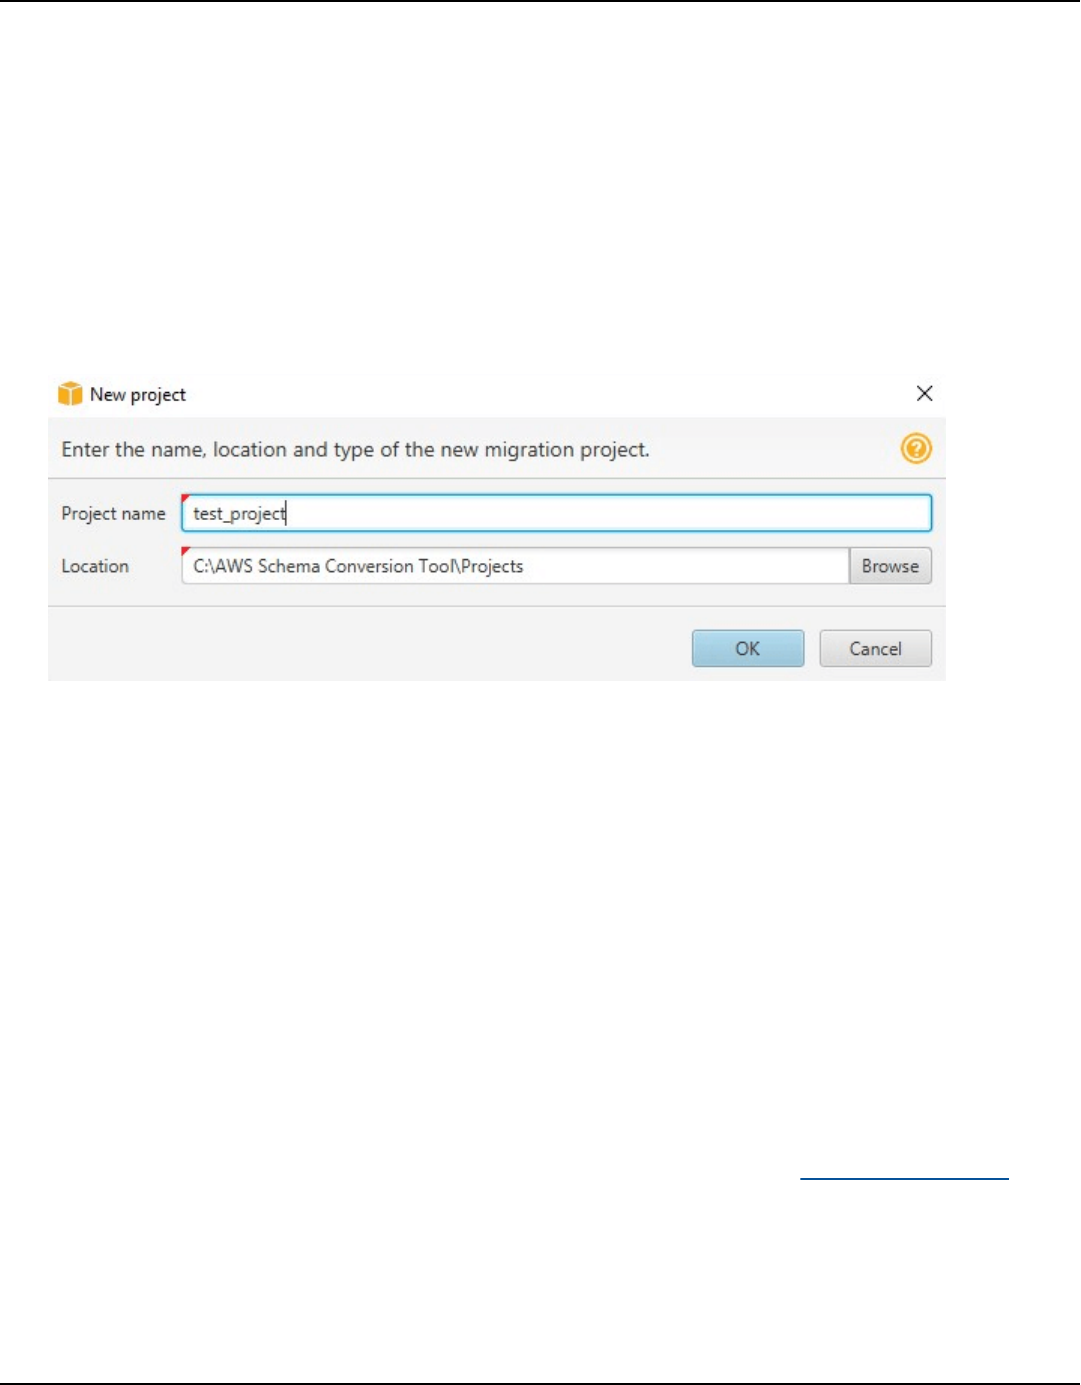
AWS Schema Conversion Tool User Guide
Starting and managing Projects in AWS SCT
To start the AWS Schema Conversion Tool, double-click the application icon.
Use the following procedure to create an AWS Schema Conversion Tool project.
To create your project
1. Start the AWS Schema Conversion Tool.
2. On the File menu, choose New project. The New project dialog box appears.
3. Enter a name for your project, which is stored locally on your computer.
4. Enter the location for your local project file.
5. Choose OK to create your AWS SCT project.
6. Choose Add source to add a new source database to your AWS SCT project. You can add
multiple source databases to your AWS SCT project.
7. Choose Add target to add a new target platform in your AWS SCT project. You can add
multiple target platforms to your AWS SCT project.
8. Choose the source database schema in the left panel.
9. In the right panel, specify the target database platform for the selected source schema.
10. Choose Create mapping. This button becomes active after you choose the source database
schema and the target database platform. For more information, see Data type mapping.
Now, your AWS SCT project is set up. You can save your project, create database migration
assessment report, and convert your source database schemas.
Starting and Managing projects Version 1.0.672 21

AWS Schema Conversion Tool User Guide
Using the AWS SCT Wizard
You can create a new database migration project using the new project wizard. This wizard assists
you in determining your migration target and connecting to your databases. It estimates how
complex a migration might be for all supported target destinations. After you run the wizard, AWS
SCT produces a summary report for the migration of your database to different target destinations.
You can use this report to compare possible target destinations and choose the optimal migration
path.
To run the new project wizard
1. Choose your source database.
a. Start the AWS Schema Conversion Tool.
b. On the File menu, choose New project wizard. The Create a new database migration
project dialog box opens.
c. To enter the source database connection information, use the following instructions:
Parameter Action
Project name Enter a name for your project, which is stored locally on your
computer.
Location Enter the location for your local project file.
Source type Choose one of the following options: SQL database, NoSQL
database, or ETL.
If you want to see the summary report that includes all the
migration destinations, choose SQL database.
Source engine Choose your source database engine.
Migration strategy Choose one of the following options:
• I want to switch engines and optimize for the cloud – This
option converts your source database to a new database engine.
Using the Wizard Version 1.0.672 22

AWS Schema Conversion Tool User Guide
Parameter Action
• I want to keep the same engine but optimize for the cloud
– This option keeps your database engine as is and moves the
database from on-premises to the cloud.
• I want to see a combined report for database engine switch
and optimization for the cloud – This option compares the
migration complexity of all available migration options.
If you want to see the aggregated assessment report that includes
all migration destinations, choose the last option.
d. Choose Next. The Connect to the source database page opens.
2. Connect to your source database.
a. Provide your connection information for the source database. The connection parameters
depend on your source database engine. Make sure the user that you use for the analysis of
your source database has the applicable permissions. For more information, see Connecting
to source databases with the AWS Schema Conversion Tool.
b. Choose Next. The Choose a schema page opens.
3. Choose your database schema.
a. Select the check box for the name of schemas that you want to assess and then choose the
schema itself. The schema name is highlighted in blue when selected and the Next button is
available.
Using the Wizard Version 1.0.672 23
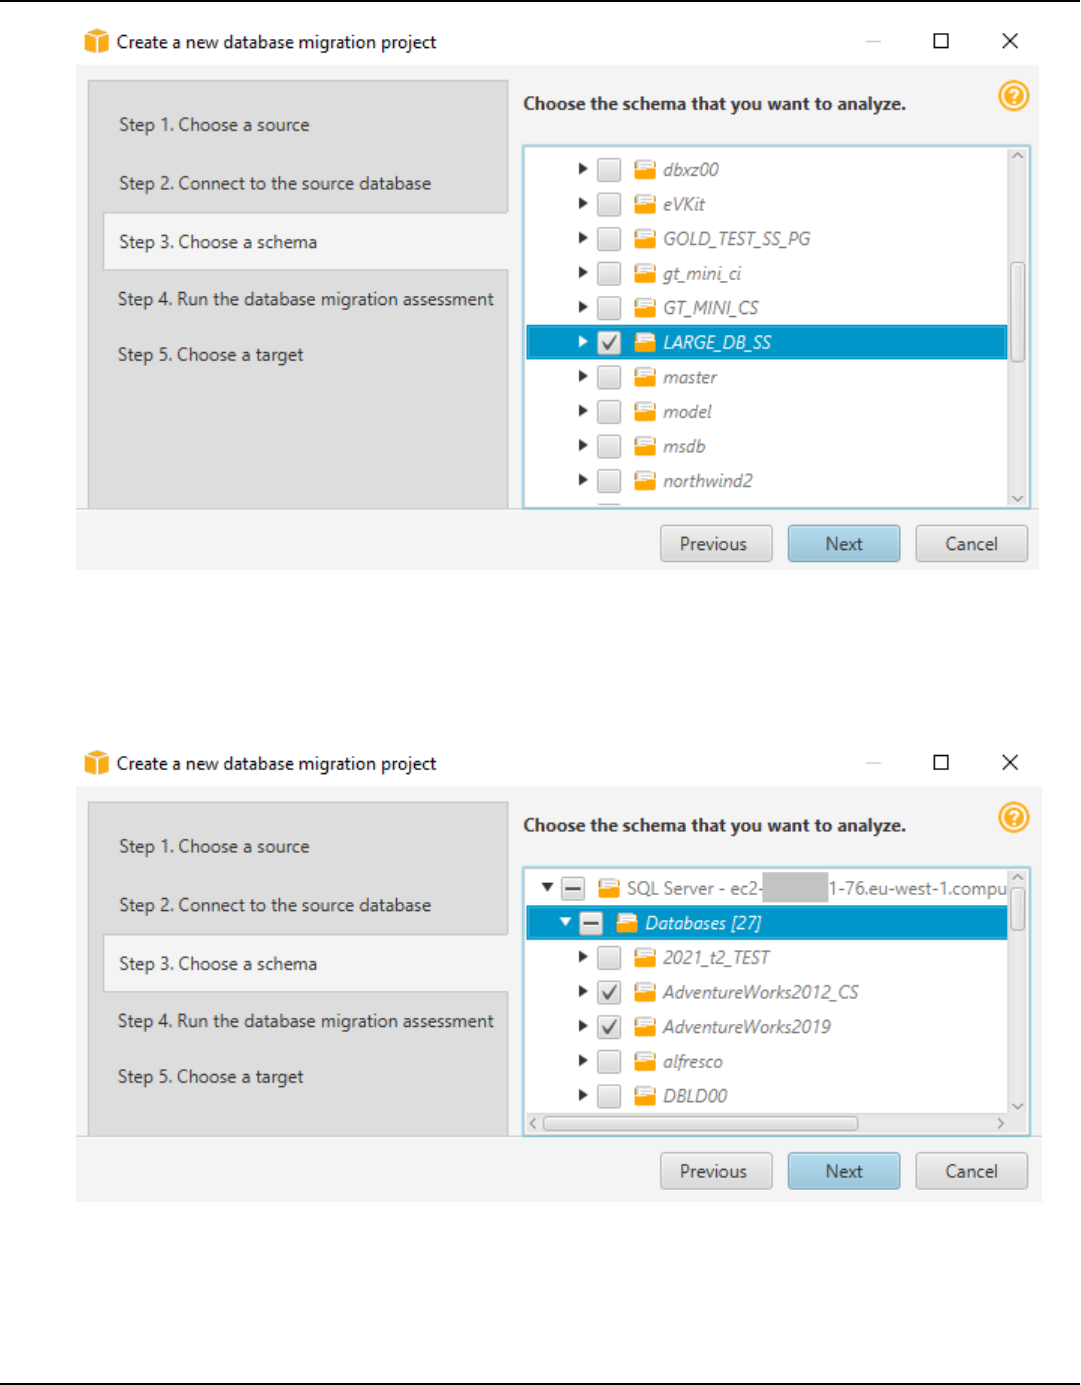
AWS Schema Conversion Tool User Guide
b. If you want to assess several database schemas, then select the check boxes for all the
schemas and then choose the parent node. For a successful assessment, you must choose
the parent node. For example, for a source SQL Server database, choose the Databases
node. The name of the parent node is highlighted in blue and the Next button is available.
c. Choose Next. AWS SCT analyzes your source database schemas and creates a database
migration assessment report. The number of database objects in your source database
Using the Wizard Version 1.0.672 24

AWS Schema Conversion Tool User Guide
schemas affects the time it takes to run the assessment. When complete, the Run the
database migration assessment page opens.
4. Run the database migration assessment.
a. You can review and compare the assessment reports for different migration targets or save
a local copy of the assessment report files for the further analysis.
b. Save a local copy of the database migration assessment report. Choose Save, then enter the
path to the folder to save the files, and choose Save. AWS SCT saves the assessment report
files to the specified folder.
c. Choose Next. The Choose a target page opens.
5. Choose your target database.
a. For Target engine, choose the target database engine that you decide to use based on the
assessment report.
b. Provide your connection information for your target database. The connection parameters
that you see depend on your selected target database engine. Make sure the user specified
for the target database has the required permissions. For more information about the
required permissions, see the sections that describe permissions for target databases in
Connecting to source databases with the AWS Schema Conversion Tool and Permissions for
Amazon Redshift as a target.
c. Choose Finish. AWS SCT creates your project and adds the mapping rules. For more
information, see Data type mapping.
Now you can use the AWS SCT project to convert your source database objects.
Saving projects in AWS SCT
Use the following procedure to save an AWS Schema Conversion Tool project.
To save your project
1. Start the AWS Schema Conversion Tool.
2. On the File menu, choose Save project.
AWS SCT saves the project in the folder, which you specified when you created the project.
Saving projects Version 1.0.672 25

AWS Schema Conversion Tool User Guide
Use the following procedure to open an existing AWS Schema Conversion Tool project.
To open your project
1. On the File menu, choose Open project. The Open dialog box appears.
2. Choose the project folder and then choose the Windows Script Component (*.sct) file.
3. AWS SCT opens your project but doesn't automatically connect to your source and target
databases. Choose Connect to the server at the top of your database schema trees to connect
to your source and target databases.
If you open a project saved in AWS SCT version 1.0.655 or before, AWS SCT automatically creates
mapping rules for all source database schemas to the target database platform. To add other
target database platforms, delete existing mapping rules and then create new mapping rules. For
more information on creating mapping rules, see Data type mapping.
Adding servers to project in AWS SCT
You can add multiple source and target database servers to an AWS Schema Conversion Tool
project.
To add a server to your project
1. Start the AWS Schema Conversion Tool.
2. Create a new project or open an existing project.
3. Choose Add source from the menu to add a new source database.
4. Choose a database platform and specify database connection credentials. For more
information on connecting to a source database, see Connecting to source databases.
Use the following procedure to connect to your database.
To connect to your database
1. Open the context (right-click) menu for a database server, and then choose Establish
connection.
You can also choose Connect to the server at the top of your database schema tree.
2. Enter the password to connect to your source database server.
Adding database servers Version 1.0.672 26

AWS Schema Conversion Tool User Guide
3. Choose Test connection to verify that AWS SCT can connect to your source database.
4. Choose Connect to connect to your source database.
Use the following procedure to remove a database server from your AWS SCT project.
To remove a database server
1. Choose the database server to remove.
2. Open the context (right-click) menu, and then choose Remove from project.
AWS SCT removes the selected database server, all mapping rules, conversion results, and
other metadata related to this server.
Using offline mode in AWS Schema Conversion Tool
You can run AWS Schema Conversion Tool in an offline mode. Following, you can learn how to work
with an existing AWS SCT project when disconnected from your source database.
AWS SCT doesn't require a connection to your source database to run the following operations:
• Add mapping rules.
• Create database migration assessment reports.
• Convert database schemas and code.
• Edit your source and converted code.
• Save your source and converted code as SQL scripts in a text file.
Before you use AWS SCT in an offline mode, connect to your source database, load metadata, and
save your project. Open this project or disconnect from the source database server to use AWS SCT
in an offline mode.
To run AWS SCT in an offline mode
1. Start the AWS Schema Conversion Tool and create a new project. For more information, see
Starting and managing Projects in AWS SCT.
2. Add a source database server and connect to your source database. For more information, see
Adding servers to project in AWS SCT.
Offline mode Version 1.0.672 27

AWS Schema Conversion Tool User Guide
3. Add a target database server or use a virtual target database platform. For more information,
see Mapping to virtual targets in the AWS Schema Conversion Tool.
4. Create a mapping rule to define the target database platform for your source database. For
more information, see Mapping data types in the AWS Schema Conversion Tool.
5. Choose View, and then choose Main view.
6. In the left panel that displays the objects of your source database, choose your source
database schemas. Open the context (right-click) menu for the object, and then choose Load
schema. This operation loads all source schema metadata into your AWS SCT project.
The Create report and Convert schema operations also load all source schema metadata into
your AWS SCT project. If you ran one of these operations from the context menu, skip the
Load schema operation.
7. On the File menu, choose Save project to save the source database metadata in your project.
8. Choose Disconnect from the server to disconnect from your source database. Now you can
use AWS SCT in the offline mode.
Using tree filters in AWS Schema Conversion Tool
To migrate data from a source to a target, AWS SCT loads all metadata from source and target
databases into a tree structure. This structure appears in AWS SCT as the tree view in the main
project window.
Some databases can have a large number of objects in the tree structure. You can use tree filters
in AWS SCT to search for objects in the source and target tree structures. When you use a tree
filter, you don't change the objects that are converted when you convert your database. The filter
changes only what you see in the tree.
Tree filters work with objects that AWS SCT has preloaded. In other words, AWS SCT doesn't load
objects from the database during searches. This approach means that the tree structure generally
contains fewer objects than are present in the database.
For tree filters, keep the following in mind:
• The filter default is ANY, which means that the filter uses a name search to find objects.
• When you select one or more object types, you see only those types of objects in the tree.
• You can use the filter mask to show different types of symbols, including Unicode, spaces, and
special characters. The “%” character is the wildcard for any symbol.
Tree filters Version 1.0.672 28
AWS Schema Conversion Tool User Guide
• After you apply a filter, the count shows only the number of filtered objects.
To create a tree filter
1. Open an existing AWS SCT project.
2. Connect to the database that you want to apply the tree filter to.
3. Choose the filter icon.
The undo filter icon is grayed out because no filter is currently applied.
4. Enter the following information in the Filter dialog box. Options in the dialog box are different
for each database engine.
AWS SCT filter
option
Action
Level Choose Categories to filter objects by categories.
Choose Statuses to filter objects by statuses.
Type For Categories in Level, choose the categories of filtered objects.
Choose Any loaded to display objects from all categories.
For Statuses in Level, choose the status of filtered objects. You can
choose one of the following options:
• Converted to display all converted objects
• Has actions to display all objects that have conversion issues
• Encrypted to display all encrypted objects
Condition For Categories in Level, choose the filtering condition between Like
and Not like.
For Statuses in Level, the filtering condition option isn't available.
Value For Categories in Level, enter the Value to filter the tree by this
value.
Tree filters Version 1.0.672 29
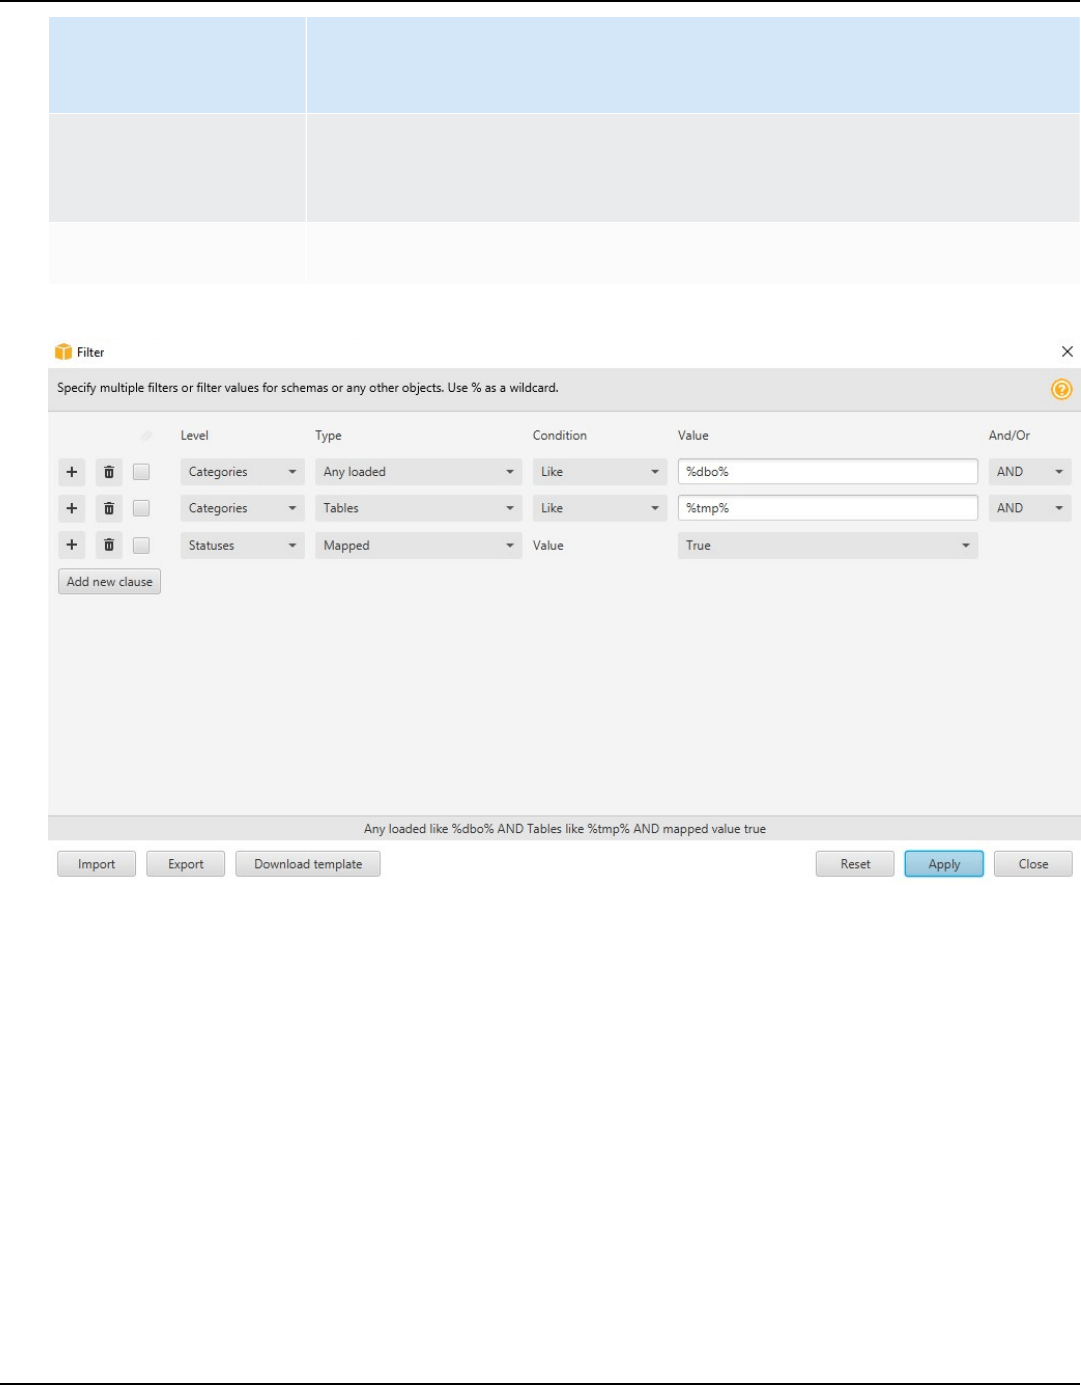
AWS Schema Conversion Tool User Guide
AWS SCT filter
option
Action
Use the percent (%) as a wildcard to display all objects.
For Statuses in Level, choose the Value between True and False.
And/Or
Choose AND or OR logical operators to apply multiple filter clauses.
5. Choose Add new clause to add an additional filter clause. AWS SCT can apply multiple filter
clauses using AND or OR logical operators.
6. Choose Apply. After you choose Apply, the undo filter icon (next to the filter icon) is enabled.
Use this icon if you want to remove the filters you applied.
7. Choose Close to close the dialog box.
When you filter the schema that appears in the tree, you don't change the objects that are
converted when you convert your schema. The filter only changes what you see in the tree.
Tree filters Version 1.0.672 30

AWS Schema Conversion Tool User Guide
Importing a file list for the tree filter
You can import a comma-separated value (CSV) file with semicolon separators or a JSON file that
contains names or values that you want the tree filter to use. Open an existing AWS SCT project,
connect to the database to apply the tree filter to, and then choose the filter icon.
To download an example of the file, choose Download template. Enter the file name and choose
Save.
To download your existing filter settings, choose Export. Enter the file name and choose Save.
To import a file list for the tree filter, choose Import. Choose a file to import, and then choose
Open. Choose Apply, and then choose Close.
CSV files use semicolon as the separator and have the following format:
•
object_type is the type of object that you want to find.
•
database_name is the name of database where this object exists.
•
schema_name is the name of schema where this object exists.
•
object_name is the object name.
•
import_type specifies to include or exclude this item from the filter.
Use JSON files to describe complex filtering cases, such as nested rules. JSON files have the
following format:
•
filterGroupType is the type of filter rule (AND or OR logical operators) that applies to multiple
filter clauses.
•
filterCategory is the level of the filter (Categories or Statuses).
•
names is the list of object names that applies for the Categories filter.
•
filterCondition is the filtering condition (LIKE or NOT LIKE) that applies for the Categories
filter.
•
transformName is the status name that applies for the Status filter.
•
value is the value to filter the tree by.
•
transformValue is the value of the filter (TRUE or FALSE) that applies for the Status filter.
Importing a file list for the tree filter Version 1.0.672 31
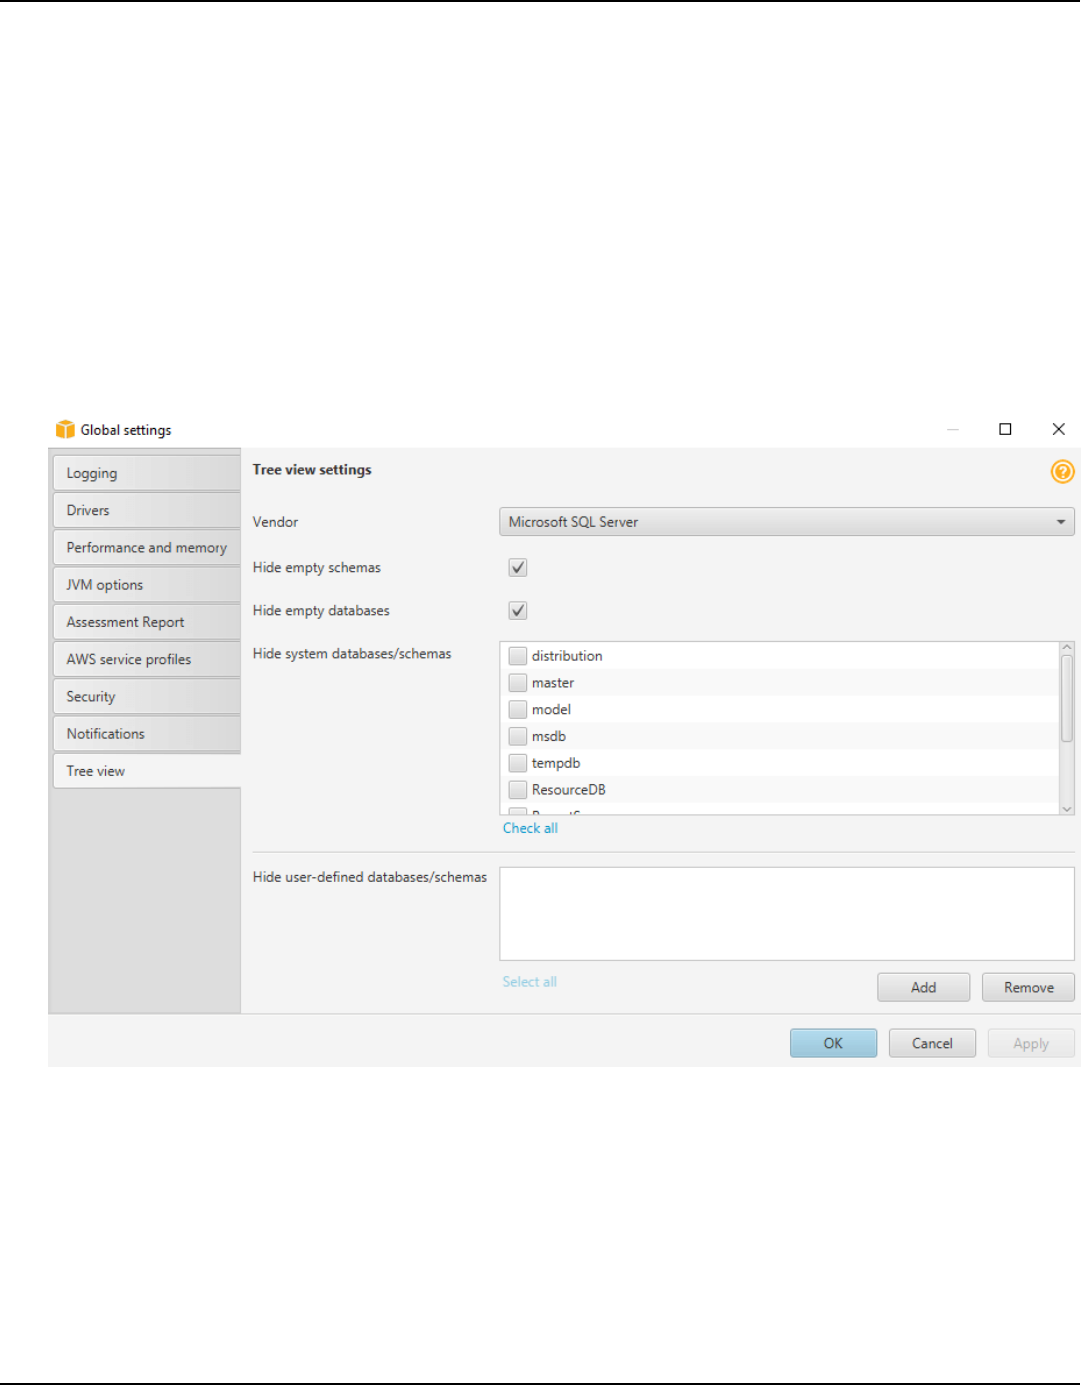
AWS Schema Conversion Tool User Guide
Hiding schemas in AWS Schema Conversion Tool
Use tree view settings to specify what schemas and databases you want to see in the AWS SCT
tree view. You can hide empty schemas, empty databases, system databases, and user-defined
databases and schemas.
To hide databases and schemas in tree view
1. Open an AWS SCT project.
2. Connect to the data store that you want to show in tree view.
3. Choose Settings, Global settings, Tree view.
4. In the Tree view settings section, do the following:
• For Vendor, choose database platform.
• Choose Hide empty schemas to hide empty schemas for the selected database platform.
• Choose Hide empty databases to hide empty databases for the selected database platform.
• For Hide system databases/schemas, choose system databases and schemas by name to
hide them.
Hiding schemas Version 1.0.672 32

AWS Schema Conversion Tool User Guide
• For Hide user-defined databases/schemas, enter the names of user-defined databases and
schemas that you want to hide, and then choose Add. The names are case insensitive.
5. Choose OK.
Viewing the Assessment Report in AWS Schema Conversion
Tool
The database migration assessment report summarizes all of the action items for schemas that
can't be converted automatically to the engine of your target Amazon RDS DB instance. The report
also includes estimates of the amount of effort that it will take to write the equivalent code for
your target DB instance.
You can create a database migration assessment report after you add the source databases and
target platforms to your project and specify mapping rules.
To create and view the database migration assessment report
1. Make sure that you created a mapping rule for the source database schema to create an
assessment report for. For more information, see Mapping new data types in the AWS Schema
Conversion Tool.
2. On the View menu, choose Main view.
3. In the left panel that displays the schema from your source database, choose schema objects
to create an assessment report for.
Make sure that you selected the check boxes for all schema objects to create an assessment
report for.
4. Open the context (right-click) menu for the object, and then choose Create report.
Assessment report Version 1.0.672 33
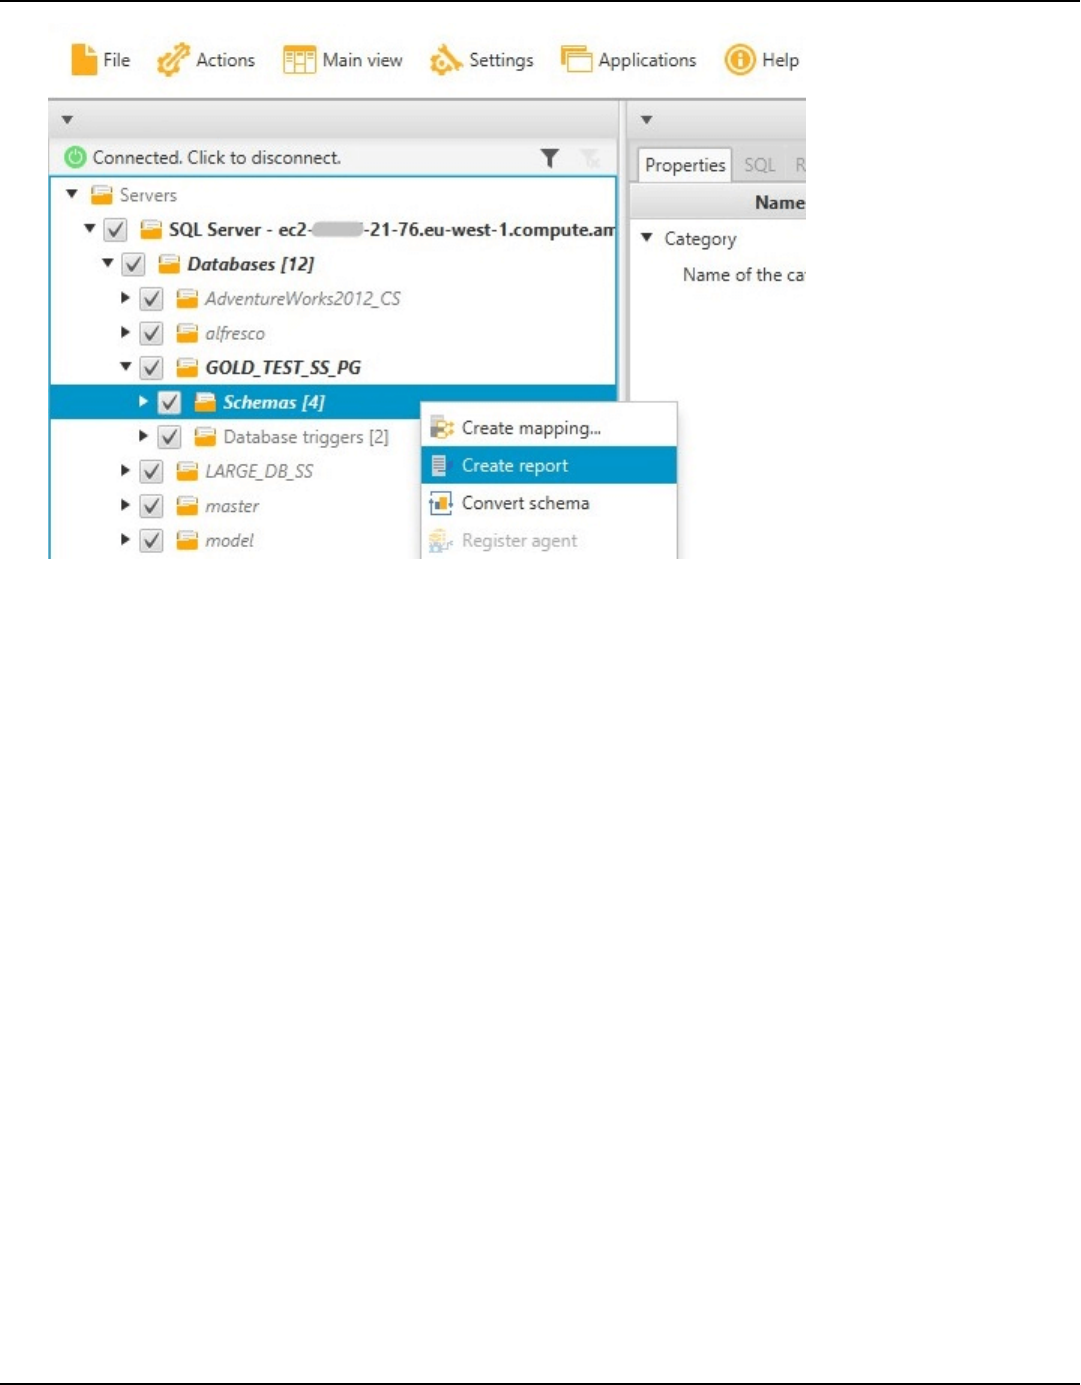
AWS Schema Conversion Tool User Guide
The assessment report view opens.
5. Choose the Action items tab.
The Action items tab displays a list of items that describe the schema that can't be converted
automatically. Choose one of the action items in the list. AWS SCT highlights the item from
your schema that the action item applies to, as shown following.
Assessment report Version 1.0.672 34
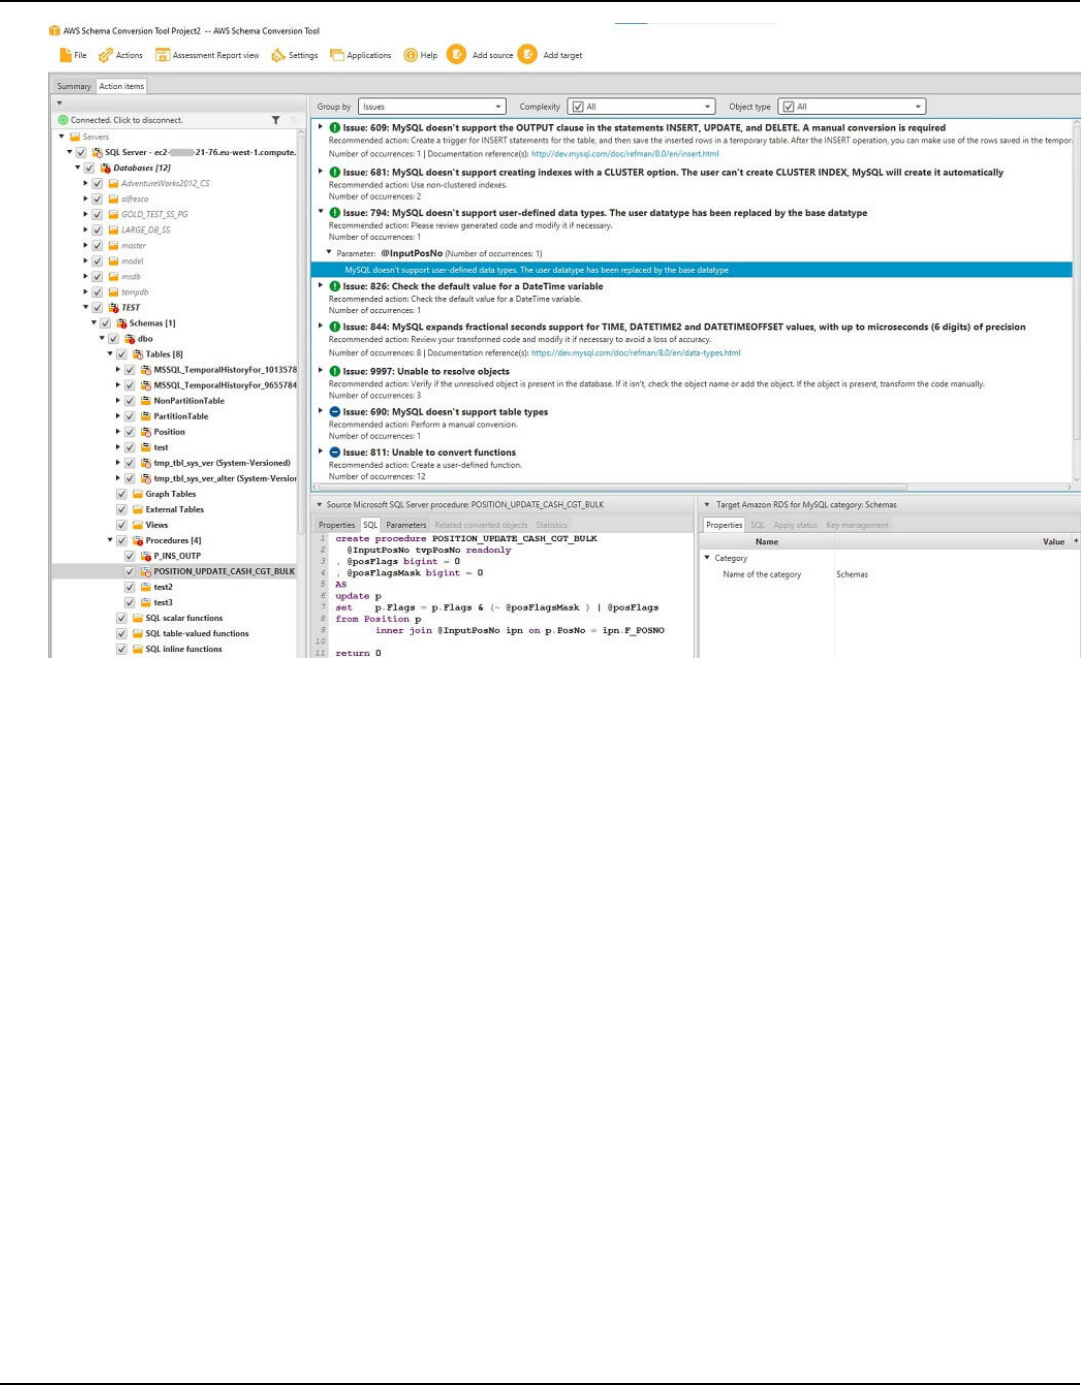
AWS Schema Conversion Tool User Guide
6. Choose the Summary tab.
The Summary tab displays the summary information from the database migration assessment
report. It shows the number of items that were converted automatically, and the number of
items that were not converted automatically. The summary also includes an estimate of the
time that it will take to create schema in your target DB instance that are equivalent to those
in your source database.
The section License Evaluation and Cloud Support contains information about moving your
existing on-premises database schema to an Amazon RDS DB instance running the same
engine. For example, if you want to change license types, this section of the report tells you
which features from your current database to remove.
An example of an assessment report summary is shown following.
Assessment report Version 1.0.672 35
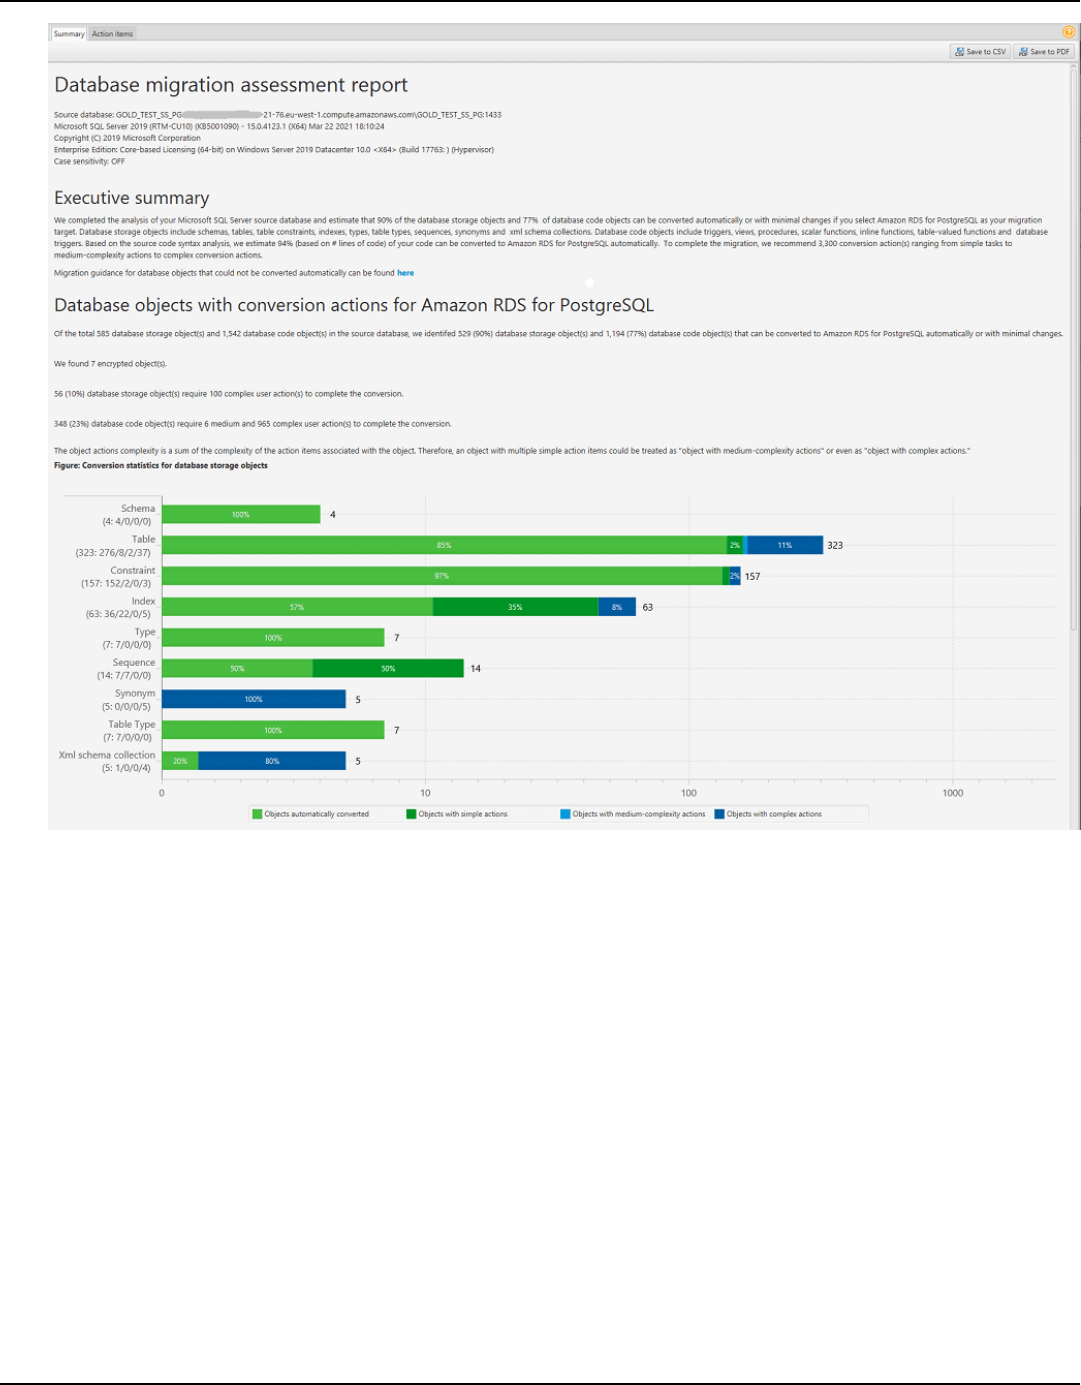
AWS Schema Conversion Tool User Guide
7. Choose the Summary tab, and then choose Save to PDF. The database migration assessment
report is saved as a PDF file. The PDF file contains both the summary and action item
information.
You can also choose Save to CSV to save the report as a CSV file. When you choose this option,
AWS SCT creates three CSV files. These files contain the following information:
• A list of conversion action items with recommended actions.
• A summary of conversion action items with an estimate of the effort required to convert an
occurrence of the action item.
• An executive summary with a number of action items categorized by the estimated time to
convert.
Assessment report Version 1.0.672 36
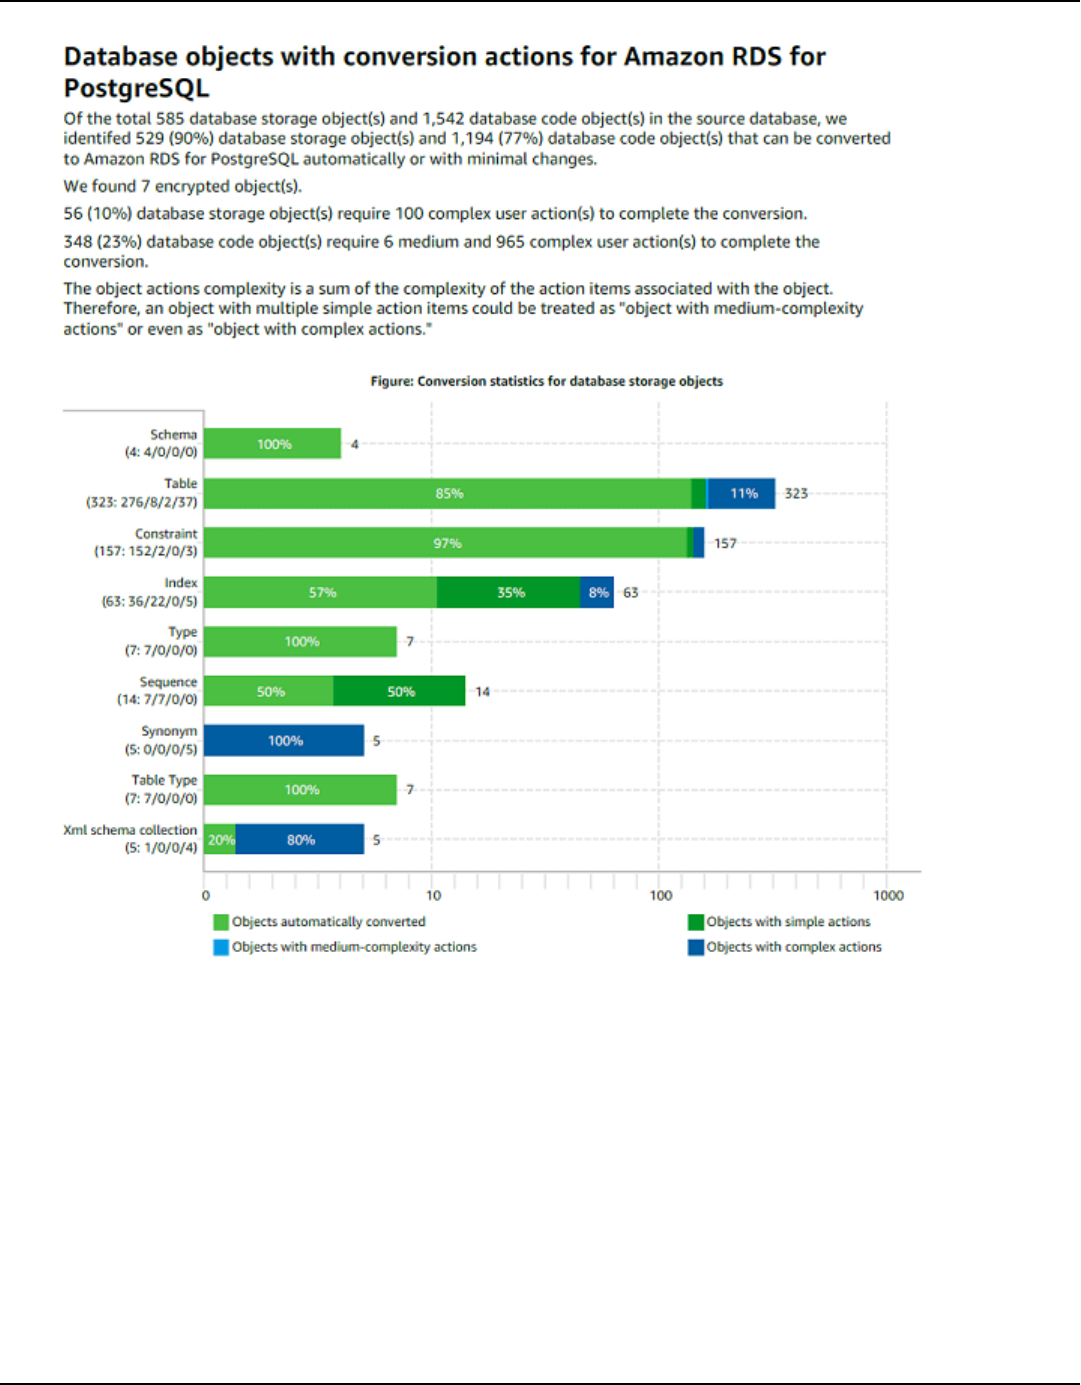
AWS Schema Conversion Tool User Guide
Converting Schemas in AWS Schema Conversion Tool
After you added source and target databases to your project and created mapping rules, you can
convert your source database schemas. Use the following procedure to convert schema.
Converting schemas Version 1.0.672 37
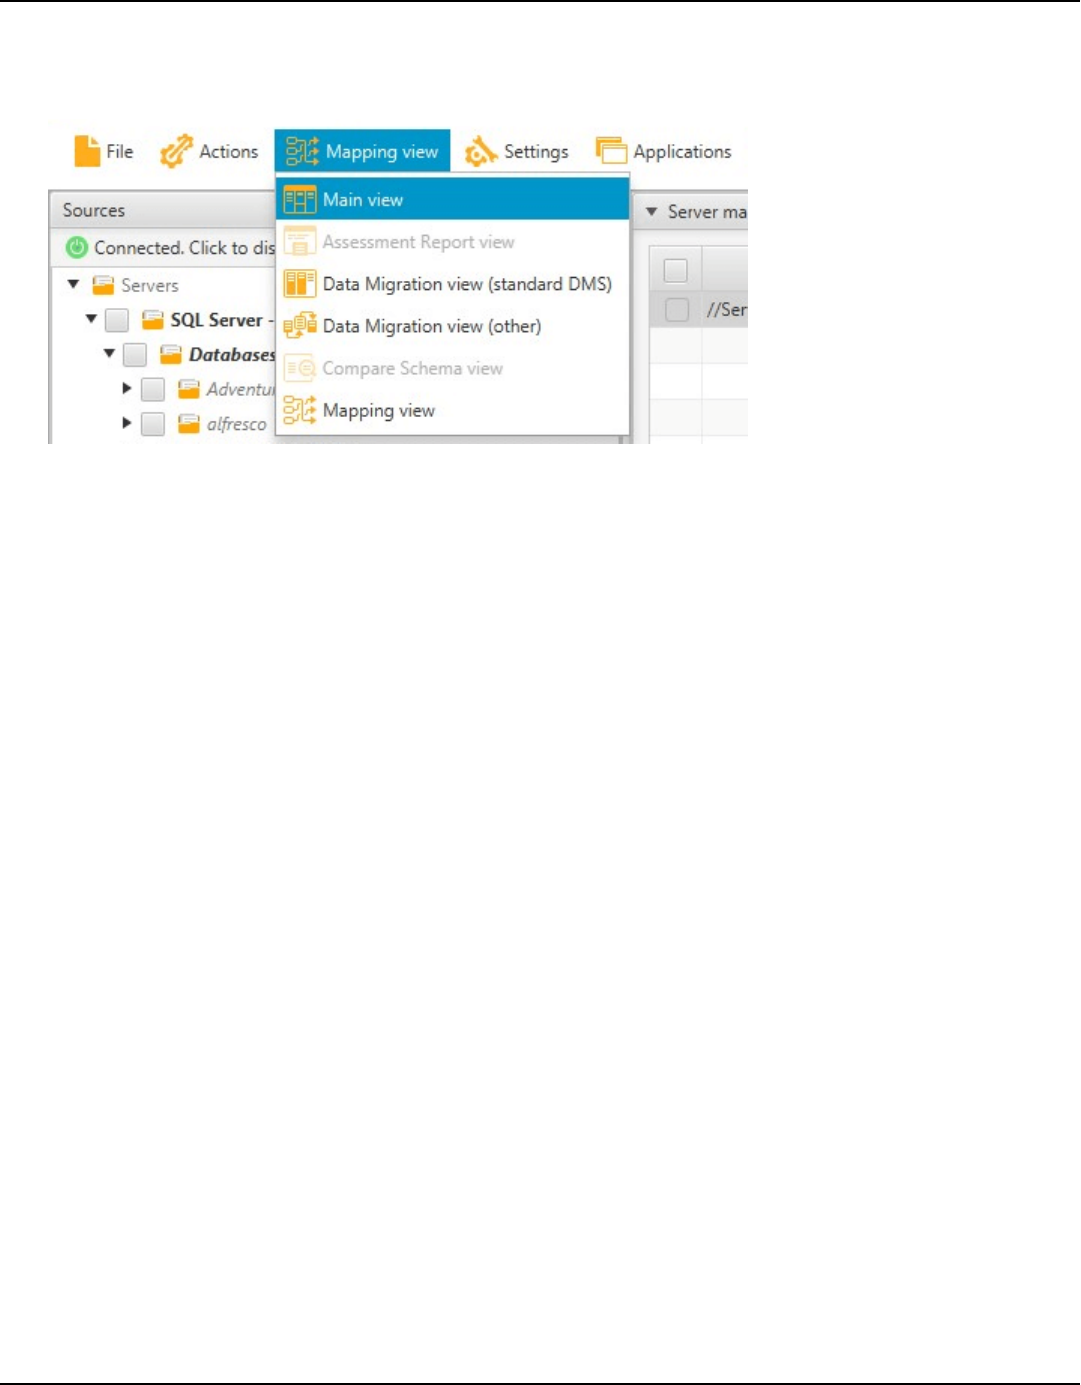
AWS Schema Conversion Tool User Guide
To convert your schema
1. Choose View, and then choose Main view.
2. In the left panel that displays the schema from your source database, select the check box for
the name of the object to convert. Next, choose this object. AWS SCT highlights the object
name in blue. Open the context (right-click) menu for the object, and choose Convert schema.
To convert several database objects, select the check boxes for all objects. Next, choose the
parent node. For example, for tables, the parent node is Tables. Make sure that AWS SCT
highlights the name of the parent node in blue. Open the context (right-click) menu for the
parent node, and choose Convert schema.
Converting schemas Version 1.0.672 38
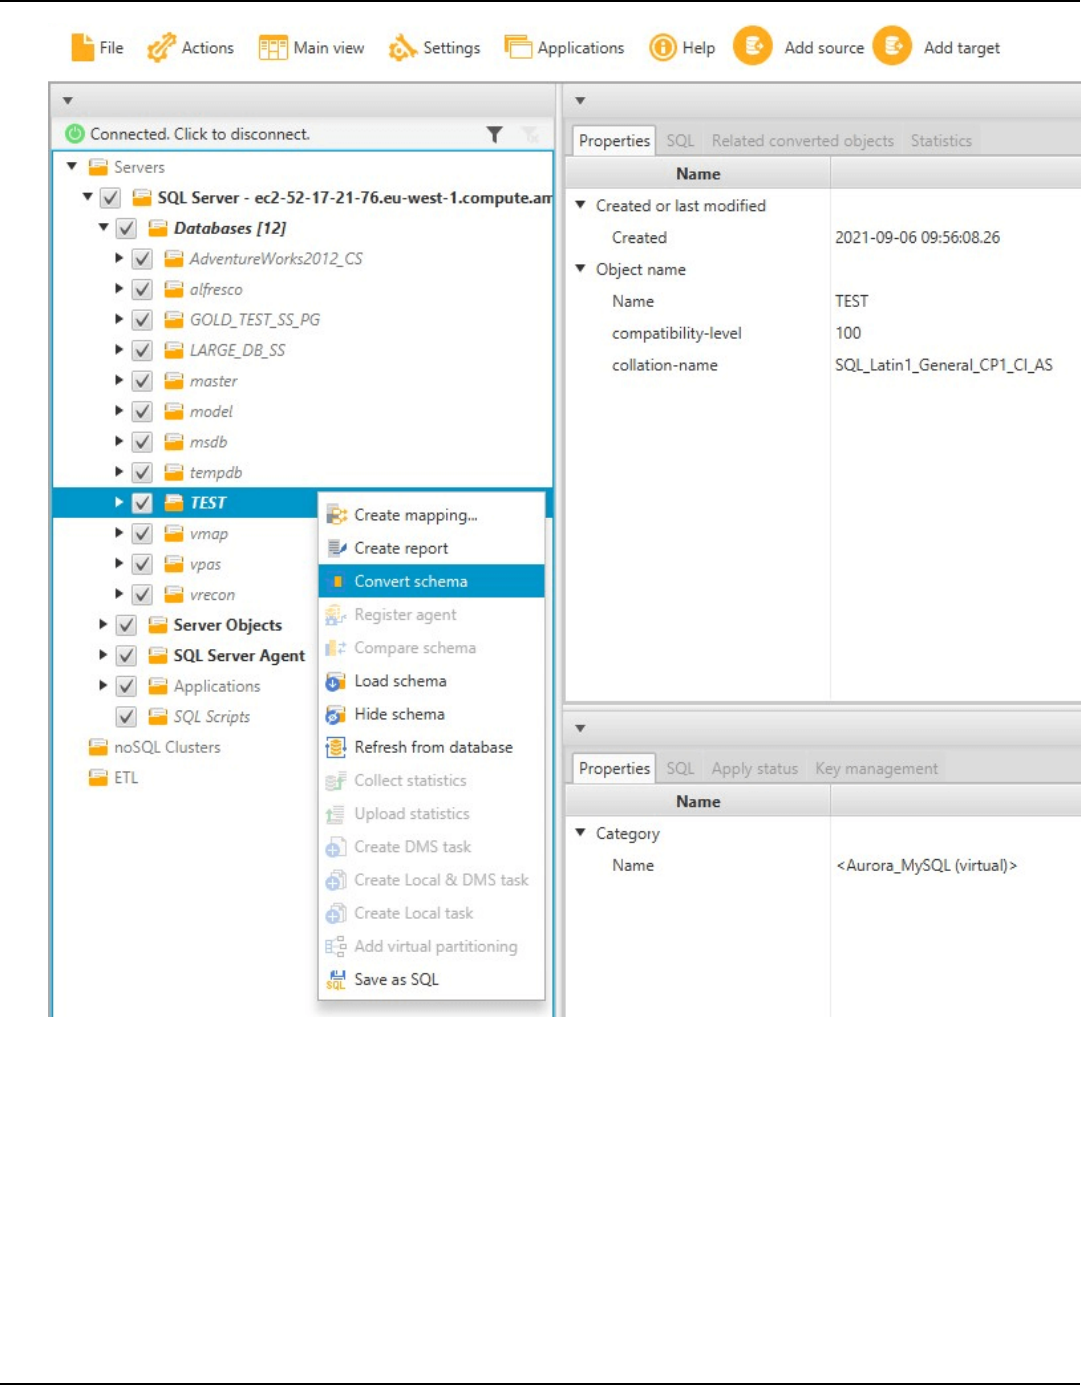
AWS Schema Conversion Tool User Guide
3. When AWS SCT finishes converting the schema, you can view the proposed schema in the
panel on the right of your project.
At this point, no schema is applied to your target database instance. The planned schema is
part of your project. If you choose a converted schema item, you can see the planned schema
command in the panel at lower center for your target database instance.
Converting schemas Version 1.0.672 39
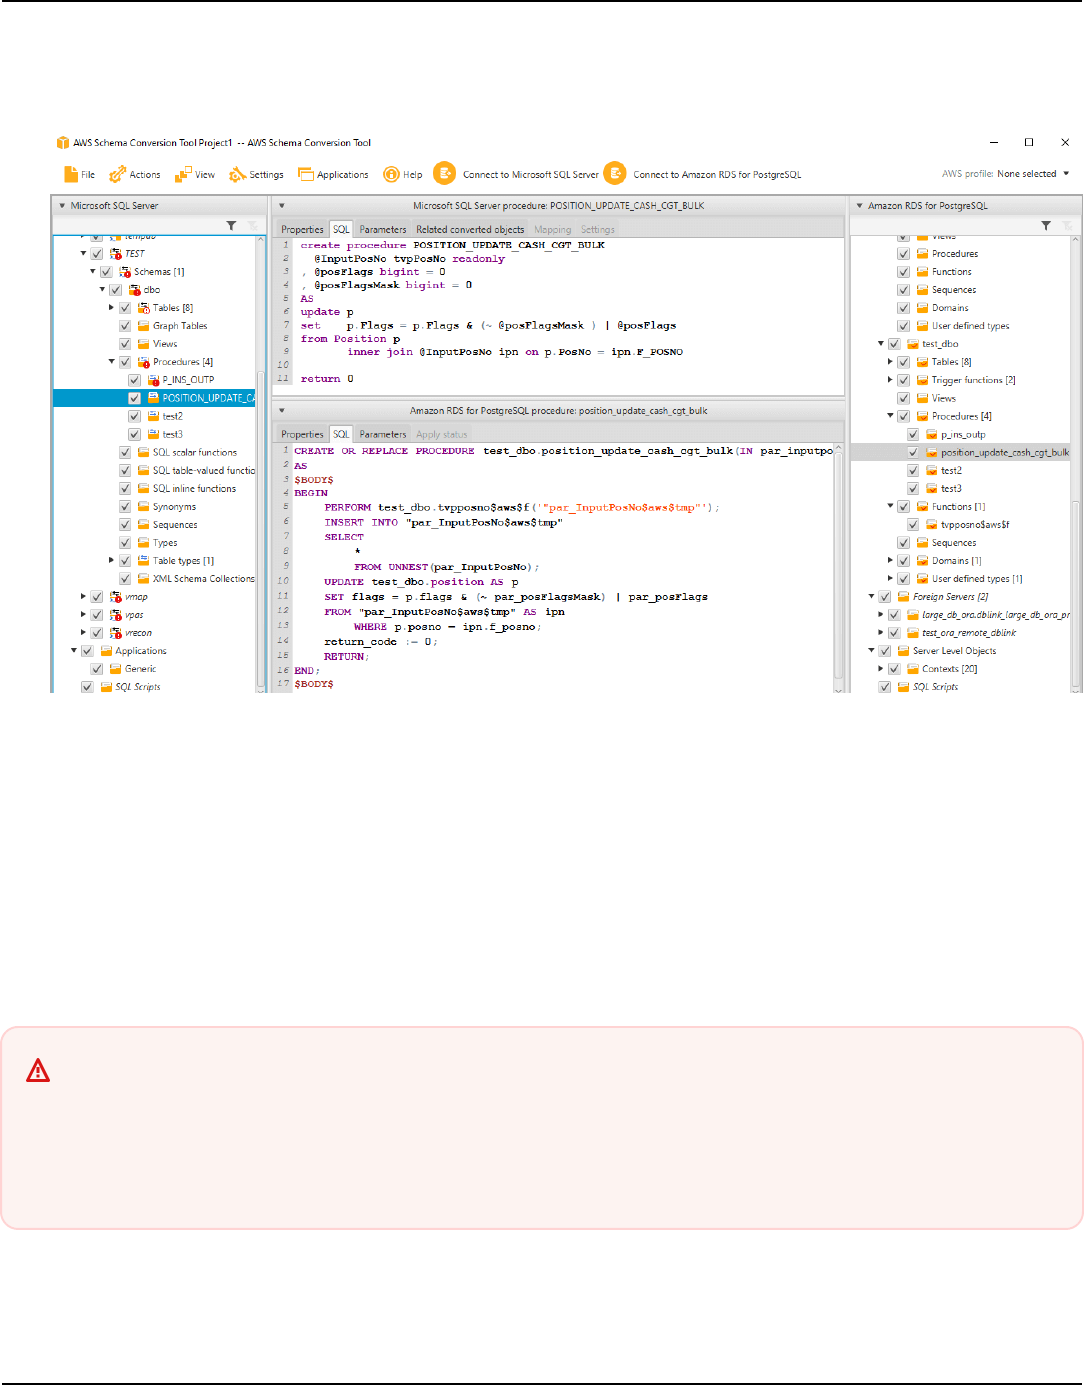
AWS Schema Conversion Tool User Guide
You can edit the schema in this window. The edited schema is stored as part of your project
and is written to the target database instance when you choose to apply your converted
schema.
Applying the converted schemas in AWS Schema Conversion
Tool
You can apply the converted database schema to your target DB instance. After the schema has
been applied to your target DB instance, you can update the schema based on the action items in
the database migration assessment report.
Warning
The following procedure overwrites the existing target schema. Be careful not to overwrite
schemas unintentionally. Be careful not to overwrite schemas in your target DB instance
that you have already modified, or you overwrite those changes.
Applying converted schemas Version 1.0.672 40
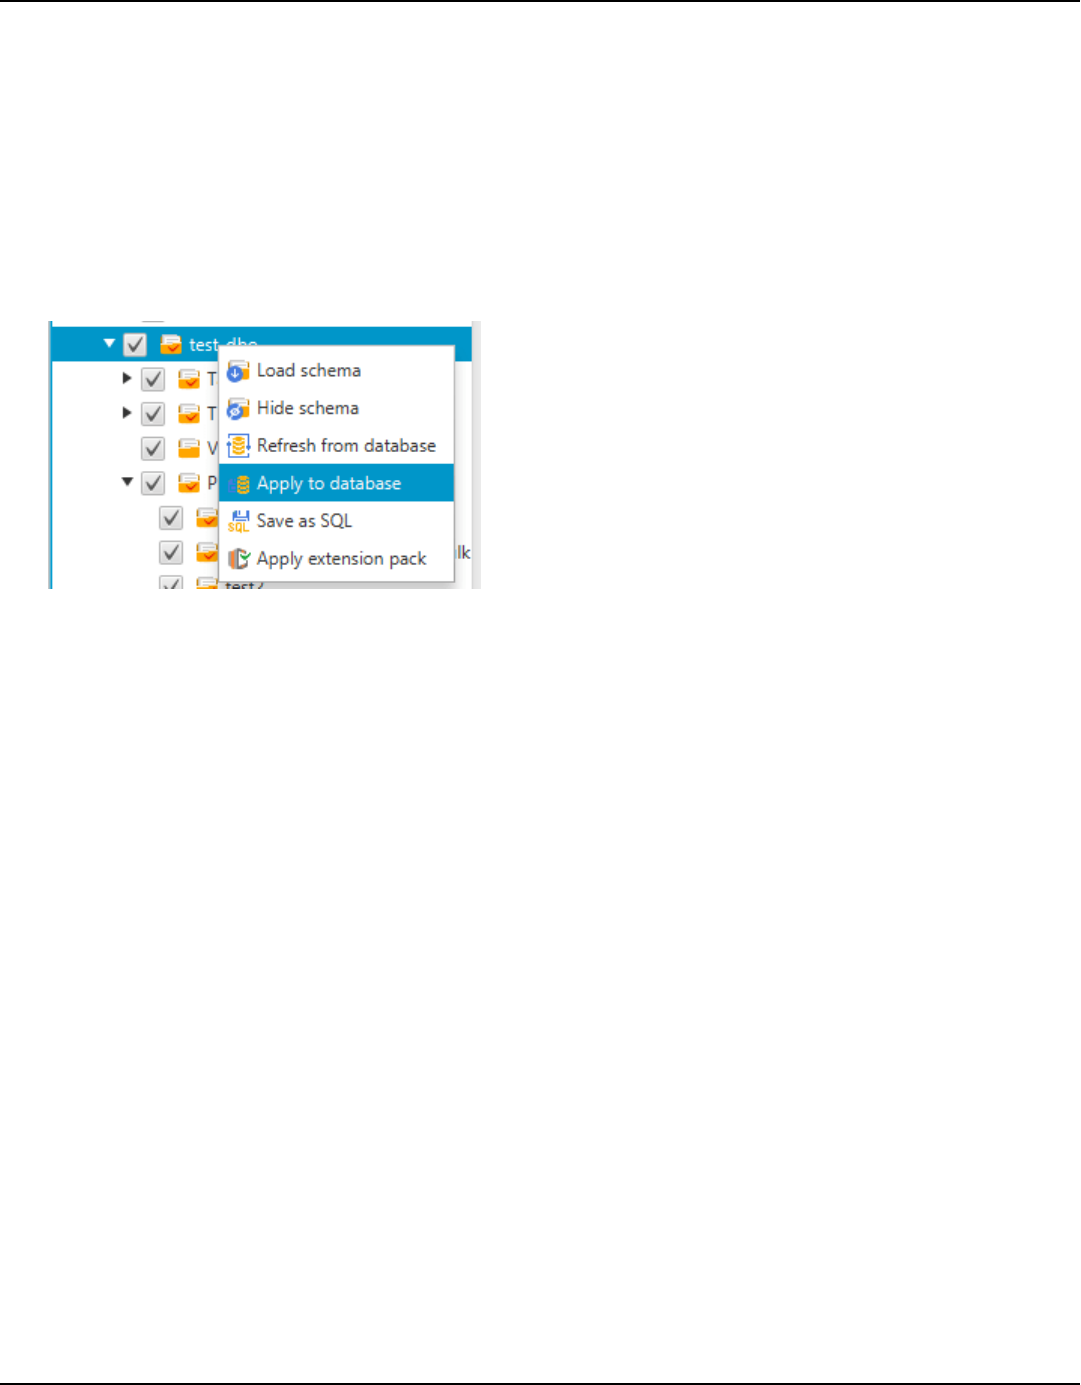
AWS Schema Conversion Tool User Guide
To apply the converted database schema to your target database instance
1. Choose Connect to the server at the top of the right panel of your project to connect to your
target database. If you're connected to your target database, then skip this step.
2. Choose the schema element in the right panel of your project that displays the planned
schema for your target DB instance.
3. Open the context (right-click) menu for the schema element, and then choose Apply to
database.
The converted schema is applied to the target DB instance.
Managing Profiles in the AWS Schema Conversion Tool
You can store your AWS credentials in AWS SCT. AWS SCT uses your credentials when you use
features that integrate with AWS services. For example, AWS SCT integrates with Amazon S3, AWS
Lambda, Amazon Relational Database Service (Amazon RDS), and AWS Database Migration Service
(AWS DMS).
AWS SCT asks you for your AWS credentials when you access a feature that requires them. You can
store your credentials in the global application settings. When AWS SCT asks for your credentials,
you can select the stored credentials.
You can store different sets of AWS credentials in the global application settings. For example, you
can store one set of credentials that you use in test scenarios, and a different set of credentials that
you use in production scenarios. You can also store different credentials for different AWS Regions.
Storing AWS credentials
Use the following procedure to store AWS credentials globally.
Managing profiles Version 1.0.672 41
AWS Schema Conversion Tool User Guide
To store AWS credentials
1. Start the AWS Schema Conversion Tool.
2. Open the Settings menu, and then choose Global settings. The Global settings dialog box
appears.
3. Choose AWS service profiles, and then choose Add a new AWS service profile.
4. Enter your AWS information as follows.
AWS SCT option Action
Profile name Enter a name for your profile.
AWS access key Enter your AWS access key.
AWS secret key Enter your AWS secret access key. For more information about AWS
access keys, see Managing access keys in the IAM User Guide.
Region Choose the AWS Region for your profile.
Amazon S3 bucket
folder
Choose the Amazon S3 bucket for your profile. You need to specify
a bucket only if you are using a feature that connects to Amazon S3.
For more information about the required privileges, see Permissions
for using the AWS service profile.
Choose Use FIPS endpoint for S3 if you need to comply with the security requirements for the
Federal Information Processing Standard (FIPS). FIPS endpoints are available in the following
AWS Regions:
• US East (N. Virginia) Region
• US East (Ohio) Region
• US West (N. California) Region
• US West (Oregon) Region
5. Choose Test connection to verify that your credentials are correct and active.
The Test connection dialog box appears. You can see the status for each of the services
connected to your profile. Pass indicates that the profile can successfully access the service.
Storing AWS credentials Version 1.0.672 42
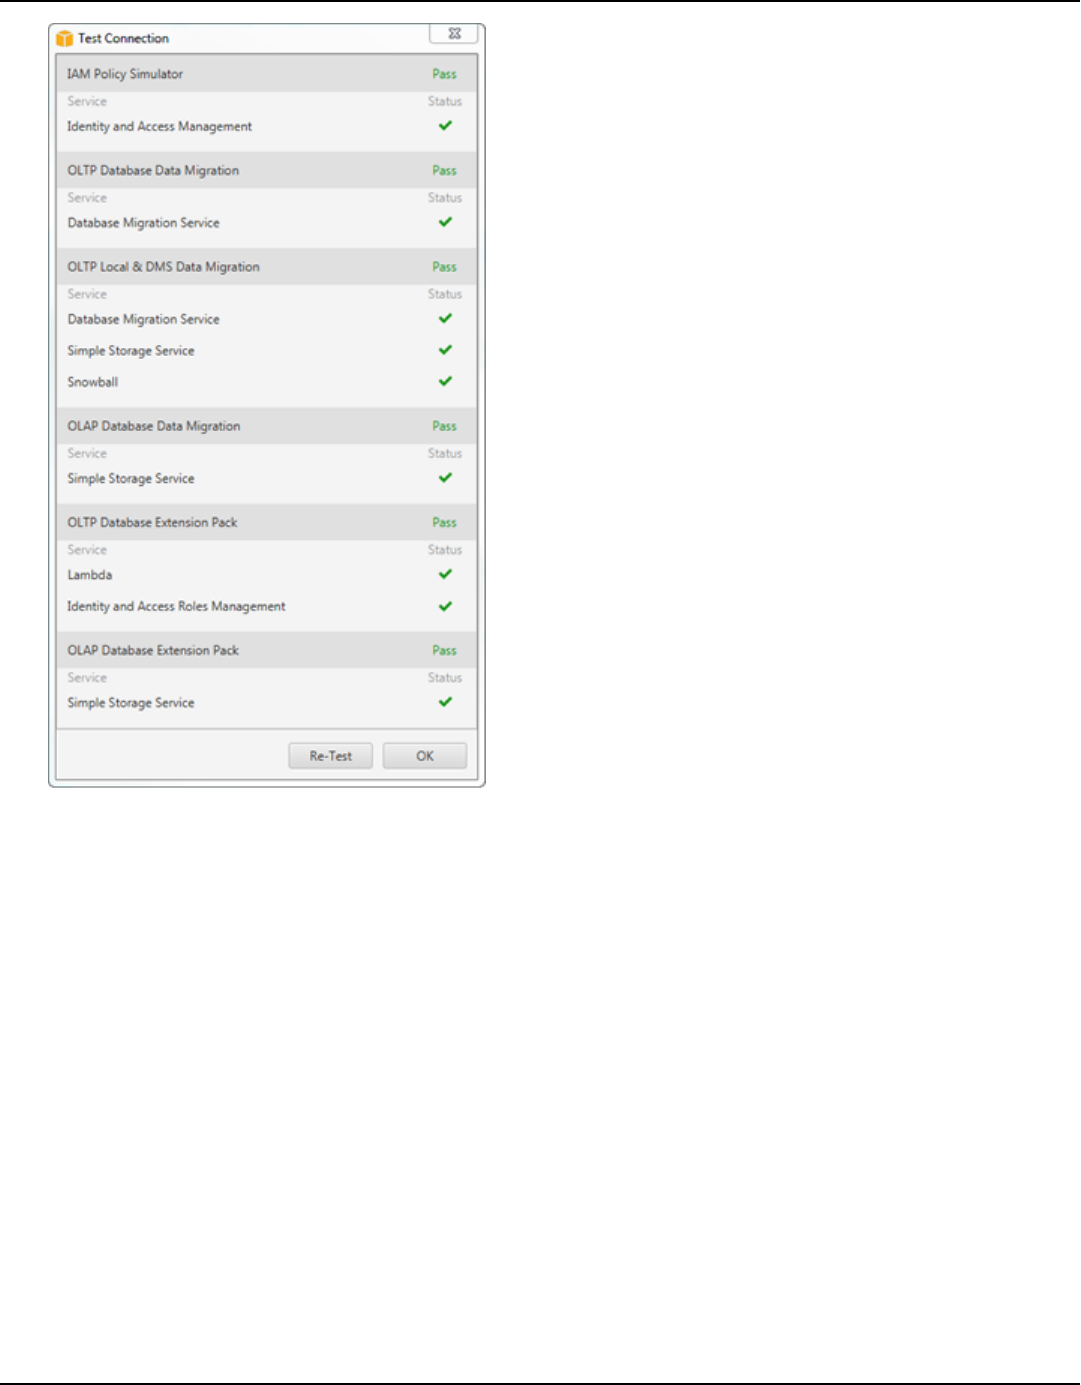
AWS Schema Conversion Tool User Guide
6. After you have configured your profile, choose Save to save your profile or Cancel to cancel
your changes.
7. Choose OK to close the Global settings dialog box.
Setting the default profile for a project
You can set the default profile for an AWS SCT project. Doing this associates the AWS credentials
stored in the profile with the project. With your project open, use the following procedure to set
the default profile.
To set the default profile for a project
1. Start the AWS Schema Conversion Tool and create a new project.
2. On the Settings menu, choose Project settings. The Project settings dialog box appears.
Setting the default profile for a project Version 1.0.672 43

AWS Schema Conversion Tool User Guide
3. Choose the Project environment tab.
4. Choose Add a new AWS service profile to add a new profile. Then for AWS service profile,
choose the profile that you want to associate with the project.
5. Choose OK to close the Project settings dialog box. You can also choose Cancel to cancel your
changes.
Permissions for using the AWS service profile
The following permissions are required for accessing your Amazon S3 bucket from your AWS
service profile:
•
s3:PutObject – to add objects in your Amazon S3 bucket.
•
s3:DeleteObject – to remove the null version of an object and insert a delete marker, which
becomes the current version of the object.
•
s3:ListBucket – to return up to 1,000 objects from your Amazon S3 bucket.
•
s3:GetObject – to retrieve objects from your Amazon S3 bucket.
The following code example shows you how to grant these permissions to your user.
{
"Version": "2012-10-17",
"Statement": [
{
"Effect": "Allow",
"Action": [
"s3:DeleteObject",
"s3:GetObject",
"s3:ListBucket",
"s3:PutObject"
],
"Resource": [
"*"
]
}
]
}
Permissions for using the AWS service profile Version 1.0.672 44

AWS Schema Conversion Tool User Guide
Configuring AWS Secrets Manager in the AWS Schema
Conversion Tool
AWS SCT can use database credentials that you store in AWS Secrets Manager. You can fill in all
values in the database connection dialog box from Secrets Manager. To use Secrets Manager, make
sure that you store AWS profiles in the AWS Schema Conversion Tool.
For more information about using AWS Secrets Manager, see What is AWS Secrets Manager? in the
AWS Secrets Manager User Guide. For more information about storing AWS profiles, see Managing
Profiles in the AWS Schema Conversion Tool.
To retrieve database credentials from Secrets Manager
1. Start the AWS Schema Conversion Tool and create a new project.
2. Choose Add source or Add target to add a new database to your project.
3. Choose a database platform and then choose Next.
4. For AWS Secret, choose the secret you want to use.
5. Choose Populate. Then AWS SCT fills in all values in the database connection dialog box.
6. Choose Test connection to verify that AWS SCT can connect to your database.
7. Choose Connect to connect to your database.
AWS SCT supports secrets that have the following structure.
{
"username": "secret_user",
"password": "secret_password",
"engine": "oracle",
"host": "secret_host.eu-west-1.compute.amazonaws.com",
"port": "1521",
"dbname": "ora_db"
}
In this structure, the username and password values are required, and all other values are
optional. Make sure that the values that you store in Secrets Manager include all database
credentials.
Configuring Secrets Manager Version 1.0.672 45

AWS Schema Conversion Tool User Guide
Storing passwords in the AWS Schema Conversion Tool
You can store a database password or SSL certificate in the AWS SCT cache. To store a password,
choose Store Password when you create a connection.
The password is encrypted using the randomly generated token in the seed.dat file. The
password is then stored with the user name in the cache file. If you lose the seed.dat file or it
becomes corrupted, the database password might be unencrypted incorrectly. In this case, the
connection fails.
Creating UNION ALL view in the AWS Schema Conversion Tool
If a source table is partitioned, AWS SCT creates n target tables, where n is the number of
partitions on the source table. AWS SCT creates a UNION ALL view on top of the target tables to
represent the source table. If you use an AWS SCT data extractor to migrate your data, the source
table partitions will be extracted and loaded in parallel by separate subtasks.
To use Union All view for a project
1. Start AWS SCT. Create a new project or open an existing AWS SCT project.
2. On the Settings menu, choose Conversion settings.
3. Choose a pair of OLAP databases from the list at the top.
4. Turn on Use Union all view?
Storing database passwords Version 1.0.672 46
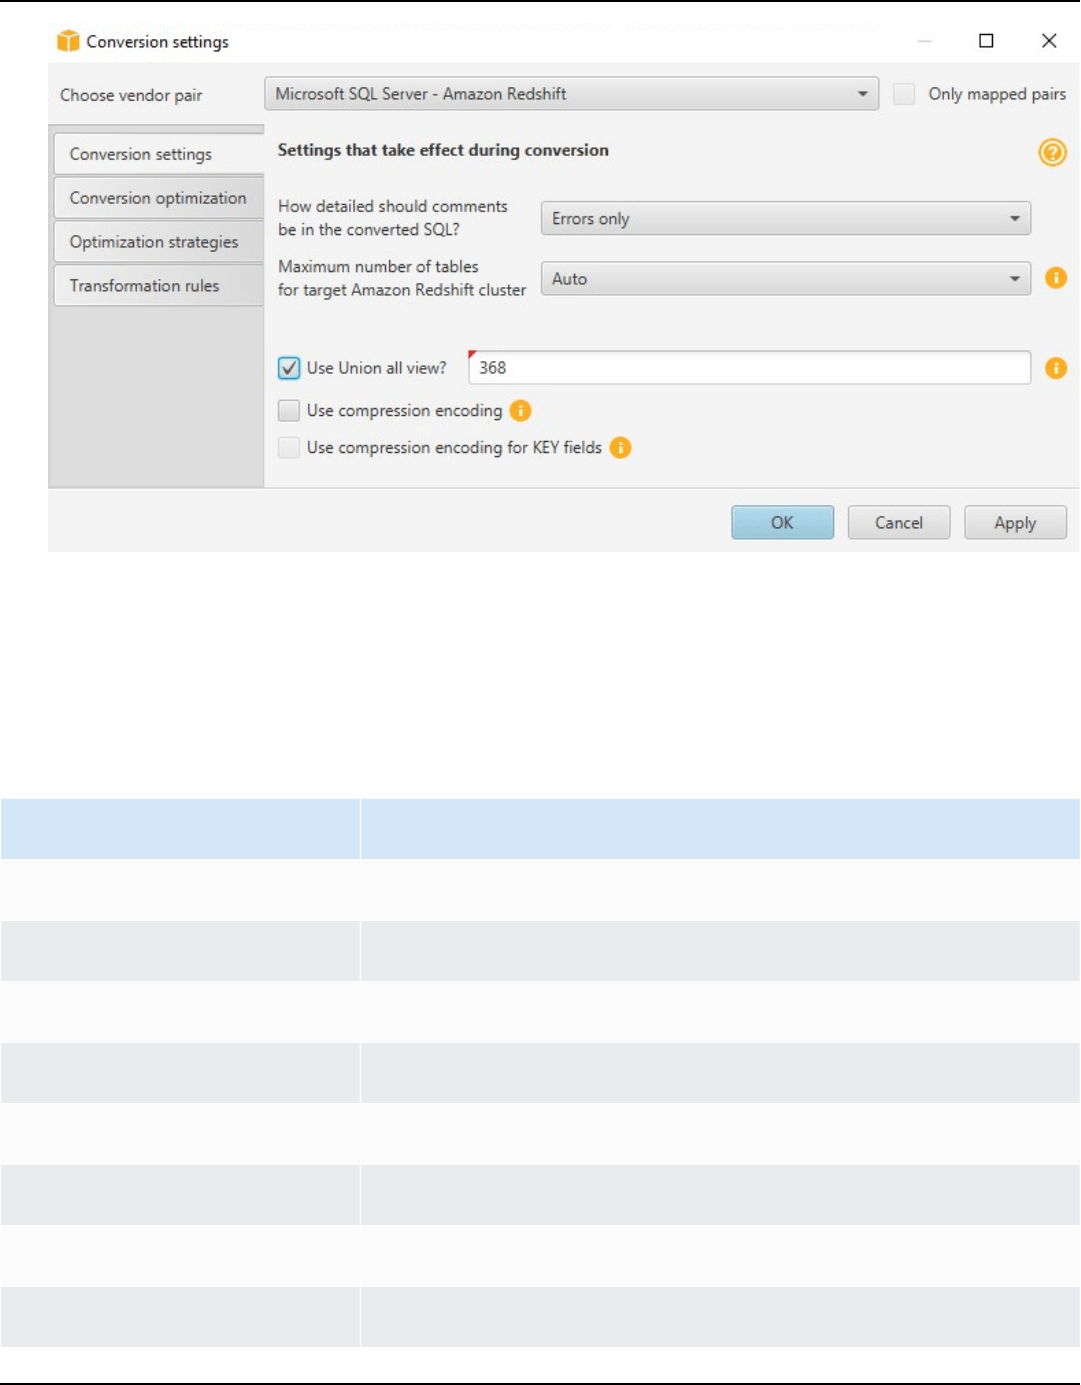
AWS Schema Conversion Tool User Guide
5. Choose OK to save the settings and close the Conversion settings dialog box.
Using Keyboard Shortcuts in the AWS Schema Conversion Tool
The following are the keyboard shortcuts that you can use with AWS SCT.
Keyboard shortcut Description
Ctrl+N Create a new project.
Ctrl+O Open an existing project.
Ctrl+S Save an open project.
Ctrl+W Create a new project by using the wizard.
Ctrl+M Create a new multiserver assessment.
Ctrl+L Add a new source database.
Ctrl+R Add a new target database.
Ctrl+F4 Close an open project.
Keyboard shortcuts Version 1.0.672 47

AWS Schema Conversion Tool User Guide
Keyboard shortcut Description
F1 Open the AWS SCT User Guide.
Keyboard shortcuts Version 1.0.672 48

AWS Schema Conversion Tool User Guide
Getting started with AWS Schema Conversion Tool
You can use the AWS Schema Conversion Tool (AWS SCT) to convert the schema for a source
database. The source database can be a self-managed engine running on-premises or on an
Amazon EC2 instance. You can convert your source schema to a schema for any supported
database that is hosted by AWS. The AWS SCT application provides a project-based user interface.
Almost all work you do with AWS SCT starts with the following steps:
1. Install AWS SCT. For more information, see Installing and Configuring AWS Schema Conversion
Tool.
2. Install an AWS SCT agent, if needed. AWS SCT agents are only required for certain migration
scenarios, such as between heterogeneous sources and targets. For more information, see
Migrating data from on-premises data warehouse to Amazon Redshift with AWS Schema
Conversion Tool.
3. Familiarize yourself with the user interface of AWS SCT. For more information, see Navigating
the user interface of the AWS SCT.
4. Create an AWS SCT project. Connect to your source and target databases. For more information
about connecting to your source database, see Connecting to source databases with the AWS
Schema Conversion Tool.
5. Create mapping rules. For more information about mapping rules, see Mapping data types in the
AWS Schema Conversion Tool.
6. Run and then review the Database Migration Assessment Report. For more information about
the assessment report, see Viewing the Assessment Report in AWS Schema Conversion Tool.
7. Convert the source database schemas. There are several aspects of the conversion you need
to keep in mind, such as what to do with items that don't convert, and how to map items that
should be converted a particular way. For more information about converting a source schema,
see Converting database schemas in AWS Schema Conversion Tool.
If you are converting a data warehouse schema, there are also aspects you need to consider
before doing the conversion. For more information, see Converting data warehouse schemas to
Amazon RDS using AWS SCT.
8. Applying the schema conversion to your target. For more information about applying a source
schema conversion, see Applying converted schemas.
Version 1.0.672 49

AWS Schema Conversion Tool User Guide
9. You can also use AWS SCT to convert SQL stored procedures and other application code. For
more information, see Converting application SQL using AWS SCT
You can also use AWS SCT to migrate your data from a source database to an Amazon-managed
database. For examples, see Migrating data from on-premises data warehouse to Amazon Redshift
with AWS Schema Conversion Tool.
Version 1.0.672 50

AWS Schema Conversion Tool User Guide
Connecting to source databases with the AWS Schema
Conversion Tool
AWS Schema Conversion Tool (AWS SCT) can convert schemas from the following source databases
and data warehouses to a target database or data warehouse. For information about permissions,
connections, and what AWS SCT can convert for use with the target database or data warehouse,
see the details in the following topics.
Encryption information
Connecting to encrypted Amazon RDS and and Aurora
Database sources
• Connecting to Apache Cassandra
• Connecting to Azure SQL
• Connecting to IBM DB2 for z/OS
• IBM Db2 LUW databases
• Using MySQL as a source
• Oracle databases
• PostgreSQL databases
• SAP databases
• SQL Server databases
Data warehouse sources
• Amazon Redshift
• Azure Synapse Analytics as a source
• BigQuery as a source
• Greenplum databases
• Netezza databases
• Oracle data warehouse
Version 1.0.672 51

AWS Schema Conversion Tool User Guide
• Snowflake
• SQL Server Data Warehouses
• Teradata databases
• Vertica databases
Big data sources
• Connecting to Apache Hadoop
• Connecting to Apache Oozie
Connecting to encrypted Amazon Relational Database
Service and Amazon Aurora databases with the AWS Schema
Conversion Tool
To open encrypted connections to Amazon RDS or Amazon Aurora databases from an application,
you need to import AWS root certificates into some form of key storage. You can download the
root certificates from AWS at Using SSL/TLS to encrypt a connection to a DB instance in the
Amazon RDS User Guide.
Two options are available, a root certificate that works for all AWS Regions and a certificate bundle
that contains both the old and new root certificates.
Depending on which you want to use, follow the steps in one of the two following procedures.
To import the certificate or certificates into the Windows system storage
1. Download a certificate or certificates from one of the following sources:
For information about downloading certificates, see Using SSL/TLS to encrypt a connection to
a DB instance in the Amazon RDS User Guide.
2.
In your Windows search window, enter Manage computer certificates. When prompted
as to whether to let the application make changes to your computer, choose Yes.
3. When the certificates window opens, if needed expand Certificates - Local Computer so
you can see the list of certificates. Open the context (right-click) menu for Trusted Root
Certification Authorities, then choose All Tasks, Import.
Connecting to encrypted Amazon RDS and and Aurora Version 1.0.672 52
AWS Schema Conversion Tool User Guide
4.
Choose Next, then Browse, and find the *.pem file that you downloaded in step 1. Choose
Open to select the certificate file, choose Next, and then choose Finish.
Note
To find the file, change the file type in the browse window to All files (*.*), because
.pem is not a standard certificate extension.
5. In the Microsoft Management Console, expand Certificates. Then expand Trusted Root
Certification Authorities, choose Certificates, and find the certificate to confirm that it exists.
The name of the certificate starts with Amazon RDS.
6. Restart your computer.
To import the certificate or certificates into the Java KeyStore
1. Download the certificate or certificates from one of the following sources:
For information about downloading certificates, see Using SSL/TLS to encrypt a connection to
a DB instance in the Amazon RDS User Guide.
2. If you downloaded the certificate bundle, split it into individual certificates files. To do so,
place each certificate block, beginning with -----BEGIN CERTIFICATE----- and ending
with -----END CERTIFICATE----- into a separate *.pem files. After you have created a
separate *.pem file for each certificate, you can safely remove the certificate bundle file.
3. Open a command window or terminal session in the directory where you downloaded the
certificate, and run the following command for every *.pem file that you created in the
previous step.
keytool -importcert -file <filename>.pem -alias <filename>.pem -keystore storename
Example
The following example assumes that you downloaded the eu-west-1-bundle.pem file.
keytool -importcert -file eu-west-1-bundle.pem -alias eu-west-1-bundle.pem -
keystore trust-2019.ks
Picked up JAVA_TOOL_OPTIONS: -Dlog4j2.formatMsgNoLookups=true
Enter keystore password:
Re-enter new password:
Connecting to encrypted Amazon RDS and and Aurora Version 1.0.672 53

AWS Schema Conversion Tool User Guide
Owner: CN=Amazon RDS Root 2019 CA, OU=Amazon RDS, O="Amazon Web Services, Inc.",
ST=Washington, L=Seattle, C=US
Issuer: CN=Amazon RDS Root 2019 CA, OU=Amazon RDS, O="Amazon Web Services, Inc.",
ST=Washington, L=Seattle, C=US
Serial number: c73467369250ae75
Valid from: Thu Aug 22 19:08:50 CEST 2019 until: Thu Aug 22 19:08:50 CEST 2024
Certificate fingerprints:
SHA1: D4:0D:DB:29:E3:75:0D:FF:A6:71:C3:14:0B:BF:5F:47:8D:1C:80:96
SHA256:
F2:54:C7:D5:E9:23:B5:B7:51:0C:D7:9E:F7:77:7C:1C:A7:E6:4A:3C:97:22:E4:0D:64:54:78:FC:70:AA:D0:08
Signature algorithm name: SHA256withRSA
Subject Public Key Algorithm: 2048-bit RSA key
Version: 3
Extensions:
#1: ObjectId: 2.5.29.35 Criticality=false
AuthorityKeyIdentifier [
KeyIdentifier [
0000: 73 5F 60 D8 BC CB 03 98 F4 2B 17 34 2E 36 5A A6 s_`......+.4.6Z.
0010: 60 FF BC 1F `...
]
]
#2: ObjectId: 2.5.29.19 Criticality=true
BasicConstraints:[
CA:true
PathLen:2147483647
]
#3: ObjectId: 2.5.29.15 Criticality=true
KeyUsage [
Key_CertSign
Crl_Sign
]
#4: ObjectId: 2.5.29.14 Criticality=false
SubjectKeyIdentifier [
KeyIdentifier [
0000: 73 5F 60 D8 BC CB 03 98 F4 2B 17 34 2E 36 5A A6 s_`......+.4.6Z.
0010: 60 FF BC 1F `...
]
]
Connecting to encrypted Amazon RDS and and Aurora Version 1.0.672 54

AWS Schema Conversion Tool User Guide
Trust this certificate? [no]: yes
Certificate was added to keystore
4. Add the keystore as a trust store in AWS SCT. To do so, from the main menu choose Settings,
Global settings, Security, Trust store, and then choose Select existing trust store.
After adding the trust store, you can use it to configure an SSL enabled connection when you
create an AWS SCT connection to the database. In the AWS SCT Connect to database dialog,
choose Use SSL and choose the trust store entered previously.
Connecting to Apache Cassandra databases with the AWS
Schema Conversion Tool
You can use AWS SCT to convert keyspaces from Apache Cassandra to Amazon DynamoDB.
Connecting to Apache Cassandra as a source
Use the following procedure to connect to your Apache Cassandra source database with the AWS
Schema Conversion Tool.
To connect to an Apache Cassandra source database
1. In the AWS Schema Conversion Tool, choose Add source.
2. Choose Cassandra, then choose Next.
The Add source dialog box appears.
3. For Connection name, enter a name for your database. AWS SCT displays this name in the tree
in the left panel.
4. Use database credentials from AWS Secrets Manager or enter them manually:
• To use database credentials from Secrets Manager, use the following instructions:
1. For AWS Secret, choose the name of the secret.
2. Choose Populate to automatically fill in all values in the database connection dialog box
from Secrets Manager.
For information about using database credentials from Secrets Manager, see Configuring
AWS Secrets Manager in the AWS Schema Conversion Tool.
Connecting to Apache Cassandra Version 1.0.672 55

AWS Schema Conversion Tool User Guide
• To enter the Apache Cassandra source database connection information manually, use the
following instructions:
Parameter Action
Server name Enter the Domain Name Service (DNS) name or IP address
of your source database server.
Server port Enter the port used to connect to your source database
server.
User name and Password Enter the database credentials to connect to your source
database server.
AWS SCT uses the password to connect to your source
database only when you choose to connect to your
database in a project. To guard against exposing the
password for your source database, AWS SCT doesn't
store the password by default. If you close your AWS SCT
project and reopen it, you are prompted for the password
to connect to your source database as needed.
Use SSL Choose this option if you want to use Secure Sockets Layer
(SSL) to connect to your database. Provide the following
additional information, as applicable, on the SSL tab:
• Trust store: The trust store to use.
• Key store: The key store to use.
Store password AWS SCT creates a secure vault to store SSL certificates
and database passwords. By turning this option on, you
can store the database password and connect quickly to
the database without having to enter the password.
5. Choose Test Connection to verify that AWS SCT can connect to your source database.
6. Choose Connect to connect to your source database.
Connecting to Apache Cassandra as a source Version 1.0.672 56

AWS Schema Conversion Tool User Guide
Connecting to Apache Hadoop databases with the AWS Schema
Conversion Tool
You can use the AWS SCT command line interface (CLI) to migrate from Apache Hadoop to Amazon
EMR. AWS SCT uses your Amazon S3 bucket as a temporary storage for your data during migration.
AWS SCT supports as a source Apache Hadoop version 2.2.0 and higher. Also, AWS SCT supports
Apache Hive version 0.13.0 and higher.
AWS SCT supports as a target Amazon EMR version 6.3.0 and higher. Also, AWS SCT supports as a
target Apache Hadoop version 2.6.0 and higher, and Apache Hive version 0.13.0 and higher.
Topics
• Prerequisites for using Apache Hadoop as a source
• Permissions for using Hive as a source
• Permissions for using HDFS as a source
• Permissions for using HDFS as a target
• Connecting to Apache Hadoop as a source
• Connecting to your source Hive and HDFS services
• Connecting to Amazon EMR as a target
Prerequisites for using Apache Hadoop as a source
The following prerequisites are required to connect to Apache Hadoop with the AWS SCT CLI.
• Create an Amazon S3 bucket to store data during the migration. You can then copy data to
Amazon EMR HDFS or use Amazon S3 as a data repository for your Hadoop workloads. For more
information, see Creating a bucket in the Amazon S3 User Guide.
•
Create an AWS Identity and Access Management (IAM) role with the AmazonS3FullAccess
policy. AWS SCT uses this IAM role to access your Amazon S3 bucket.
• Take a note of your AWS secret key and AWS secret access key. For more information about AWS
access keys, see Managing access keys in the IAM User Guide.
• Create and configure a target Amazon EMR cluster. For more information, see Getting started
with Amazon EMR in the Amazon EMR Management Guide.
Connecting to Apache Hadoop Version 1.0.672 57

AWS Schema Conversion Tool User Guide
•
Install the distcp utility on your source Apache Hadoop cluster. Also, install the s3-dist-cp
utility on your target Amazon EMR cluster. Make sure that your database users have permissions
to run these utilities.
•
Configure the core-site.xml file in your source Hadoop cluster to use the s3a protocol. To do
so, set the fs.s3a.aws.credentials.provider parameter to one of the following values.
•
org.apache.hadoop.fs.s3a.TemporaryAWSCredentialsProvider
•
org.apache.hadoop.fs.s3a.SimpleAWSCredentialsProvider
•
org.apache.hadoop.fs.s3a.AnonymousAWSCredentialsProvider
•
org.apache.hadoop.fs.s3a.auth.AssumedRoleCredentialProvider
You can add the following code example into the core-site.xml file.
<property>
<name>fs.s3a.aws.credentials.provider</name>
<value>org.apache.hadoop.fs.s3a.SimpleAWSCredentialsProvider</value>
</property>
The preceding example shows one of the four options from the preceding list of options. If you
don't set the fs.s3a.aws.credentials.provider parameter in the core-site.xml file,
AWS SCT chooses the provider automatically.
Permissions for using Hive as a source
The permissions required for a Hive source user are as follows:
•
READ access to the source data folders and to the source Amazon S3 bucket
•
READ+WRITE access to the intermediate and target Amazon S3 buckets
To increase the migration speed, we recommend that you run compaction for ACID-transactional
source tabes.
The permissions required for an Amazon EMR Hive target user are as follows:
•
READ access to the target Amazon S3 bucket
•
READ+WRITE access to the intermediate Amazon S3 bucket
•
READ+WRITE access to the target HDFS folders
Permissions for Hive as a source Version 1.0.672 58

AWS Schema Conversion Tool User Guide
Permissions for using HDFS as a source
The permissions required for HDFS as a source are as follows:
•
EXECUTE for the NameNode
•
EXECUTE+READ for all source folders and files that you include in the migration project
•
READ+WRITE for the tmp directory in the NameNode to run Spark jobs and store files before the
migration to Amazon S3
In HDFS, all operations require traversal access. Traversal access demands the EXECUTE permission
on all existing components of the path, except for the final path component. For example, for any
operation accessing /foo/bar/baz, your user must have EXECUTE permission on /, /foo, and /
foo/bar.
The following code example demonstrates how to grant EXECUTE+READ permissions for your
source folders and files, and READ+WRITE permissions for the tmp directory.
hadoop fs –chmod –R 744 /user/hdfs-data
hadoop fs –chmod –R 766 /tmp
Permissions for using HDFS as a target
The permissions required for Amazon EMR HDFS as a target are as follows:
•
EXECUTE for the NameNode of the target Amazon EMR cluster
•
READ+WRITE for the target HDFS folders where you will store data after migration
Connecting to Apache Hadoop as a source
You can use Apache Hadoop as a source in AWS SCT version 1.0.670 or higher. You can migrate
Hadoop clusters to Amazon EMR only in the AWS SCT command line interface (CLI). Before you
start, familiarize yourself with the command line interface of AWS SCT. For more information, see
CLI Reference for AWS Schema Conversion Tool.
Permissions for HDFS as a source Version 1.0.672 59

AWS Schema Conversion Tool User Guide
To connect to Apache Hadoop in the AWS SCT CLI
1. Create a new AWS SCT CLI script or edit an existing scenario template. For example, you can
download and edit the HadoopMigrationTemplate.scts template. For more information,
see Getting CLI scenarios.
2. Configure the AWS SCT application settings such as the driver location and log folder.
Download the required JDBC driver and specify the location where you store the file. For more
information, see Installing JDBC drivers for AWS Schema Conversion Tool.
The following code example shows you how to add the path to the Apache Hive driver. After
you run this code example, AWS SCT stores log files in the c:\sct folder.
SetGlobalSettings
-save: 'true'
-settings: '{
"hive_driver_file": "c:\\sct\\HiveJDBC42.jar",
"log_folder": "c:\\sct",
"console_log_folder": "c:\\sct"
}'
/
You can use this example and the following examples in Windows.
3. Create a new AWS SCT project.
The following code example creates the hadoop_emr project in the c:\sct folder.
CreateProject
-name: 'hadoop_emr'
-directory: 'c:\sct'
/
4. Add your source Hadoop cluster to the project.
Use the AddSourceCluster command to connect to the source Hadoop cluster. Make sure
that you provide values for the following mandatory parameters: name, host, port, and
user. Other parameters are optional.
Connecting to Apache Hadoop as a source Version 1.0.672 60

AWS Schema Conversion Tool User Guide
The following code example adds the source Hadoop cluster. This example sets
HADOOP_SOURCE as a name of the source cluster. Use this object name to add Hive and HDFS
services to the project and create mapping rules.
AddSourceCluster
-name: 'HADOOP_SOURCE'
-vendor: 'HADOOP'
-host: 'hadoop_address'
-port: '22'
-user: 'hadoop_user'
-password: 'hadoop_password'
-useSSL: 'true'
-privateKeyPath: 'c:\path\name.pem'
-passPhrase: 'hadoop_passphrase'
/
In the preceding example, replace hadoop_address with the IP address of your Hadoop
cluster. If needed, configure the value of the port option. Next, replace hadoop_user and
hadoop_password with the name of your Hadoop user and the password for this user. For
path\name, enter the name and path to the PEM file for your source Hadoop cluster.
5. Save your CLI script. Next, add the connection information for your Hive and HDFS services.
Connecting to your source Hive and HDFS services
You can connect to your source Hive and HDFS services with the AWS SCT CLI. To connect to
Apache Hive, use the Hive JDBC driver version 2.3.4 or higher. For more information, see Installing
JDBC drivers for AWS Schema Conversion Tool.
AWS SCT connects to Apache Hive with the hadoop cluster user. To do so, use the
AddSourceClusterHive and AddSourceClusterHDFS commands. You can use one of the
following approaches.
• Create a new SSH tunnel.
For createTunnel, enter true. For host, enter the internal IP address of your source Hive or
HDFS service. For port, enter the service port of your Hive or HDFS service.
Connecting to Hive and HDFS Version 1.0.672 61

AWS Schema Conversion Tool User Guide
Next, enter your Hive or HDFS credentials for user and password. For more information about
SSH tunnels, see Set up an SSH tunnel to the primary node using local port forwarding in the
Amazon EMR Management Guide.
• Use an existing SSH tunnel.
For host, enter localhost. For port, enter the local port from the SSH tunnel parameters.
• Connect to your Hive and HDFS services directly.
For host, enter the IP address or hostname of your source Hive or HDFS service. For port, enter
the service port of your Hive or HDFS service. Next, enter your Hive or HDFS credentials for user
and password.
To connect to Hive and HDFS in the AWS SCT CLI
1. Open your CLI script which includes the connection information for your source Hadoop
cluster. Make sure that you use the name of the Hadoop cluster that you defined in the
previous step.
2. Add your source Hive service to the project.
Use the AddSourceClusterHive command to connect the source Hive service. Make sure
that you provide values for the following mandatory parameters: user, password, cluster,
name, and port. Other parameters are optional.
The following code example creates a tunnel for AWS SCT to work with your Hive service. This
source Hive service runs on the same PC as AWS SCT. This example uses the HADOOP_SOURCE
source cluster from the previous example.
AddSourceClusterHive
-cluster: 'HADOOP_SOURCE'
-name: 'HIVE_SOURCE'
-host: 'localhost'
-port: '10005'
-user: 'hive_user'
-password: 'hive_password'
-createTunnel: 'true'
-localPort: '10005'
-remoteHost: 'hive_remote_address'
-remotePort: 'hive_port'
Connecting to Hive and HDFS Version 1.0.672 62

AWS Schema Conversion Tool User Guide
/
The following code example connects to your Hive service without a tunnel.
AddSourceClusterHive
-cluster: 'HADOOP_SOURCE'
-name: 'HIVE_SOURCE'
-host: 'hive_address'
-port: 'hive_port'
-user: 'hive_user'
-password: 'hive_password'
/
In the preceding examples, replace hive_user and hive_password with the name of your
Hive user and the password for this user.
Next, replace hive_address and hive_port with the NameNode IP address and port of your
source Hadoop cluster.
For hive_remote_address, you might use the default value 127.0.0.1 or the NameNode
IP address of your source Hive service.
3. Add your source HDFS service to the project.
Use the AddSourceClusterHDFS command to connect the source HDFS service. Make sure
that you provide values for the following mandatory parameters: user, password, cluster,
name, and port. Other parameters are optional.
Make sure that your user has the required permissions to migrate data from your source HDFS
service. For more information, see Permissions for using Hive as a source.
The following code example creates a tunnel for AWS SCT to work with your Apache HDFS
service. This example uses the HADOOP_SOURCE source cluster that you created before.
AddSourceClusterHDFS
-cluster: 'HADOOP_SOURCE'
-name: 'HDFS_SOURCE'
-host: 'localhost'
-port: '9005'
-user: 'hdfs_user'
-password: 'hdfs_password'
Connecting to Hive and HDFS Version 1.0.672 63

AWS Schema Conversion Tool User Guide
-createTunnel: 'true'
-localPort: '9005'
-remoteHost: 'hdfs_remote_address'
-remotePort: 'hdfs_port'
/
The following code connects to your Apache HDFS service without a tunnel.
AddSourceClusterHDFS
-cluster: 'HADOOP_SOURCE'
-name: 'HDFS_SOURCE'
-host: 'hdfs_address'
-port: 'hdfs_port'
-user: 'hdfs_user'
-password: 'hdfs_password'
/
In the preceding examples, replace hdfs_user and hdfs_password with the name of your
HDFS user and the password for this user.
Next, replace hdfs_address and hdfs_port with the NameNode IP address and port of your
source Hadoop cluster.
For hdfs_remote_address, you might use the default value 127.0.0.1 or the NameNode
IP address of your source Hive service.
4. Save your CLI script. Next, add the connection information for your target Amazon EMR cluster,
and the migration commands.
Connecting to Amazon EMR as a target
You can connect to your target Amazon EMR cluster with the AWS SCT CLI. To do so, you authorize
inbound traffic and use SSH. In this case, AWS SCT has all required permissions to work with your
Amazon EMR cluster. For more information, see Before you connect and Connect to the primary
node using SSH in the Amazon EMR Management Guide.
AWS SCT connects to Amazon EMR Hive with the hadoop cluster user. To connect to Amazon EMR
Hive, use the Hive JDBC driver version 2.6.2.1002 or higher. For more information, see Installing
JDBC drivers for AWS Schema Conversion Tool.
Connecting to Amazon EMR as a target Version 1.0.672 64

AWS Schema Conversion Tool User Guide
To connect to Amazon EMR in the AWS SCT CLI
1. Open your CLI script which includes the connection information for your source Hadoop
cluster. Add the target Amazon EMR credentials into this file.
2. Add your target Amazon EMR cluster to the project.
The following code example adds the target Amazon EMR cluster. This example sets
HADOOP_TARGET as a name of the target cluster. Use this object name to add your Hive and
HDFS services and an Amazon S3, bucket folder to the project and create mapping rules.
AddTargetCluster
-name: 'HADOOP_TARGET'
-vendor: 'AMAZON_EMR'
-host: 'ec2-44-44-55-66.eu-west-1.EXAMPLE.amazonaws.com'
-port: '22'
-user: 'emr_user'
-password: 'emr_password'
-useSSL: 'true'
-privateKeyPath: 'c:\path\name.pem'
-passPhrase: '1234567890abcdef0!'
-s3Name: 'S3_TARGET'
-accessKey: 'AKIAIOSFODNN7EXAMPLE'
-secretKey: 'wJalrXUtnFEMI/K7MDENG/bPxRfiCYEXAMPLEKEY'
-region: 'eu-west-1'
-s3Path: 'doc-example-bucket/example-folder'
/
In the preceding example, enter your AWS resource names and Amazon EMR connection
information. This includes the IP address of your Amazon EMR cluster, AWS access key, AWS
secret access key, and Amazon S3 bucket. If needed, configure the value of the port variable.
Next, replace emr_user and emr_password with the name of your Amazon EMR user and
the password for this user. For path\name, enter the name and path to the PEM file for your
target Amazon EMR cluster. For more information, see Download PEM File for EMR Cluster
Access.
3. Add your target Amazon S3 bucket to the project.
The following code example adds the target Amazon S3 bucket. This example uses the
HADOOP_TARGET cluster that you created before.
AddTargetClusterS3
Connecting to Amazon EMR as a target Version 1.0.672 65

AWS Schema Conversion Tool User Guide
-cluster: 'HADOOP_TARGET'
-Name: 'S3_TARGET'
-accessKey: 'AKIAIOSFODNN7EXAMPLE'
-secretKey: 'wJalrXUtnFEMI/K7MDENG/bPxRfiCYEXAMPLEKEY'
-region: 'eu-west-1'
-s3Path: 'doc-example-bucket/example-folder'
/
In the preceding example, enter your AWS access key, AWS secret access key, and Amazon S3
bucket.
4. Add your target Hive service to the project.
The following code example creates a tunnel for AWS SCT to work with your target Hive
service. This example uses the HADOOP_TARGET target cluster that you created before.
AddTargetClusterHive
-cluster: 'HADOOP_TARGET'
-name: 'HIVE_TARGET'
-host: 'localhost'
-port: '10006'
-user: 'hive_user'
-password: 'hive_password'
-createTunnel: 'true'
-localPort: '10006'
-remoteHost: 'hive_address'
-remotePort: 'hive_port'
/
In the preceding example, replace hive_user and hive_password with the name of your
Hive user and the password for this user.
Next, replace hive_address with the default value 127.0.0.1 or with the NameNode IP
address of your target Hive service. Next, replace hive_port with the port of your target Hive
service.
5. Add your target HDFS service to the project.
The following code example creates a tunnel for AWS SCT to work with your Apache HDFS
service. This example uses the HADOOP_TARGET target cluster that you created before.
AddTargetClusterHDFS
Connecting to Amazon EMR as a target Version 1.0.672 66

AWS Schema Conversion Tool User Guide
-cluster: 'HADOOP_TARGET'
-name: 'HDFS_TARGET'
-host: 'localhost'
-port: '8025'
-user: 'hdfs_user'
-password: 'hdfs_password'
-createTunnel: 'true'
-localPort: '8025'
-remoteHost: 'hdfs_address'
-remotePort: 'hdfs_port'
/
In the preceding example, replace hdfs_user and hdfs_password with the name of your
HDFS user and the password for this user.
Next, replace hdfs_address and hdfs_port with the private IP address and port of the
NameNode of your target HDFS service.
6. Save your CLI script. Next, add mapping rules and migration commands. For more information,
see Migrating Hadoop workloads.
Connecting to Apache Oozie workflows with the AWS Schema
Conversion Tool
You can use the AWS SCT command line interface (CLI) to convert Apache Oozie workflows to AWS
Step Functions. After you migrate your Apache Hadoop workloads to Amazon EMR, you can use a
native service in the AWS Cloud to orchestrate your jobs. For more information, see Connecting to
Apache Hadoop.
AWS SCT converts your Oozie workflows to AWS Step Functions and uses AWS Lambda to emulate
features that AWS Step Functions doesn't support. Also, AWS SCT converts your Oozie job
properties to AWS Systems Manager.
To convert Apache Oozie workflows, make sure that you use AWS SCT version 1.0.671 or higher.
Also, familiarize yourself with the command line interface of AWS SCT. For more information, see
CLI Reference for AWS Schema Conversion Tool.
Prerequisites for using Apache Oozie as a source
The following prerequisites are required to connect to Apache Oozie with the AWS SCT CLI.
Connecting to Apache Oozie Version 1.0.672 67

AWS Schema Conversion Tool User Guide
• Create an Amazon S3 bucket to store the definitions of state machines. You can use these
definitions to configure your state machines. For more information, see Creating a bucket in the
Amazon S3 User Guide.
•
Create an AWS Identity and Access Management (IAM) role with the AmazonS3FullAccess
policy. AWS SCT uses this IAM role to access your Amazon S3 bucket.
• Take a note of your AWS secret key and AWS secret access key. For more information about AWS
access keys, see Managing access keys in the IAM User Guide.
• Store your AWS credentials and the information about your Amazon S3 bucket in the AWS
service profile in the global application settings. Then, AWS SCT uses this AWS service profile to
work with your AWS resources. For more information, see Managing Profiles in the AWS Schema
Conversion Tool.
To work with your source Apache Oozie workflows, AWS SCT requires the specific structure of
your source files. Each of your application folders must include the job.properties file. This
file includes key-value pairs of your job properties. Also, each of your application folders must
include the workflow.xml file. This file describes the action nodes and control flow nodes of your
workflow.
Connecting to Apache Oozie as a source
Use the following procedure to connect to your Apache Oozie source files.
To connect to Apache Oozie in the AWS SCT CLI
1. Create a new AWS SCT CLI script or edit an existing scenario template. For example, you can
download and edit the OozieConversionTemplate.scts template. For more information,
see Getting CLI scenarios.
2. Configure the AWS SCT application settings.
The following code example saves the application settings and allows to store passwords in
your project. You can use these saved settings in other projects.
SetGlobalSettings
-save: 'true'
-settings: '{
"store_password": "true"
}'
Connecting to Apache Oozie as a source Version 1.0.672 68

AWS Schema Conversion Tool User Guide
/
3. Create a new AWS SCT project.
The following code example creates the oozie project in the c:\sct folder.
CreateProject
-name: 'oozie'
-directory: 'c:\sct'
/
4.
Add the folder with your source Apache Oozie files to the project using the AddSource
command. Make sure that you use the APACHE_OOZIE value for the vendor parameter. Also,
provide values for the following required parameters: name and mappingsFolder.
The following code example adds Apache Oozie as a source in your AWS SCT project. This
example creates a source object with the name OOZIE. Use this object name to add mapping
rules. After you run this code example, AWS SCT uses the c:\oozie folder to load your source
files in the project.
AddSource
-name: 'OOZIE'
-vendor: 'APACHE_OOZIE'
-mappingsFolder: 'c:\oozie'
/
You can use this example and the following examples in Windows.
5.
Connect to your source Apache Oozie files using the ConnectSource command. Use the
name of your source object that you defined in the previous step.
ConnectSource
-name: 'OOZIE'
-mappingsFolder: 'c:\oozie'
/
6. Save your CLI script. Next, add the connection information for your AWS Step Functions
service.
Connecting to Apache Oozie as a source Version 1.0.672 69

AWS Schema Conversion Tool User Guide
Permissions for using AWS Lambda functions in the extension pack
For the source functions that AWS Step Functions doesn't support, AWS SCT creates an extension
pack. This extension pack includes AWS Lambda functions, which emulate your source functions.
To use this extension pack, create an AWS Identity and Access Management (IAM) role with the
following permissions.
{
"Version": "2012-10-17",
"Statement": [
{
"Sid": "lambda",
"Effect": "Allow",
"Action": [
"lambda:InvokeFunction"
],
"Resource": [
"arn:aws:lambda:*:498160209112:function:LoadParameterInitialState:*",
"arn:aws:lambda:*:498160209112:function:EvaluateJSPELExpressions:*"
]
},
{
"Sid": "emr",
"Effect": "Allow",
"Action": [
"elasticmapreduce:DescribeStep",
"elasticmapreduce:AddJobFlowSteps"
],
"Resource": [
"arn:aws:elasticmapreduce:*:498160209112:cluster/*"
]
},
{
"Sid": "s3",
"Effect": "Allow",
"Action": [
"s3:GetObject"
],
"Resource": [
"arn:aws:s3:::*/*"
]
}
Permissions for AWS Lambda Version 1.0.672 70

AWS Schema Conversion Tool User Guide
]
}
To apply the extension pack, AWS SCT requires an IAM role with the following permissions.
{
"Version": "2012-10-17",
"Statement": [
{
"Effect": "Allow",
"Action": [
"iam:GetRole",
"iam:ListRolePolicies",
"iam:CreateRole",
"iam:TagRole",
"iam:PutRolePolicy",
"iam:DeleteRolePolicy",
"iam:DeleteRole",
"iam:PassRole"
],
"Resource": [
"arn:aws:iam::ACCOUNT_NUMBER:role/sct/*"
]
},
{
"Effect": "Allow",
"Action": [
"iam:GetRole",
"iam:ListRolePolicies"
],
"Resource": [
"arn:aws:iam::ACCOUNT_NUMBER:role/
lambda_LoadParameterInitialStateRole",
"arn:aws:iam::ACCOUNT_NUMBER:role/lambda_EvaluateJSPELExpressionsRole",
"arn:aws:iam::ACCOUNT_NUMBER:role/
stepFunctions_MigratedOozieWorkflowRole"
]
},
{
"Effect": "Allow",
"Action": [
"lambda:GetFunction",
"lambda:CreateFunction",
Permissions for AWS Lambda Version 1.0.672 71

AWS Schema Conversion Tool User Guide
"lambda:UpdateFunctionCode",
"lambda:DeleteFunction"
],
"Resource": [
"arn:aws:lambda:*:ACCOUNT_NUMBER:function:LoadParameterInitialState",
"arn:aws:lambda:*:ACCOUNT_NUMBER:function:EvaluateJSPELExpressions"
]
}
]
}
Connecting to AWS Step Functions as a target
Use the following procedure to connect to AWS Step Functions as a target.
To connect to AWS Step Functions in the AWS SCT CLI
1. Open your CLI script which includes the connection information for your Apache Oozie source
files.
2.
Add the information about your migration target in the AWS SCT project using the AddTarget
command. Make sure that you use the STEP_FUNCTIONS value for the vendor parameter.
Also, provide values for the following required parameters: name and profile.
The following code example adds AWS Step Functions as a source in your AWS SCT project.
This example creates a target object with the name AWS_STEP_FUNCTIONS. Use this object
name when you create mapping rules. Also, this example uses an AWS SCT service profile that
you created in the prerequisites step. Make sure that you replace profile_name with the
name of your profile.
AddTarget
-name: 'AWS_STEP_FUNCTIONS'
-vendor: 'STEP_FUNCTIONS'
-profile: 'profile_name'
/
If you don't use the AWS service profile, make sure that you provide values for the following
required parameters: accessKey, secretKey, awsRegion, and s3Path. Use these
parameters to specify your AWS secret access key, AWS secret key, AWS Region, and the path
to your Amazon S3 bucket.
Connecting to AWS Step Functions as a target Version 1.0.672 72
AWS Schema Conversion Tool User Guide
3.
Connect to AWS Step Functions using the ConnectTarget command. Use the name of your
target object that you defined in the previous step.
The following code example connects to the AWS_STEP_FUNCTIONS target object using your
AWS service profile. Make sure that you replace profile_name with the name of your profile.
ConnectTarget
-name: 'AWS_STEP_FUNCTIONS'
-profile: 'profile_name'
/
4. Save your CLI script. Next, add mapping rules and migration commands. For more information,
see Converting Oozie workflows;.
Connecting to Microsoft Azure SQL Databases with the AWS
SCT
You can use AWS SCT to convert schemas, code objects, and application code from Azure SQL
Database to the following targets:
• Amazon RDS for MySQL
• Amazon Aurora MySQL-Compatible Edition
• Amazon RDS for PostgreSQL
• Amazon Aurora PostgreSQL-Compatible Edition
Topics
• Privileges for Azure SQL Database as a source
• Connecting to Azure SQL Database as a source
Privileges for Azure SQL Database as a source
The privileges required for Azure SQL Database as a source are as follows:
• VIEW DEFINITION
• VIEW DATABASE STATE
Connecting to Azure SQL Version 1.0.672 73

AWS Schema Conversion Tool User Guide
Repeat the grant for each database whose schema you are converting.
The privileges required for target MySQL and PostgreSQL databases are described in the following
sections.
• Privileges for MySQL as a target database
• Privileges for PostgreSQL as a target database
Connecting to Azure SQL Database as a source
Use the following procedure to connect to your Azure SQL Database source database with the AWS
Schema Conversion Tool.
To connect to an Azure SQL Database source database
1. In the AWS Schema Conversion Tool, choose Add source.
2. Choose Azure SQL Database, then choose Next.
The Add source dialog box appears.
3. For Connection name, enter a name for your database. AWS SCT displays this name in the tree
in the left panel.
4. Use database credentials from AWS Secrets Manager or enter them manually:
• To use database credentials from Secrets Manager, use the following instructions:
1. For AWS Secret, choose the name of the secret.
2. Choose Populate to automatically fill in all values in the database connection dialog box
from Secrets Manager.
For information about using database credentials from Secrets Manager, see Configuring
AWS Secrets Manager in the AWS Schema Conversion Tool.
• To enter the Azure SQL Database source database connection information manually, use the
following instructions:
Parameter Action
Server name Enter the Domain Name Service (DNS) name or IP address
of your source database server.
Connecting to Azure SQL Database as a source Version 1.0.672 74

AWS Schema Conversion Tool User Guide
Parameter Action
Database Enter the database name to connect to.
User name and Password Enter the database credentials to connect to your source
database server.
AWS SCT uses the password to connect to your source
database only when you choose to connect to your
database in a project. To guard against exposing the
password for your source database, AWS SCT doesn't
store the password by default. If you close your AWS SCT
project and reopen it, you are prompted for the password
to connect to your source database as needed.
Store password AWS SCT creates a secure vault to store SSL certificates
and database passwords. By turning this option on, you
can store the database password and connect quickly to
the database without having to enter the password.
5. Choose Test Connection to verify that AWS SCT can connect to your source database.
6. Choose Connect to connect to your source database.
Connecting to IBM DB2 for z/OS Databases with the AWS
Schema Conversion Tool
You can use AWS SCT to convert schemas, code objects, and application code from IBM Db2 for z/
OS to the following targets.
• Amazon RDS for MySQL
• Amazon Aurora MySQL-Compatible Edition
• Amazon RDS for PostgreSQL
• Amazon Aurora PostgreSQL-Compatible Edition
Connecting to IBM DB2 for z/OS Version 1.0.672 75

AWS Schema Conversion Tool User Guide
Prerequisites for Db2 for z/OS as a source database
The IBM Db2 for z/OS version 12 function level 100 database version doesn't support most new
capabilities of IBM Db2 for z/OS version 12. This database version provides support for fallback
to Db2 version 11 and data sharing with Db2 version 11. To avoid the conversion of unsupported
features of Db2 version 11, we recommend that you use an IBM Db2 for z/OS database function
level 500 or higher as a source for AWS SCT.
You can use the following code example to check the version of your source IBM Db2 for z/OS
database.
SELECT GETVARIABLE('SYSIBM.VERSION') as version FROM SYSIBM.SYSDUMMY1;
Make sure that this code returns version DSN12015 or higher.
You can use the following code example to check the value of the APPLICATION COMPATIBILITY
special register in your source IBM Db2 for z/OS database.
SELECT CURRENT APPLICATION COMPATIBILITY as version FROM SYSIBM.SYSDUMMY1;
Make sure that this code returns version V12R1M500 or higher.
Privileges for Db2 for z/OS as a source database
The privileges needed to connect to a Db2 for z/OS database and read system catalogs and tables
are as follows:
• SELECT ON SYSIBM.LOCATIONS
• SELECT ON SYSIBM.SYSCHECKS
• SELECT ON SYSIBM.SYSCOLUMNS
• SELECT ON SYSIBM.SYSDATABASE
• SELECT ON SYSIBM.SYSDATATYPES
• SELECT ON SYSIBM.SYSDUMMY1
• SELECT ON SYSIBM.SYSFOREIGNKEYS
• SELECT ON SYSIBM.SYSINDEXES
• SELECT ON SYSIBM.SYSKEYCOLUSE
Prerequisites for Db2 for z/OS Version 1.0.672 76

AWS Schema Conversion Tool User Guide
• SELECT ON SYSIBM.SYSKEYS
• SELECT ON SYSIBM.SYSKEYTARGETS
• SELECT ON SYSIBM.SYSJAROBJECTS
• SELECT ON SYSIBM.SYSPACKAGE
• SELECT ON SYSIBM.SYSPARMS
• SELECT ON SYSIBM.SYSRELS
• SELECT ON SYSIBM.SYSROUTINES
• SELECT ON SYSIBM.SYSSEQUENCES
• SELECT ON SYSIBM.SYSSEQUENCESDEP
• SELECT ON SYSIBM.SYSSYNONYMS
• SELECT ON SYSIBM.SYSTABCONST
• SELECT ON SYSIBM.SYSTABLES
• SELECT ON SYSIBM.SYSTABLESPACE
• SELECT ON SYSIBM.SYSTRIGGERS
• SELECT ON SYSIBM.SYSVARIABLES
• SELECT ON SYSIBM.SYSVIEWS
To convert Db2 for z/OS tables to PostgreSQL partitioned tables, gather statistics on tablespaces
and tables in your database using the RUNSTATS utility as shown following.
LISTDEF YOURLIST INCLUDE TABLESPACES DATABASE YOURDB
RUNSTATS TABLESPACE
LIST YOURLIST
TABLE (ALL) INDEX (ALL KEYCARD)
UPDATE ALL
REPORT YES
SHRLEVEL REFERENCE
In the preceding example, replace the YOURDB placeholder with the name of the source database.
Connecting to Db2 for z/OS as a source
Use the following procedure to connect to your Db2 for z/OS source database with AWS SCT.
Connecting to Db2 for z/OS as a source Version 1.0.672 77
AWS Schema Conversion Tool User Guide
To connect to an IBM Db2 for z/OS source database
1. In the AWS Schema Conversion Tool, choose Add source.
2. Choose Db2 for z/OS, then choose Next.
The Add source dialog box appears.
3. For Connection name, enter a name for your database. AWS SCT displays this name in the tree
in the left panel.
4. Use database credentials from AWS Secrets Manager or enter them manually:
• To use database credentials from Secrets Manager, use the following instructions:
1. For AWS Secret, choose the name of the secret.
2. Choose Populate to automatically fill in all values in the database connection dialog box
from Secrets Manager.
For information about using database credentials from Secrets Manager, see Configuring
AWS Secrets Manager in the AWS Schema Conversion Tool.
• To enter the IBM Db2 for z/OS source database connection information manually, use the
following instructions:
Parameter Action
Server name Enter the Domain Name System (DNS) name or IP address
of your source database server.
Server port Enter the port used to connect to your source database
server.
Location Enter the unique name of the Db2 location you want to
access.
User name and Password Enter the database credentials to connect to your source
database server.
AWS SCT uses the password to connect to your source
database only when you choose to connect to your
database in a project. To guard against exposing the
password for your source database, AWS SCT doesn't
Connecting to Db2 for z/OS as a source Version 1.0.672 78

AWS Schema Conversion Tool User Guide
Parameter Action
store the password by default. If you close your AWS SCT
project and reopen it, you are prompted for the password
to connect to your source database as needed.
Use SSL Choose this option if you want to use Secure Sockets Layer
(SSL) to connect to your database. Provide the following
additional information, as applicable, on the SSL tab:
• Trust store: The location of a trust store containing
certificates. For this location to appear here, make sure
to add it in Global settings.
Store password AWS SCT creates a secure vault to store SSL certificates
and database passwords. By turning this option on, you
can store the database password and connect quickly to
the database without having to enter the password.
Db2 for z/OS driver path Enter the path to the driver to use to connect to the
source database. For more information, see Installing JDBC
drivers for AWS Schema Conversion Tool.
If you store the driver path in the global project settings,
the driver path doesn't appear on the connection dialog
box. For more information, see Storing driver paths in the
global settings.
5. Choose Test Connection to verify that AWS SCT can connect to your source database.
6. Choose Connect to connect to your source database.
Privileges for MySQL as a target database
The privileges required for MySQL as a target are as follows:
• CREATE ON *.*
• ALTER ON *.*
• DROP ON *.*
• INDEX ON *.*
Privileges for MySQL as a target Version 1.0.672 79

AWS Schema Conversion Tool User Guide
• REFERENCES ON *.*
• SELECT ON *.*
• CREATE VIEW ON *.*
• SHOW VIEW ON *.*
• TRIGGER ON *.*
• CREATE ROUTINE ON *.*
• ALTER ROUTINE ON *.*
• EXECUTE ON *.*
• SELECT ON mysql.proc
• INSERT, UPDATE ON AWS_DB2ZOS_EXT.*
• INSERT, UPDATE, DELETE ON AWS_DB2ZOS_EXT_DATA.*
• CREATE TEMPORARY TABLES ON AWS_DB2ZOS_EXT_DATA.*
You can use the following code example to create a database user and grant the privileges.
CREATE USER 'user_name' IDENTIFIED BY 'your_password';
GRANT CREATE ON *.* TO 'user_name';
GRANT ALTER ON *.* TO 'user_name';
GRANT DROP ON *.* TO 'user_name';
GRANT INDEX ON *.* TO 'user_name';
GRANT REFERENCES ON *.* TO 'user_name';
GRANT SELECT ON *.* TO 'user_name';
GRANT CREATE VIEW ON *.* TO 'user_name';
GRANT SHOW VIEW ON *.* TO 'user_name';
GRANT TRIGGER ON *.* TO 'user_name';
GRANT CREATE ROUTINE ON *.* TO 'user_name';
GRANT ALTER ROUTINE ON *.* TO 'user_name';
GRANT EXECUTE ON *.* TO 'user_name';
GRANT SELECT ON mysql.proc TO 'user_name';
GRANT INSERT, UPDATE ON AWS_DB2ZOS_EXT.* TO 'user_name';
GRANT INSERT, UPDATE, DELETE ON AWS_DB2ZOS_EXT_DATA.* TO 'user_name';
GRANT CREATE TEMPORARY TABLES ON AWS_DB2ZOS_EXT_DATA.* TO 'user_name';
In the preceding example, replace user_name with the name of your user. Then, replace
your_password with a secure password.
Privileges for MySQL as a target Version 1.0.672 80

AWS Schema Conversion Tool User Guide
To use Amazon RDS for MySQL as a target, set the log_bin_trust_function_creators
parameter to true, and the character_set_server to latin1. To configure these parameters,
create a new DB parameter group or modify an existing DB parameter group.
To use Aurora MySQL as a target, set the log_bin_trust_function_creators parameter to
true, and the character_set_server to latin1. Also, set the lower_case_table_names
parameter to true. To configure these parameters, create a new DB parameter group or modify an
existing DB parameter group.
Privileges for PostgreSQL as a target database
To use PostgreSQL as a target, AWS SCT requires the CREATE ON DATABASE privilege. Make sure
that you grant this privilege for each target PostgreSQL database.
To use Amazon RDS for PostgreSQL as a target, AWS SCT requires the rds_superuser privilege.
To use the converted public synonyms, change the database default search path to "$user",
public_synonyms, public.
You can use the following code example to create a database user and grant the privileges.
CREATE ROLE user_name LOGIN PASSWORD 'your_password';
GRANT CREATE ON DATABASE db_name TO user_name;
GRANT rds_superuser TO user_name;
ALTER DATABASE db_name SET SEARCH_PATH = "$user", public_synonyms, public;
In the preceding example, replace user_name with the name of your user. Then, replace db_name
with the name of your target database. Finally, replace your_password with a secure password.
In PostgreSQL, only the schema owner or a superuser can drop a schema. The owner can drop
a schema and all objects that this schema includes even if the owner of the schema doesn't own
some of its objects.
When you use different users to convert and apply different schemas to your target database, you
can get an error message when AWS SCT can't drop a schema. To avoid this error message, use the
superuser role.
Db2 for z/OS to PostgreSQL conversion settings
To edit Db2 for z/OS to PostgreSQL conversion settings, choose Settings, and then choose
Conversion settings. From the upper list, choose Db2 for z/OS, and then choose Db2 for z/OS –
Privileges for PostgreSQL as a target Version 1.0.672 81

AWS Schema Conversion Tool User Guide
PostgreSQL or Db2 for z/OS – Amazon Aurora (PostgreSQL compatible). AWS SCT displays all
available settings for IBM Db2 for z/OS to PostgreSQL conversion.
Db2 for z/OS to PostgreSQL conversion settings in AWS SCT include options for the following:
• To limit the number of comments with action items in the converted code.
For Add comments in the converted code for the action items of selected severity and higher,
choose the severity of action items. AWS SCT adds comments in the converted code for action
items of the selected severity and higher.
For example, to minimize the number of comments in your converted code, choose Errors only.
To include comments for all action items in your converted code, choose All messages.
• To generate unique names for constraints in the target database.
In PostgreSQL, all constraint names that you use must be unique. AWS SCT can generate unique
names for constraints in the converted code by adding a prefix with the table name to the name
of your constraint. To make sure that AWS SCT generates unique names for your constraints,
select Generate unique names for constraints.
• To keep the formatting of column names, expressions, and clauses in DML statements in the
converted code.
AWS SCT can keep the layout of column names, expressions, and clauses in DML statements in
the similar position and order as in the source code. To do so, select Yes for Keep the formatting
of column names, expressions, and clauses in DML statements.
• To exclude table partitions from the conversion scope.
AWS SCT can skip all partitions of a source table during the conversion. To do so, select Exclude
table partitions from the conversion scope.
• To use automatic partitioning for tables that are partitioned by growth.
For data migration, AWS SCT can automatically partition all tables that are larger than the
specified size. To use this option, select Enforce partition of tables larger than, and enter the
tables size in gigabytes. Next, enter the number of partitions. AWS SCT considers the direct
access storage device (DASD) size of your source database when you turn on this option.
AWS SCT can determine the number of partitions automatically. To do so, select Increase the
number of partitions proportionally, and enter the maximum number of partitions.
• To return dynamic result sets as an array of values of the refcursor data type.
Db2 for z/OS to PostgreSQL conversion settings Version 1.0.672 82

AWS Schema Conversion Tool User Guide
AWS SCT can convert source procedures that return dynamic result sets into procedures which
have an array of open refcursors as an additional output parameter. To do so, select Use an array
of refcursors to return all dynamic result sets.
• To specify the standard to use for the conversion of date and time values to string
representations.
AWS SCT can convert date and time values to string representations using one of the supported
industry formats. To do so, select Use string representations of date values or Use string
representations of time values. Next, choose one of the following standards.
• International Standards Organization (ISO)
• IBM European Standard (EUR)
• IBM USA Standard (USA)
• Japanese Industrial Standard Christian Era (JIS)
ConnConnecting to IBM DB2 for Linux, UNIX, and Windows
Databases with the AWS Schema Conversion Tool
You can use AWS SCT to convert schemas, code objects in the SQL language, and application code
from IBM Db2 for Linux, Unix, and Windows (Db2 LUW) to the following targets.
• Amazon RDS for MySQL
• Amazon Aurora MySQL-Compatible Edition
• Amazon RDS for PostgreSQL
• Amazon Aurora PostgreSQL-Compatible Edition
• Amazon RDS for MariaDB
AWS SCT supports as a source Db2 LUW versions 9.1, 9.5, 9.7, 10.1, 10.5, 11.1, and 11.5.
Privileges for Db2 LUW as a source
The privileges needed to connect to a Db2 LUW database, to check available privileges and read
schema metadata for a source are as follows:
• Privilege needed to establish a connection:
IBM Db2 LUW databases Version 1.0.672 83

AWS Schema Conversion Tool User Guide
• CONNECT ON DATABASE
• Privilege needed to run SQL statements:
• EXECUTE ON PACKAGE NULLID.SYSSH200
• Privileges needed to get instance-level information:
• EXECUTE ON FUNCTION SYSPROC.ENV_GET_INST_INFO
• SELECT ON SYSIBMADM.ENV_INST_INFO
• SELECT ON SYSIBMADM.ENV_SYS_INFO
• Privileges needed to check privileges granted through roles, groups, and authorities:
• EXECUTE ON FUNCTION SYSPROC.AUTH_LIST_AUTHORITIES_FOR_AUTHID
• EXECUTE ON FUNCTION SYSPROC.AUTH_LIST_GROUPS_FOR_AUTHID
• EXECUTE ON FUNCTION SYSPROC.AUTH_LIST_ROLES_FOR_AUTHID
• SELECT ON SYSIBMADM.PRIVILEGES
• Privileges needed on system catalogs and tables:
• SELECT ON SYSCAT.ATTRIBUTES
• SELECT ON SYSCAT.CHECKS
• SELECT ON SYSCAT.COLIDENTATTRIBUTES
• SELECT ON SYSCAT.COLUMNS
• SELECT ON SYSCAT.DATAPARTITIONEXPRESSION
• SELECT ON SYSCAT.DATAPARTITIONS
• SELECT ON SYSCAT.DATATYPEDEP
• SELECT ON SYSCAT.DATATYPES
• SELECT ON SYSCAT.HIERARCHIES
• SELECT ON SYSCAT.INDEXCOLUSE
• SELECT ON SYSCAT.INDEXES
• SELECT ON SYSCAT.INDEXPARTITIONS
• SELECT ON SYSCAT.KEYCOLUSE
• SELECT ON SYSCAT.MODULEOBJECTS
• SELECT ON SYSCAT.MODULES
• SELECT ON SYSCAT.NICKNAMES
• SELECT ON SYSCAT.PERIODS
Privileges for Db2 LUW Version 1.0.672 84

AWS Schema Conversion Tool User Guide
• SELECT ON SYSCAT.REFERENCES
• SELECT ON SYSCAT.ROUTINEPARMS
• SELECT ON SYSCAT.ROUTINES
• SELECT ON SYSCAT.ROWFIELDS
• SELECT ON SYSCAT.SCHEMATA
• SELECT ON SYSCAT.SEQUENCES
• SELECT ON SYSCAT.TABCONST
• SELECT ON SYSCAT.TABLES
• SELECT ON SYSCAT.TRIGGERS
• SELECT ON SYSCAT.VARIABLEDEP
• SELECT ON SYSCAT.VARIABLES
• SELECT ON SYSCAT.VIEWS
• SELECT ON SYSIBM.SYSDUMMY1
• To run SQL statements, the user account needs a privilege to use at least one of the workloads
enabled in the database. If none of the workloads are assigned to the user, ensure that the
default user workload is accessible to the user:
• USAGE ON WORKLOAD SYSDEFAULTUSERWORKLOAD
To run queries, you need to create system temporary tablespaces with page size 8K, 16K, and 32K,
if they don't exist. To create the temporary tablespaces, run the following scripts.
CREATE BUFFERPOOL BP8K
IMMEDIATE
ALL DBPARTITIONNUMS
SIZE AUTOMATIC
NUMBLOCKPAGES 0
PAGESIZE 8K;
CREATE SYSTEM TEMPORARY TABLESPACE TS_SYS_TEMP_8K
PAGESIZE 8192
BUFFERPOOL BP8K;
CREATE BUFFERPOOL BP16K
IMMEDIATE
ALL DBPARTITIONNUMS
SIZE AUTOMATIC
Privileges for Db2 LUW Version 1.0.672 85

AWS Schema Conversion Tool User Guide
NUMBLOCKPAGES 0
PAGESIZE 16K;
CREATE SYSTEM TEMPORARY TABLESPACE TS_SYS_TEMP_BP16K
PAGESIZE 16384
BUFFERPOOL BP16K;
CREATE BUFFERPOOL BP32K
IMMEDIATE
ALL DBPARTITIONNUMS
SIZE AUTOMATIC
NUMBLOCKPAGES 0
PAGESIZE 32K;
CREATE SYSTEM TEMPORARY TABLESPACE TS_SYS_TEMP_BP32K
PAGESIZE 32768
BUFFERPOOL BP32K;
Connecting to Db2 LUW as a source
Use the following procedure to connect to your Db2 LUW source database with the AWS Schema
Conversion Tool.
To connect to a Db2 LUW source database
1. In the AWS Schema Conversion Tool, choose Add source.
2. Choose Db2 LUW, then choose Next.
The Add source dialog box appears.
3. For Connection name, enter a name for your database. AWS SCT displays this name in the tree
in the left panel.
4. Use database credentials from AWS Secrets Manager or enter them manually:
• To use database credentials from Secrets Manager, use the following instructions:
1. For AWS Secret, choose the name of the secret.
2. Choose Populate to automatically fill in all values in the database connection dialog box
from Secrets Manager.
For information about using database credentials from Secrets Manager, see Configuring
AWS Secrets Manager in the AWS Schema Conversion Tool.
Connecting to Db2 LUW as a source Version 1.0.672 86

AWS Schema Conversion Tool User Guide
• To enter the IBM Db2 LUW source database connection information manually, use the
following instructions:
Parameter Action
Server name Enter the Domain Name System (DNS) name or IP address
of your source database server.
Server port Enter the port used to connect to your source database
server.
Database Enter the name of the Db2 LUW database.
User name and Password Enter the database credentials to connect to your source
database server.
AWS SCT uses the password to connect to your source
database only when you choose to connect to your
database in a project. To guard against exposing the
password for your source database, AWS SCT doesn't
store the password by default. If you close your AWS SCT
project and reopen it, you are prompted for the password
to connect to your source database as needed.
Use SSL Choose this option if you want to use Secure Sockets Layer
(SSL) to connect to your database. Provide the following
additional information, as applicable, on the SSL tab:
• Trust store: The location of a trust store containing
certificates. For this location to appear here, make sure
to add it in Global settings.
Store password AWS SCT creates a secure vault to store SSL certificates
and database passwords. By turning this option on, you
can store the database password and connect quickly to
the database without having to enter the password.
Connecting to Db2 LUW as a source Version 1.0.672 87

AWS Schema Conversion Tool User Guide
Parameter Action
Db2 LUW driver path Enter the path to the driver to use to connect to the
source database. For more information, see Installing JDBC
drivers for AWS Schema Conversion Tool.
If you store the driver path in the global project settings,
the driver path doesn't appear on the connection dialog
box. For more information, see Storing driver paths in the
global settings.
5. Choose Test Connection to verify that AWS SCT can connect to your source database.
6. Choose Connect to connect to your source database.
Migrating from IBM DB2 for Linux, UNIX, and Windows to Amazon
Relational Database Service for PostgreSQL or Amazon Aurora
PostgreSQL-Compatible Edition
When you migrate IBM Db2 LUW to PostgreSQL, AWS SCT can convert various trigger statements
used with Db2 LUW. These trigger statements include the following:
• Trigger events – INSERT, DELETE, and UPDATE trigger events specify that the triggered action
runs whenever the event is applied to the subject table or subject view. You can specify any
combination of the INSERT, DELETE, and UPDATE events, but you can specify each event
only once. AWS SCT supports single and multiple trigger events. For events, PostgreSQL has
practically the same functionality.
• Event OF COLUMN – You can specify a column name from a base table. The trigger is activated
only by the update of a column that is identified in the column-name list. PostgreSQL has the
same functionality.
• Statement triggers – These specify that the triggered action is applied only once for the whole
statement. You can’t specify this type of trigger granularity for a BEFORE trigger or an INSTEAD
OF trigger. If specified, an UPDATE or DELETE trigger is activated, even if no rows are affected.
PostgreSQL also has this functionality and trigger declaration for statement triggers is identical
for PostgreSQL and Db2 LUW.
• Referencing clauses – These specify the correlation names for transition variables and the table
names for transition tables. Correlation names identify a specific row in the set of rows affected
Db2 LUW to PostgreSQL Version 1.0.672 88

AWS Schema Conversion Tool User Guide
by the triggering SQL operation. Table names identify the complete set of affected rows. Each
row affected by a triggering SQL operation is available to the triggered action by qualifying
columns with specified correlation-names. PostgreSQL doesn’t support this functionality, and
only uses a NEW or OLD correlation name.
• INSTEAD OF triggers – AWS SCT supports these.
Converting Db2 LUW partitioned tables to PostgreSQL version 10 partitioned
tables
AWS SCT can convert Db2 LUW tables to partitioned tables in PostgreSQL 10. There are several
restrictions when converting a Db2 LUW partitioned table to PostgreSQL:
• You can create a partitioned table with a nullable column in Db2 LUW, and you can specify a
partition to store NULL values. However, PostgreSQL doesn’t support NULL values for RANGE
partitioning.
• Db2 LUW can use an INCLUSIVE or EXCLUSIVE clause to set range boundary values. PostgreSQL
only supports INCLUSIVE for a starting boundary and EXCLUSIVE for an ending boundary. The
converted partition name is in the format <original_table_name>_<original_partition_name>.
• You can create primary or unique keys for partitioned tables in Db2 LUW. PostgreSQL
requires you to create primary or unique key for each partition directly. Primary or unique key
constraints must be removed from the parent table. The converted key name is in the format
<original_key_name>_<original_partition _name>.
• You can create a foreign key constraint from and to a partitioned table in Db2 LUW. However,
PostgreSQL doesn’t support foreign keys references in partitioned tables. PostgreSQL also
doesn’t support foreign key references from a partitioned table to another table.
• You can create an index on a partitioned table in Db2 LUW. However, PostgreSQL requires you to
create an index for each partition directly. Indexes must be removed from the parent table. The
converted index name is in the format <original_index_name>_<original_partition_name>.
• You must define row triggers on individual partitions, not on the partitioned table. Triggers
must be removed from the parent table. The converted trigger name is in the format
<original_trigger_name>_<original_partition_name>.
Db2 LUW to PostgreSQL Version 1.0.672 89

AWS Schema Conversion Tool User Guide
Privileges for PostgreSQL as a target
To use PostgreSQL as a target, AWS SCT requires the CREATE ON DATABASE privilege. Make sure
that you grant this privilege for each target PostgreSQL database.
To use the converted public synonyms, change the database default search path to "$user",
public_synonyms, public.
You can use the following code example to create a database user and grant the privileges.
CREATE ROLE user_name LOGIN PASSWORD 'your_password';
GRANT CREATE ON DATABASE db_name TO user_name;
ALTER DATABASE db_name SET SEARCH_PATH = "$user", public_synonyms, public;
In the preceding example, replace user_name with the name of your user. Then, replace db_name
with the name of your target database. Finally, replace your_password with a secure password.
In PostgreSQL, only the schema owner or a superuser can drop a schema. The owner can drop
a schema and all objects that this schema includes even if the owner of the schema doesn't own
some of its objects.
When you use different users to convert and apply different schemas to your target database, you
can get an error message when AWS SCT can't drop a schema. To avoid this error message, use the
superuser role.
Migrating from IBM DB2 for Linux, UNIX, and Windows to Amazon RDS
for MySQL or Amazon Aurora MySQL
When you convert an IBM Db2 LUW database to RDS for MySQL or Amazon Aurora MySQL, be
aware of the following.
Privileges for MySQL as a target
The privileges required for MySQL as a target are as follows:
• CREATE ON *.*
• ALTER ON *.*
• DROP ON *.*
Db2 LUW to MySQL Version 1.0.672 90

AWS Schema Conversion Tool User Guide
• INDEX ON *.*
• REFERENCES ON *.*
• SELECT ON *.*
• CREATE VIEW ON *.*
• SHOW VIEW ON *.*
• TRIGGER ON *.*
• CREATE ROUTINE ON *.*
• ALTER ROUTINE ON *.*
• EXECUTE ON *.*
• SELECT ON mysql.proc
• INSERT, UPDATE ON AWS_DB2_EXT.*
• INSERT, UPDATE, DELETE ON AWS_DB2_EXT_DATA.*
• CREATE TEMPORARY TABLES ON AWS_DB2_EXT_DATA.*
You can use the following code example to create a database user and grant the privileges.
CREATE USER 'user_name' IDENTIFIED BY 'your_password';
GRANT CREATE ON *.* TO 'user_name';
GRANT ALTER ON *.* TO 'user_name';
GRANT DROP ON *.* TO 'user_name';
GRANT INDEX ON *.* TO 'user_name';
GRANT REFERENCES ON *.* TO 'user_name';
GRANT SELECT ON *.* TO 'user_name';
GRANT CREATE VIEW ON *.* TO 'user_name';
GRANT SHOW VIEW ON *.* TO 'user_name';
GRANT TRIGGER ON *.* TO 'user_name';
GRANT CREATE ROUTINE ON *.* TO 'user_name';
GRANT ALTER ROUTINE ON *.* TO 'user_name';
GRANT EXECUTE ON *.* TO 'user_name';
GRANT SELECT ON mysql.proc TO 'user_name';
GRANT INSERT, UPDATE ON AWS_DB2_EXT.* TO 'user_name';
GRANT INSERT, UPDATE, DELETE ON AWS_DB2_EXT_DATA.* TO 'user_name';
GRANT CREATE TEMPORARY TABLES ON AWS_DB2_EXT_DATA.* TO 'user_name';
In the preceding example, replace user_name with the name of your user. Then, replace
your_password with a secure password.
Db2 LUW to MySQL Version 1.0.672 91

AWS Schema Conversion Tool User Guide
To use Amazon RDS for MySQL or Aurora MySQL as a target, set the lower_case_table_names
parameter to 1. This value means that the MySQL server handles identifiers of such object names
as tables, indexes, triggers, and databases as case insensitive. If you have turned on binary logging
in your target instance, then set the log_bin_trust_function_creators parameter to 1. In
this case, you don't need to use the DETERMINISTIC, READS SQL DATA or NO SQL characteristics
to create stored functions. To configure these parameters, create a new DB parameter group or
modify an existing DB parameter group.
Using MySQL as a source for AWS SCT
You can use AWS SCT to convert schemas, database code objects, and application code from
MySQL to the following targets:
• Amazon RDS for PostgreSQL
• Amazon Aurora PostgreSQL-Compatible Edition
• Amazon RDS for MySQL
For more information, see the following sections:
Topics
• Privileges for MySQL as a source database
• Connecting to MySQL as a source
• Privileges for PostgreSQL as a target database
Privileges for MySQL as a source database
The privileges required for MySQL as a source are as follows:
• SELECT ON *.*
• SHOW VIEW ON *.*
Connecting to MySQL as a source
Use the following procedure to connect to your MySQL source database with the AWS Schema
Conversion Tool.
Using MySQL as a source Version 1.0.672 92

AWS Schema Conversion Tool User Guide
To connect to a MySQL source database
1. In the AWS Schema Conversion Tool, choose Add source.
2. Choose MySQL, then choose Next.
The Add source dialog box appears.
3. For Connection name, enter a name for your database. AWS SCT displays this name in the tree
in the left panel.
4. Use database credentials from AWS Secrets Manager or enter them manually:
• To use database credentials from Secrets Manager, use the following instructions:
1. For AWS Secret, choose the name of the secret.
2. Choose Populate to automatically fill in all values in the database connection dialog box
from Secrets Manager.
For information about using database credentials from Secrets Manager, see Configuring
AWS Secrets Manager in the AWS Schema Conversion Tool.
• To enter the MySQL source database connection information manually, use the following
instructions:
Parameter Action
Server name Enter the Domain Name System (DNS) name or IP address
of your source database server.
You can connect to your source MySQL database using an
IPv6 address protocol. To do so, make sure that you use
square brackets to enter the IP address, as shown in the
following example.
[2001:db8:ffff:ffff:ffff:ffff:ffff:fffe]
Server port Enter the port used to connect to your source database
server.
User name and Password Enter the database credentials to connect to your source
database server.
Connecting to MySQL as a source Version 1.0.672 93

AWS Schema Conversion Tool User Guide
Parameter Action
AWS SCT uses the password to connect to your source
database only when you choose to connect to your
database in a project. To guard against exposing the
password for your source database, AWS SCT doesn't
store the password by default. If you close your AWS SCT
project and reopen it, you are prompted for the password
to connect to your source database as needed.
Use SSL Choose this option to use Secure Sockets Layer (SSL) to
connect to your database. Provide the following additional
information, as applicable, on the SSL tab:
• Require SSL: Choose this option to connect to the server
only through SSL.
If you choose Require SSL, it means that if the server
doesn't support SSL, you can't connect to the server. If
you don't choose Require SSL and the server doesn't
support SSL, you can still connect to the server without
using SSL. For more information, see Configuring
MySQL to Use Secure Connections.
• Verify server certificate: Select this option to verify the
server certificate by using a trust store.
• Trust store: The location of a trust store containing
certificates.
Store password AWS SCT creates a secure vault to store SSL certificates
and database passwords. Enabling this option lets you
store the database password and to connect quickly to the
database without having to enter the password.
Connecting to MySQL as a source Version 1.0.672 94
AWS Schema Conversion Tool User Guide
Parameter Action
MySql driver path Enter the path to the driver to use to connect to the
source database. For more information, see Installing JDBC
drivers for AWS Schema Conversion Tool.
If you store the driver path in the global project settings,
the driver path doesn't appear on the connection dialog
box. For more information, see Storing driver paths in the
global settings.
5. Choose Test Connection to verify that AWS SCT can connect to your source database.
6. Choose Connect to connect to your source database.
Privileges for PostgreSQL as a target database
To use PostgreSQL as a target, AWS SCT requires the CREATE ON DATABASE privilege. Make sure
that you grant this privilege for each target PostgreSQL database.
To use the converted public synonyms, change the database default search path to "$user",
public_synonyms, public.
You can use the following code example to create a database user and grant the privileges.
CREATE ROLE user_name LOGIN PASSWORD 'your_password';
GRANT CREATE ON DATABASE db_name TO user_name;
ALTER DATABASE db_name SET SEARCH_PATH = "$user", public_synonyms, public;
In the preceding example, replace user_name with the name of your user. Then, replace db_name
with the name of your target database. Finally, replace your_password with a secure password.
In PostgreSQL, only the schema owner or a superuser can drop a schema. The owner can drop
a schema and all objects that this schema includes even if the owner of the schema doesn't own
some of its objects.
When you use different users to convert and apply different schemas to your target database, you
can get an error message when AWS SCT can't drop a schema. To avoid this error message, use the
superuser role.
Privileges for PostgreSQL as a target Version 1.0.672 95

AWS Schema Conversion Tool User Guide
Connecting to Oracle Databases with the AWS Schema
Conversion Tool
You can use AWS SCT to convert schemas, database code objects, and application code from Oracle
Database to the following targets:
• Amazon RDS for MySQL
• Amazon Aurora MySQL-Compatible Edition
• Amazon RDS for PostgreSQL
• Amazon Aurora PostgreSQL-Compatible Edition
• Amazon RDS for Oracle
• Amazon RDS for MariaDB
When the source is an Oracle database, comments can be converted to the appropriate format
in, for example, a PostgreSQL database. AWS SCT can convert comments on tables, views, and
columns. Comments can include apostrophes; AWS SCT doubles the apostrophes when converting
SQL statements, just as it does for string literals.
For more information, see the following.
Topics
• Privileges for Oracle as a source
• Connecting to Oracle as a source
• Migrating from Oracle to Amazon RDS for PostgreSQL or Amazon Aurora PostgreSQL with AWS
Schema Conversion Tool
• Migrating from Oracle to Amazon RDS for MySQL or Amazon Aurora MySQL with the AWS
Schema Conversion Tool
• Migrating from Oracle Database to Amazon RDS for Oracle with AWS Schema Conversion Tool
Privileges for Oracle as a source
The privileges required for Oracle as a source are as follows:
• CONNECT
• SELECT_CATALOG_ROLE
Oracle databases Version 1.0.672 96

AWS Schema Conversion Tool User Guide
• SELECT ANY DICTIONARY
• SELECT ON SYS.ARGUMENT$
Connecting to Oracle as a source
Use the following procedure to connect to your Oracle source database with the AWS Schema
Conversion Tool.
To connect to an Oracle source database
1. In the AWS Schema Conversion Tool, choose Add source.
2. Choose Oracle, then choose Next.
The Add source dialog box appears.
3. For Connection name, enter a name for your database. AWS SCT displays this name in the tree
in the left panel.
4. Use database credentials from AWS Secrets Manager or enter them manually:
• To use database credentials from Secrets Manager, use the following instructions:
1. For AWS Secret, choose the name of the secret.
2. Choose Populate to automatically fill in all values in the database connection dialog box
from Secrets Manager.
For information about using database credentials from Secrets Manager, see Configuring
AWS Secrets Manager in the AWS Schema Conversion Tool.
• To enter the Oracle source database connection information manually, use the following
instructions:
Parameter Action
Type Choose the connection type to your database. Depending
on your type, provide the following additional informati
on:
• SID
• Server name: The Domain Name System (DNS) name
or IP address of your source database server.
Connecting to Oracle as a source Version 1.0.672 97
AWS Schema Conversion Tool User Guide
Parameter Action
• Server port: The port used to connect to your source
database server.
• Oracle SID: The Oracle System ID (SID). To find the
Oracle SID, submit the following query to your Oracle
database:
SELECT sys_context('userenv','inst
ance_name') AS SID FROM dual;
• Service name
• Server name: The DNS name or IP address of your
source database server.
You can connect to your source Oracle database using
an IPv6 address protocol. To do so, make sure that you
use square brackets to enter the IP address, as shown
in the following example.
[2001:db8:ffff:ffff:ffff:ffff:ffff:fffe]
• Server port: The port used to connect to your source
database server.
• Service name: The name of the Oracle service to
connect to.
• TNS alias
• TNS file path: The path to the file that contains the
Transparent Network Substrate (TNS) name connectio
n information.
After you choose the TNS file, AWS SCT adds all
Oracle database connections from the file to the TNS
alias list.
Choose this option to connect to Oracle Real Applicati
on Clusters (RAC).
Connecting to Oracle as a source Version 1.0.672 98

AWS Schema Conversion Tool User Guide
Parameter Action
• TNS alias: The TNS alias from this file to use to
connect to the source database.
• TNS connect identifier
• TNS connect identifier: The identifier for the registere
d TNS connection information.
User name and Password Enter the database credentials to connect to your source
database server.
The first time you connect to the Oracle database, you
enter the path to the Oracle Driver file (ojdbc8.jar). You
can download the file at http://www.oracle.com/tec
hnetwork/database/features/jdbc/index-091264.html.
Make sure to register on the free Oracle Technical Network
website to complete the download. AWS SCT uses the
selected driver for any future Oracle database connectio
ns. The driver path can be modified using the Drivers tab
in Global Settings.
AWS SCT uses the password to connect to your source
database only when you choose to connect to your
database in a project. To guard against exposing the
password for your source database, AWS SCT doesn't
store the password by default. If you close your AWS SCT
project and reopen it, you are prompted for the password
to connect to your source database as needed.
Connecting to Oracle as a source Version 1.0.672 99

AWS Schema Conversion Tool User Guide
Parameter Action
Use SSL Choose this option to use Secure Sockets Layer (SSL) to
connect to your database. Provide the following additional
information, as applicable, on the SSL tab:
• SSL authentication: Select this option to use SSL
authentication by certificate Set up your trust store and
key store in Settings, Global settings, Security.
• Trust store: The trust store to use.
• Key store: The key store to use.
Store password AWS SCT creates a secure vault to store SSL certificates
and database passwords. Choose this option to store the
database password and to connect quickly to the database
without having to enter the password.
Oracle driver path Enter the path to the driver to use to connect to the
source database. For more information, see Installing JDBC
drivers for AWS Schema Conversion Tool.
If you store the driver path in the global project settings,
the driver path doesn't appear in the connection dialog
box. For more information, see Storing driver paths in the
global settings.
5. Choose Test Connection to verify that AWS SCT can connect to your source database.
6. Choose Connect to connect to your source database.
Migrating from Oracle to Amazon RDS for PostgreSQL or Amazon
Aurora PostgreSQL with AWS Schema Conversion Tool
When you convert an Oracle database to RDS for PostgreSQL or Amazon Aurora PostgreSQL, be
aware of the following.
Topics
• Privileges for PostgreSQL as a target database
Oracle to PostgreSQL Version 1.0.672 100
AWS Schema Conversion Tool User Guide
• Oracle to PostgreSQL conversion settings
• Converting Oracle sequences
• Converting Oracle ROWID
• Converting Oracle dynamic SQL
• Converting Oracle partitions
When converting Oracle system objects to PostgreSQL, AWS SCT performs conversions as shown in
the following table.
Oracle system
object
Description Converted
PostgreSQL object
V$VERSION Displays version numbers of core library
components in the Oracle Database
aws_oracle_ext.v$v
ersion
V$INSTANCE A view that shows the state of the current
instance.
aws_oracle_ext.v$i
nstance
You can use AWS SCT to convert Oracle SQL*Plus files to psql, which is a terminal-based front-end
to PostgreSQL. For more information, see Converting application SQL using AWS SCT.
Privileges for PostgreSQL as a target database
To use PostgreSQL as a target, AWS SCT requires the CREATE ON DATABASE privilege. Make sure
that you grant this privilege for each target PostgreSQL database.
To use the converted public synonyms, change the database default search path to "$user",
public_synonyms, public.
You can use the following code example to create a database user and grant the privileges.
CREATE ROLE user_name LOGIN PASSWORD 'your_password';
GRANT CREATE ON DATABASE db_name TO user_name;
ALTER DATABASE db_name SET SEARCH_PATH = "$user", public_synonyms, public;
In the preceding example, replace user_name with the name of your user. Then, replace db_name
with the name of your target database. Finally, replace your_password with a secure password.
Oracle to PostgreSQL Version 1.0.672 101

AWS Schema Conversion Tool User Guide
To use Amazon RDS for PostgreSQL as a target, AWS SCT requires the rds_superuser privilege.
In PostgreSQL, only the schema owner or a superuser can drop a schema. The owner can drop
a schema and all objects that this schema includes even if the owner of the schema doesn't own
some of its objects.
When you use different users to convert and apply different schemas to your target database, you
can get an error message when AWS SCT can't drop a schema. To avoid this error message, use the
superuser role.
Oracle to PostgreSQL conversion settings
To edit Oracle to PostgreSQL conversion settings, choose Settings in AWS SCT, and then choose
Conversion settings. From the upper list, choose Oracle, and then choose Oracle – PostgreSQL.
AWS SCT displays all available settings for Oracle to PostgreSQL conversion.
Oracle to PostgreSQL conversion settings in AWS SCT include options for the following:
• To limit the number of comments with action items in the converted code.
For Add comments in the converted code for the action items of selected severity and higher,
choose the severity of action items. AWS SCT adds comments in the converted code for action
items of the selected severity and higher.
For example, to minimize the number of comments in your converted code, choose Errors only.
To include comments for all action items in your converted code, choose All messages.
• To allow AWS SCT to convert Oracle materialized views to tables or materialized views
on PostgreSQL. For Materialized view conversion as, choose how to convert your source
materialized views.
•
To work with your source Oracle code when it includes the TO_CHAR, TO_DATE, and TO_NUMBER
functions with parameters that PostgreSQL doesn't support. By default, AWS SCT emulates the
usage of these parameters in the converted code.
When your source Oracle code includes only parameters that PostgreSQL supports, you can use
native PostgreSQL TO_CHAR, TO_DATE, and TO_NUMBER functions. In this case, the converted
code works faster. To include only these parameters, select the following values:
• Function TO_CHAR() does not use Oracle specific formatting strings
• Function TO_DATE() does not use Oracle specific formatting strings
• Function TO_NUMBER() does not use Oracle specific formatting strings
Oracle to PostgreSQL Version 1.0.672 102

AWS Schema Conversion Tool User Guide
• To address when your source Oracle database stores only integer values in the primary or foreign
key columns of the NUMBER data type, AWS SCT can convert these columns to the BIGINT data
type. This approach improves the performance of your converted code. To take this approach,
select Convert NUMBER primary / foreign key columns to BIGINT ones. Make sure that your
source doesn't include floating point values in these columns to avoid data loss.
• To skip deactivated triggers and constraints in your source code. To do so, choose Ignore
disabled triggers and constraints.
• To use AWS SCT to convert string variables that are called as dynamic SQL. Your database code
can change the values of these string variables. To make sure that AWS SCT always converts
the latest value of this string variable, select Convert the dynamic SQL code that is created in
called routines.
• To address that PostgreSQL version 10 and earlier don't support procedures. If you or your users
aren't familiar with using procedures in PostgreSQL, AWS SCT can convert Oracle procedures to
PostgreSQL functions. To do so, select Convert procedures to functions.
• To see additional information about the occurred action items. To do so, you can add specific
functions to the extension pack by selecting Add on exception raise block for migration issues
with the next severity levels. Then choose severity levels to raise user-defined exceptions.
• To work with a source Oracle database that might include constraints with the automatically
generated names. If your source code uses these names, make sure that you select Convert the
system generated constraint names using the source original names. If your source code uses
these constraints but doesn't use their names, clear this option to increase the conversion speed.
• To address whether your database and applications run in different time zones. By default, AWS
SCT emulates time zones in the converted code. However, you don't need this emulation when
your database and applications use the same time zone. In this case, select Time zone on the
client side matches the time zone on server.
• To address whether your source and target databases run in different time zones. If they do, the
function that emulates the SYSDATE built-in Oracle function returns different values compared
to the source function. To make sure that your source and target functions return the same
values, choose Set default time zone for SYSDATE emulation.
• To use the functions from the orafce extension in your converted code. To do so, for Use orafce
implementation, select the functions to use. For more information about orafce, see orafce on
GitHub.
Oracle to PostgreSQL Version 1.0.672 103

AWS Schema Conversion Tool User Guide
Converting Oracle sequences
AWS SCT converts sequences from Oracle to PostgreSQL. If you use sequences to maintain
integrity constraints, make sure that the new values of a migrated sequence don't overlap the
existing values.
To populate converted sequences with the last value from the source database
1. Open your AWS SCT project with Oracle as the source.
2. Choose Settings, and then choose Conversion settings.
3. From the upper list, choose Oracle, and then choose Oracle – PostgreSQL. AWS SCT displays
all available settings for Oracle to PostgreSQL conversion.
4. Choose Populate converted sequences with the last value generated on the source side.
5. Choose OK to save the settings and close the Conversion settings dialog box.
Converting Oracle ROWID
In an Oracle database, the ROWID pseudocolumn contains the address of the table row. The ROWID
pseudocolumn is unique to Oracle, so AWS SCT converts the ROWID pseudocolumn to a data
column on PostgreSQL. By using this conversion, you can keep the ROWID information.
When converting the ROWID pseudocolumn, AWS SCT can create a data column with the bigint
data type. If no primary key exists, AWS SCT sets the ROWID column as the primary key. If a
primary key exists, AWS SCT sets the ROWID column with a unique constraint.
If your source database code includes operations with ROWID, which you can't run using a numeric
data type, AWS SCT can create a data column with the character varying data type.
To create a data column for Oracle ROWID for a project
1. Open your AWS SCT project with Oracle as the source.
2. Choose Settings, and then choose Conversion settings.
3. From the upper list, choose Oracle, and then choose Oracle – PostgreSQL. AWS SCT displays
all available settings for Oracle to PostgreSQL conversion.
4. For Generate row ID, do one of the following:
• Choose Generate as identity to create a numeric data column.
Oracle to PostgreSQL Version 1.0.672 104
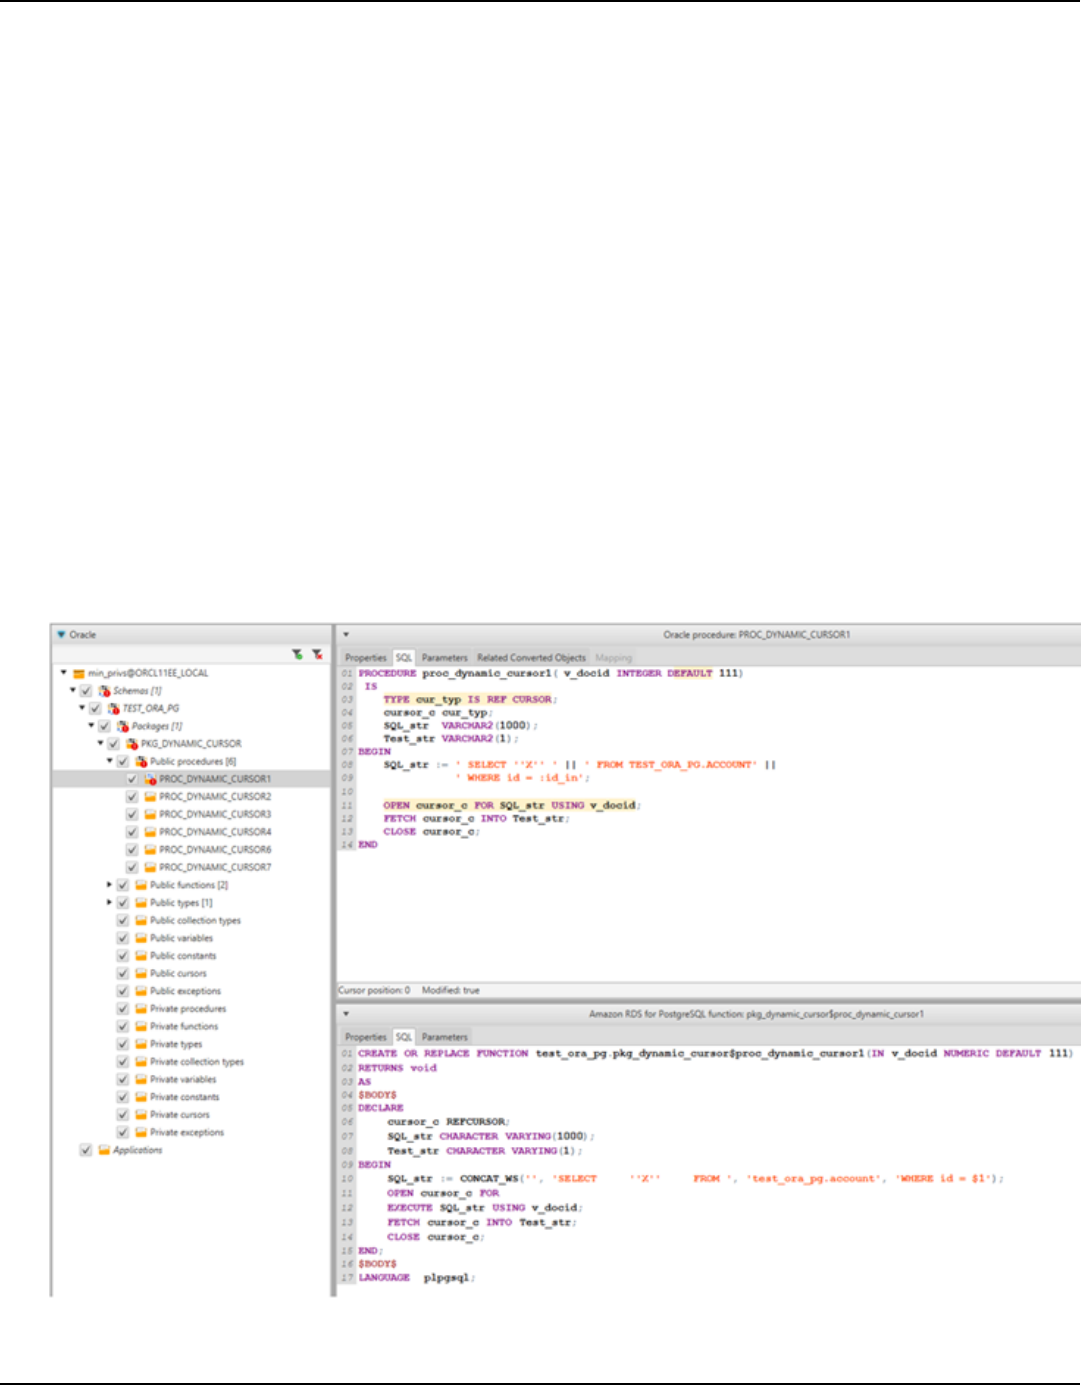
AWS Schema Conversion Tool User Guide
• Choose Generate as character domain type to create a character data column.
5. Choose OK to save the settings and close the Conversion settings dialog box.
Converting Oracle dynamic SQL
Oracle provides two ways to implement dynamic SQL: using an EXECUTE IMMEDIATE statement or
calling procedures in the DBMS_SQL package. If your source Oracle database includes objects with
dynamic SQL, use AWS SCT to convert Oracle dynamic SQL statements to PostgreSQL.
To convert Oracle dynamic SQL to PostgreSQL
1. Open your AWS SCT project with Oracle as the source.
2. Choose a database object that uses dynamic SQL in the Oracle source tree view.
3. Open the context (right-click) menu for the object, choose Convert schema, and agree to
replace the objects if they exist. The following screenshot shows the converted procedure
below the Oracle procedure with dynamic SQL.
Oracle to PostgreSQL Version 1.0.672 105

AWS Schema Conversion Tool User Guide
Converting Oracle partitions
AWS SCT currently supports the following partitioning methods:
• Range
• List
• Multicolumn range
• Hash
• Composite (list-list, range-list, list-range, list-hash, range-hash, hash-hash)
Migrating from Oracle to Amazon RDS for MySQL or Amazon Aurora
MySQL with the AWS Schema Conversion Tool
To emulate Oracle database functions in your converted MySQL code, use the Oracle to MySQL
extension pack in AWS SCT. For more information about extension packs, see Using extension
packs with AWS Schema Conversion Tool.
Topics
• Privileges for MySQL as a target database
• Oracle to MySQL conversion settings
• Migration considerations
• Converting the WITH statement in Oracle to RDS for MySQL or Amazon Aurora MySQL
Privileges for MySQL as a target database
The privileges required for MySQL as a target are as follows:
• CREATE ON *.*
• ALTER ON *.*
• DROP ON *.*
• INDEX ON *.*
• REFERENCES ON *.*
• SELECT ON *.*
Oracle to MySQL Version 1.0.672 106

AWS Schema Conversion Tool User Guide
• CREATE VIEW ON *.*
• SHOW VIEW ON *.*
• TRIGGER ON *.*
• CREATE ROUTINE ON *.*
• ALTER ROUTINE ON *.*
• EXECUTE ON *.*
• CREATE TEMPORARY TABLES ON *.*
• AWS_LAMBDA_ACCESS
• INSERT, UPDATE ON AWS_ORACLE_EXT.*
• INSERT, UPDATE, DELETE ON AWS_ORACLE_EXT_DATA.*
If you use a MySQL database version 5.7 or lower as a target, then grant the INVOKE LAMBDA *.*
permission instead of AWS_LAMBDA_ACCESS. For MySQL databases version 8.0 and higher, grant
the AWS_LAMBDA_ACCESS permission.
You can use the following code example to create a database user and grant the privileges.
CREATE USER 'user_name' IDENTIFIED BY 'your_password';
GRANT CREATE ON *.* TO 'user_name';
GRANT ALTER ON *.* TO 'user_name';
GRANT DROP ON *.* TO 'user_name';
GRANT INDEX ON *.* TO 'user_name';
GRANT REFERENCES ON *.* TO 'user_name';
GRANT SELECT ON *.* TO 'user_name';
GRANT CREATE VIEW ON *.* TO 'user_name';
GRANT SHOW VIEW ON *.* TO 'user_name';
GRANT TRIGGER ON *.* TO 'user_name';
GRANT CREATE ROUTINE ON *.* TO 'user_name';
GRANT ALTER ROUTINE ON *.* TO 'user_name';
GRANT EXECUTE ON *.* TO 'user_name';
GRANT CREATE TEMPORARY TABLES ON *.* TO 'user_name';
GRANT AWS_LAMBDA_ACCESS TO 'user_name';
GRANT INSERT, UPDATE ON AWS_ORACLE_EXT.* TO 'user_name';
GRANT INSERT, UPDATE, DELETE ON AWS_ORACLE_EXT_DATA.* TO 'user_name';
In the preceding example, replace user_name with the name of your user. Then, replace
your_password with a secure password.
Oracle to MySQL Version 1.0.672 107

AWS Schema Conversion Tool User Guide
If you use a MySQL database version 5.7 or lower as a target, then use GRANT INVOKE LAMBDA
ON *.* TO 'user_name' instead of GRANT AWS_LAMBDA_ACCESS TO 'user_name'.
To use Amazon RDS for MySQL or Aurora MySQL as a target, set the lower_case_table_names
parameter to 1. This value means that the MySQL server handles identifiers of such object names
as tables, indexes, triggers, and databases as case insensitive. If you have turned on binary logging
in your target instance, then set the log_bin_trust_function_creators parameter to 1. In
this case, you don't need to use the DETERMINISTIC, READS SQL DATA or NO SQL characteristics
to create stored functions. To configure these parameters, create a new DB parameter group or
modify an existing DB parameter group.
Oracle to MySQL conversion settings
To edit Oracle to MySQL conversion settings, choose Settings in AWS SCT, and then choose
Conversion settings. From the upper list, choose Oracle, and then choose Oracle – MySQL. AWS
SCT displays all available settings for Oracle to MySQL conversion.
Oracle to MySQL conversion settings in AWS SCT include options for the following:
• To limit the number of comments with action items in the converted code.
For Add comments in the converted code for the action items of selected severity and higher,
choose the severity of action items. AWS SCT adds comments in the converted code for action
items of the selected severity and higher.
For example, to minimize the number of comments in your converted code, choose Errors only.
To include comments for all action items in your converted code, choose All messages.
•
To address that your source Oracle database can use the ROWID pseudocolumn but MySQL
doesn't support similar functionality. AWS SCT can emulate the ROWID pseudocolumn in the
converted code. To do so, choose Generate as identity for Generate row ID?.
If your source Oracle code doesn't use the ROWID pseudocolumn, choose Don't generate for
Generate row ID? In this case, the converted code works faster.
•
To work with your source Oracle code when it includes the TO_CHAR, TO_DATE, and TO_NUMBER
functions with parameters that MySQL doesn't support. By default, AWS SCT emulates the usage
of these parameters in the converted code.
Oracle to MySQL Version 1.0.672 108
AWS Schema Conversion Tool User Guide
When your source Oracle code includes only parameters that PostgreSQL supports, you can use
native MySQL TO_CHAR, TO_DATE, and TO_NUMBER functions. In this case, the converted code
works faster. To include only these parameters, select the following values:
• Function TO_CHAR() does not use Oracle specific formatting strings
• Function TO_DATE() does not use Oracle specific formatting strings
• Function TO_NUMBER() does not use Oracle specific formatting strings
• To addess whether your database and applications run in different time zones. By default, AWS
SCT emulates time zones in the converted code. However, you don't need this emulation when
your database and applications use the same time zone. In this case, select Time zone on the
client side matches the time zone on server.
Migration considerations
When you convert Oracle to RDS for MySQL or Aurora MySQL, to change the order that statements
run in, you can use a GOTO statement and a label. Any PL/SQL statements that follow a GOTO
statement are skipped, and processing continues at the label. You can use GOTO statements
and labels anywhere within a procedure, batch, or statement block. You can also next GOTO
statements.
MySQL doesn't use GOTO statements. When AWS SCT converts code that contains a GOTO
statement, it converts the statement to use a BEGIN…END or LOOP…END LOOP statement.
You can find examples of how AWS SCT converts GOTO statements in the table following.
Oracle statement MySQL statement
BEGIN
....
statement1;
....
GOTO label1;
statement2;
....
label1:
Statement3;
....
END
BEGIN
label1:
BEGIN
....
statement1;
....
LEAVE label1;
statement2;
....
END;
Statement3;
Oracle to MySQL Version 1.0.672 109

AWS Schema Conversion Tool User Guide
Oracle statement MySQL statement
....
END
BEGIN
....
statement1;
....
label1:
statement2;
....
GOTO label1;
statement3;
....
statement4;
....
END
BEGIN
....
statement1;
....
label1:
LOOP
statement2;
....
ITERATE label1;
LEAVE label1;
END LOOP;
statement3;
....
statement4;
....
END
BEGIN
....
statement1;
....
label1:
statement2;
....
statement3;
....
statement4;
....
END
BEGIN
....
statement1;
....
label1:
BEGIN
statement2;
....
statement3;
....
statement4;
....
END;
END
Oracle to MySQL Version 1.0.672 110

AWS Schema Conversion Tool User Guide
Converting the WITH statement in Oracle to RDS for MySQL or Amazon Aurora
MySQL
You use the WITH clause (subquery_factoring) in Oracle to assign a name (query_name) to a
subquery block. You can then reference the subquery block multiple places in the query by
specifying query_name. If a subquery block doesn't contain links or parameters (local, procedure,
function, package), then AWS SCT converts the clause to a view or a temporary table.
The advantage of converting the clause to a temporary table is that repeated references to the
subquery might be more efficient. The greater efficiency is because the data is easily retrieved
from the temporary table rather than being required by each reference. You can emulate this by
using additional views or a temporary table. The view name uses the format <procedure_name>
$<subselect_alias>.
You can find examples in the table following.
Oracle statement MySQL statement
CREATE PROCEDURE
TEST_ORA_PG.P_WITH_SELECT_V
ARIABLE_01
(p_state IN NUMBER)
AS
l_dept_id NUMBER := 1;
BEGIN
FOR cur IN
(WITH dept_empl(id, name,
surname,
lastname, state, dept_id)
AS
(
SELECT id, name,
surname,
lastname, state,
dept_id
FROM test_ora_
pg.dept_employees
WHERE state =
p_state AND
dept_id =
l_dept_id)
CREATE PROCEDURE test_ora_pg.P_WITH
_SELECT_VARIABLE_01(IN par_P_STATE
DOUBLE)
BEGIN
DECLARE var_l_dept_id DOUBLE
DEFAULT 1;
DECLARE var$id VARCHAR (8000);
DECLARE var$state VARCHAR (8000);
DECLARE done INT DEFAULT FALSE;
DECLARE cur CURSOR FOR SELECT
ID, STATE
FROM (SELECT
ID, NAME, SURNAME,
LASTNAME, STATE, DEPT_ID
FROM TEST_ORA_PG.DEPT_E
MPLOYEES
WHERE STATE = par_p_sta
te AND DEPT_ID = var_l_dept_id) AS
dept_empl
ORDER BY ID;
DECLARE CONTINUE HANDLER FOR NOT
FOUND
SET done := TRUE;
Oracle to MySQL Version 1.0.672 111

AWS Schema Conversion Tool User Guide
Oracle statement MySQL statement
SELECT id,state
FROM dept_empl
ORDER BY id) LOOP
NULL;
END LOOP;
OPEN cur;
read_label:
LOOP
FETCH cur INTO var$id, var
$state;
IF done THEN
LEAVE read_label;
END IF;
BEGIN
END;
END LOOP;
CLOSE cur;
END;
Oracle to MySQL Version 1.0.672 112

AWS Schema Conversion Tool User Guide
Oracle statement MySQL statement
CREATE PROCEDURE
TEST_ORA_PG.P_WITH_SELECT_R
EGULAR_MULT_01
AS
BEGIN
FOR cur IN (
WITH dept_empl AS
(
SELECT id,
name, surname,
lastname,
state, dept_id
FROM
test_ora_pg.dept_employees
WHERE state =
1),
dept AS
(SELECT id deptid,
parent_id,
name deptname
FROM test_ora_
pg.department
)
SELECT dept_empl
.*,dept.*
FROM dept_empl, dept
WHERE dept_empl
.dept_id = dept.deptid
) LOOP
NULL;
END LOOP;
CREATE VIEW TEST_ORA_PG.`P_WIT
H_SELECT_REGULAR_MULT_01$dept_empl
`(id, name, surname, lastname, state,
dept_id)
AS
(SELECT id, name, surname, lastname,
state, dept_id
FROM test_ora_pg.dept_employees
WHERE state = 1);
CREATE VIEW TEST_ORA_PG.`P_WIT
H_SELECT_REGULAR_MULT_01$dept
`(deptid, parent_id,deptname)
AS
(SELECT id deptid, parent_id, name
deptname
FROM test_ora_pg.department);
CREATE PROCEDURE test_ora_pg.P_WITH
_SELECT_REGULAR_MULT_01()
BEGIN
DECLARE var$ID DOUBLE;
DECLARE var$NAME VARCHAR (30);
DECLARE var$SURNAME VARCHAR (30);
DECLARE var$LASTNAME VARCHAR (30);
DECLARE var$STATE DOUBLE;
DECLARE var$DEPT_ID DOUBLE;
DECLARE var$deptid DOUBLE;
DECLARE var$PARENT_ID DOUBLE;
DECLARE var$deptname VARCHAR
(200);
DECLARE done INT DEFAULT FALSE;
DECLARE cur CURSOR FOR SELECT
dept_empl.*, dept.*
FROM TEST_ORA_PG.`P_WIT
H_SELECT_REGULAR_MULT_01$dept_empl
` AS dept_empl,
TEST_ORA_PG.`P_WIT
H_SELECT_REGULAR_MULT_01$dept
` AS dept
Oracle to MySQL Version 1.0.672 113

AWS Schema Conversion Tool User Guide
Oracle statement MySQL statement
WHERE dept_empl.DEPT_ID =
dept.DEPTID;
DECLARE CONTINUE HANDLER FOR NOT
FOUND
SET done := TRUE;
OPEN cur;
read_label:
LOOP
FETCH cur INTO var$ID, var$NAME,
var$SURNAME,
var$LASTNAME, var$STATE, var
$DEPT_ID, var$deptid,
var$PARENT_ID, var$deptname;
IF done THEN
LEAVE read_label;
END IF;
BEGIN
END;
END LOOP;
CLOSE cur;
END;
call test_ora_pg.P_WITH_SELECT_R
EGULAR_MULT_01()
Oracle to MySQL Version 1.0.672 114

AWS Schema Conversion Tool User Guide
Oracle statement MySQL statement
CREATE PROCEDURE
TEST_ORA_PG.P_WITH_SELECT_V
AR_CROSS_02(p_state IN NUMBER)
AS
l_dept_id NUMBER := 10;
BEGIN
FOR cur IN (
WITH emp AS
(SELECT id, name,
surname,
lastname, state,
dept_id
FROM test_ora_
pg.dept_employees
WHERE dept_id >
10
),
active_emp AS
(
SELECT id
FROM emp
WHERE emp.state
= p_state
)
SELECT *
FROM active_emp
) LOOP
NULL;
END LOOP;
END;
CREATE VIEW TEST_ORA_PG.`P_WIT
H_SELECT_VAR_CROSS_01$emp
`(id, name, surname, lastname,
state, dept_id)
AS
(SELECT
id, name, surname, lastname,
state, dept_id
FROM TEST_ORA_PG.DEPT_EMPLOYEES
WHERE DEPT_ID > 10);
CREATE PROCEDURE
test_ora_pg.P_WITH_SELECT_V
AR_CROSS_02(IN par_P_STATE DOUBLE)
BEGIN
DECLARE var_l_dept_id DOUBLE
DEFAULT 10;
DECLARE var$ID DOUBLE;
DECLARE done INT DEFAULT FALSE;
DECLARE cur CURSOR FOR SELECT *
FROM
(SELECT
ID
FROM
TEST_ORA_
PG.
`P_WITH_S
ELECT_VAR_CROSS_01$emp` AS emp
WHERE emp.STATE = par_p_state)
AS
active_emp;
DECLARE CONTINUE HANDLER FOR NOT
FOUND
SET done := TRUE;
OPEN cur;
read_label:
Oracle to MySQL Version 1.0.672 115

AWS Schema Conversion Tool User Guide
Oracle statement MySQL statement
LOOP
FETCH cur INTO var$ID;
IF done THEN
LEAVE read_label;
END IF;
BEGIN
END;
END LOOP;
CLOSE cur;
END;
Migrating from Oracle Database to Amazon RDS for Oracle with AWS
Schema Conversion Tool
Some things to consider when migrating Oracle schema and code to Amazon RDS for Oracle:
• AWS SCT can add directory objects to the object tree. Directory objects are logical structures that
each represent a physical directory on the server's file system. You can use directory objects with
packages such as DBMS_LOB, UTL_FILE, DBMS_FILE_TRANSFER, the DATAPUMP utility, and so
on.
• AWS SCT supports converting Oracle tablespaces to an Amazon RDS for Oracle DB instance.
Oracle stores data logically in tablespaces and physically in data files associated with the
corresponding tablespace. In Oracle, you can create a tablespace with data file names. Amazon
RDS supports Oracle Managed Files (OMF) for data files, log files, and control files only. AWS SCT
creates the needed data files during conversion.
• AWS SCT can convert server-level roles and privileges. The Oracle database engine uses role-
based security. A role is a collection of privileges that you can grant to or revoke from a user.
A predefined role in Amazon RDS, called DBA, normally allows all administrative privileges on
an Oracle database engine. The following privileges are not available for the DBA role on an
Amazon RDS DB instance using the Oracle engine:
• Alter database
• Alter system
• Create any directory
Oracle to Amazon RDS for Oracle Version 1.0.672 116

AWS Schema Conversion Tool User Guide
• Grant any privilege
• Grant any role
• Create external job
You can grant all other privileges to an Amazon RDS for Oracle user role, including advanced
filtering and column privileges.
• AWS SCT supports converting Oracle jobs into jobs that can run on Amazon RDS for Oracle.
There are a few limitations to the conversion, including the following:
• Executable jobs are not supported.
• Schedule jobs that use the ANYDATA data type as an argument are not supported.
• Oracle Real Application Clusters (RAC) One Node is an option to the Oracle Database Enterprise
Edition that was introduced with Oracle Database 11g Release 2. Amazon RDS for Oracle doesn’t
support the RAC feature. For high availability, use Amazon RDS Multi-AZ.
In a Multi-AZ deployment, Amazon RDS automatically provisions and maintains a synchronous
standby replica in a different Availability Zone. The primary DB instance is synchronously
replicated across Availability Zones to a standby replica. This functionality provides data
redundancy, eliminates I/O freezes, and minimizes latency spikes during system backups.
• Oracle Spatial provides a SQL schema and functions that facilitate the storage, retrieval,
update, and query of collections of spatial data in an Oracle database. Oracle Locator provides
capabilities that are typically required to support internet and wireless service-based applications
and partner-based GIS solutions. Oracle Locator is a limited subset of Oracle Spatial.
To use Oracle Spatial and Oracle Locator features, add the SPATIAL option or LOCATOR option
(mutually exclusive) to the option group of your DB instance.
There are some prerequisites to using Oracle Spatial and Oracle Locator on an Amazon RDS for
Oracle DB instance:
• The instance should use Oracle Enterprise Edition version 12.1.0.2.v6 or higher, or 11.2.0.4.v10
or higher.
• The instance should be inside a virtual private cloud (VPC).
• The instance should the DB instance class that can support the Oracle feature. For example,
Oracle Spatial is not supported for the db.m1.small, db.t1.micro, db.t2.micro, or db.t2.small DB
instance classes. For more information, see DB instance class support for Oracle.
Oracle to Amazon RDS for Oracle Version 1.0.672 117

AWS Schema Conversion Tool User Guide
• The instance must have the Auto Minor Version Upgrade option enabled. Amazon RDS updates
your DB instance to the latest Oracle PSU if there are security vulnerabilities with a CVSS score
of 9+ or other announced security vulnerabilities. For more information, see
Settings for Oracle DB instances.
• If your DB instance is version 11.2.0.4.v10 or higher, you must install the XMLDB option. For
more information, see
Oracle XML DB.
• You should have an Oracle Spatial license from Oracle. For more information, see Oracle
Spatial and Graph in the Oracle documentation.
• Data Guard is included with Oracle Database Enterprise Edition. For high availability, use Amazon
RDS Multi-AZ feature.
In a Multi-AZ deployment, Amazon RDS automatically provisions and maintains a synchronous
standby replica in a different Availability Zone. The primary DB instance is synchronously
replicated across Availability Zones to a standby replica. This functionality provides data
redundancy, eliminates I/O freezes, and minimizes latency spikes during system backups.
• AWS SCT supports converting Oracle DBMS_SCHEDULER objects when migrating to Amazon
RDS for Oracle. The AWS SCT assessment report indicates if a schedule object can be converted.
For more information on using schedule objects with Amazon RDS, see the Amazon RDS
documentation.
• For Oracle to Amazon RDS for Oracle conversions, DB Links is supported. A database link is a
schema object in one database that enables you to access objects on another database. The
other database doesn’t need to be an Oracle database. However, to access non-Oracle databases
you must use Oracle Heterogeneous Services.
Once you create a database link, you can use the link in SQL statements to refer to tables, views,
and PL/SQL objects in the other database. To use a database link, append @dblink to the
table, view, or PL/SQL object name. You can query a table or view in the other database with
the SELECT statement. For more information about using Oracle database links, see the Oracle
documentation.
For more information about using database links with Amazon RDS, see the Amazon RDS
documentation.
• The AWS SCT assessment report provides server metrics for the conversion. These metrics about
your Oracle instance include the following:
Oracle to Amazon RDS for Oracle Version 1.0.672 118

AWS Schema Conversion Tool User Guide
• Computation and memory capacity of the target DB instance.
• Unsupported Oracle features such as Real Application Clusters that Amazon RDS doesn't
support.
• Disk read-write load
• Average total disk throughput
• Server information such as server name, OS, host name, and character set.
Privileges for RDS for Oracle as a target
To migrate to Amazon RDS for Oracle, create a privileged database user. You can use the following
code example.
CREATE USER user_name IDENTIFIED BY your_password;
-- System privileges
GRANT DROP ANY CUBE BUILD PROCESS TO user_name;
GRANT ALTER ANY CUBE TO user_name;
GRANT CREATE ANY CUBE DIMENSION TO user_name;
GRANT CREATE ANY ASSEMBLY TO user_name;
GRANT ALTER ANY RULE TO user_name;
GRANT SELECT ANY DICTIONARY TO user_name;
GRANT ALTER ANY DIMENSION TO user_name;
GRANT CREATE ANY DIMENSION TO user_name;
GRANT ALTER ANY TYPE TO user_name;
GRANT DROP ANY TRIGGER TO user_name;
GRANT CREATE ANY VIEW TO user_name;
GRANT ALTER ANY CUBE BUILD PROCESS TO user_name;
GRANT CREATE ANY CREDENTIAL TO user_name;
GRANT DROP ANY CUBE DIMENSION TO user_name;
GRANT DROP ANY ASSEMBLY TO user_name;
GRANT DROP ANY PROCEDURE TO user_name;
GRANT ALTER ANY PROCEDURE TO user_name;
GRANT ALTER ANY SQL TRANSLATION PROFILE TO user_name;
GRANT DROP ANY MEASURE FOLDER TO user_name;
GRANT CREATE ANY MEASURE FOLDER TO user_name;
GRANT DROP ANY CUBE TO user_name;
GRANT DROP ANY MINING MODEL TO user_name;
GRANT CREATE ANY MINING MODEL TO user_name;
GRANT DROP ANY EDITION TO user_name;
GRANT CREATE ANY EVALUATION CONTEXT TO user_name;
Oracle to Amazon RDS for Oracle Version 1.0.672 119

AWS Schema Conversion Tool User Guide
GRANT DROP ANY DIMENSION TO user_name;
GRANT ALTER ANY INDEXTYPE TO user_name;
GRANT DROP ANY TYPE TO user_name;
GRANT CREATE ANY PROCEDURE TO user_name;
GRANT CREATE ANY SQL TRANSLATION PROFILE TO user_name;
GRANT CREATE ANY CUBE TO user_name;
GRANT COMMENT ANY MINING MODEL TO user_name;
GRANT ALTER ANY MINING MODEL TO user_name;
GRANT DROP ANY SQL PROFILE TO user_name;
GRANT CREATE ANY JOB TO user_name;
GRANT DROP ANY EVALUATION CONTEXT TO user_name;
GRANT ALTER ANY EVALUATION CONTEXT TO user_name;
GRANT CREATE ANY INDEXTYPE TO user_name;
GRANT CREATE ANY OPERATOR TO user_name;
GRANT CREATE ANY TRIGGER TO user_name;
GRANT DROP ANY ROLE TO user_name;
GRANT DROP ANY SEQUENCE TO user_name;
GRANT DROP ANY CLUSTER TO user_name;
GRANT DROP ANY SQL TRANSLATION PROFILE TO user_name;
GRANT ALTER ANY ASSEMBLY TO user_name;
GRANT CREATE ANY RULE SET TO user_name;
GRANT ALTER ANY OUTLINE TO user_name;
GRANT UNDER ANY TYPE TO user_name;
GRANT CREATE ANY TYPE TO user_name;
GRANT DROP ANY MATERIALIZED VIEW TO user_name;
GRANT ALTER ANY ROLE TO user_name;
GRANT DROP ANY VIEW TO user_name;
GRANT ALTER ANY INDEX TO user_name;
GRANT COMMENT ANY TABLE TO user_name;
GRANT CREATE ANY TABLE TO user_name;
GRANT CREATE USER TO user_name;
GRANT DROP ANY RULE SET TO user_name;
GRANT CREATE ANY CONTEXT TO user_name;
GRANT DROP ANY INDEXTYPE TO user_name;
GRANT ALTER ANY OPERATOR TO user_name;
GRANT CREATE ANY MATERIALIZED VIEW TO user_name;
GRANT ALTER ANY SEQUENCE TO user_name;
GRANT DROP ANY SYNONYM TO user_name;
GRANT CREATE ANY SYNONYM TO user_name;
GRANT DROP USER TO user_name;
GRANT ALTER ANY MEASURE FOLDER TO user_name;
GRANT ALTER ANY EDITION TO user_name;
GRANT DROP ANY RULE TO user_name;
GRANT CREATE ANY RULE TO user_name;
Oracle to Amazon RDS for Oracle Version 1.0.672 120

AWS Schema Conversion Tool User Guide
GRANT ALTER ANY RULE SET TO user_name;
GRANT CREATE ANY OUTLINE TO user_name;
GRANT UNDER ANY TABLE TO user_name;
GRANT UNDER ANY VIEW TO user_name;
GRANT DROP ANY DIRECTORY TO user_name;
GRANT ALTER ANY CLUSTER TO user_name;
GRANT CREATE ANY CLUSTER TO user_name;
GRANT ALTER ANY TABLE TO user_name;
GRANT CREATE ANY CUBE BUILD PROCESS TO user_name;
GRANT ALTER ANY CUBE DIMENSION TO user_name;
GRANT CREATE ANY EDITION TO user_name;
GRANT CREATE ANY SQL PROFILE TO user_name;
GRANT ALTER ANY SQL PROFILE TO user_name;
GRANT DROP ANY OUTLINE TO user_name;
GRANT DROP ANY CONTEXT TO user_name;
GRANT DROP ANY OPERATOR TO user_name;
GRANT DROP ANY LIBRARY TO user_name;
GRANT ALTER ANY LIBRARY TO user_name;
GRANT CREATE ANY LIBRARY TO user_name;
GRANT ALTER ANY MATERIALIZED VIEW TO user_name;
GRANT ALTER ANY TRIGGER TO user_name;
GRANT CREATE ANY SEQUENCE TO user_name;
GRANT DROP ANY INDEX TO user_name;
GRANT CREATE ANY INDEX TO user_name;
GRANT DROP ANY TABLE TO user_name;
GRANT SELECT_CATALOG_ROLE TO user_name;
GRANT SELECT ANY SEQUENCE TO user_name;
-- Database Links
GRANT CREATE DATABASE LINK TO user_name;
GRANT CREATE PUBLIC DATABASE LINK TO user_name;
GRANT DROP PUBLIC DATABASE LINK TO user_name;
-- Server Level Objects (directory)
GRANT CREATE ANY DIRECTORY TO user_name;
GRANT DROP ANY DIRECTORY TO user_name;
-- (for RDS only)
GRANT EXECUTE ON RDSADMIN.RDSADMIN_UTIL TO user_name;
-- Server Level Objects (tablespace)
GRANT CREATE TABLESPACE TO user_name;
GRANT DROP TABLESPACE TO user_name;
Oracle to Amazon RDS for Oracle Version 1.0.672 121

AWS Schema Conversion Tool User Guide
-- Server Level Objects (user roles)
/* (grant source privileges with admin option or convert roles/privs as DBA) */
-- Queues
grant execute on DBMS_AQADM to user_name;
grant aq_administrator_role to user_name;
-- for Materialized View Logs creation
GRANT SELECT ANY TABLE TO user_name;
-- Roles
GRANT RESOURCE TO user_name;
GRANT CONNECT TO user_name;
In the preceding example, replace user_name with the name of your user. Then, replace
your_password with a secure password.
Limitations when converting Oracle to Amazon RDS for Oracle
Some limitations you should consider when migrating Oracle schema and code to Amazon RDS for
Oracle:
• A predefined role in Amazon RDS, called DBA, normally allows all administrative privileges on
an Oracle database engine. The following privileges are not available for the DBA role on an
Amazon RDS DB instance using the Oracle engine:
• Alter database
• Alter system
• Create any directory
• Grant any privilege
• Grant any role
• Create external job
You can grant all other privileges to an Oracle RDS user role.
• Amazon RDS for Oracle supports traditional auditing, fine-grained auditing using the DBMS_FGA
package, and Oracle Unified Auditing.
• Amazon RDS for Oracle doesn’t support change data capture (CDC). To do CDC during and after
a database migration, use AWS Database Migration Service.
Oracle to Amazon RDS for Oracle Version 1.0.672 122

AWS Schema Conversion Tool User Guide
Connecting to PostgreSQL Databases with the AWS Schema
Conversion Tool
You can use AWS SCT to convert schemas, database code objects, and application code from
PostgreSQL to the following targets:
• Amazon RDS for MySQL
• Amazon Aurora MySQL-Compatible Edition
• Amazon RDS for PostgreSQL
• Amazon Aurora PostgreSQL-Compatible Edition
For more information, see the following sections:
Topics
• Privileges for PostgreSQL as a source database
• Connecting to PostgreSQL as a source
• Privileges for MySQL as a target database
Privileges for PostgreSQL as a source database
The privileges required for PostgreSQL as a source are as follows:
•
CONNECT ON DATABASE <database_name>
•
USAGE ON SCHEMA <database_name>
•
SELECT ON ALL TABLES IN SCHEMA <database_name>
•
SELECT ON ALL SEQUENCES IN SCHEMA <database_name>
Connecting to PostgreSQL as a source
Use the following procedure to connect to your PostgreSQL source database with the AWS Schema
Conversion Tool.
To connect to a PostgreSQL source database
1. In the AWS Schema Conversion Tool, choose Add source.
PostgreSQL databases Version 1.0.672 123
AWS Schema Conversion Tool User Guide
2. Choose PostgreSQL, then choose Next.
The Add source dialog box appears.
3. For Connection name, enter a name for your database. AWS SCT displays this name in the tree
in the left panel.
4. Use database credentials from AWS Secrets Manager or enter them manually:
• To use database credentials from Secrets Manager, use the following instructions:
1. For AWS Secret, choose the name of the secret.
2. Choose Populate to automatically fill in all values in the database connection dialog box
from Secrets Manager.
For information about using database credentials from Secrets Manager, see Configuring
AWS Secrets Manager in the AWS Schema Conversion Tool.
• To enter the PostgreSQL source database connection information manually, use the
following instructions:
Parameter Action
Server name Enter the Domain Name System (DNS) name or IP address
of your source database server.
You can connect to your source PostgreSQL database
using an IPv6 address protocol. To do so, make sure that
you use square brackets to enter the IP address, as shown
in the following example.
[2001:db8:ffff:ffff:ffff:ffff:ffff:fffe]
Server port Enter the port used to connect to your source database
server.
Database Enter the name of the PostgreSQL database.
User name and Password Enter the database credentials to connect to your source
database server.
Connecting to PostgreSQL as a source Version 1.0.672 124

AWS Schema Conversion Tool User Guide
Parameter Action
AWS SCT uses the password to connect to your source
database only when you choose to connect to your
database in a project. To guard against exposing the
password for your source database, AWS SCT doesn't
store the password by default. If you close your AWS SCT
project and reopen it, you are prompted for the password
to connect to your source database as needed.
Use SSL Choose this option to use Secure Sockets Layer (SSL) to
connect to your database. Provide the following additional
information, as applicable, on the SSL tab:
• Verify server certificate: Select this option to verify the
server certificate by using a trust store.
• Trust store: The location of a trust store containing
certificates. For this location to appear in the Global
settings section, make sure to add it.
Store password AWS SCT creates a secure vault to store SSL certificates
and database passwords. Enabling this option lets you
store the database password and to connect quickly to the
database without having to enter the password.
PostgreSQL driver path Enter the path to the driver to use to connect to the
source database. For more information, see Installing JDBC
drivers for AWS Schema Conversion Tool.
If you store the driver path in the global project settings,
the driver path doesn't appear on the connection dialog
box. For more information, see Storing driver paths in the
global settings.
5. Choose Test Connection to verify that AWS SCT can connect to your source database.
6. Choose Connect to connect to your source database.
Connecting to PostgreSQL as a source Version 1.0.672 125

AWS Schema Conversion Tool User Guide
Privileges for MySQL as a target database
The privileges required for MySQL as a target when you migrate from PostgreSQL are as follows:
• CREATE ON *.*
• ALTER ON *.*
• DROP ON *.*
• INDEX ON *.*
• REFERENCES ON *.*
• SELECT ON *.*
• CREATE VIEW ON *.*
• SHOW VIEW ON *.*
• TRIGGER ON *.*
• CREATE ROUTINE ON *.*
• ALTER ROUTINE ON *.*
• EXECUTE ON *.*
• INSERT, UPDATE ON AWS_POSTGRESQL_EXT.*
• INSERT, UPDATE, DELETE ON AWS_POSTGRESQL_EXT_DATA.*
• CREATE TEMPORARY TABLES ON AWS_POSTGRESQL_EXT_DATA.*
You can use the following code example to create a database user and grant the privileges.
CREATE USER 'user_name' IDENTIFIED BY 'your_password';
GRANT CREATE ON *.* TO 'user_name';
GRANT ALTER ON *.* TO 'user_name';
GRANT DROP ON *.* TO 'user_name';
GRANT INDEX ON *.* TO 'user_name';
GRANT REFERENCES ON *.* TO 'user_name';
GRANT SELECT ON *.* TO 'user_name';
GRANT CREATE VIEW ON *.* TO 'user_name';
GRANT SHOW VIEW ON *.* TO 'user_name';
GRANT TRIGGER ON *.* TO 'user_name';
GRANT CREATE ROUTINE ON *.* TO 'user_name';
GRANT ALTER ROUTINE ON *.* TO 'user_name';
GRANT EXECUTE ON *.* TO 'user_name';
GRANT INSERT, UPDATE ON AWS_POSTGRESQL_EXT.* TO 'user_name';
Privileges for MySQL as a target Version 1.0.672 126

AWS Schema Conversion Tool User Guide
GRANT INSERT, UPDATE, DELETE ON AWS_POSTGRESQL_EXT_DATA.* TO 'user_name';
GRANT CREATE TEMPORARY TABLES ON AWS_POSTGRESQL_EXT_DATA.* TO 'user_name';
In the preceding example, replace user_name with the name of your user. Then, replace
your_password with a secure password.
To use Amazon RDS for MySQL or Aurora MySQL as a target, set the lower_case_table_names
parameter to 1. This value means that the MySQL server handles identifiers of such object names
as tables, indexes, triggers, and databases as case insensitive. If you have turned on binary logging
in your target instance, then set the log_bin_trust_function_creators parameter to 1. In
this case, you don't need to use the DETERMINISTIC, READS SQL DATA or NO SQL characteristics
to create stored functions. To configure these parameters, create a new DB parameter group or
modify an existing DB parameter group.
Connecting to SAP Databases with the AWS Schema Conversion
Tool
You can use AWS SCT to convert schemas, database code objects, and application code from SAP
(Sybase) Adaptive Server Enterprise (ASE) to the following targets:
• Amazon RDS for MySQL
• Amazon Aurora MySQL-Compatible Edition
• Amazon RDS for MariaDB
• Amazon RDS for PostgreSQL
• Amazon Aurora PostgreSQL-Compatible Edition
For more information, see the following sections:
Topics
• Privileges for SAP ASE as a source database
• Connecting to SAP ASE (Sybase) as a source
• Privileges for MySQL as a target database
• SAP ASE to MySQL conversion settings
• Privileges for PostgreSQL as a target database
• SAP ASE to PostgreSQL conversion settings
SAP databases Version 1.0.672 127

AWS Schema Conversion Tool User Guide
Privileges for SAP ASE as a source database
To use an SAP ASE database as a source, you create a database user and grant permissions. To do
this, take the following steps.
Create and configure a database user
1. Connect to the source database.
2. Create a database user with the following commands. Provide a password for the new user.
USE master
CREATE LOGIN min_privs WITH PASSWORD <password>
sp_adduser min_privs
grant select on dbo.spt_values to min_privs
grant select on asehostname to min_privs
3. For every database you are going to migrate, grant the following privileges.
USE <database_name>
sp_adduser min_privs
grant select on dbo.sysusers to min_privs
grant select on dbo.sysobjects to min_privs
grant select on dbo.sysindexes to min_privs
grant select on dbo.syscolumns to min_privs
grant select on dbo.sysreferences to min_privs
grant select on dbo.syscomments to min_privs
grant select on dbo.syspartitions to min_privs
grant select on dbo.syspartitionkeys to min_privs
grant select on dbo.sysconstraints to min_privs
grant select on dbo.systypes to min_privs
grant select on dbo.sysqueryplans to min_privs
Connecting to SAP ASE (Sybase) as a source
Use the following procedure to connect to your SAP ASE source database with the AWS Schema
Conversion Tool.
To connect to a SAP ASE source database
1. In the AWS Schema Conversion Tool, choose Add source.
Privileges for SAP ASE Version 1.0.672 128
AWS Schema Conversion Tool User Guide
2. Choose SAP ASE, then choose Next.
The Add source dialog box appears.
3. For Connection name, enter a name for your database. AWS SCT displays this name in the tree
in the left panel.
4. Use database credentials from AWS Secrets Manager or enter them manually:
• To use database credentials from Secrets Manager, use the following instructions:
1. For AWS Secret, choose the name of the secret.
2. Choose Populate to automatically fill in all values in the database connection dialog box
from Secrets Manager.
For information about using database credentials from Secrets Manager, see Configuring
AWS Secrets Manager in the AWS Schema Conversion Tool.
• To enter the SAP ASE source database connection information manually, use the following
instructions:
Parameter Action
Server name Enter the Domain Name System (DNS) name or IP address
of your source database server.
Server port Enter the port used to connect to your source database
server.
Database Enter the name of the SAP ASE database.
User name and Password Enter the database credentials to connect to your source
database server.
Note
AWS SCT uses the password to connect to your
source database only when you choose to connect
to your database in a project. To guard against
exposing the password for your source database,
AWS SCT doesn't store the password by default. If
you close your AWS SCT project and reopen it, you
Connecting to SAP ASE as a source Version 1.0.672 129

AWS Schema Conversion Tool User Guide
Parameter Action
are prompted for the password to connect to your
source database as needed.
Use SSL Choose this option to use Secure Sockets Layer (SSL) to
connect to your database. Provide the following additional
information, as applicable, on the SSL tab:
• Verify server certificate: Select this option to verify the
server certificate by using a trust store.
• Trust store: The location of a trust store containing
certificates.
Store password AWS SCT creates a secure vault to store SSL certificates
and database passwords. Enabling this option lets you
store the database password and to connect quickly to the
database without having to enter the password.
SAP ASE driver path Enter the path to the driver to use to connect to the
source database. For more information, see Installing JDBC
drivers for AWS Schema Conversion Tool.
If you store the driver path in the global project settings,
the driver path doesn't appear on the connection dialog
box. For more information, see Storing driver paths in the
global settings.
5. Choose Test Connection to verify that AWS SCT can connect to your source database.
6. Choose Connect to connect to your source database.
Privileges for MySQL as a target database
The privileges required for MySQL as a target are as follows:
• CREATE ON *.*
• ALTER ON *.*
• DROP ON *.*
Privileges for MySQL as a target Version 1.0.672 130

AWS Schema Conversion Tool User Guide
• INDEX ON *.*
• REFERENCES ON *.*
• SELECT ON *.*
• CREATE VIEW ON *.*
• SHOW VIEW ON *.*
• TRIGGER ON *.*
• CREATE ROUTINE ON *.*
• ALTER ROUTINE ON *.*
• EXECUTE ON *.*
• INSERT, UPDATE ON AWS_SAPASE_EXT.*
• CREATE TEMPORARY TABLES ON AWS_SAPASE_EXT.*
You can use the following code example to create a database user and grant the privileges.
CREATE USER 'user_name' IDENTIFIED BY 'your_password';
GRANT CREATE ON *.* TO 'user_name';
GRANT ALTER ON *.* TO 'user_name';
GRANT DROP ON *.* TO 'user_name';
GRANT INDEX ON *.* TO 'user_name';
GRANT REFERENCES ON *.* TO 'user_name';
GRANT SELECT ON *.* TO 'user_name';
GRANT CREATE VIEW ON *.* TO 'user_name';
GRANT SHOW VIEW ON *.* TO 'user_name';
GRANT TRIGGER ON *.* TO 'user_name';
GRANT CREATE ROUTINE ON *.* TO 'user_name';
GRANT ALTER ROUTINE ON *.* TO 'user_name';
GRANT EXECUTE ON *.* TO 'user_name';
GRANT INSERT, UPDATE ON AWS_SAPASE_EXT.* TO 'user_name';
GRANT CREATE TEMPORARY TABLES ON AWS_SAPASE_EXT.* TO 'user_name';
In the preceding example, replace user_name with the name of your user. Then, replace
your_password with a secure password.
To use Amazon RDS for MySQL or Aurora MySQL as a target, set the lower_case_table_names
parameter to 1. This value means that the MySQL server handles identifiers of such object names
as tables, indexes, triggers, and databases as case insensitive. If you have turned on binary logging
in your target instance, then set the log_bin_trust_function_creators parameter to 1. In
Privileges for MySQL as a target Version 1.0.672 131

AWS Schema Conversion Tool User Guide
this case, you don't need to use the DETERMINISTIC, READS SQL DATA or NO SQL characteristics
to create stored functions. To configure these parameters, create a new DB parameter group or
modify an existing DB parameter group.
SAP ASE to MySQL conversion settings
To edit SAP ASE to MySQL conversion settings, choose Settings, and then choose Conversion
settings. From the upper list, choose SAP ASE, and then choose SAP ASE – MySQL or SAP ASE
– Amazon Aurora (MySQL compatible). AWS SCT displays all available settings for SAP ASE to
PostgreSQL conversion.
SAP ASE to MySQL conversion settings in AWS SCT include options for the following:
• To limit the number of comments with action items in the converted code.
For Add comments in the converted code for the action items of selected severity and higher,
choose the severity of action items. AWS SCT adds comments in the converted code for action
items of the selected severity and higher.
For example, to minimize the number of comments in your converted code, choose Errors only.
To include comments for all action items in your converted code, choose All messages.
• To use the exact names of the source database objects in the converted code.
By default, AWS SCT converts the names of database objects, variables, and parameters to
lowercase. To keep the original case for these names, select Treat source database object names
as case sensitive. Choose this option if you use case-sensitive object names in your source SAP
ASE database server.
Privileges for PostgreSQL as a target database
To use PostgreSQL as a target, AWS SCT requires the CREATE ON DATABASE privilege. Make sure
that you grant this privilege for each target PostgreSQL database.
To use the converted public synonyms, change the database default search path to "$user",
public_synonyms, public.
You can use the following code example to create a database user and grant the privileges.
CREATE ROLE user_name LOGIN PASSWORD 'your_password';
SAP ASE to MySQL conversion settings Version 1.0.672 132

AWS Schema Conversion Tool User Guide
GRANT CREATE ON DATABASE db_name TO user_name;
ALTER DATABASE db_name SET SEARCH_PATH = "$user", public_synonyms, public;
In the preceding example, replace user_name with the name of your user. Then, replace db_name
with the name of your target database. Finally, replace your_password with a secure password.
In PostgreSQL, only the schema owner or a superuser can drop a schema. The owner can drop
a schema and all objects that this schema includes even if the owner of the schema doesn't own
some of its objects.
When you use different users to convert and apply different schemas to your target database, you
can get an error message when AWS SCT can't drop a schema. To avoid this error message, use the
superuser role.
SAP ASE to PostgreSQL conversion settings
To edit SAP ASE to PostgreSQL conversion settings, choose Settings, and then choose Conversion
settings. From the upper list, choose SAP ASE, and then choose SAP ASE – PostgreSQL or SAP ASE
– Amazon Aurora (PostgreSQL compatible). AWS SCT displays all available settings for SAP ASE to
PostgreSQL conversion.
SAP ASE to PostgreSQL conversion settings in AWS SCT include options for the following:
• To limit the number of comments with action items in the converted code.
For Add comments in the converted code for the action items of selected severity and higher,
choose the severity of action items. AWS SCT adds comments in the converted code for action
items of the selected severity and higher.
For example, to minimize the number of comments in your converted code, choose Errors only.
To include comments for all action items in your converted code, choose All messages.
• To define the template to use for the schema names in the converted code. For Schema name
generation template, choose one of the following options:
• <source_db> – Uses the SAP ASE database name as a schema name in PostgreSQL.
• <source_schema> – Uses the SAP ASE schema name as a schema name in PostgreSQL.
• <source_db>_<schema> – Uses a combination of the SAP ASE database and schema names as
a schema name in PostgreSQL.
• To use the exact names of the source database objects in the converted code.
SAP ASE to PostgreSQL conversion settings Version 1.0.672 133

AWS Schema Conversion Tool User Guide
By default, AWS SCT converts the names of database objects, variables, and parameters to
lowercase. To keep the original case for these names, select Treat source database object names
as case sensitive. Choose this option if you use case-sensitive object names in your source SAP
ASE database server.
For case-sensitive operations, AWS SCT can avoid the conversion of database object names to
lowercase. To do so, select Avoid casting to lowercase for case sensitive operations.
• To allow the use of indexes with the same name in different tables in SAP ASE.
In PostgreSQL, all index names that you use in the schema must be unique. To make sure that
AWS SCT generates unique names for all your indexes, select Generate unique names for
indexes.
Connect Microsoft SQL Servers with AWS Schema Conversion
Tool
You can use AWS SCT to convert schemas, database code objects, and application code from SQL
Server to the following targets:
• Amazon RDS for MySQL
• Amazon Aurora MySQL-Compatible Edition
• Amazon RDS for PostgreSQL
• Amazon Aurora PostgreSQL-Compatible Edition
• Amazon RDS for SQL Server
• Amazon RDS for MariaDB
Note
AWS SCT does not support using Amazon RDS for SQL server as a source.
You can use AWS SCT to create an assessment report for the migration of schemas, database code
objects, and application code from SQL Server to Babelfish for Aurora PostgreSQL, as described
following.
SQL Server databases Version 1.0.672 134

AWS Schema Conversion Tool User Guide
Topics
• Privileges for Microsoft SQL Server as a source
• Using Windows Authentication when using Microsoft SQL Server as a source
• Connecting to SQL Server as a source
• Converting SQL Server to MySQL
• Migrating from SQL Server to PostgreSQL with AWS Schema Conversion Tool
• Migrating from SQL Server to Amazon RDS for SQL Server with AWS Schema Conversion Tool
Privileges for Microsoft SQL Server as a source
The privileges required for Microsoft SQL Server as a source are as follows:
• VIEW DEFINITION
• VIEW DATABASE STATE
The VIEW DEFINITION privilege enables users that have public access to see object definitions.
AWS SCT uses the VIEW DATABASE STATE privilege to check the features of the SQL Server
Enterprise edition.
Repeat the grant for each database whose schema you are converting.
In addition, grant the following privileges on the master database:
• VIEW SERVER STATE
• VIEW ANY DEFINITION
AWS SCT uses the VIEW SERVER STATE privilege to collect server settings and configuration.
Make sure that you grant the VIEW ANY DEFINITION privilege to view endpoints.
To read information about Microsoft Analysis Services, run the following command on the master
database.
EXEC master..sp_addsrvrolemember @loginame = N'<user_name>', @rolename = N'sysadmin'
In the preceding example, replace the <user_name> placeholder with the name of the user that
you granted with the privileges before.
Privileges for Microsoft SQL Server Version 1.0.672 135
AWS Schema Conversion Tool User Guide
To read information about SQL Server Agent, add your user to the SQLAgentUser role. Run the
following command on the msdb database.
EXEC sp_addrolemember <SQLAgentRole>, <user_name>;
In the preceding example, replace the <SQLAgentRole> placeholder with the name of the SQL
Server Agent role. Then replace the <user_name> placeholder with the name of the user that you
granted with the privileges before. For more information, see Adding a user to the SQLAgentUser
role in the Amazon RDS User Guide.
To detect log shipping, grant the SELECT on dbo.log_shipping_primary_databases
privilege on the msdb database.
To use the notification approach of the DDL replication, grant the RECEIVE ON
<schema_name>.<queue_name> privilege on your source databases. In this example, replace
the <schema_name> placeholder with the schema name of your database. Then, replace the
<queue_name> placeholder with the name of a queue table.
Using Windows Authentication when using Microsoft SQL Server as a
source
If your application runs on a Windows-based intranet, you might be able to use Windows
Authentication for database access. Windows Authentication uses the current Windows identity
established on the operating system thread to access the SQL Server database. You can then map
the Windows identity to a SQL Server database and permissions. To connect to SQL Server using
Windows Authentication, you must specify the Windows identity that your application is using. You
must also grant the Windows identity access to the SQL Server database.
SQL Server has two modes of access: Windows Authentication mode and Mixed Mode. Windows
Authentication mode enables Windows Authentication and disables SQL Server Authentication.
Mixed Mode enables both Windows Authentication and SQL Server Authentication. Windows
Authentication is always available and cannot be disabled. For more information about Windows
Authentication, see the Microsoft Windows documentation.
The possible example for creating a user in TEST_DB is shown following.
USE [TEST_DB]
CREATE USER [TestUser] FOR LOGIN [TestDomain\TestUser]
GRANT VIEW DEFINITION TO [TestUser]
Using Windows Authentication with Microsoft SQL Server Version 1.0.672 136

AWS Schema Conversion Tool User Guide
GRANT VIEW DATABASE STATE TO [TestUser]
Using Windows Authentication with a JDBC connection
The JDBC driver does not support Windows Authentication when the driver is used on non-
Windows operating systems. Windows Authentication credentials, such as user name and
password, are not automatically specified when connecting to SQL Server from non-Windows
operating systems. In such cases, the applications must use SQL Server Authentication instead.
In JDBC connection string, the parameter integratedSecurity must be specified to connect
using Windows Authentication. The JDBC driver supports Integrated Windows Authentication on
Windows operating systems through the integratedSecurity connection string parameter.
To use integrated authentication
1. Install the JDBC driver.
2.
Copy the sqljdbc_auth.dll file to a directory on the Windows system path on the
computer where the JDBC driver is installed.
The sqljdbc_auth.dll files are installed in the following location:
<installation directory>\sqljdbc_<version>\<language>\auth\
When you try to establish a connection to SQL Server database using Windows Authentication, you
might get this error: This driver is not configured for integrated authentication. This problem can
be solved by performing the following actions:
• Declare two variables that point to the installed path of your JDBC:
variable name: SQLJDBC_HOME; variable value: D:\lib\JDBC4.1\enu (where your
sqljdbc4.jar exists);
variable name: SQLJDBC_AUTH_HOME; variable value: D\lib\JDBC4.1\enu\auth
\x86 (if you are running 32bit OS) or D\lib\JDBC4.1\enu\auth\x64 (if you are running 64bit
OS). This is where your sqljdbc_auth.dll is located.
•
Copy sqljdbc_auth.dll to the folder where your JDK/JRE is running. You may copy to lib
folder, bin folder, and so on. As an example, you might copy to the following folder.
[JDK_INSTALLED_PATH]\bin;
Using Windows Authentication with Microsoft SQL Server Version 1.0.672 137
AWS Schema Conversion Tool User Guide
[JDK_INSTALLED_PATH]\jre\bin;
[JDK_INSTALLED_PATH]\jre\lib;
[JDK_INSTALLED_PATH]\lib;
• Ensure that in your JDBC library folder, you have only the SQLJDBC4.jar file. Remove any other
sqljdbc*.jar files from that folder (or copy them to another folder). If you are adding the driver as
part of your program, ensure that you add only SQLJDBC4.jar as the driver to use.
• Copy sqljdbc_auth.dll the file in the folder with your application.
Note
If you are running a 32-bit Java Virtual Machine (JVM), use the sqljdbc_auth.dll file in the
x86 folder, even if the operating system is the x64 version. If you are running a 64-bit JVM
on a x64 processor, use the sqljdbc_auth.dll file in the x64 folder.
When you connect to a SQL Server database, you can choose either Windows Authentication or
SQL Server Authentication for the Authentication option.
Connecting to SQL Server as a source
Use the following procedure to connect to your Microsoft SQL Server source database with the
AWS Schema Conversion Tool.
To connect to a Microsoft SQL Server source database
1. In the AWS Schema Conversion Tool, choose Add source.
2. Choose Microsoft SQL Server, then choose Next.
The Add source dialog box appears.
3. For Connection name, enter a name for your database. AWS SCT displays this name in the tree
in the left panel.
4. Use database credentials from AWS Secrets Manager or enter them manually:
• To use database credentials from Secrets Manager, use the following instructions:
1. For AWS Secret, choose the name of the secret.
2. Choose Populate to automatically fill in all values in the database connection dialog box
from Secrets Manager.
Connecting to SQL Server as a source Version 1.0.672 138

AWS Schema Conversion Tool User Guide
For information about using database credentials from Secrets Manager, see Configuring
AWS Secrets Manager in the AWS Schema Conversion Tool.
• To enter the Microsoft SQL Server source database connection information manually, use
the following instructions:
Parameter Action
Server name Enter the Domain Name Service (DNS) name or IP address
of your source database server.
You can connect to your source SQL Server database using
an IPv6 address protocol. To do so, make sure that you use
square brackets to enter the IP address, as shown in the
following example.
[2001:db8:ffff:ffff:ffff:ffff:ffff:fffe]
Server port Enter the port used to connect to your source database
server.
Instance name Enter the instance name for the SQL Server database.
To find the instance name, run the query SELECT
@@servername; on your SQL Server database.
Authentication Choose the authentication type from Windows Authentic
ation and SQL Server Authentication.
User name and Password Enter the database credentials to connect to your source
database server.
AWS SCT uses the password to connect to your source
database only when you choose to connect to your
database in a project. To guard against exposing the
password for your source database, AWS SCT doesn't
store the password by default. If you close your AWS SCT
project and reopen it, you are prompted for the password
to connect to your source database as needed.
Connecting to SQL Server as a source Version 1.0.672 139
AWS Schema Conversion Tool User Guide
Parameter Action
Use SSL Choose this option to use Secure Sockets Layer (SSL) to
connect to your database. Provide the following additional
information, as applicable, on the SSL tab:
• Trust server certificate: Select this option to trust the
server certificate.
• Trust store: The location of a trust store containing
certificates. For this location to appear in the Global
settings section, make sure to add it.
Store password AWS SCT creates a secure vault to store SSL certificates
and database passwords. Enabling this option lets you
store the database password and to connect quickly to the
database without having to enter the password.
Sql Server Driver Path Enter the path to the driver to use to connect to the
source database. For more information, see Installing JDBC
drivers for AWS Schema Conversion Tool.
If you store the driver path in the global project settings,
the driver path doesn't appear on the connection dialog
box. For more information, see Storing driver paths in the
global settings.
Windows Authentication
library
Enter the path to the sqljdbc_auth.dll file. By
default, this file is installed in the following location:
<installation directory of the JDBC
driver>sqljdbc_<version> \<language> \auth\
5. Choose Test Connection to verify that AWS SCT can connect to your source database.
6. Choose Connect to connect to your source database.
Connecting to SQL Server as a source Version 1.0.672 140

AWS Schema Conversion Tool User Guide
Converting SQL Server to MySQL
To emulate Microsoft SQL Server database functions in your converted MySQL code, use the SQL
Server to MySQL extension pack in AWS SCT. For more information about extension packs, see
Using extension packs with AWS Schema Conversion Tool.
Topics
• Privileges for MySQL as a target database
• SQL Server to MySQL conversion settings
• Migration considerations
Privileges for MySQL as a target database
The privileges required for MySQL as a target are as follows:
• CREATE ON *.*
• ALTER ON *.*
• DROP ON *.*
• INDEX ON *.*
• REFERENCES ON *.*
• SELECT ON *.*
• CREATE VIEW ON *.*
• SHOW VIEW ON *.*
• TRIGGER ON *.*
• CREATE ROUTINE ON *.*
• ALTER ROUTINE ON *.*
• EXECUTE ON *.*
• INSERT, UPDATE ON AWS_SQLSERVER_EXT.*
• INSERT, UPDATE, DELETE ON AWS_SQLSERVER_EXT_DATA.*
• CREATE TEMPORARY TABLES ON AWS_SQLSERVER_EXT_DATA.*
You can use the following code example to create a database user and grant the privileges.
CREATE USER 'user_name' IDENTIFIED BY 'your_password';
SQL Server to MySQL Version 1.0.672 141

AWS Schema Conversion Tool User Guide
GRANT CREATE ON *.* TO 'user_name';
GRANT ALTER ON *.* TO 'user_name';
GRANT DROP ON *.* TO 'user_name';
GRANT INDEX ON *.* TO 'user_name';
GRANT REFERENCES ON *.* TO 'user_name';
GRANT SELECT ON *.* TO 'user_name';
GRANT CREATE VIEW ON *.* TO 'user_name';
GRANT SHOW VIEW ON *.* TO 'user_name';
GRANT TRIGGER ON *.* TO 'user_name';
GRANT CREATE ROUTINE ON *.* TO 'user_name';
GRANT ALTER ROUTINE ON *.* TO 'user_name';
GRANT EXECUTE ON *.* TO 'user_name';
GRANT INSERT, UPDATE ON AWS_SQLSERVER_EXT.* TO 'user_name';
GRANT INSERT, UPDATE, DELETE ON AWS_SQLSERVER_EXT_DATA.* TO 'user_name';
GRANT CREATE TEMPORARY TABLES ON AWS_SQLSERVER_EXT_DATA.* TO 'user_name';
In the preceding example, replace user_name with the name of your user. Then, replace
your_password with a secure password.
If you use a MySQL database version 5.7 or lower as a target, then run the following command. For
MySQL databases version 8.0 and higher, this command is deprecated.
GRANT SELECT ON mysql.proc TO 'user_name';
To use Amazon RDS for MySQL or Aurora MySQL as a target, set the lower_case_table_names
parameter to 1. This value means that the MySQL server handles identifiers of such object names
as tables, indexes, triggers, and databases as case insensitive. If you have turned on binary logging
in your target instance, then set the log_bin_trust_function_creators parameter to 1. In
this case, you don't need to use the DETERMINISTIC, READS SQL DATA or NO SQL characteristics
to create stored functions. To configure these parameters, create a new DB parameter group or
modify an existing DB parameter group.
SQL Server to MySQL conversion settings
To edit SQL Server to MySQL conversion settings, in AWS SCT choose Settings, and then choose
Conversion settings. From the upper list, choose SQL Server, and then choose SQL Server –
MySQL. AWS SCT displays all available settings for SQL Server to MySQL conversion.
SQL Server to MySQL conversion settings in AWS SCT include options for the following:
• To limit the number of comments with action items in the converted code.
SQL Server to MySQL Version 1.0.672 142

AWS Schema Conversion Tool User Guide
For Add comments in the converted code for the action items of selected severity and higher,
choose the severity of action items. AWS SCT adds comments in the converted code for action
items of the selected severity and higher.
For example, to minimize the number of comments in your converted code, choose Errors only.
To include comments for all action items in your converted code, choose All messages.
•
To allow your source SQL Server database to store the output of EXEC in a table. AWS SCT
creates temporary tables and an additional procedure to emulate this feature. To use this
emulation, select Create additional routines for handling open datasets.
Migration considerations
Consider these things when migrating a SQL Server schema to MySQL:
•
MySQL doesn’t support the MERGE statement. However, AWS SCT can emulate the MERGE
statement during conversion by using the INSERT ON DUPLICATE KEY clause and the UPDATE
FROM and DELETE FROM statements.
For correct emulation using INSERT ON DUPLICATE KEY, make sure that a unique constraint or
primary key exists on the target MySQL database.
•
You can use a GOTO statement and a label to change the order that statements are run in. Any
Transact-SQL statements that follow a GOTO statement are skipped, and processing continues
at the label. You can use GOTO statements and labels anywhere within a procedure, batch, or
statement block. You can also nest GOTO statements.
MySQL doesn’t use GOTO statements. When AWS SCT converts code that contains a GOTO
statement, it converts the statement to use a BEGIN…END or LOOP…END LOOP statement. You
can find examples of how AWS SCT converts GOTO statements in the table following.
SQL Server statement MySQL statement
BEGIN
....
statement1;
....
GOTO label1;
statement2;
BEGIN
label1:
BEGIN
....
statement1;
....
SQL Server to MySQL Version 1.0.672 143

AWS Schema Conversion Tool User Guide
SQL Server statement MySQL statement
....
label1:
Statement3;
....
END
LEAVE label1;
statement2;
....
END;
Statement3;
....
END
BEGIN
....
statement1;
....
label1:
statement2;
....
GOTO label1;
statement3;
....
statement4;
....
END
BEGIN
....
statement1;
....
label1:
LOOP
statement2;
....
ITERATE label1;
LEAVE label1;
END LOOP;
statement3;
....
statement4;
....
END
SQL Server to MySQL Version 1.0.672 144
AWS Schema Conversion Tool User Guide
SQL Server statement MySQL statement
BEGIN
....
statement1;
....
label1:
statement2;
....
statement3;
....
statement4;
....
END
BEGIN
....
statement1;
....
label1:
BEGIN
statement2;
....
statement3;
....
statement4;
....
END;
END
• MySQL doesn't support multistatement table-valued functions. AWS SCT simulates table-valued
functions during a conversion by creating temporary tables and rewriting statements to use
these temporary tables.
Migrating from SQL Server to PostgreSQL with AWS Schema
Conversion Tool
You can use the SQL Server to PostgreSQL extension pack in AWS SCT. This extension pack
emulates SQL Server database functions in the converted PostgreSQL code. Use the SQL Server to
PostgreSQL extension pack to emulate SQL Server Agent and SQL Server Database Mail. For more
information about extension packs, see Using extension packs with AWS Schema Conversion Tool.
Topics
• Privileges for PostgreSQL as a target database
• SQL Server to PostgreSQL conversion settings
• Converting SQL Server partitions to PostgreSQL version 10 partitions
• Migration considerations
• Using an AWS SCT extension pack to emulate SQL Server Agent in PostgreSQL
• Using an AWS SCT extension pack to emulate SQL Server Database Mail in PostgreSQL
SQL Server to PostgreSQL Version 1.0.672 145

AWS Schema Conversion Tool User Guide
Privileges for PostgreSQL as a target database
To use PostgreSQL as a target, AWS SCT requires the CREATE ON DATABASE privilege. Make sure
that you grant this privilege for each target PostgreSQL database.
To use the converted public synonyms, change the database default search path to "$user",
public_synonyms, public.
You can use the following code example to create a database user and grant the privileges.
CREATE ROLE user_name LOGIN PASSWORD 'your_password';
GRANT CREATE ON DATABASE db_name TO user_name;
ALTER DATABASE db_name SET SEARCH_PATH = "$user", public_synonyms, public;
In the preceding example, replace user_name with the name of your user. Then, replace db_name
with the name of your target database. Finally, replace your_password with a secure password.
In PostgreSQL, only the schema owner or a superuser can drop a schema. The owner can drop
a schema and all objects that this schema includes even if the owner of the schema doesn't own
some of its objects.
When you use different users to convert and apply different schemas to your target database, you
can get an error message when AWS SCT can't drop a schema. To avoid this error message, use the
superuser role.
SQL Server to PostgreSQL conversion settings
To edit SQL Server to PostgreSQL conversion settings, choose Settings, and then choose
Conversion settings. From the upper list, choose SQL Server, and then choose SQL Server –
PostgreSQL. AWS SCT displays all available settings for SQL Server to PostgreSQL conversion.
SQL Server to PostgreSQL conversion settings in AWS SCT include options for the following:
• To limit the number of comments with action items in the converted code.
For Add comments in the converted code for the action items of selected severity and higher,
choose the severity of action items. AWS SCT adds comments in the converted code for action
items of the selected severity and higher.
For example, to minimize the number of comments in your converted code, choose Errors only.
To include comments for all action items in your converted code, choose All messages.
SQL Server to PostgreSQL Version 1.0.672 146

AWS Schema Conversion Tool User Guide
• To allow to use indexes with the same name in different tables in SQL Server.
In PostgreSQL, all index names that you use in the schema, must be unique. To make sure that
AWS SCT generates unique names for all your indexes, select Generate unique names for
indexes.
• To convert SQL Server procedures to PostgreSQL functions.
PostgreSQL version 10 and earlier doesn't support procedures. For customers who aren't familiar
with using procedures in PostgreSQL, AWS SCT can convert procedures to functions. To do so,
select Convert procedures to functions.
•
To emulate the output of EXEC in a table.
Your source SQL Server database can store the output of EXEC in a table. AWS SCT creates
temporary tables and an additional procedure to emulate this feature. To use this emulation,
select Create additional routines for handling open datasets.
• To define the template to use for the schema names in the converted code. For Schema name
generation template, choose one of the following options:
• <source_db> – Uses the SQL Server database name as a schema name in PostgreSQL.
• <source_schema> – Uses the SQL Server schema name as a schema name in PostgreSQL.
• <source_db>_<schema> – Uses a combination of the SQL Server database and schema names
as a schema name in PostgreSQL.
• To keep the letter case of your source object names.
To avoid conversion of object names to lower case, select Avoid casting to lower case for case
sensitive operations. This option applies only when you turn on case sensitivity option in your
target database.
• To keep the parameter names from your source database.
To add double quotation marks to the names of parameters in the converted code, select Keep
original parameter names.
Converting SQL Server partitions to PostgreSQL version 10 partitions
When you convert a Microsoft SQL Server database to Amazon Aurora PostgreSQL-Compatible
Edition (Aurora PostgreSQL) or Amazon Relational Database Service for PostgreSQL (Amazon RDS
for PostgreSQL), be aware of the following.
SQL Server to PostgreSQL Version 1.0.672 147

AWS Schema Conversion Tool User Guide
In SQL Server, you create partitions with partition functions. When converting from a SQL Server
portioned table to a PostgreSQL version 10 partitioned table, be aware of several potential issues:
• SQL Server allows you to partition a table using a column without a NOT NULL constraint. In that
case, all NULL values go to the leftmost partition. PostgreSQL doesn’t support NULL values for
RANGE partitioning.
• SQL Server allows you to create primary and unique keys for partitioned tables. For PostgreSQL,
you create primary or unique keys for each partition directly. Thus, PRIMARY or UNIQUE KEY
constraint must be removed from their parent table when migrating to PostgreSQL. The
resulting key names take the format <original_key_name>_<partition_number>.
• SQL Server allows you to create foreign key constraint from and to partitioned tables.
PostgreSQL doesn’t support foreign keys referencing partitioned tables. Also, PostgreSQL
doesn’t support foreign key references from a partitioned table to another table.
• SQL Server allows you to create indexes for partitioned tables. For PostgreSQL, an index
should be created for each partition directly. Thus, indexes must be removed from their
parent tables when migrating to PostgreSQL. The resulting index names take the format
<original_index_name>_<partition_number>.
• PostgreSQL doesn’t support partitioned indexes.
Migration considerations
Some things to consider when migrating a SQL Server schema to PostgreSQL:
• In PostgreSQL, all object’s names in a schema must be unique, including indexes. Index names
must be unique in the schema of the base table. In SQL Server, an index name can be the same
for different tables.
To ensure the uniqueness of index names, AWS SCT gives you the option to generate unique
index names if your index names are not unique. To do this, choose the option Generate unique
index names in the project properties. By default, this option is enabled. If this option is enabled,
unique index names are created using the format IX_table_name_index_name. If this option is
disabled, index names aren’t changed.
• A GOTO statement and a label can be used to change the order that statements are run in. Any
Transact-SQL statements that follow a GOTO statement are skipped and processing continues
at the label. GOTO statements and labels can be used anywhere within a procedure, batch, or
statement block. GOTO statements can also be nested.
SQL Server to PostgreSQL Version 1.0.672 148

AWS Schema Conversion Tool User Guide
PostgreSQL doesn’t use GOTO statements. When AWS SCT converts code that contains a GOTO
statement, it converts the statement to use a BEGIN…END or LOOP…END LOOP statement. You
can find examples of how AWS SCT converts GOTO statements in the table following.
SQL Server GOTO statements and the converted PostgreSQL statements
SQL Server statement PostgreSQL statement
BEGIN
....
statement1;
....
GOTO label1;
statement2;
....
label1:
Statement3;
....
END
BEGIN
label1:
BEGIN
....
statement1;
....
EXIT label1;
statement2;
....
END;
Statement3;
....
END
BEGIN
....
statement1;
....
label1:
statement2;
....
GOTO label1;
statement3;
....
statement4;
....
END
BEGIN
....
statement1;
....
label1:
LOOP
statement2;
....
CONTINUE label1;
EXIT label1;
END LOOP;
statement3;
....
statement4;
....
END
SQL Server to PostgreSQL Version 1.0.672 149

AWS Schema Conversion Tool User Guide
SQL Server statement PostgreSQL statement
BEGIN
....
statement1;
....
label1:
statement2;
....
statement3;
....
statement4;
....
END
BEGIN
....
statement1;
....
label1:
BEGIN
statement2;
....
statement3;
....
statement4;
....
END;
END
• PostgreSQL doesn't support a MERGE statement. AWS SCT emulates the behavior of a MERGE
statement in the following ways:
• By INSERT ON CONFLICT construction.
• By using the UPDATE FROM DML statement, such as MERGE without a WHEN NOT MATCHED
clause.
• By using CURSOR, such as with a MERGE with DELETE clause or by using a complex MERGE ON
condition statement.
• AWS SCT can add database triggers to the object tree when Amazon RDS is the target.
• AWS SCT can add server-level triggers to the object tree when Amazon RDS is the target.
•
SQL Server automatically creates and manages deleted and inserted tables. You can use
these temporary, memory-resident tables to test the effects of certain data modifications and
to set conditions for DML trigger actions. AWS SCT can convert the usage of these tables inside
DML trigger statements.
• AWS SCT can add linked servers to the object tree when Amazon RDS is the target.
• When migrating from Microsoft SQL Server to PostgreSQL, the built-in SUSER_SNAME function
is converted as follows:
• SUSER_SNAME – Returns the login name associated with a security identification number
(SID).
• SUSER_SNAME(<server_user_sid>) – Not supported.
SQL Server to PostgreSQL Version 1.0.672 150
AWS Schema Conversion Tool User Guide
• SUSER_SNAME() CURRENT_USER – Returns the user name of the current execution context.
• SUSER_SNAME(NULL) – Returns NULL.
• Converting table-valued functions is supported. Table-valued functions return a table and can
take the place of a table in a query.
• PATINDEX returns the starting position of the first occurrence of a pattern in a specified
expression on all valid text and character data types. It returns zeros if the pattern is not found.
When converting from SQL Server to Amazon RDS for PostgreSQL, AWS SCT replaces application
code that uses PATINDEX with aws_sqlserver_ext.patindex(<pattern character>, <expression
character varying>) .
• In SQL Server, a user-defined table type is a type that represents the definition of a table
structure. You use a user-defined table type to declare table-value parameters for stored
procedures or functions. You can also use a user-defined table type to declare table variables
that you want to use in a batch or in the body of a stored procedure or function. AWS SCT
emulated this type in PostgreSQL by creating a temporary table.
When converting from SQL Server to PostgreSQL, AWS SCT converts SQL Server system objects
into recognizable objects in PostgreSQL. The following table shows how the system objects are
converted.
MS SQL Server use cases PostgreSQL substitution
SYS.SCHEMAS AWS_SQLSERVER_EXT.SYS_SCHEMAS
SYS.TABLES AWS_SQLSERVER_EXT.SYS_TABLES
SYS.VIEWS AWS_SQLSERVER_EXT.SYS_VIEWS
SYS.ALL_VIEWS AWS_SQLSERVER_EXT.SYS_ALL_VIEWS
SYS.TYPES AWS_SQLSERVER_EXT.SYS_TYPES
SYS.COLUMNS AWS_SQLSERVER_EXT.SYS_COLUMNS
SYS.ALL_COLUMNS AWS_SQLSERVER_EXT.SYS_ALL_COLUMNS
SYS.FOREIGN_KEYS AWS_SQLSERVER_EXT.SYS_FOREIGN_KEYS
SQL Server to PostgreSQL Version 1.0.672 151
AWS Schema Conversion Tool User Guide
MS SQL Server use cases PostgreSQL substitution
SYS.SYSFOREIGNKEYS AWS_SQLSERVER_EXT.SYS_SYSFOREIGNKEYS
SYS.FOREIGN_KEY_CO
LUMNS
AWS_SQLSERVER_EXT.SYS_FOREIGN_KEY_COLUMNS
SYS.KEY_CONSTRAINTS AWS_SQLSERVER_EXT.SYS_KEY_CONSTRAINTS
SYS.IDENTITY_COLUMNS AWS_SQLSERVER_EXT.SYS_IDENTITY_COLUMNS
SYS.PROCEDURES AWS_SQLSERVER_EXT.SYS_PROCEDURES
SYS.INDEXES AWS_SQLSERVER_EXT.SYS_INDEXES
SYS.SYSINDEXES AWS_SQLSERVER_EXT.SYS_SYSINDEXES
SYS.OBJECTS AWS_SQLSERVER_EXT.SYS_OBJECTS
SYS.ALL_OBJECTS AWS_SQLSERVER_EXT.SYS_ALL_OBJECTS
SYS.SYSOBJECTS AWS_SQLSERVER_EXT.SYS_SYSOBJECTS
SYS.SQL_MODULES AWS_SQLSERVER_EXT.SYS_SQL_MODULES
SYS.DATABASES AWS_SQLSERVER_EXT.SYS_DATABASES
INFORMATION_SCHEMA
.SCHEMATA
AWS_SQLSERVER_EXT.INFORMATION_SCHEMA_SCHEMATA
INFORMATION_SCHEMA
.VIEWS
AWS_SQLSERVER_EXT.INFORMATION_SCHEMA_VIEWS
INFORMATION_SCHEMA
.TABLES
AWS_SQLSERVER_EXT.INFORMATION_SCHEMA_TABLES
INFORMATION_SCHEMA
.COLUMNS
AWS_SQLSERVER_EXT.INFORMATION_SCHEMA_COLUMNS
INFORMATION_SCHEMA
.CHECK_CONSTRAINTS
AWS_SQLSERVER_EXT.INFORMATION_SCHEMA_CHECK_CO
NSTRAINTS
SQL Server to PostgreSQL Version 1.0.672 152

AWS Schema Conversion Tool User Guide
MS SQL Server use cases PostgreSQL substitution
INFORMATION_SCHEMA
.REFERENTIAL_CONST
RAINTS
AWS_SQLSERVER_EXT.INFORMATION_SCHEMA_REFERENT
IAL_CONSTRAINTS
INFORMATION_SCHEMA
.TABLE_CONSTRAINTS
AWS_SQLSERVER_EXT.INFORMATION_SCHEMA_TABLE_CO
NSTRAINTS
INFORMATION_SCHEMA
.KEY_COLUMN_USAGE
AWS_SQLSERVER_EXT.INFORMATION_SCHEMA_KEY_COLU
MN_USAGE
INFORMATION_SCHEMA
.CONSTRAINT_TABLE_
USAGE
AWS_SQLSERVER_EXT.INFORMATION_SCHEMA_CONSTRAI
NT_TABLE_USAGE
INFORMATION_SCHEMA
.CONSTRAINT_COLUMN
_USAGE
AWS_SQLSERVER_EXT.INFORMATION_SCHEMA_CONSTRAI
NT_COLUMN_USAGE
INFORMATION_SCHEMA
.ROUTINES
AWS_SQLSERVER_EXT.INFORMATION_SCHEMA_ROUTINES
SYS.SYSPROCESSES AWS_SQLSERVER_EXT.SYS_SYSPROCESSES
sys.system_objects AWS_SQLSERVER_EXT.SYS_SYSTEM_OBJECTS
Using an AWS SCT extension pack to emulate SQL Server Agent in PostgreSQL
SQL Server Agent is a Microsoft Windows service that runs SQL Server jobs. SQL Server Agent runs
jobs on a schedule, in response to a specific event, or on demand. For more information about SQL
Server Agent, see Microsoft technical documentation.
PostgreSQL doesn't have an equivalent for SQL Server Agent. To emulate the SQL Server Agent
features, AWS SCT creates an extension pack. This extension pack uses AWS Lambda and Amazon
CloudWatch. AWS Lambda implements the interface that you use to manage schedules and run
jobs. Amazon CloudWatch maintains the schedule rules.
SQL Server to PostgreSQL Version 1.0.672 153

AWS Schema Conversion Tool User Guide
AWS Lambda and Amazon CloudWatch use a JSON parameter to interact. This JSON parameter has
the following structure.
{
"mode": mode,
"parameters": {
list of parameters
},
"callback": procedure name
}
In the preceding example, mode is the type of the task and list of parameters is a set of
parameters that depend on the type of the task. Also, procedure name is the name of the
procedure that runs after the task is completed.
AWS SCT uses one Lambda function to control and run jobs. The CloudWatch rule starts the run
of the job and provides the necessary information to start the job. When the CloudWatch rule
triggers, it starts the Lambda function using the parameters from the rule.
To create a simple job that calls a procedure, use the following format.
{
"mode": "run_job",
"parameters": {
"vendor": "mysql",
"cmd": "lambda_db.nightly_job"
}
}
To create a job with several steps, use the following format.
{
"mode": "run_job",
"parameters": {
"job_name": "Job1",
"enabled": "true",
"start_step_id": 1,
"notify_level_email": [0|1|2|3],
"notify_email": email,
"delete_level": [0|1|2|3],
"job_callback": "ProcCallBackJob(job_name, code, message)",
SQL Server to PostgreSQL Version 1.0.672 154

AWS Schema Conversion Tool User Guide
"step_callback": "ProcCallBackStep(job_name, step_id, code, message)"
},
"steps": [
{
"id":1,
"cmd": "ProcStep1",
"cmdexec_success_code": 0,
"on_success_action": [|2|3|4],
"on_success_step_id": 1,
"on_fail_action": 0,
"on_fail_step_id": 0,
"retry_attempts": number,
"retry_interval": number
},
{
"id":2,
"cmd": "ProcStep2",
"cmdexec_success_code": 0,
"on_success_action": [1|2|3|4],
"on_success_step_id": 0,
"on_fail_action": 0,
"on_fail_step_id": 0,
"retry_attempts": number,
"retry_interval": number
},
...
]
}
To emulate the SQL Server Agent behavior in PostgreSQL, the AWS SCT extension pack also creates
the following tables and procedures.
Tables that emulate SQL Server Agent in PostgreSQL
To emulate SQL Server Agent, the extension pack uses the following tables:
sysjobs
Stores the information about the jobs.
sysjobsteps
Stores the information about the steps of a job.
SQL Server to PostgreSQL Version 1.0.672 155

AWS Schema Conversion Tool User Guide
sysschedules
Stores the information about the job schedules.
sysjobschedules
Stores the schedule information for individual jobs.
sysjobhistory
Stores the information about the runs of scheduled jobs.
Procedures that emulate SQL Server Agent in PostgreSQL
To emulate SQL Server Agent, the extension pack uses the following procedures:
sp_add_job
Adds a new job.
sp_add_jobstep
Adds a step to a job.
sp_add_schedule
Creates a new schedule rule in Amazon CloudWatch. You can use this schedule with any number
of jobs.
sp_attach_schedule
Sets a schedule for the selected job.
sp_add_jobschedule
Creates a schedule rule for a job in Amazon CloudWatch and sets the target for this rule.
sp_update_job
Updates the attributes of the previously created job.
sp_update_jobstep
Updates the attributes of the step in a job.
sp_update_schedule
Updates the attributes of a schedule rule in Amazon CloudWatch.
SQL Server to PostgreSQL Version 1.0.672 156

AWS Schema Conversion Tool User Guide
sp_update_jobschedule
Updates the attributes of the schedule for the specified job.
sp_delete_job
Deletes a job.
sp_delete_jobstep
Deletes a job step from a job.
sp_delete_schedule
Deletes a schedule.
sp_delete_jobschedule
Deletes the schedule rule for the specified job from Amazon CloudWatch.
sp_detach_schedule
Removes an association between a schedule and a job.
get_jobs, update_job
Internal procedures that interact with AWS Elastic Beanstalk.
sp_verify_job_date, sp_verify_job_time, sp_verify_job, sp_verify_jobstep, sp_verify_schedule,
sp_verify_job_identifiers, sp_verify_schedule_identifiers
Internal procedures that check settings.
Syntax for procedures that emulate SQL Server Agent in PostgreSQL
The aws_sqlserver_ext.sp_add_job procedure in the extension pack emulates the
msdb.dbo.sp_add_job procedure. For more information about the source SQL Server Agent
procedure, see Microsoft technical documentation.
par_job_name varchar,
par_enabled smallint = 1,
par_description varchar = NULL::character varying,
par_start_step_id integer = 1,
par_category_name varchar = NULL::character varying,
par_category_id integer = NULL::integer,
par_owner_login_name varchar = NULL::character varying,
par_notify_level_eventlog integer = 2,
par_notify_level_email integer = 0,
SQL Server to PostgreSQL Version 1.0.672 157

AWS Schema Conversion Tool User Guide
par_notify_level_netsend integer = 0,
par_notify_level_page integer = 0,
par_notify_email_operator_name varchar = NULL::character varying,
par_notify_netsend_operator_name varchar = NULL::character varying,
par_notify_page_operator_name varchar = NULL::character varying,
par_delete_level integer = 0,
inout par_job_id integer = NULL::integer,
par_originating_server varchar = NULL::character varying,
out returncode integer
The aws_sqlserver_ext.sp_add_jobstep procedure in the extension pack emulates the
msdb.dbo.sp_add_jobstep procedure. For more information about the source SQL Server
Agent procedure, see Microsoft technical documentation.
par_job_id integer = NULL::integer,
par_job_name varchar = NULL::character varying,
par_step_id integer = NULL::integer,
par_step_name varchar = NULL::character varying,
par_subsystem varchar = 'TSQL'::bpchar,
par_command text = NULL::text,
par_additional_parameters text = NULL::text,
par_cmdexec_success_code integer = 0,
par_on_success_action smallint = 1,
par_on_success_step_id integer = 0,
par_on_fail_action smallint = 2,
par_on_fail_step_id integer = 0,
par_server varchar = NULL::character varying,
par_database_name varchar = NULL::character varying,
par_database_user_name varchar = NULL::character varying,
par_retry_attempts integer = 0,
par_retry_interval integer = 0,
par_os_run_priority integer = 0,
par_output_file_name varchar = NULL::character varying,
par_flags integer = 0,
par_proxy_id integer = NULL::integer,
par_proxy_name varchar = NULL::character varying,
inout par_step_uid char = NULL::bpchar,
out returncode integer
The aws_sqlserver_ext.sp_add_schedule procedure in the extension pack emulates the
msdb.dbo.sp_add_schedule procedure. For more information about the source SQL Server
Agent procedure, see Microsoft technical documentation.
SQL Server to PostgreSQL Version 1.0.672 158

AWS Schema Conversion Tool User Guide
par_schedule_name varchar,
par_enabled smallint = 1,
par_freq_type integer = 0,
par_freq_interval integer = 0,
par_freq_subday_type integer = 0,
par_freq_subday_interval integer = 0,
par_freq_relative_interval integer = 0,
par_freq_recurrence_factor integer = 0,
par_active_start_date integer = NULL::integer,
par_active_end_date integer = 99991231,
par_active_start_time integer = 0,
par_active_end_time integer = 235959,
par_owner_login_name varchar = NULL::character varying,
*inout par_schedule_uid char = NULL::bpchar,*
inout par_schedule_id integer = NULL::integer,
par_originating_server varchar = NULL::character varying,
out returncode integer
The aws_sqlserver_ext.sp_attach_schedule procedure in the extension pack emulates the
msdb.dbo.sp_attach_schedule procedure. For more information about the source SQL Server
Agent procedure, see Microsoft technical documentation.
par_job_id integer = NULL::integer,
par_job_name varchar = NULL::character varying,
par_schedule_id integer = NULL::integer,
par_schedule_name varchar = NULL::character varying,
par_automatic_post smallint = 1,
out returncode integer
The aws_sqlserver_ext.sp_add_jobschedule procedure in the extension pack emulates the
msdb.dbo.sp_add_jobschedule procedure. For more information about the source SQL Server
Agent procedure, see Microsoft technical documentation.
par_job_id integer = NULL::integer,
par_job_name varchar = NULL::character varying,
par_name varchar = NULL::character varying,
par_enabled smallint = 1,
par_freq_type integer = 1,
par_freq_interval integer = 0,
par_freq_subday_type integer = 0,
par_freq_subday_interval integer = 0,
SQL Server to PostgreSQL Version 1.0.672 159

AWS Schema Conversion Tool User Guide
par_freq_relative_interval integer = 0,
par_freq_recurrence_factor integer = 0,
par_active_start_date integer = NULL::integer,
par_active_end_date integer = 99991231,
par_active_start_time integer = 0,
par_active_end_time integer = 235959,
inout par_schedule_id integer = NULL::integer,
par_automatic_post smallint = 1,
inout par_schedule_uid char = NULL::bpchar,
out returncode integer
The aws_sqlserver_ext.sp_delete_job procedure in the extension pack emulates the
msdb.dbo.sp_delete_job procedure. For more information about the source SQL Server Agent
procedure, see Microsoft technical documentation.
par_job_id integer = NULL::integer,
par_job_name varchar = NULL::character varying,
par_originating_server varchar = NULL::character varying,
par_delete_history smallint = 1,
par_delete_unused_schedule smallint = 1,
out returncode integer
The aws_sqlserver_ext.sp_delete_jobstep procedure in the extension pack emulates the
msdb.dbo.sp_delete_jobstep procedure. For more information about the source SQL Server
Agent procedure, see Microsoft technical documentation.
par_job_id integer = NULL::integer,
par_job_name varchar = NULL::character varying,
par_step_id integer = NULL::integer,
out returncode integer
The aws_sqlserver_ext.sp_delete_jobschedule procedure in the extension pack emulates
the msdb.dbo.sp_delete_jobschedule procedure. For more information about the source SQL
Server Agent procedure, see Microsoft technical documentation.
par_job_id integer = NULL::integer,
par_job_name varchar = NULL::character varying,
par_name varchar = NULL::character varying,
par_keep_schedule integer = 0,
par_automatic_post smallint = 1,
out returncode integer
SQL Server to PostgreSQL Version 1.0.672 160

AWS Schema Conversion Tool User Guide
The aws_sqlserver_ext.sp_delete_schedule procedure in the extension pack emulates the
msdb.dbo.sp_delete_schedule procedure. For more information about the source SQL Server
Agent procedure, see Microsoft technical documentation.
par_schedule_id integer = NULL::integer,
par_schedule_name varchar = NULL::character varying,
par_force_delete smallint = 0,
par_automatic_post smallint = 1,
out returncode integer
The aws_sqlserver_ext.sp_detach_schedule procedure in the extension pack emulates the
msdb.dbo.sp_detach_schedule procedure. For more information about the source SQL Server
Agent procedure, see Microsoft technical documentation.
par_job_id integer = NULL::integer,
par_job_name varchar = NULL::character varying,
par_schedule_id integer = NULL::integer,
par_schedule_name varchar = NULL::character varying,
par_delete_unused_schedule smallint = 0,
par_automatic_post smallint = 1,
out returncode integer
The aws_sqlserver_ext.sp_update_job procedure in the extension pack emulates the
msdb.dbo.sp_update_job procedure. For more information about the source SQL Server Agent
procedure, see Microsoft technical documentation.
par_job_id integer = NULL::integer
par_job_name varchar = NULL::character varying
par_new_name varchar = NULL::character varying
par_enabled smallint = NULL::smallint
par_description varchar = NULL::character varying
par_start_step_id integer = NULL::integer
par_category_name varchar = NULL::character varying
par_owner_login_name varchar = NULL::character varying
par_notify_level_eventlog integer = NULL::integer
par_notify_level_email integer = NULL::integer
par_notify_level_netsend integer = NULL::integer
par_notify_level_page integer = NULL::integer
par_notify_email_operator_name varchar = NULL::character varying
par_notify_netsend_operator_name varchar = NULL::character varying
par_notify_page_operator_name varchar = NULL::character varying
SQL Server to PostgreSQL Version 1.0.672 161

AWS Schema Conversion Tool User Guide
par_delete_level integer = NULL::integer
par_automatic_post smallint = 1
out returncode integer
The aws_sqlserver_ext.sp_update_jobschedule procedure in the extension pack emulates
the msdb.dbo.sp_update_jobschedule procedure. For more information about the source SQL
Server Agent procedure, see Microsoft technical documentation.
par_job_id integer = NULL::integer
par_job_name varchar = NULL::character varying
par_name varchar = NULL::character varying
par_new_name varchar = NULL::character varying
par_enabled smallint = NULL::smallint
par_freq_type integer = NULL::integer
par_freq_interval integer = NULL::integer
par_freq_subday_type integer = NULL::integer
par_freq_subday_interval integer = NULL::integer
par_freq_relative_interval integer = NULL::integer
par_freq_recurrence_factor integer = NULL::integer
par_active_start_date integer = NULL::integer
par_active_end_date integer = NULL::integer
par_active_start_time integer = NULL::integer
par_active_end_time integer = NULL::integer
par_automatic_post smallint = 1
out returncode integer
The aws_sqlserver_ext.sp_update_jobstep procedure in the extension pack emulates the
msdb.dbo.sp_update_jobstep procedure. For more information about the source SQL Server
Agent procedure, see Microsoft technical documentation.
par_job_id integer = NULL::integer
par_job_name varchar = NULL::character varying
par_step_id integer = NULL::integer
par_step_name varchar = NULL::character varying
par_subsystem varchar = NULL::character varying
par_command text = NULL::text
par_additional_parameters text = NULL::text
par_cmdexec_success_code integer = NULL::integer
par_on_success_action smallint = NULL::smallint
par_on_success_step_id integer = NULL::integer
par_on_fail_action smallint = NULL::smallint
par_on_fail_step_id integer = NULL::integer
SQL Server to PostgreSQL Version 1.0.672 162

AWS Schema Conversion Tool User Guide
par_server varchar = NULL::character varying
par_database_name varchar = NULL::character varying
par_database_user_name varchar = NULL::character varying
par_retry_attempts integer = NULL::integer
par_retry_interval integer = NULL::integer
par_os_run_priority integer = NULL::integer
par_output_file_name varchar = NULL::character varying
par_flags integer = NULL::integer
par_proxy_id integer = NULL::integer
par_proxy_name varchar = NULL::character varying
out returncode integer
The aws_sqlserver_ext.sp_update_schedule procedure in the extension pack emulates the
msdb.dbo.sp_update_schedule procedure. For more information about the source SQL Server
Agent procedure, see Microsoft technical documentation.
par_schedule_id integer = NULL::integer
par_name varchar = NULL::character varying
par_new_name varchar = NULL::character varying
par_enabled smallint = NULL::smallint
par_freq_type integer = NULL::integer
par_freq_interval integer = NULL::integer
par_freq_subday_type integer = NULL::integer
par_freq_subday_interval integer = NULL::integer
par_freq_relative_interval integer = NULL::integer
par_freq_recurrence_factor integer = NULL::integer
par_active_start_date integer = NULL::integer
par_active_end_date integer = NULL::integer
par_active_start_time integer = NULL::integer
par_active_end_time integer = NULL::integer
par_owner_login_name varchar = NULL::character varying
par_automatic_post smallint = 1
out returncode integer
Examples for using procedures that emulate SQL Server Agent in PostgreSQL
To add a new job, use the aws_sqlserver_ext.sp_add_job procedure as shown following.
SELECT * FROM aws_sqlserver_ext.sp_add_job (
par_job_name := 'test_job',
par_enabled := 1::smallint,
par_start_step_id := 1::integer,
SQL Server to PostgreSQL Version 1.0.672 163

AWS Schema Conversion Tool User Guide
par_category_name := '[Uncategorized (Local)]',
par_owner_login_name := 'sa');
To add a new job step, use the aws_sqlserver_ext.sp_add_jobstep procedure as shown
following.
SELECT * FROM aws_sqlserver_ext.sp_add_jobstep (
par_job_name := 'test_job',
par_step_id := 1::smallint,
par_step_name := 'test_job_step1',
par_subsystem := 'TSQL',
par_command := 'EXECUTE [dbo].[PROC_TEST_JOB_STEP1];',
par_server := NULL,
par_database_name := 'GOLD_TEST_SS');
To add a simple schedule, use the aws_sqlserver_ext.sp_add_schedule procedure as shown
following.
SELECT * FROM aws_sqlserver_ext.sp_add_schedule(
par_schedule_name := 'RunOnce',
par_freq_type := 1,
par_active_start_time := 233000);
To set a schedule for a job, use the aws_sqlserver_ext.sp_attach_schedule procedure as
shown following.
SELECT * FROM aws_sqlserver_ext.sp_attach_schedule (
par_job_name := 'test_job',
par_schedule_name := 'NightlyJobs');
To create a schedule for a job, use the aws_sqlserver_ext.sp_add_jobschedule procedure as
shown following.
SELECT * FROM aws_sqlserver_ext.sp_add_jobschedule (
par_job_name := 'test_job2',
par_name := 'test_schedule2',
par_enabled := 1::smallint,
par_freq_type := 4,
par_freq_interval := 1,
par_freq_subday_type := 4,
par_freq_subday_interval := 1,
SQL Server to PostgreSQL Version 1.0.672 164

AWS Schema Conversion Tool User Guide
par_freq_relative_interval := 0,
par_freq_recurrence_factor := 0,
par_active_start_date := 20100801,
par_active_end_date := 99991231,
par_active_start_time := 0,
par_active_end_time := 0);
Use case examples for emulating SQL Server Agent in PostgreSQL
If your source database code uses SQL Server Agent to run jobs, you can use the SQL Server to
PostgreSQL extension pack for AWS SCT to convert this code to PostgreSQL. The extension pack
uses AWS Lambda functions to emulate the behavior of SQL Server Agent.
You can create a new AWS Lambda function or register an existing function.
To create a new AWS Lambda function
1. In AWS SCT, in the target database tree, open the context (right-click) menu, choose Apply
extension pack for, and then choose PostgreSQL.
The extension pack wizard appears.
2. On the SQL Server Agent emulation service tab, do the following:
• Choose Create an AWS Lambda function.
• For Database login, enter the name of the target database user.
• For Database password, enter the password for the user name that you entered on the
preceding step.
• For Python library folder, enter the path to your Python library folder.
• Choose Create AWS Lambda function, and then choose Next.
To register an AWS Lambda function that you deployed earlier
• Run the following script on your target database.
SELECT
FROM aws_sqlserver_ext.set_service_setting(
p_service := 'JOB',
p_setting := 'LAMBDA_ARN',
p_value := ARN)
SQL Server to PostgreSQL Version 1.0.672 165

AWS Schema Conversion Tool User Guide
In the preceding example, ARN is the Amazon Resource Name (ARN) of the deployed AWS
Lambda function.
The following example creates a simple task that consists of one step. Every five minutes, this
task runs the previously created job_example function. This function inserts records into the
job_example_table table.
To create this simple task
1.
Create a job using the aws_sqlserver_ext.sp_add_job function as shown following.
SELECT
FROM aws_sqlserver_ext.sp_add_job (
par_job_name := 'test_simple_job');
2.
Create a job step using the aws_sqlserver_ext.sp_add_jobstep function as shown
following.
SELECT
FROM aws_sqlserver_ext.sp_add_jobstep (
par_job_name := 'test_simple_job',
par_step_name := 'test_simple_job_step1',
par_command := 'PERFORM job_simple_example;');
The job step specifies what the function does.
3.
Create a scheduler for the job using the aws_sqlserver_ext.sp_add_jobschedule
function as shown following.
SELECT
FROM aws_sqlserver_ext.sp_add_jobschedule (
par_job_name := 'test_simple_job',
par_name := 'test_schedule',
par_freq_type := 4, /* Daily */
par_freq_interval := 1, /* frequency_interval is unused */
par_freq_subday_type := 4, /* Minutes */
par_freq_subday_interval := 5 /* 5 minutes */);
The job step specifies what the function does.
SQL Server to PostgreSQL Version 1.0.672 166

AWS Schema Conversion Tool User Guide
To delete this job, use the aws_sqlserver_ext.sp_delete_job function as shown following.
PERFORM aws_sqlserver_ext.sp_delete_job(
par_job_name := 'PeriodicJob1'::character varying,
par_delete_history := 1::smallint,
par_delete_unused_schedule := 1::smallint);
Using an AWS SCT extension pack to emulate SQL Server Database Mail in
PostgreSQL
You can use SQL Server Database Mail to send email messages to users from the SQL Server
Database Engine or Azure SQL Managed Instance. These email messages can contain query results
or include files from any resource on your network. For more information about SQL Server
Database Mail, see Microsoft technical documentation.
PostgreSQL doesn't have an equivalent for SQL Server Database Mail. To emulate the SQL Server
Database Mail features, AWS SCT creates an extension pack. This extension pack uses AWS Lambda
and Amazon Simple Email Service (Amazon SES). AWS Lambda provides users with an interface
to interact with Amazon SES email sending service. To set up this interaction, add the Amazon
Resource Name (ARN) of your Lambda function.
For a new email account, use the following command.
do
$$
begin
PERFORM sysmail_add_account_sp (
par_account_name :='your_account_name',
par_email_address := 'your_account_email',
par_display_name := 'your_account_display_name',
par_mailserver_type := 'AWSLAMBDA'
par_mailserver_name := 'ARN'
);
end;
$$ language plpgsql;
To add the ARN of your Lambda function to the existing email account, use the following
command.
do
SQL Server to PostgreSQL Version 1.0.672 167

AWS Schema Conversion Tool User Guide
$$
begin
PERFORM sysmail_update_account_sp (
par_account_name :='existind_account_name',
par_mailserver_type := 'AWSLAMBDA'
par_mailserver_name := 'ARN'
);
end;
$$ language plpgsql;
In the preceding examples, ARN is the ARN of your Lambda function.
To emulate the SQL Server Database Mail behavior in PostgreSQL, the AWS SCT extension pack
uses the following tables, views, and procedures.
Tables that emulate SQL Server Database Mail in PostgreSQL
To emulate SQL Server Database Mail, the extension pack uses the following tables:
sysmail_account
Stores the information about the email accounts.
sysmail_profile
Stores the information about the user profiles.
sysmail_server
Stores the information about the email servers.
sysmail_mailitems
Stores the list of the email messages.
sysmail_attachments
Contains one row for each email attachment.
sysmail_log
Stores the service information about sending email messages.
sysmail_profileaccount
Stores the information about the user profiles and email accounts.
SQL Server to PostgreSQL Version 1.0.672 168

AWS Schema Conversion Tool User Guide
Views that emulate SQL Server Database Mail in PostgreSQL
To emulate SQL Server Database Mail, AWS SCT creates the following views in the PostgreSQL
database to ensure compatibility. The extension pack doesn't use them, but your converted code
can query these views.
sysmail_allitems
Includes a list of all emails.
sysmail_faileditems
Includes a list of emails that couldn't be sent.
sysmail_sentitems
Includes a list of sent emails.
sysmail_unsentitems
Includes a list of emails that aren't sent yet.
sysmail_mailattachments
Includes a list of attached files.
Procedures that emulate SQL Server Database Mail in PostgreSQL
To emulate SQL Server Database Mail, the extension pack uses the following procedures:
sp_send_dbmail
Sends an email to the specified recipients.
sysmail_add_profile_sp
Creates a new user profile.
sysmail_add_account_sp
Creates a new email account that stores such information as Simple Mail Transfer Protocol
(SMTP) credentials, and so on.
sysmail_add_profileaccount_sp
Adds an email account to the specified user profile.
SQL Server to PostgreSQL Version 1.0.672 169

AWS Schema Conversion Tool User Guide
sysmail_update_profile_sp
Changes the attributes of the user profile such as description, name, and so on.
sysmail_update_account_sp
Changes the information in the existing email account.
sysmail_update_profileaccount_sp
Updates the email account information in the specified user profile.
sysmail_delete_profileaccount_sp
Removes an email account from the specified user profile.
sysmail_delete_account_sp
Deletes the email account.
sysmail_delete_profile_sp
Deletes the user profile.
sysmail_delete_mailitems_sp
Deletes emails from internal tables.
sysmail_help_profile_sp
Displays information about the user profile.
sysmail_help_account_sp
Displays information about the email account.
sysmail_help_profileaccount_sp
Displays information about email accounts associated with the user profile.
sysmail_dbmail_json
An internal procedure that generates JSON requests for AWS Lambda functions.
sysmail_verify_profile_sp, sysmail_verify_account_sp, sysmail_verify_addressparams_sp
Internal procedures that check settings.
SQL Server to PostgreSQL Version 1.0.672 170

AWS Schema Conversion Tool User Guide
sp_get_dbmail, sp_set_dbmail, sysmail_dbmail_xml
Deprecated internal procedures.
Syntax for procedures that emulate SQL Server Database Mail in PostgreSQL
The aws_sqlserver_ext.sp_send_dbmail procedure in the extension pack emulates the
msdb.dbo.sp_send_dbmail procedure. For more information about the source SQL Server
Database Mail procedure, see Microsoft technical documentation.
par_profile_name varchar = NULL::character varying,
par_recipients text = NULL::text,
par_copy_recipients text = NULL::text,
par_blind_copy_recipients text = NULL::text,
par_subject varchar = NULL::character varying,
par_body text = NULL::text,
par_body_format varchar = NULL::character varying,
par_importance varchar = 'NORMAL'::character varying,
par_sensitivity varchar = 'NORMAL'::character varying,
par_file_attachments text = NULL::text,
par_query text = NULL::text,
par_execute_query_database varchar = NULL::character varying,
par_attach_query_result_as_file smallint = 0,
par_query_attachment_filename varchar = NULL::character varying,
par_query_result_header smallint = 1,
par_query_result_width integer = 256,
par_query_result_separator VARCHAR = ' '::character varying,
par_exclude_query_output smallint = 0,
par_append_query_error smallint = 0,
par_query_no_truncate smallint = 0,
par_query_result_no_padding smallint = 0,
out par_mailitem_id integer,
par_from_address text = NULL::text,
par_reply_to text = NULL::text,
out returncode integer
The aws_sqlserver_ext.sysmail_delete_mailitems_sp procedure in the extension pack
emulates the msdb.dbo.sysmail_delete_mailitems_sp procedure. For more information
about the source SQL Server Database Mail procedure, see Microsoft technical documentation.
par_sent_before timestamp = NULL::timestamp without time zone,
par_sent_status varchar = NULL::character varying,
SQL Server to PostgreSQL Version 1.0.672 171

AWS Schema Conversion Tool User Guide
out returncode integer
The aws_sqlserver_ext.sysmail_add_profile_sp procedure in the extension pack
emulates the msdb.dbo.sysmail_add_profile_sp procedure. For more information about the
source SQL Server Database Mail procedure, see Microsoft technical documentation.
par_profile_name varchar,
par_description varchar = NULL::character varying,
out par_profile_id integer,
out returncode integer
The aws_sqlserver_ext.sysmail_add_account_sp procedure in the extension pack
emulates the msdb.dbo.sysmail_add_account_sp procedure. For more information about the
source SQL Server Database Mail procedure, see Microsoft technical documentation.
par_account_name varchar
par_email_address varchar
par_display_name varchar = NULL::character varying
par_replyto_address varchar = NULL::character varying
par_description varchar = NULL::character varying
par_mailserver_name varchar = NULL::character varying
par_mailserver_type varchar = 'SMTP'::bpchar
par_port integer = 25
par_username varchar = NULL::character varying
par_password varchar = NULL::character varying
par_use_default_credentials smallint = 0
par_enable_ssl smallint = 0
out par_account_id integer
out returncode integer
The aws_sqlserver_ext.sysmail_add_profileaccount_sp procedure in the extension pack
emulates the msdb.dbo.sysmail_add_profileaccount_sp procedure. For more information
about the source SQL Server Database Mail procedure, see Microsoft technical documentation.
par_profile_id integer = NULL::integer,
par_profile_name varchar = NULL::character varying,
par_account_id integer = NULL::integer,
par_account_name varchar = NULL::character varying,
par_sequence_number integer = NULL::integer,
out returncode integer
SQL Server to PostgreSQL Version 1.0.672 172

AWS Schema Conversion Tool User Guide
The aws_sqlserver_ext.sysmail_help_profile_sp procedure in the extension pack
emulates the msdb.dbo.sysmail_help_profile_sp procedure. For more information about
the source SQL Server Database Mail procedure, see Microsoft technical documentation.
par_profile_id integer = NULL::integer,
par_profile_name varchar = NULL::character varying,
out returncode integer
The aws_sqlserver_ext.sysmail_update_profile_sp procedure in the extension pack
emulates the msdb.dbo.sysmail_update_profile_sp procedure. For more information about
the source SQL Server Database Mail procedure, see Microsoft technical documentation.
par_profile_id integer = NULL::integer,
par_profile_name varchar = NULL::character varying,
par_description varchar = NULL::character varying,
out returncode integer
The aws_sqlserver_ext.sysmail_delete_profile_sp procedure in the extension pack
emulates the msdb.dbo.sysmail_delete_profile_sp procedure. For more information about
the source SQL Server Database Mail procedure, see Microsoft technical documentation.
par_profile_id integer = NULL::integer,
par_profile_name varchar = NULL::character varying,
par_force_delete smallint = 1,
out returncode integer
The aws_sqlserver_ext.sysmail_help_account_sp procedure in the extension pack
emulates the msdb.dbo.sysmail_help_account_sp procedure. For more information about
the source SQL Server Database Mail procedure, see Microsoft technical documentation.
par_account_id integer = NULL::integer,
par_account_name varchar = NULL::character varying,
out returncode integer
The aws_sqlserver_ext.sysmail_update_account_sp procedure in the extension pack
emulates the msdb.dbo.sysmail_update_account_sp procedure. For more information about
the source SQL Server Database Mail procedure, see Microsoft technical documentation.
par_account_id integer = NULL::integer,
par_account_name varchar = NULL::character varying,
SQL Server to PostgreSQL Version 1.0.672 173

AWS Schema Conversion Tool User Guide
par_email_address varchar = NULL::character varying,
par_display_name varchar = NULL::character varying,
par_replyto_address varchar = NULL::character varying,
par_description varchar = NULL::character varying,
par_mailserver_name varchar = NULL::character varying,
par_mailserver_type varchar = NULL::character varying,
par_port integer = NULL::integer,
par_username varchar = NULL::character varying,
par_password varchar = NULL::character varying,
par_use_default_credentials smallint = NULL::smallint,
par_enable_ssl smallint = NULL::smallint,
par_timeout integer = NULL::integer,
par_no_credential_change smallint = NULL::smallint,
out returncode integer
The aws_sqlserver_ext.sysmail_delete_account_sp procedure in the extension pack
emulates the msdb.dbo.sysmail_delete_account_sp procedure. For more information about
the source SQL Server Database Mail procedure, see Microsoft technical documentation.
par_account_id integer = NULL::integer,
par_account_name varchar = NULL::character varying,
out returncode integer
The aws_sqlserver_ext.sysmail_help_profileaccount_sp procedure in the extension
pack emulates the msdb.dbo.sysmail_help_profileaccount_sp procedure. For more
information about the source SQL Server Database Mail procedure, see Microsoft technical
documentation.
par_profile_id integer = NULL::integer,
par_profile_name varchar = NULL::character varying,
par_account_id integer = NULL::integer,
par_account_name varchar = NULL::character varying,
out returncode integer
The aws_sqlserver_ext.sysmail_update_profileaccount_sp procedure in the extension
pack emulates the msdb.dbo.sysmail_update_profileaccount_sp procedure. For more
information about the source SQL Server Database Mail procedure, see Microsoft technical
documentation.
par_profile_id integer = NULL::integer,
par_profile_name varchar = NULL::character varying,
SQL Server to PostgreSQL Version 1.0.672 174

AWS Schema Conversion Tool User Guide
par_account_id integer = NULL::integer,
par_account_name varchar = NULL::character varying,
par_sequence_number integer = NULL::integer,
out returncode integer
The aws_sqlserver_ext.sysmail_delete_profileaccount_sp procedure in the extension
pack emulates the msdb.dbo.sysmail_delete_profileaccount_sp procedure. For more
information about the source SQL Server Database Mail procedure, see Microsoft technical
documentation.
par_profile_id integer = NULL::integer,
par_profile_name varchar = NULL::character varying,
par_account_id integer = NULL::integer,
par_account_name varchar = NULL::character varying,
out returncode integer
Examples for using procedures that emulate SQL Server Database Mail in PostgreSQL
To send an email, use the aws_sqlserver_ext.sp_send_dbmail procedure as shown following.
PERFORM sp_send_dbmail (
par_profile_name := 'Administrator',
par_recipients := '[email protected]',
par_subject := 'Automated Success Message',
par_body := 'The stored procedure finished'
);
The following example shows how to send an email with query results.
PERFORM sp_send_dbmail (
par_profile_name := 'Administrator',
par_recipients := '[email protected]',
par_subject := 'Account with id = 1',
par_query := 'SELECT COUNT(*)FROM Account WHERE id = 1'
);
The following example shows how to send an email with HTML code.
DECLARE var_tableHTML TEXT;
SET var_tableHTML := CONCAT(
'<H1>Work Order Report</H1>',
SQL Server to PostgreSQL Version 1.0.672 175

AWS Schema Conversion Tool User Guide
'<table border="1">',
'<tr><th>Work Order ID</th><th>Product ID</th>',
'<th>Name</th><th>Order Qty</th><th>Due Date</th>',
'<th>Expected Revenue</th></tr>',
'</table>'
);
PERFORM sp_send_dbmail (
par_recipients := '[email protected]',
par_subject := 'Work Order List',
par_body := var_tableHTML,
par_body_format := 'HTML'
);
To delete emails, use the aws_sqlserver_ext.sysmail_delete_mailitems_sp procedure as
shown following.
DECLARE var_GETDATE datetime;
SET var_GETDATE = NOW();
PERFORM sysmail_delete_mailitems_sp (
par_sent_before := var_GETDATE
);
The following example shows how to delete the oldest emails.
PERFORM sysmail_delete_mailitems_sp (
par_sent_before := '31.12.2015'
);
The following example shows how to delete all emails that can't be sent.
PERFORM sysmail_delete_mailitems_sp (
par_sent_status := 'failed'
);
To create a new user profile, use the aws_sqlserver_ext.sysmail_add_profile_sp
procedure as shown following.
PERFORM sysmail_add_profile_sp (
profile_name := 'Administrator',
par_description := 'administrative mail'
);
SQL Server to PostgreSQL Version 1.0.672 176

AWS Schema Conversion Tool User Guide
The following example shows how to create a new profile and save the unique profile identifier in a
variable.
DECLARE var_profileId INT;
SELECT par_profile_id
FROM sysmail_add_profile_sp (
profile_name := 'Administrator',
par_description := ' Profile used for administrative mail.')
INTO var_profileId;
SELECT var_profileId;
To create a new email account, use the aws_sqlserver_ext.sysmail_add_account_sp
procedure as shown following.
PERFORM sysmail_add_account_sp (
par_account_name :='Audit Account',
par_email_address := '[email protected]',
par_display_name := 'Test Automated Mailer',
par_description := 'Account for administrative e-mail.',
par_mailserver_type := 'AWSLAMBDA'
par_mailserver_name := 'arn:aws:lambda:us-west-2:555555555555:function:pg_v3'
);
To add an email account to the user profile, use the
aws_sqlserver_ext.sysmail_add_profileaccount_sp procedure as shown following.
PERFORM sysmail_add_profileaccount_sp (
par_account_name := 'Administrator',
par_account_name := 'Audit Account',
par_sequence_number := 1
);
Use case examples for emulating SQL Server Database Mail in PostgreSQL
If your source database code uses SQL Server Database Mail to send emails, you can use the AWS
SCT extension pack to convert this code to PostgreSQL.
To send an email from your PostgreSQL database
1. Create and configure your AWS Lambda function.
SQL Server to PostgreSQL Version 1.0.672 177

AWS Schema Conversion Tool User Guide
2. Apply the AWS SCT extension pack.
3.
Create a user profile using the sysmail_add_profile_sp function as shown following.
4.
Create an email account using the sysmail_add_account_sp function as shown following.
5.
Add this email account to your user profile using the sysmail_add_profileaccount_sp
function as shown following.
CREATE OR REPLACE FUNCTION aws_sqlserver_ext.
proc_dbmail_settings_msdb()
RETURNS void
AS
$BODY$
BEGIN
PERFORM aws_sqlserver_ext.sysmail_add_profile_sp(
par_profile_name := 'Administrator',
par_description := 'administrative mail'
);
PERFORM aws_sqlserver_ext.sysmail_add_account_sp(
par_account_name := 'Audit Account',
par_description := 'Account for administrative e-mail.',
par_email_address := '[email protected]',
par_display_name := 'Test Automated Mailer',
par_mailserver_type := 'AWSLAMBDA'
par_mailserver_name := 'your_ARN'
);
PERFORM aws_sqlserver_ext.sysmail_add_profileaccount_sp(
par_profile_name := 'Administrator',
par_account_name := 'Audit Account',
par_sequence_number := 1
);
END;
$BODY$
LANGUAGE plpgsql;
6.
Send an email using the sp_send_dbmail function as shown following.
CREATE OR REPLACE FUNCTION aws_sqlserver_ext.
proc_dbmail_send_msdb()
RETURNS void
AS
$BODY$
BEGIN
PERFORM aws_sqlserver_ext.sp_send_dbmail(
SQL Server to PostgreSQL Version 1.0.672 178

AWS Schema Conversion Tool User Guide
par_profile_name := 'Administrator',
par_recipients := '[email protected]',
par_body := 'The stored procedure finished',
par_subject := 'Automated Success Message'
);
END;
$BODY$
LANGUAGE plpgsql;
To view the information about all user profiles, use the sysmail_help_profile_sp procedure as
shown following.
SELECT FROM aws_sqlserver_ext.sysmail_help_profile_sp();
The following example displays the information about the specific user profile.
select from aws_sqlserver_ext.sysmail_help_profile_sp(par_profile_id := 1);
select from aws_sqlserver_ext.sysmail_help_profile_sp(par_profile_name :=
'Administrator');
To view the information about all email accounts, use the sysmail_help_account_sp procedure
as shown following.
select from aws_sqlserver_ext.sysmail_help_account_sp();
The following example displays the information about the specific email account.
select from aws_sqlserver_ext.sysmail_help_account_sp(par_account_id := 1);
select from aws_sqlserver_ext.sysmail_help_account_sp(par_account_name := 'Audit
Account');
To view the information about all email accounts that are associated with the user profiles, use the
sysmail_help_profileaccount_sp procedure as shown following.
select from aws_sqlserver_ext.sysmail_help_profileaccount_sp();
The following example filters the records by identifier, profile name, or account name.
select from aws_sqlserver_ext.sysmail_help_profileaccount_sp(par_profile_id := 1);
SQL Server to PostgreSQL Version 1.0.672 179

AWS Schema Conversion Tool User Guide
select from aws_sqlserver_ext.sysmail_help_profileaccount_sp(par_profile_id := 1,
par_account_id := 1);
select from aws_sqlserver_ext.sysmail_help_profileaccount_sp(par_profile_name :=
'Administrator');
select from aws_sqlserver_ext.sysmail_help_profileaccount_sp(par_account_name := 'Audit
Account');
To change the user profile name or description, use the sysmail_update_profile_sp
procedure as shown following.
select aws_sqlserver_ext.sysmail_update_profile_sp(
par_profile_id := 2,
par_profile_name := 'New profile name'
);
To change the email account settings, use the ysmail_update_account_sp procedure as shown
following.
select from aws_sqlserver_ext.sysmail_update_account_sp (
par_account_name := 'Audit Account',
par_mailserver_name := 'arn:aws:lambda:region:XXXXXXXXXXXX:function:func_test',
par_mailserver_type := 'AWSLAMBDA'
);
Migrating from SQL Server to Amazon RDS for SQL Server with AWS
Schema Conversion Tool
Some things to consider when migrating SQL Server schema and code to Amazon RDS for SQL
Server:
• AWS SCT can convert SQL Server Agent to provide schedules, alerts, and jobs on an Amazon RDS
for SQL Server DB instance. After conversion, you can use an Amazon RDS for SQL Server DB
instance with SQL Server Reporting Services (SSRS), SQL Server Analysis Services (SSAS), and
SQL Server Integration Services (SSIS).
• Amazon RDS currently doesn’t support SQL Server Service Broker or additional T-SQL endpoints
that require you to run the CREATE ENDPOINT command.
• Amazon RDS has limited support for linked servers. When converting SQL Server application
code that uses linked servers, AWS SCT converts the application code. However, make sure to
review the behavior of objects that use linked servers before you run the converted code.
SQL Server to Amazon RDS SQL Server Version 1.0.672 180

AWS Schema Conversion Tool User Guide
• Always on is used.
• The AWS SCT assessment report provides server metrics for the conversion. These metrics about
your SQL Server instance include the following:
• Data mirroring is used.
• SQL Server Log Shipping is configured.
• Failover cluster is used.
• Database Mail is configured.
• Full Text Search Service is used. Amazon RDS for SQL Server has a limited full text search, and
it does not support semantic search.
• Data Quality Service (DQS) is installed. Amazon RDS doesn't support DQS so we recommend
that you install SQL Server on an Amazon EC2 instance.
Privileges for RDS for SQL Server as a target
To migrate to RDS for SQL Server, create a database user and then grant the required privileges for
each database. You can use the following code example.
CREATE LOGIN user_name WITH PASSWORD 'your_password';
USE db_name
CREATE USER user_name FOR LOGIN user_name
GRANT VIEW DEFINITION TO user_name
GRANT VIEW DATABASE STATE TO user_name
GRANT CREATE SCHEMA TO user_name;
GRANT CREATE TABLE TO user_name;
GRANT CREATE VIEW TO user_name;
GRANT CREATE TYPE TO user_name;
GRANT CREATE DEFAULT TO user_name;
GRANT CREATE FUNCTION TO user_name;
GRANT CREATE PROCEDURE TO user_name;
GRANT CREATE ASSEMBLY TO user_name;
GRANT CREATE AGGREGATE TO user_name;
GRANT CREATE FULLTEXT CATALOG TO user_name;
GRANT CREATE SYNONYM TO user_name;
GRANT CREATE XML SCHEMA COLLECTION TO user_name;
In the preceding example, replace user_name with the name of your user. Then, replace db_name
with the name of your target database. Finally, replace your_password with a secure password.
SQL Server to Amazon RDS SQL Server Version 1.0.672 181

AWS Schema Conversion Tool User Guide
Data warehouse sources for AWS Schema Conversion Tool
AWS SCT can convert schemas for the following source data warehouses to a supported target. For
information about permissions, connections, and what AWS SCT can convert for use with the target
database or data warehouse, see details in the following.
Topics
• Connecting Amazon Redshift with the AWS Schema Conversion Tool
• Connecting Azure Synapse Analytics with AWS Schema Conversion Tool
• Connecting to Google BigQuery with AWS Schema Conversion Tool
• Connecting Greenplum Database with AWS Schema Conversion Tool
• Connecting to Netezza with AWS Schema Conversion Tool
• Connecting Oracle Data Warehouse with AWS SCT
• Connecting to a Snowflake data warehouse with AWS Schema Conversion Tool
• Connecting to a SQL Server Data Warehouse with the AWS Schema Conversion Tool
• Connecting to a Teradata Data Warehouse with the AWS Schema Conversion Tool
• Connecting the AWS Schema Conversion Tool to Vertica databases
Connecting Amazon Redshift with the AWS Schema Conversion Tool
You can use AWS SCT to optimize your Amazon Redshift cluster. AWS SCT provides you with
recommendations on the selection of distribution and sort keys for your Amazon Redshift cluster.
You can consider the Amazon Redshift optimization project as an AWS SCT project with the source
and target pointing to the different Amazon Redshift clusters.
Privileges for Amazon Redshift as a source database
The following privileges are required for using Amazon Redshift as a source:
•
USAGE ON SCHEMA <schema_name>
•
SELECT ON ALL TABLES IN SCHEMA <schema_name>
• SELECT ON PG_CATALOG.PG_STATISTIC
• SELECT ON SVV_TABLE_INFO
Data warehouses Version 1.0.672 182

AWS Schema Conversion Tool User Guide
• SELECT ON TABLE STV_BLOCKLIST
• SELECT ON TABLE STV_TBL_PERM
• SELECT ON SYS_SERVERLESS_USAGE
• SELECT ON PG_DATABASE_INFO
• SELECT ON PG_STATISTIC
In the preceding examples, replace the <schema_name> placeholder with the name of the source
schema.
For the privileges required for Amazon Redshift as a target, see Permissions for Amazon Redshift as
a target.
Connecting to Amazon Redshift as a source
Use the following procedure to connect to your Amazon Redshift source database with the AWS
Schema Conversion Tool.
To connect to an Amazon Redshift source database
1. In the AWS Schema Conversion Tool, choose Add source.
2. Choose Amazon Redshift, then choose Next.
The Add source dialog box appears.
3. For Connection name, enter a name for your database. AWS SCT displays this name in the tree
in the left panel.
4. Use database credentials from AWS Secrets Manager or enter them manually:
• To use database credentials from Secrets Manager, use the following instructions:
1. For AWS Secret, choose the name of the secret.
2. Choose Populate to automatically fill in all values in the database connection dialog box
from Secrets Manager.
For information about using database credentials from Secrets Manager, see Configuring
AWS Secrets Manager in the AWS Schema Conversion Tool.
• To enter the connection information for the Amazon Redshift source database, use the
following instructions:
Amazon Redshift Version 1.0.672 183

AWS Schema Conversion Tool User Guide
Parameter Action
Server name Enter the Domain Name System (DNS) name or IP address
of your source database server.
Server port Enter the port used to connect to your source database
server.
Database Enter the name of the Amazon Redshift database.
User name and Password Enter the database credentials to connect to your source
database server.
AWS SCT uses the password to connect to your source
database only when you choose to connect to your
database in a project. To guard against exposing the
password for your source database, AWS SCT doesn't
store the password by default. If you close your AWS SCT
project and reopen it, you are prompted for the password
to connect to your source database as needed.
Use SSL Choose this option to use Secure Sockets Layer (SSL) to
connect to your database. Provide the following additional
information, as applicable, on the SSL tab:
• Verify server certificate: Select this option to verify the
server certificate by using a trust store.
• Trust store: The location of a trust store containing
certificates. For this location to appear here, make sure
to add it in Global settings.
For more information about SSL support for Amazon
Redshift, see Configure security options for connections.
Store password AWS SCT creates a secure vault to store SSL certificates
and database passwords. By turning this option on, you
can store the database password and connect quickly to
the database without having to enter the password.
Amazon Redshift Version 1.0.672 184

AWS Schema Conversion Tool User Guide
Parameter Action
Redshift driver path Enter the path to the driver to use to connect to the
source database. For more information, see Installing JDBC
drivers for AWS Schema Conversion Tool.
If you store the driver path in the global project settings,
the driver path doesn't appear on the connection dialog
box. For more information, see Storing driver paths in the
global settings.
5. Choose Test Connection to verify that AWS SCT can connect to your source database.
6. Choose Connect to connect to your source database.
Amazon Redshift optimization settings
To edit Amazon Redshift optimization settings, choose Settings in AWS SCT, and then choose
Conversion settings. From the upper list, choose Amazon Redshift, and then choose Amazon
Redshift – Amazon Redshift. AWS SCT displays all available settings for Amazon Redshift
optimization.
Amazon Redshift optimization settings in AWS SCT include options for the following:
• To limit the number of comments with action items in the converted code.
For Add comments in the converted code for the action items of selected severity and higher,
choose the severity of action items. AWS SCT adds comments in the converted code for action
items of the selected severity and higher.
For example, to minimize the number of comments in your converted code, choose Errors only.
To include comments for all action items in your converted code, choose All messages.
• To set the maximum number of tables that AWS SCT can apply to your target Amazon Redshift
cluster.
For The maximum number of tables for the target Amazon Redshift cluster, choose the
number of tables that AWS SCT can apply to your Amazon Redshift cluster.
Amazon Redshift has quotas that limit the use tables for different cluster node types. If you
choose Auto, AWS SCT determines the number of tables to apply to your target Amazon
Amazon Redshift Version 1.0.672 185

AWS Schema Conversion Tool User Guide
Redshift cluster depending on the node type. Optionally, choose the value manually. For more
information, see Quotas and limits in Amazon Redshift in the Amazon Redshift Management
Guide.
AWS SCT converts all your source tables, even if the number of tables is more than your Amazon
Redshift cluster can store. AWS SCT stores the converted code in your project and doesn't apply
it to the target database. If you reach the Amazon Redshift cluster quota for the tables when
you apply the converted code, then AWS SCT displays a warning message. Also, AWS SCT applies
tables to your target Amazon Redshift cluster until the number of tables reaches the limit.
• To choose the migration strategy.
AWS recommends using different clusters as a source and target for your optimization project.
Before the start of the Amazon Redshift optimization process, you create a copy of your source
Amazon Redshift cluster. You can include your source data into this copy or create an empty
cluster.
For Migration strategy, choose Migration to a copy to include data from your source cluster in
the target cluster.
For Migration strategy, choose Migration to a clean slate to review the optimization
suggestions. After you accept these suggestions, migrate your source data to the target cluster.
• To apply compression to Amazon Redshift table columns. To do so, select Use compression
encoding.
AWS SCT assigns compression encoding to columns automatically using the default Amazon
Redshift algorithm. For more information, see Compression encodings in the Amazon Redshift
Database Developer Guide.
By default, Amazon Redshift doesn't apply compression to columns that are defined as sort and
distribution keys. You can change this behavior and apply compression to these columns. To do
so, select Use compression encoding for KEY columns. You can select this option only when you
selected the Use compression encoding option.
• To work with automatic table optimization.
Automatic table optimization is a self-tuning process in Amazon Redshift that automatically
optimizes the design of tables. For more information, see Working with automatic table
optimization in the Amazon Redshift Database Developer Guide.
Amazon Redshift Version 1.0.672 186

AWS Schema Conversion Tool User Guide
To use only on the automatic table optimization, choose Optimization strategies in the left
pane. Then select Use Amazon Redshift automatic table tuning, and choose None for Initial
key selection strategy.
• To choose sort and distribution keys using your strategy.
You can choose sort and distribution keys using Amazon Redshift metadata, statistical
information, or both these options. For Initial key selection strategy on the Optimization
strategies tab, choose one of the following options:
• Use metadata, ignore statistical information
• Ignore metadata, use statistical information
• Use metadata and statistical information
Depending on the option that you choose, you can select optimization strategies. Then, for each
strategy, enter the value (0–100). These values define the weight of each strategy. Using these
weight values, AWS SCT defines how each rule influences on the choice of distribution and sort
keys. The default values are based on the AWS migration best practices.
You can define the size of small tables for the Find small tables strategy. For Min table row
count and Max table row count, enter the minimum and maximum number of rows in a table to
define it as a small table. AWS SCT applies the ALL distribution style to small tables. In this case,
a copy of the entire table is distributed to every node.
• To configure strategy details.
In addition to defining the weight for each optimization strategy, you can configure the
optimization settings. To do so, choose Conversion optimization.
• For Sort key columns limit, enter the maximum number of columns in the sort key.
• For Skewed threshold value, enter the percentage (0–100) of a skewed value for a column.
AWS SCT excludes columns with a skew value greater than the threshold from the list of
candidates for the distribution key. AWS SCT defines the skewed value for a column as the
percentage ratio of the number of occurrences of the most common value to the total number
of records.
• For Top N queries from the query history table, enter the number (1–100) of the most
frequently used queries to analyze.
• For Select statistics user, choose the database user whose query statistics you want to
analyze.
Amazon Redshift Version 1.0.672 187

AWS Schema Conversion Tool User Guide
Connecting Azure Synapse Analytics with AWS Schema Conversion Tool
You can use AWS SCT to convert schemas, code objects, and application code from Azure Synapse
Analytics to Amazon Redshift.
Privileges for Azure Synapse Analytics as a source database
The following privileges are required for using an Azure Synapse Analytics data warehouse as a
source:
• VIEW DEFINITION
• VIEW DATABASE STATE
Apply the privileges for each database whose schema you are converting.
Connecting to Azure Synapse Analytics as a source
Use the following procedure to connect to your Azure Synapse Analytics data warehouse with the
AWS Schema Conversion Tool.
To connect to an Azure Synapse Analytics data warehouse as a source
1. In the AWS Schema Conversion Tool, choose Add source.
2. Choose Azure Synapse Analytics, then choose Next.
The Add source dialog box appears.
3. For Connection name, enter a name for your database. AWS SCT displays this name in the tree
in the left panel.
4. Use database credentials from AWS Secrets Manager or enter them manually:
• To use database credentials from Secrets Manager, use the following instructions:
1. For AWS Secret, choose the name of the secret.
2. Choose Populate to automatically fill in all values in the database connection dialog box
from Secrets Manager.
For information about using database credentials from Secrets Manager, see Configuring
AWS Secrets Manager in the AWS Schema Conversion Tool.
Azure Synapse Analytics as a source Version 1.0.672 188

AWS Schema Conversion Tool User Guide
• To enter the connection information for the Azure Synapse Analytics data warehouse
manually, use the following instructions:
Parameter Action
Server name Enter the Domain Name Service (DNS) name or IP address
of your source database server.
SQL pool Enter the name of the Azure SQL pool.
User name and Password Enter the database credentials to connect to your source
database server.
AWS SCT uses the password to connect to your source
database only when you choose to connect to your
database in a project. To guard against exposing the
password for your source database, AWS SCT doesn't
store the password by default. If you close your AWS SCT
project and reopen it, you are prompted for the password
to connect to your source database as needed.
Use SSL Choose this option to use Secure Sockets Layer (SSL) to
connect to your database. Provide the following additional
information, as applicable, on the SSL tab:
• Trust server certificate: Choose this option to trust the
server certificate.
• Trust store: A trust store that you set up in the Global
settings.
Store password AWS SCT creates a secure vault to store SSL certificates
and database passwords. By turning on this option, you
can store the database password and connect quickly to
the database without entering the password.
5. Choose Test Connection to verify that AWS SCT can connect to your source database.
6. Choose Connect to connect to your source database.
Azure Synapse Analytics as a source Version 1.0.672 189

AWS Schema Conversion Tool User Guide
Azure Synapse Analytics to Amazon Redshift conversion settings
To edit Azure Synapse Analytics to Amazon Redshift conversion settings, choose Settings in AWS
SCT, and then choose Conversion settings. From the upper list, choose Azure Synapse, and then
choose Azure Synapse – Amazon Redshift. AWS SCT displays all available settings for Azure
Synapse Analytics to Amazon Redshift conversion.
Azure Synapse Analytics to Amazon Redshift conversion settings in AWS SCT include options for
the following:
• To limit the number of comments with action items in the converted code.
For Add comments in the converted code for the action items of selected severity and higher,
choose the severity of action items. AWS SCT adds comments in the converted code for action
items of the selected severity and higher.
For example, to minimize the number of comments in your converted code, choose Errors only.
To include comments for all action items in your converted code, choose All messages.
• To set the maximum number of tables that AWS SCT can apply to your target Amazon Redshift
cluster.
For The maximum number of tables for the target Amazon Redshift cluster, choose the
number of tables that AWS SCT can apply to your Amazon Redshift cluster.
Amazon Redshift has quotas that limit the use tables for different cluster node types. If you
choose Auto, AWS SCT determines the number of tables to apply to your target Amazon
Redshift cluster depending on the node type. Optionally, choose the value manually. For more
information, see Quotas and limits in Amazon Redshift in the Amazon Redshift Management
Guide.
AWS SCT converts all your source tables, even if this is more than your Amazon Redshift cluster
can store. AWS SCT stores the converted code in your project and doesn't apply it to the target
database. If you reach the Amazon Redshift cluster quota for the tables when you apply the
converted code, then AWS SCT displays a warning message. Also, AWS SCT applies tables to your
target Amazon Redshift cluster until the number of tables reaches the limit.
• To migrate partitions of the source table to separate tables in Amazon Redshift. To do so, select
Use the UNION ALL view and enter the maximum number of target tables that AWS SCT can
create for a single source table.
Azure Synapse Analytics as a source Version 1.0.672 190

AWS Schema Conversion Tool User Guide
Amazon Redshift doesn't support table partitioning. To emulate this behavior and make queries
run faster, AWS SCT can migrate each partition of your source table to a separate table in
Amazon Redshift. Then, AWS SCT creates a view that includes data from all these tables.
AWS SCT automatically determines the number of partitions in your source table. Depending
on the type of source table partitioning, this number can exceed the quota for the tables that
you can apply to your Amazon Redshift cluster. To avoid reaching this quota, enter the maximum
number of target tables that AWS SCT can create for partitions of a single source table. The
default option is 368 tables, which represents a partition for 366 days of a year and two tables
for NO RANGE and UNKNOWN partitions.
• To apply compression to Amazon Redshift table columns. To do so, select Use compression
encoding.
AWS SCT assigns compression encoding to columns automatically using the default Amazon
Redshift algorithm. For more information, see Compression encodings in the Amazon Redshift
Database Developer Guide.
By default, Amazon Redshift doesn't apply compression to columns that are defined as sort and
distribution keys. You can change this behavior and apply compression to these columns. To do
so, select Use compression encoding for KEY columns. You can select this option only when you
select the Use compression encoding option.
Azure Synapse Analytics to Amazon Redshift conversion optimization settings
To edit Azure Synapse Analytics to Amazon Redshift conversion optimization settings, choose
Settings in AWS SCT, and then choose Conversion settings. From the upper list, choose
Azure Synapse, and then choose Azure Synapse – Amazon Redshift. In the left pane, choose
Optimization strategies. AWS SCT displays conversion optimization settings for Azure Synapse
Analytics to Amazon Redshift conversion.
Azure Synapse Analytics to Amazon Redshift conversion optimization settings in AWS SCT include
options for the following:
• To work with automatic table optimization. To do so, select Use Amazon Redshift automatic
table tuning.
Azure Synapse Analytics as a source Version 1.0.672 191

AWS Schema Conversion Tool User Guide
Automatic table optimization is a self-tuning process in Amazon Redshift that automatically
optimizes the design of tables. For more information, see Working with automatic table
optimization in the Amazon Redshift Database Developer Guide.
To rely only on the automatic table optimization, choose None for Initial key selection strategy.
• To choose sort and distribution keys using your strategy.
You can choose sort and distribution keys using Amazon Redshift metadata, statistical
information, or both these options. For Initial key selection strategy on the Optimization
strategies tab, choose one of the following options:
• Use metadata, ignore statistical information
• Ignore metadata, use statistical information
• Use metadata and statistical information
Depending on the option that you choose, you can select optimization strategies. Then, for each
strategy, enter the value (0–100). These values define the weight of each strategy. Using these
weight values, AWS SCT defines how each rule influences on the choice of distribution and sort
keys. The default values are based on the AWS migration best practices.
You can define the size of small tables for the Find small tables strategy. For Min table row
count and Max table row count, enter the minimum and maximum number of rows in a table to
define it as a small table. AWS SCT applies the ALL distribution style to small tables. In this case,
a copy of the entire table is distributed to every node.
• To configure strategy details.
In addition to defining the weight for each optimization strategy, you can configure the
optimization settings. To do so, choose Conversion optimization.
• For Sort key columns limit, enter the maximum number of columns in the sort key.
• For Skewed threshold value, enter the percentage (0–100) of a skewed value for a column.
AWS SCT excludes columns with the skew value greater than the threshold from the list of
candidates for the distribution key. AWS SCT defines the skewed value for a column as the
percentage ratio of the number of occurrences of the most common value to the total number
of records.
• For Top N queries from the query history table, enter the number (1–100) of the most
frequently used queries to analyze.
Azure Synapse Analytics as a source Version 1.0.672 192

AWS Schema Conversion Tool User Guide
• For Select statistics user, choose the database user for which you want to analyze the query
statistics.
Also, on the Optimization strategies tab, you can define the size of small tables for the Find
small tables strategy. For Min table row count and Max table row count, enter the minimum
and maximum number of rows in a table to consider it as a small table. AWS SCT applies the ALL
distribution style to small tables. In this case, a copy of the entire table is distributed to every
node.
Connecting to Google BigQuery with AWS Schema Conversion Tool
You can use AWS SCT to convert schemas, code objects, and application code from BigQuery to
Amazon Redshift.
Privileges for BigQuery as a source
To use a BigQuery data warehouse as a source in AWS SCT, create a service account. In Google
Cloud, applications use service accounts to make authorized API calls. Service accounts differ from
user accounts. For more information, see Service accounts in the Google Cloud Identity and Access
Management documentation.
Make sure that you grant the following roles to your service account:
•
BigQuery Admin
•
Storage Admin
The BigQuery Admin role provides permissions to manage all resources within the project. AWS
SCT uses this role to load your BigQuery metadata in the migration project.
The Storage Admin role grants full control of data objects and buckets. You can find this role
under Cloud Storage. AWS SCT uses this role to extract your data from BigQuery and then load
it into Amazon Redshift.
To create a service account key file
1. Sign in to the Google Cloud management console at https://console.cloud.google.com/.
2. On the BigQuery API page, choose Enable. Skip this step if you see API Enabled.
3. On the Service accounts page, choose your project, and then choose Create service account.
BigQuery as a source Version 1.0.672 193

AWS Schema Conversion Tool User Guide
4. On the Service account details page, enter a descriptive value for Service account name.
Choose Create and continue. The Grant this service account access to the project page
opens.
5. For Select a role, choose BigQuery, and then choose BigQuery Admin.
6. Choose Add another role. For Select a role, choose Cloud Storage, and then choose Storage
Admin.
7. Choose Continue, and then choose Done.
8. On the Service accounts page, choose the service account that you created.
9. Choose Keys, and then choose Create new key for Add key.
10. Choose JSON, and then choose Create. Choose the folder to save your private key or select the
default folder for downloads in your browser.
To extract data from a BigQuery data warehouse, AWS SCT uses the Google Cloud Storage bucket
folder. Create this bucket before you start data migration. Enter the path to your Google Cloud
Storage bucket folder in the Create Local task dialog box. For more information, see Creating,
running, and monitoring an AWS SCT task.
Connecting to BigQuery as a source
Use the following procedure to connect to your source BigQuery project with the AWS Schema
Conversion Tool.
To connect to a BigQuery source data warehouse
1. In the AWS Schema Conversion Tool, choose Add source.
2. Choose BigQuery, then choose Next.
The Add source dialog box appears.
3. For Connection name, enter a name for your BigQuery project. AWS SCT displays this name in
the tree in the left panel.
4. For Key path, enter the path to the service account key file. For more information about
creating this file, see Privileges for BigQuery as a source.
5. Choose Test Connection to verify that AWS SCT can connect to your source BigQuery project.
6. Choose Connect to connect to your source BigQuery project.
BigQuery as a source Version 1.0.672 194

AWS Schema Conversion Tool User Guide
Limitations on using BigQuery as a source for AWS SCT
The following limitations apply when using BigQuery as a source for AWS SCT:
• AWS SCT doesn't support the conversion of subqueries in analytic functions.
•
You can't use AWS SCT to convert BigQuery SELECT AS STRUCT and SELECT AS VALUE
statements.
• AWS SCT doesn't support the conversion of the following types of functions:
• Approximate aggregate
• Bit
• Debugging
• Federated query
• Geography
• Hash
• Mathematical
• Net
• Statistical aggregate
• UUID
• AWS SCT provides limited support for the conversion of string functions.
•
AWS SCT doesn't support the conversion of UNNEST operators.
• You can't convert correlated join operations in AWS SCT.
•
AWS SCT doesn't support the conversion of QUALIFY, WINDOW, LIMIT, and OFFSET clauses.
• You can't use AWS SCT to convert recursive common table expressions.
•
AWS SCT doesn't support the conversion of INSERT statements with subqueries inside VALUES
clauses.
•
AWS SCT doesn't support the conversion of UPDATE statements for nested fields and repeated
records.
•
You can't use AWS SCT to convert STRUCT and ARRAY data types.
BigQuery to Amazon Redshift conversion settings
To edit BigQuery to Amazon Redshift conversion settings, choose Settings in AWS SCT, and then
choose Conversion settings. From the upper list, choose Google BigQuery, and then choose
BigQuery as a source Version 1.0.672 195

AWS Schema Conversion Tool User Guide
Google BigQuery – Amazon Redshift. AWS SCT displays all available settings for BigQuery to
Amazon Redshift conversion.
BigQuery to Amazon Redshift conversion settings in AWS SCT include options for the following:
• To limit the number of comments with action items in the converted code.
For Add comments in the converted code for the action items of selected severity and higher,
choose the severity of action items. AWS SCT adds comments in the converted code for action
items of the selected severity and higher.
For example, to minimize the number of comments in your converted code, choose Errors only.
To include comments for all action items in your converted code, choose All messages.
• To set the maximum number of tables that AWS SCT can apply to your target Amazon Redshift
cluster.
For The maximum number of tables for the target Amazon Redshift cluster, choose the
number of tables that AWS SCT can apply to your Amazon Redshift cluster.
Amazon Redshift has quotas that limit the use tables for different cluster node types. If you
choose Auto, AWS SCT determines the number of tables to apply to your target Amazon
Redshift cluster depending on the node type. Optionally, choose the value manually. For more
information, see Quotas and limits in Amazon Redshift in the Amazon Redshift Management
Guide.
AWS SCT converts all your source tables, even if this is more than your Amazon Redshift cluster
can store. AWS SCT stores the converted code in your project and doesn't apply it to the target
database. If you reach the Amazon Redshift cluster quota for the tables when you apply the
converted code, then AWS SCT displays a warning message. Also, AWS SCT applies tables to your
target Amazon Redshift cluster until the number of tables reaches the limit.
• To apply compression to Amazon Redshift table columns. To do so, select Use compression
encoding.
AWS SCT assigns compression encoding to columns automatically using the default Amazon
Redshift algorithm. For more information, see Compression encodings in the Amazon Redshift
Database Developer Guide.
By default, Amazon Redshift doesn't apply compression to columns that are defined as sort and
distribution keys. You can change this behavior and apply compression to these columns. To do
BigQuery as a source Version 1.0.672 196

AWS Schema Conversion Tool User Guide
so, select Use compression encoding for KEY columns. You can select this option only when you
select the Use compression encoding option.
BigQuery to Amazon Redshift conversion optimization settings
To edit BigQuery to Amazon Redshift conversion optimization settings, choose Settings in AWS
SCT, and then choose Conversion settings. From the upper list, choose Google BigQuery, and then
choose Google BigQuery – Amazon Redshift. In the left pane, choose Optimization strategies.
AWS SCT displays conversion optimization settings for BigQuery to Amazon Redshift conversion.
BigQuery to Amazon Redshift conversion optimization settings in AWS SCT include options for the
following:
• To work with automatic table optimization. To do so, select Use Amazon Redshift automatic
table tuning.
Automatic table optimization is a self-tuning process in Amazon Redshift that automatically
optimizes the design of tables. For more information, see Working with automatic table
optimization in the Amazon Redshift Database Developer Guide.
To rely only on the automatic table optimization, choose None for Initial key selection strategy.
• To choose sort and distribution keys using your strategy.
You can choose sort and distribution keys using Amazon Redshift metadata, statistical
information, or both these options. For Initial key selection strategy on the Optimization
strategies tab, choose one of the following options:
• Use metadata, ignore statistical information
• Ignore metadata, use statistical information
• Use metadata and statistical information
Depending on the option that you choose, you can select optimization strategies. Then, for each
strategy, enter the value (0–100). These values define the weight of each strategy. Using these
weight values, AWS SCT defines how each rule influences on the choice of distribution and sort
keys. The default values are based on the AWS migration best practices.
You can define the size of small tables for the Find small tables strategy. For Min table row
count and Max table row count, enter the minimum and maximum number of rows in a table to
BigQuery as a source Version 1.0.672 197

AWS Schema Conversion Tool User Guide
define it as a small table. AWS SCT applies the ALL distribution style to small tables. In this case,
a copy of the entire table is distributed to every node.
• To configure strategy details.
In addition to defining the weight for each optimization strategy, you can configure the
optimization settings. To do so, choose Conversion optimization.
• For Sort key columns limit, enter the maximum number of columns in the sort key.
• For Skewed threshold value, enter the percentage (0–100) of a skewed value for a column.
AWS SCT excludes columns with the skew value greater than the threshold from the list of
candidates for the distribution key. AWS SCT defines the skewed value for a column as the
percentage ratio of the number of occurrences of the most common value to the total number
of records.
• For Top N queries from the query history table, enter the number (1–100) of the most
frequently used queries to analyze.
• For Select statistics user, choose the database user for which you want to analyze the query
statistics.
Also, on the Optimization strategies tab, you can define the size of small tables for the Find
small tables strategy. For Min table row count and Max table row count, enter the minimum
and maximum number of rows in a table to consider it as a small table. AWS SCT applies the ALL
distribution style to small tables. In this case, a copy of the entire table is distributed to every
node.
Connecting Greenplum Database with AWS Schema Conversion Tool
You can use AWS SCT to convert schemas, code objects, and application code from Greenplum
Database to Amazon Redshift.
Privileges for Greenplum Database as a source
The following privileges are required for using Greenplum Database as a source:
•
CONNECT ON DATABASE <database_name>
•
USAGE ON SCHEMA <schema_name>
•
SELECT ON <schema_name>.<table_name>
•
SELECT ON SEQUENCE <schema_name>.<sequence_name>
Greenplum databases Version 1.0.672 198

AWS Schema Conversion Tool User Guide
In the preceding example, replace placeholders as following:
•
Replace database_name with the name of the source database.
•
Replace schema_name with the name of the source schema.
•
Replace table_name with the name of the source table.
•
Replace sequence_name with the name of the sequence name.
Connecting to Greenplum Database as a source
Use the following procedure to connect to your Greenplum source database with AWS SCT.
To connect to a Greenplum source database
1. In the AWS Schema Conversion Tool, choose Add source.
2. Choose SAP ASE, then choose Next.
The Add source dialog box appears.
3. For Connection name, enter a name for your database. AWS SCT displays this name in the tree
in the left panel.
4. Use database credentials from AWS Secrets Manager or enter them manually:
• To use database credentials from Secrets Manager, use the following instructions:
1. For AWS Secret, choose the name of the secret.
2. Choose Populate to automatically fill in all values in the database connection dialog box
from Secrets Manager.
For information about using database credentials from Secrets Manager, see Configuring
AWS Secrets Manager in the AWS Schema Conversion Tool.
• To enter the Greenplum source database credentials manually, use the following
instructions:
Parameter Action
Server name Enter the Domain Name System (DNS) name or IP address
of your source database server.
Greenplum databases Version 1.0.672 199

AWS Schema Conversion Tool User Guide
Parameter Action
Server port Enter the port used to connect to your source database
server.
Database Enter the name of the Greenplum database.
User name and Password Enter the database credentials to connect to your source
database server.
AWS SCT uses the password to connect to your source
database only when you choose to connect to your
database in a project. To guard against exposing the
password for your source database, AWS SCT doesn't
store the password by default. If you close your AWS SCT
project and reopen it, you are prompted for the password
to connect to your source database as needed.
Use SSL Choose this option to use Secure Sockets Layer (SSL) to
connect to your database. Provide the following additional
information, as applicable, on the SSL tab:
• Verify server certificate: Select this option to verify the
server certificate by using a trust store.
• Trust store: The location of a trust store containing
certificates.
Store password AWS SCT creates a secure vault to store SSL certificates
and database passwords. By turning this option on, you
can store the database password and connect quickly to
the database without having to enter the password.
Greenplum databases Version 1.0.672 200

AWS Schema Conversion Tool User Guide
Parameter Action
Greenplum Database
driver path
Enter the path to the driver to use to connect to the
source database. For more information, see Installing JDBC
drivers for AWS Schema Conversion Tool.
If you store the driver path in the global project settings,
the driver path doesn't appear on the connection dialog
box. For more information, see Storing driver paths in the
global settings.
5. Choose Test Connection to verify that AWS SCT can connect to your source database.
6. Choose Connect to connect to your source database.
Greenplum to Amazon Redshift conversion settings
To edit Greenplum to Amazon Redshift conversion settings, choose Settings in AWS SCT, and then
choose Conversion settings. From the upper list, choose Greenplum, and then choose Greenplum
– Amazon Redshift. AWS SCT displays all available settings for Greenplum to Amazon Redshift
conversion.
Greenplum to Amazon Redshift conversion settings in AWS SCT include options for the following:
• To limit the number of comments with action items in the converted code.
For Add comments in the converted code for the action items of selected severity and higher,
choose the severity of action items. AWS SCT adds comments in the converted code for action
items of the selected severity and higher.
For example, to minimize the number of comments in your converted code, choose Errors only.
To include comments for all action items in your converted code, choose All messages.
• To set the maximum number of tables that AWS SCT can apply to your target Amazon Redshift
cluster.
For The maximum number of tables for the target Amazon Redshift cluster, choose the
number of tables that AWS SCT can apply to your Amazon Redshift cluster.
Amazon Redshift has quotas that limit the use tables for different cluster node types. If you
choose Auto, AWS SCT determines the number of tables to apply to your target Amazon
Greenplum databases Version 1.0.672 201

AWS Schema Conversion Tool User Guide
Redshift cluster depending on the node type. Optionally, choose the value manually. For more
information, see Quotas and limits in Amazon Redshift in the Amazon Redshift Management
Guide.
AWS SCT converts all your source tables, even if this is more than your Amazon Redshift cluster
can store. AWS SCT stores the converted code in your project and doesn't apply it to the target
database. If you reach the Amazon Redshift cluster quota for the tables when you apply the
converted code, then AWS SCT displays a warning message. Also, AWS SCT applies tables to your
target Amazon Redshift cluster until the number of tables reaches the limit.
• To migrate partitions of the source table to separate tables in Amazon Redshift. To do so, select
Use the UNION ALL view and enter the maximum number of target tables that AWS SCT can
create for a single source table.
Amazon Redshift doesn't support table partitioning. To emulate this behavior and make queries
run faster, AWS SCT can migrate each partition of your source table to a separate table in
Amazon Redshift. Then, AWS SCT creates a view that includes data from all these tables.
AWS SCT automatically determines the number of partitions in your source table. Depending
on the type of source table partitioning, this number can exceed the quota for the tables that
you can apply to your Amazon Redshift cluster. To avoid reaching this quota, enter the maximum
number of target tables that AWS SCT can create for partitions of a single source table. The
default option is 368 tables, which represents a partition for 366 days of a year and two tables
for NO RANGE and UNKNOWN partitions.
• To apply compression to Amazon Redshift table columns. To do so, select Use compression
encoding.
AWS SCT assigns compression encoding to columns automatically using the default Amazon
Redshift algorithm. For more information, see Compression encodings in the Amazon Redshift
Database Developer Guide.
By default, Amazon Redshift doesn't apply compression to columns that are defined as sort and
distribution keys. You can change this behavior and apply compression to these columns. To do
so, select Use compression encoding for KEY columns. You can select this option only when you
select the Use compression encoding option.
Greenplum databases Version 1.0.672 202

AWS Schema Conversion Tool User Guide
Greenplum to Amazon Redshift conversion optimization settings
To edit Greenplum to Amazon Redshift conversion optimization settings, choose Settings in AWS
SCT, and then choose Conversion settings. From the upper list, choose Greenplum, and then
choose Greenplum – Amazon Redshift. In the left pane, choose Optimization strategies. AWS SCT
displays conversion optimization settings for Greenplum to Amazon Redshift conversion.
Greenplum to Amazon Redshift conversion optimization settings in AWS SCT include options for
the following:
• To work with automatic table optimization. To do so, select Use Amazon Redshift automatic
table tuning.
Automatic table optimization is a self-tuning process in Amazon Redshift that automatically
optimizes the design of tables. For more information, see Working with automatic table
optimization in the Amazon Redshift Database Developer Guide.
To rely only on the automatic table optimization, choose None for Initial key selection strategy.
• To choose sort and distribution keys using your strategy.
You can choose sort and distribution keys using Amazon Redshift metadata, statistical
information, or both these options. For Initial key selection strategy on the Optimization
strategies tab, choose one of the following options:
• Use metadata, ignore statistical information
• Ignore metadata, use statistical information
• Use metadata and statistical information
Depending on the option that you choose, you can select optimization strategies. Then, for each
strategy, enter the value (0–100). These values define the weight of each strategy. Using these
weight values, AWS SCT defines how each rule influences on the choice of distribution and sort
keys. The default values are based on the AWS migration best practices.
You can define the size of small tables for the Find small tables strategy. For Min table row
count and Max table row count, enter the minimum and maximum number of rows in a table to
define it as a small table. AWS SCT applies the ALL distribution style to small tables. In this case,
a copy of the entire table is distributed to every node.
• To configure strategy details.
Greenplum databases Version 1.0.672 203

AWS Schema Conversion Tool User Guide
In addition to defining the weight for each optimization strategy, you can configure the
optimization settings. To do so, choose Conversion optimization.
• For Sort key columns limit, enter the maximum number of columns in the sort key.
• For Skewed threshold value, enter the percentage (0–100) of a skewed value for a column.
AWS SCT excludes columns with the skew value greater than the threshold from the list of
candidates for the distribution key. AWS SCT defines the skewed value for a column as the
percentage ratio of the number of occurrences of the most common value to the total number
of records.
• For Top N queries from the query history table, enter the number (1–100) of the most
frequently used queries to analyze.
• For Select statistics user, choose the database user for which you want to analyze the query
statistics.
Also, on the Optimization strategies tab, you can define the size of small tables for the Find
small tables strategy. For Min table row count and Max table row count, enter the minimum
and maximum number of rows in a table to consider it as a small table. AWS SCT applies the ALL
distribution style to small tables. In this case, a copy of the entire table is distributed to every
node.
Connecting to Netezza with AWS Schema Conversion Tool
You can use AWS SCT to convert schemas, code objects, and application code from Netezza to
Amazon Redshift.
Privileges for Netezza as a source
The following privileges are required for using Netezza as a source:
• select on system.definition_schema.system view
• select on system.definition_schema.system table
• select on system.definition_schema.management table
•
list on <database_name>
•
list on <schema_name>
•
list on <database_name>.all.table
•
list on <database_name>.all.external table
Netezza databases Version 1.0.672 204

AWS Schema Conversion Tool User Guide
•
list on <database_name>.all.view
•
list on <database_name>.all.materialized view
•
list on <database_name>.all.procedure
•
list on <database_name>.all.sequence
•
list on <database_name>.all.function
•
list on <database_name>.all.aggregate
In the preceding example, replace placeholders as following:
•
Replace database_name with the name of the source database.
•
Replace schema_name with the name of the source schema.
AWS SCT requires access to the following system tables and views. You can grant access to
these objects instead of granting access to system.definition_schema.system view and
system.definition_schema.system tables in the preceding list.
• select on system.definition_schema._t_aggregate
• select on system.definition_schema._t_class
• select on system.definition_schema._t_constraint
• select on system.definition_schema._t_const_relattr
• select on system.definition_schema._t_database
• select on system.definition_schema._t_grpobj_priv
• select on system.definition_schema._t_grpusr
• select on system.definition_schema._t_hist_config
• select on system.definition_schema._t_object
• select on system.definition_schema._t_object_classes
• select on system.definition_schema._t_proc
• select on system.definition_schema._t_type
• select on system.definition_schema._t_user
• select on system.definition_schema._t_usrobj_priv
• select on system.definition_schema._vt_sequence
• select on system.definition_schema._v_aggregate
Netezza databases Version 1.0.672 205

AWS Schema Conversion Tool User Guide
• select on system.definition_schema._v_constraint_depends
• select on system.definition_schema._v_database
• select on system.definition_schema._v_datatype
• select on system.definition_schema._v_dslice
• select on system.definition_schema._v_function
• select on system.definition_schema._v_group
• select on system.definition_schema._v_obj_relation
• select on system.definition_schema._v_obj_relation_xdb
• select on system.definition_schema._v_procedure
• select on system.definition_schema._v_relation_column
• select on system.definition_schema._v_relation_keydata
• select on system.definition_schema._v_relobjclasses
• select on system.definition_schema._v_schema_xdb
• select on system.definition_schema._v_sequence
• select on system.definition_schema._v_synonym
• select on system.definition_schema._v_system_info
• select on system.definition_schema._v_sys_constraint
• select on system.definition_schema._v_sys_object_dslice_info
• select on system.definition_schema._v_sys_user
• select on system.definition_schema._v_table
• select on system.definition_schema._v_table_constraint
• select on system.definition_schema._v_table_dist_map
• select on system.definition_schema._v_table_organize_column
• select on system.definition_schema._v_table_storage_stat
• select on system.definition_schema._v_user
• select on system.definition_schema._v_view
• select on system.information_schema._v_relation_column
• select on system.information_schema._v_table
• select on $hist_column_access_*
Netezza databases Version 1.0.672 206

AWS Schema Conversion Tool User Guide
Connecting to Netezza as a source
Use the following procedure to connect to your Netezza source database with the AWS Schema
Conversion Tool.
To connect to a Netezza source database
1. In the AWS Schema Conversion Tool, choose Add source.
2. Choose Netezza, then choose Next.
The Add source dialog box appears.
3. For Connection name, enter a name for your database. AWS SCT displays this name in the tree
in the left panel.
4. Use database credentials from AWS Secrets Manager or enter them manually:
• To use database credentials from Secrets Manager, use the following instructions:
1. For AWS Secret, choose the name of the secret.
2. Choose Populate to automatically fill in all values in the database connection dialog box
from Secrets Manager.
For information about using database credentials from Secrets Manager, see Configuring
AWS Secrets Manager in the AWS Schema Conversion Tool.
• To enter the Netezza source database connection information manually, use the following
instructions:
Parameter Action
Server name Enter the Domain Name System (DNS) name or IP address
of your source database server.
Server port Enter the port used to connect to your source database
server.
User name and Password Enter the database credentials to connect to your source
database server.
AWS SCT uses the password to connect to your source
database only when you choose to connect to your
Netezza databases Version 1.0.672 207
AWS Schema Conversion Tool User Guide
Parameter Action
database in a project. To guard against exposing the
password for your source database, AWS SCT doesn't
store the password by default. If you close your AWS SCT
project and reopen it, you are prompted for the password
to connect to your source database as needed.
Store password AWS SCT creates a secure vault to store SSL certificates
and database passwords. By turning this option on, you
can store the database password and connect quickly to
the database without having to enter the password.
Netezza driver path Enter the path to the driver to use to connect to the
source database. For more information, see Installing JDBC
drivers for AWS Schema Conversion Tool.
If you store the driver path in the global project settings,
the driver path doesn't appear on the connection dialog
box. For more information, see Storing driver paths in the
global settings.
5. Choose Test Connection to verify that AWS SCT can connect to your source database.
6. Choose Connect to connect to your source database.
Configuring ongoing data replication
After you convert your Netezza database schemas and apply them to your Amazon Redshift
database, you can migrate data with AWS SCT data extraction agents. The agent extracts your
data and uploads it to your Amazon S3 bucket. You can then use AWS SCT to copy the data from
Amazon S3 to Amazon Redshift.
If data in your source database changes during the migration process, you can capture ongoing
changes with your AWS SCT data extraction agents. Then you can replicate these ongoing changes
in your target database after you complete the initial data migration. This process is called ongoing
data replication or change data capture (CDC).
Netezza databases Version 1.0.672 208

AWS Schema Conversion Tool User Guide
To configure ongoing data replication for migrations from Netezza to Amazon Redshift
1. In your source database, create a history database. You can use the following code example in
the Netezza command line interface (CLI).
nzhistcreatedb -d history_database_name -t query -v 1 -u load_user -o histdb_owner
-p your_password
In the preceding example, replace history_database_name with the name of your history
database. Next, replace load_user with the name of the user that you have defined to load
history data to the database. Then, replace histdb_owner with the name of the user that you
have defined as the owner of the history database. Make sure that you have already created
this user and granted the CREATE DATABASE permission. Finally, replace your_password
with a secure password.
2. Configure the history logging. To do so, use the following code example.
CREATE HISTORY CONFIGURATION history_configuration_name HISTTYPE QUERY
DATABASE history_database_name USER load_user PASSWORD your_password COLLECT
PLAN, COLUMN
LOADINTERVAL 1 LOADMINTHRESHOLD 0 LOADMAXTHRESHOLD 0 STORAGELIMIT 25
LOADRETRY 2 VERSION 1;
In the preceding example, replace history_configuration_name and
history_database_name with the names of your history configuration and your history
database. Next, replace load_user with the name of the user that you have defined to load
history data to the database. Then, replace your_password with a secure password.
3. Grant read permissions for all tables in the history database. You can use the following code
example to grant the SELECT permission.
GRANT SELECT ON history_database_name.ALL.TABLE TO your_user;
In the preceding example, replace history_database_name with the name of your history
database. Next, replace your_user with the name of the user with minimal permissions to
work with your Netezza database. You use the credentials of this database user in AWS SCT.
4. Collect statistics for each table in your source schema to get the information about the
cardinality of columns. You can use the following command to generate statistics in your
history database.
Netezza databases Version 1.0.672 209
AWS Schema Conversion Tool User Guide
GENERATE STATISTICS on "schema_name"."table_name";
In the preceding example, replace schema_name and table_name with the name of your
database schema and table.
5. Make sure that you completed the prerequisites by running the following query:
SELECT COUNT(*)
FROM history_database_name.history_schema_name."$hist_column_access_N";
In the preceding example, replace history_database_name and history_schema_name
with the name of your history database and schema. Next, replace N with the the version
number of your history database. For more information about history database versions, see
the IBM Netezza Documentation.
6. Install your data extraction agents. For more information, see Installing extraction agents.
Make sure that the {working.folder} parameter in the settings.properties file for all
extractor instances points to the same folder. In this case, your extractors can coordinate the
CDC session and use a single transaction point for all subtasks.
7. Register your data extraction agent. For more information, see Registering extraction agents
with the AWS Schema Conversion Tool.
8. Create your CDC task. For more information, see Creating, running, and monitoring an AWS
SCT task.
a. Open your project in AWS SCT. In the left pane, choose your source table. Open the context
(right-click) menu, and choose Create local task.
b. For Task name, enter a descriptive name for your data migration task.
c. For Migration mode, choose Extract, upload, and copy.
d. Select Enable CDC.
e. Choose the CDC settings tab and define the scope and the schedule of CDC sessions.
f. Choose Test task to verify that you can connect to your working folder, Amazon S3 bucket,
and Amazon Redshift data warehouse.
g. Choose Create to create your task.
h. Choose the Tasks tab, choose your task from the list, and choose Start.
Netezza databases Version 1.0.672 210

AWS Schema Conversion Tool User Guide
9. The AWS SCT task maintains transactional consistency on the target database. The data
extraction agent replicates transactions from the source in transaction ID order.
If you stop any of the migration sessions or if it fails, then the CDC processing also stops.
Netezza to Amazon Redshift conversion settings
To edit Netezza to Amazon Redshift conversion settings, choose Settings in AWS SCT, and then
choose Conversion settings. From the upper list, choose Netezza, and then choose Netezza
– Amazon Redshift. AWS SCT displays all available settings for Netezza to Amazon Redshift
conversion.
Netezza to Amazon Redshift conversion settings in AWS SCT include options for the following:
• To limit the number of comments with action items in the converted code.
For Add comments in the converted code for the action items of selected severity and higher,
choose the severity of action items. AWS SCT adds comments in the converted code for action
items of the selected severity and higher.
For example, to minimize the number of comments in your converted code, choose Errors only.
To include comments for all action items in your converted code, choose All messages.
• To set the maximum number of tables that AWS SCT can apply to your target Amazon Redshift
cluster.
For The maximum number of tables for the target Amazon Redshift cluster, choose the
number of tables that AWS SCT can apply to your Amazon Redshift cluster.
Amazon Redshift has quotas that limit the use tables for different cluster node types. If you
choose Auto, AWS SCT determines the number of tables to apply to your target Amazon
Redshift cluster depending on the node type. Optionally, choose the value manually. For more
information, see Quotas and limits in Amazon Redshift in the Amazon Redshift Management
Guide.
AWS SCT converts all your source tables, even if this is more than your Amazon Redshift cluster
can store. AWS SCT stores the converted code in your project and doesn't apply it to the target
database. If you reach the Amazon Redshift cluster quota for the tables when you apply the
converted code, then AWS SCT displays a warning message. Also, AWS SCT applies tables to your
target Amazon Redshift cluster until the number of tables reaches the limit.
Netezza databases Version 1.0.672 211

AWS Schema Conversion Tool User Guide
• To apply compression to Amazon Redshift table columns. To do so, select Use compression
encoding.
AWS SCT assigns compression encoding to columns automatically using the default Amazon
Redshift algorithm. For more information, see Compression encodings in the Amazon Redshift
Database Developer Guide.
By default, Amazon Redshift doesn't apply compression to columns that are defined as sort and
distribution keys. You can change this behavior and apply compression to these columns. To do
so, select Use compression encoding for KEY columns. You can select this option only when you
select the Use compression encoding option.
Netezza to Amazon Redshift conversion optimization settings
To edit Netezza to Amazon Redshift conversion optimization settings, choose Settings in AWS
SCT, and then choose Conversion settings. From the upper list, choose Netezza, and then choose
Netezza – Amazon Redshift. In the left pane, choose Optimization strategies. AWS SCT displays
conversion optimization settings for Netezza to Amazon Redshift conversion.
Netezza to Amazon Redshift conversion optimization settings in AWS SCT include options for the
following:
• To work with automatic table optimization. To do so, select Use Amazon Redshift automatic
table tuning.
Automatic table optimization is a self-tuning process in Amazon Redshift that automatically
optimizes the design of tables. For more information, see Working with automatic table
optimization in the Amazon Redshift Database Developer Guide.
To rely only on the automatic table optimization, choose None for Initial key selection strategy.
• To choose sort and distribution keys using your strategy.
You can choose sort and distribution keys using Amazon Redshift metadata, statistical
information, or both these options. For Initial key selection strategy on the Optimization
strategies tab, choose one of the following options:
• Use metadata, ignore statistical information
• Ignore metadata, use statistical information
• Use metadata and statistical information
Netezza databases Version 1.0.672 212

AWS Schema Conversion Tool User Guide
Depending on the option that you choose, you can select optimization strategies. Then, for each
strategy, enter the value (0–100). These values define the weight of each strategy. Using these
weight values, AWS SCT defines how each rule influences on the choice of distribution and sort
keys. The default values are based on the AWS migration best practices.
You can define the size of small tables for the Find small tables strategy. For Min table row
count and Max table row count, enter the minimum and maximum number of rows in a table to
define it as a small table. AWS SCT applies the ALL distribution style to small tables. In this case,
a copy of the entire table is distributed to every node.
• To configure strategy details.
In addition to defining the weight for each optimization strategy, you can configure the
optimization settings. To do so, choose Conversion optimization.
• For Sort key columns limit, enter the maximum number of columns in the sort key.
• For Skewed threshold value, enter the percentage (0–100) of a skewed value for a column.
AWS SCT excludes columns with the skew value greater than the threshold from the list of
candidates for the distribution key. AWS SCT defines the skewed value for a column as the
percentage ratio of the number of occurrences of the most common value to the total number
of records.
• For Top N queries from the query history table, enter the number (1–100) of the most
frequently used queries to analyze.
• For Select statistics user, choose the database user for which you want to analyze the query
statistics.
Also, on the Optimization strategies tab, you can define the size of small tables for the Find
small tables strategy. For Min table row count and Max table row count, enter the minimum
and maximum number of rows in a table to consider it as a small table. AWS SCT applies the ALL
distribution style to small tables. In this case, a copy of the entire table is distributed to every
node.
Connecting Oracle Data Warehouse with AWS SCT
You can use AWS SCT to convert schemas, code objects, and application code from Oracle Data
Warehouse to Amazon Redshift or Amazon Redshift and AWS Glue used in combination.
Oracle data warehouse Version 1.0.672 213

AWS Schema Conversion Tool User Guide
Privileges for Oracle Data Warehouse as a source
The following privileges are required for using Oracle Data Warehouse as a source:
• connect
• select_catalog_role
• select any dictionary
Connecting to Oracle Data Warehouse as a source
Use the following procedure to connect to your Oracle data warehouse source database with the
AWS Schema Conversion Tool.
To connect to an Oracle Data Warehouse source database
1. In the AWS Schema Conversion Tool, choose Add source.
2. Choose Oracle, then choose Next.
The Add source dialog box appears.
3. For Connection name, enter a name for your database. AWS SCT displays this name in the tree
in the left panel.
4. Use database credentials from AWS Secrets Manager or enter them manually:
• To use database credentials from Secrets Manager, use the following instructions:
1. For AWS Secret, choose the name of the secret.
2. Choose Populate to automatically fill in all values in the database connection dialog box
from Secrets Manager.
For information about using database credentials from Secrets Manager, see Configuring
AWS Secrets Manager in the AWS Schema Conversion Tool.
• To enter the Oracle source data warehouse connection information manually, use the
following instructions:
Oracle data warehouse Version 1.0.672 214

AWS Schema Conversion Tool User Guide
Parameter Action
Type Choose the connection type to your database. Depending
on your type, provide the following additional informati
on:
• SID
• Server name: The Domain Name System (DNS) name
or IP address of your source database server.
• Server port: The port used to connect to your source
database server.
• Oracle SID: The Oracle System ID (SID). To find the
Oracle SID, submit the following query to your Oracle
database:
SELECT sys_context('userenv','inst
ance_name') AS SID FROM dual;
• Service Name
• Server name: The DNS name or IP address of your
source database server.
• Server port: The port used to connect to your source
database server.
• Service Name: The name of the Oracle service to
connect to.
• TNS alias
• TNS file path: The path to the file that contains the
Transparent Network Substrate (TNS) name connectio
n information.
• TNS file path: The TNS alias from this file to use to
connect to the source database.
• TNS connect identifier
• TNS connect identifier: The identifier for the registere
d TNS connection information.
Oracle data warehouse Version 1.0.672 215

AWS Schema Conversion Tool User Guide
Parameter Action
User name and Password Enter the database credentials to connect to your source
database server.
AWS SCT uses the password to connect to your source
database only when you choose to connect to your
database in a project. To guard against exposing the
password for your source database, AWS SCT doesn't
store the password by default. If you close your AWS SCT
project and reopen it, you are prompted for the password
to connect to your source database as needed.
Use SSL Choose this option to use Secure Sockets Layer (SSL) to
connect to your database. Provide the following additional
information, as applicable, on the SSL tab:
• SSL authentication: Select this option to use SSL
authentication for the connection.
• Trust store: The location of a trust store containing
certificates.
• Key store: The location of a key store containing a
private key and certificates. This value is required if SSL
authentication is selected and is otherwise optional.
Store password AWS SCT creates a secure vault to store SSL certificates
and database passwords. By turning this option on, you
can store the database password and connect quickly to
the database without having to enter the password.
Oracle driver path Enter the path to the driver to use to connect to the
source database. For more information, see Installing JDBC
drivers for AWS Schema Conversion Tool.
If you store the driver path in the global project settings,
the driver path doesn't appear on the connection dialog
box. For more information, see Storing driver paths in the
global settings.
Oracle data warehouse Version 1.0.672 216

AWS Schema Conversion Tool User Guide
5. Choose Test Connection to verify that AWS SCT can connect to your source database.
6. Choose Connect to connect to your source database.
Oracle Data Warehouse to Amazon Redshift conversion settings
To edit Oracle Data Warehouse to Amazon Redshift conversion settings, choose Settings in AWS
SCT, and then choose Conversion settings. From the upper list, choose Oracle, and then choose
Oracle – Amazon Redshift. AWS SCT displays all available settings for Oracle Data Warehouse to
Amazon Redshift conversion.
Oracle Data Warehouse to Amazon Redshift conversion settings in AWS SCT include options for the
following:
• To limit the number of comments with action items in the converted code.
For Add comments in the converted code for the action items of selected severity and higher,
choose the severity of action items. AWS SCT adds comments in the converted code for action
items of the selected severity and higher.
For example, to minimize the number of comments in your converted code, choose Errors only.
To include comments for all action items in your converted code, choose All messages.
• To set the maximum number of tables that AWS SCT can apply to your target Amazon Redshift
cluster.
For The maximum number of tables for the target Amazon Redshift cluster, choose the
number of tables that AWS SCT can apply to your Amazon Redshift cluster.
Amazon Redshift has quotas that limit the use tables for different cluster node types. If you
choose Auto, AWS SCT determines the number of tables to apply to your target Amazon
Redshift cluster depending on the node type. Optionally, choose the value manually. For more
information, see Quotas and limits in Amazon Redshift in the Amazon Redshift Management
Guide.
AWS SCT converts all your source tables, even if this is more than your Amazon Redshift cluster
can store. AWS SCT stores the converted code in your project and doesn't apply it to the target
database. If you reach the Amazon Redshift cluster quota for the tables when you apply the
converted code, then AWS SCT displays a warning message. Also, AWS SCT applies tables to your
target Amazon Redshift cluster until the number of tables reaches the limit.
Oracle data warehouse Version 1.0.672 217

AWS Schema Conversion Tool User Guide
• To migrate partitions of the source table to separate tables in Amazon Redshift. To do so, select
Use the UNION ALL view and enter the maximum number of target tables that AWS SCT can
create for a single source table.
Amazon Redshift doesn't support table partitioning. To emulate this behavior and make queries
run faster, AWS SCT can migrate each partition of your source table to a separate table in
Amazon Redshift. Then, AWS SCT creates a view that includes data from all these tables.
AWS SCT automatically determines the number of partitions in your source table. Depending
on the type of source table partitioning, this number can exceed the quota for the tables that
you can apply to your Amazon Redshift cluster. To avoid reaching this quota, enter the maximum
number of target tables that AWS SCT can create for partitions of a single source table. The
default option is 368 tables, which represents a partition for 366 days of a year and two tables
for NO RANGE and UNKNOWN partitions.
•
To convert the data type formatting functions such as TO_CHAR, TO_DATE, and TO_NUMBER with
datetime format elements that Amazon Redshift doesn't support. By default, AWS SCT uses the
extension pack functions to emulate the usage of these unsupported format elements in the
converted code.
The datetime format model in Oracle includes more elements compared to datetime format
strings in Amazon Redshift. When your source code includes only datetime format elements
that Amazon Redshift supports, you don't need the extension pack functions in the converted
code. To avoid using the extension pack functions in the converted code, select Datetype format
elements that you use in the Oracle code are similar to datetime format strings in Amazon
Redshift. In this case, the converted code works faster.
The numeric format model in Oracle includes more elements compared to numeric format
strings in Amazon Redshift. When your source code includes only numeric format elements
that Amazon Redshift supports, you don't need the extension pack functions in the converted
code. To avoid using the extension pack functions in the converted code, select Numeric format
elements that you use in the Oracle code are similar to numeric format strings in Amazon
Redshift. In this case, the converted code works faster.
•
To convert Oracle LEAD and LAG analytic functions. By default, AWS SCT raises an action item for
each LEAD and LAG function.
When your source code doesn't use the default values for offset in these functions, AWS SCT
can emulate the usage of these functions with the NVL function. To do so, select Use the NVL
function to emulate the behavior of Oracle LEAD and LAG functions.
Oracle data warehouse Version 1.0.672 218

AWS Schema Conversion Tool User Guide
• To emulate the behavior of primary and unique keys in your Amazon Redshift cluster, select
Emulate the behavior of primary and unique keys.
Amazon Redshift doesn't enforce unique and primary keys and uses them for informational
purposes only. If you use these constraints in your code, then make sure that AWS SCT emulates
their behavior in the converted code.
• To apply compression to Amazon Redshift table columns. To do so, select Use compression
encoding.
AWS SCT assigns compression encoding to columns automatically using the default Amazon
Redshift algorithm. For more information, see Compression encodings in the Amazon Redshift
Database Developer Guide.
By default, Amazon Redshift doesn't apply compression to columns that are defined as sort and
distribution keys. You can change this behavior and apply compression to these columns. To do
so, select Use compression encoding for KEY columns. You can select this option only when you
select the Use compression encoding option.
Oracle Data Warehouse to Amazon Redshift conversion optimization settings
To edit Oracle Data Warehouse to Amazon Redshift conversion optimization settings, choose
Settings in AWS SCT, and then choose Conversion settings. From the upper list, choose Oracle,
and then choose Oracle – Amazon Redshift. In the left pane, choose Optimization strategies.
AWS SCT displays conversion optimization settings for Oracle Data Warehouse to Amazon Redshift
conversion.
Oracle Data Warehouse to Amazon Redshift conversion optimization settings in AWS SCT include
options for the following:
• To work with automatic table optimization. To do so, select Use Amazon Redshift automatic
table tuning.
Automatic table optimization is a self-tuning process in Amazon Redshift that automatically
optimizes the design of tables. For more information, see Working with automatic table
optimization in the Amazon Redshift Database Developer Guide.
To rely only on the automatic table optimization, choose None for Initial key selection strategy.
• To choose sort and distribution keys using your strategy.
Oracle data warehouse Version 1.0.672 219

AWS Schema Conversion Tool User Guide
You can choose sort and distribution keys using Amazon Redshift metadata, statistical
information, or both these options. For Initial key selection strategy on the Optimization
strategies tab, choose one of the following options:
• Use metadata, ignore statistical information
• Ignore metadata, use statistical information
• Use metadata and statistical information
Depending on the option that you choose, you can select optimization strategies. Then, for each
strategy, enter the value (0–100). These values define the weight of each strategy. Using these
weight values, AWS SCT defines how each rule influences on the choice of distribution and sort
keys. The default values are based on the AWS migration best practices.
You can define the size of small tables for the Find small tables strategy. For Min table row
count and Max table row count, enter the minimum and maximum number of rows in a table to
define it as a small table. AWS SCT applies the ALL distribution style to small tables. In this case,
a copy of the entire table is distributed to every node.
• To configure strategy details.
In addition to defining the weight for each optimization strategy, you can configure the
optimization settings. To do so, choose Conversion optimization.
• For Sort key columns limit, enter the maximum number of columns in the sort key.
• For Skewed threshold value, enter the percentage (0–100) of a skewed value for a column.
AWS SCT excludes columns with the skew value greater than the threshold from the list of
candidates for the distribution key. AWS SCT defines the skewed value for a column as the
percentage ratio of the number of occurrences of the most common value to the total number
of records.
• For Top N queries from the query history table, enter the number (1–100) of the most
frequently used queries to analyze.
• For Select statistics user, choose the database user for which you want to analyze the query
statistics.
Also, on the Optimization strategies tab, you can define the size of small tables for the Find
small tables strategy. For Min table row count and Max table row count, enter the minimum
and maximum number of rows in a table to consider it as a small table. AWS SCT applies the ALL
distribution style to small tables. In this case, a copy of the entire table is distributed to every
node.
Oracle data warehouse Version 1.0.672 220

AWS Schema Conversion Tool User Guide
Connecting to a Snowflake data warehouse with AWS Schema
Conversion Tool
You can use AWS SCT to convert schemas, code objects, and application code from Snowflake to
Amazon Redshift.
Privileges for Snowflake as a source database
You can create a role with privileges and grant this role the name of a user by using the
SECURITYADMIN role and the SECURITYADMIN session context.
The example following creates minimal privileges and grants them to the min_privs user.
create role role_name;
grant role role_name to role sysadmin;
grant usage on database db_name to role role_name;
grant usage on schema db_name.schema_name to role role_name;
grant usage on warehouse datawarehouse_name to role role_name;
grant monitor on database db_name to role role_name;
grant monitor on warehouse datawarehouse_name to role role_name;
grant select on all tables in schema db_name.schema_name to role role_name;
grant select on future tables in schema db_name.schema_name to role role_name;
grant select on all views in schema db_name.schema_name to role role_name;
grant select on future views in schema db_name.schema_name to role role_name;
grant select on all external tables in schema db_name.schema_name to role role_name;
grant select on future external tables in schema db_name.schema_name to role role_name;
grant usage on all sequences in schema db_name.schema_name to role role_name;
grant usage on future sequences in schema db_name.schema_name to role role_name;
grant usage on all functions in schema db_name.schema_name to role role_name;
grant usage on future functions in schema db_name.schema_name to role role_name;
grant usage on all procedures in schema db_name.schema_name to role role_name;
grant usage on future procedures in schema db_name.schema_name to role role_name;
create user min_privs password='real_user_password'
DEFAULT_ROLE = role_name DEFAULT_WAREHOUSE = 'datawarehouse_name';
grant role role_name to user min_privs;
In the preceding example, replace placeholders as following:
•
Replace role_name with the name of a role with read-only privileges.
•
Replace db_name with the name of the source database.
•
Replace schema_name with the name of the source schema.
Snowflake Version 1.0.672 221

AWS Schema Conversion Tool User Guide
•
Replace datawarehousename with the name of a required data warehouse.
•
Replace min_privs with the name of a user that has minimal privileges.
The DEFAULT_ROLE and DEFAULT_WAREHOUSE parameters are key-sensitive.
Configuring secure access to Amazon S3
Security and access management policies for an Amazon S3 bucket allow Snowflake to access, read
data from, and write data to the S3 bucket. You can configure secure access to a private Amazon S3
bucket using the Snowflake STORAGE INTEGRATION object type. A Snowflake storage integration
object delegates authentication responsibility to a Snowflake identity and access management
entity.
For more information, see Configuring a Snowflake Storage Integration to Access Amazon S3 in the
Snowflake documentation.
Connecting to Snowflake as a source
Use the following procedure to connect to your source database with the AWS Schema Conversion
Tool.
To connect to an Snowflake source database
1. In the AWS Schema Conversion Tool, choose Add source.
2. Choose Snowflake, then choose Next.
The Add source dialog box appears.
3. For Connection name, enter a name for your database. AWS SCT displays this name in the tree
in the left panel.
4. Use database credentials from AWS Secrets Manager or enter them manually:
• To use database credentials from Secrets Manager, use the following instructions:
1. For AWS Secret, choose the name of the secret.
2. Choose Populate to automatically fill in all values in the database connection dialog box
from Secrets Manager.
For information about using database credentials from Secrets Manager, see Configuring
AWS Secrets Manager in the AWS Schema Conversion Tool.
Snowflake Version 1.0.672 222
AWS Schema Conversion Tool User Guide
• To enter the Snowflake source data warehouse connection information manually, use the
following instructions:
Parameter Action
Server name Enter the Domain Name System (DNS) name or IP address
of your source database server.
Server port Enter the port used to connect to your source database
server.
Database Enter the name of the Snowflake database.
User name and Password Enter the database credentials to connect to your source
database server.
AWS SCT stores your password in an encrypted format
only if you explicitly request it.
Use SSL Choose this option if you want to use Secure Sockets Layer
(SSL) to connect to your database. Provide the following
additional information, as applicable, on the SSL tab:
• Private key path: The location of a private key.
• Passphrase: The passphrase for the private key.
For more information about SSL support for Snowflake,
see Configure security options for connections.
Store password AWS SCT creates a secure vault to store SSL certificates
and database passwords. If you set this option, you can
store the database password. Doing this means that you
can connect quickly to the database without having to
enter the password.
Snowflake Version 1.0.672 223

AWS Schema Conversion Tool User Guide
Parameter Action
Snowflake driver path Enter the path to the driver to use to connect to the
source database. For more information, see Installing JDBC
drivers for AWS Schema Conversion Tool.
If you store the driver path in the global project settings,
the driver path doesn't appear on the connection dialog
box. For more information, see Storing driver paths in the
global settings.
5. Choose Test Connection to verify that AWS SCT can connect to your source database.
6. Choose Connect to connect to your source database.
Limitations for Snowflake as a source
The following are limitations when using Snowflake as a source for AWS SCT:
• Object identifiers must be unique within the context of the object type and the parent object:
Database
Schema identifiers must be unique within a database.
Schemas
Objects identifiers such as for tables and views must be unique within a schema.
Tables/Views
Column identifiers must be unique within a table.
• The maximum number of tables for large and xlarge cluster node types is 9,900. For 8xlarge
cluster node types, the maximum number of tables is 100,000. The limit includes temporary
tables, both user-defined and created by Amazon Redshift during query processing or system
maintenance. For more information, see Amazon Redshift quotas in the Amazon Redshift Cluster
Management Guide.
• For stored procedures, the maximum number of input and output arguments is 32.
Snowflake Version 1.0.672 224

AWS Schema Conversion Tool User Guide
Source data types for Snowflake
Following, you can find the Snowflake source data types that are supported when using AWS SCT
and the default mapping to an Amazon Redshift target.
Snowflake data types Amazon Redshift data types
NUMBER NUMERIC(38)
NUMBER(p) If p is =< 4, then SMALLINT
If p is => 5 and =< 9, then INTEGER
If p is => 10 and =< 18, then BIGINT
If p is => 19 then NUMERIC(p)
NUMBER(p, 0) If p is =< 4, then SMALLINT
If p is => 5 and =< 9, then INTEGER
If p is => 10 and =< 18, then BIGINT
If p is => 19 then: NUMERIC(p,0)
NUMBER(p, s) If p is => 1 and =< 38, and if s is => 1 and =< 37,
then
NUMERIC(p,s)
FLOAT FLOAT
TEXT
Unicode characters up to 16,777,216
bytes; up to 4 bytes per character.
VARCHAR(MAX)
TEXT(p)
Unicode characters up to 65,535 bytes;
up to 4 bytes per character.
If p is =< 65,535 then, VARCHAR(p)
Snowflake Version 1.0.672 225

AWS Schema Conversion Tool User Guide
Snowflake data types Amazon Redshift data types
TEXT(p)
Unicode characters up to 16,777,216
bytes; up to 4 bytes per character.
If p is => 65,535 and =< 16,777,216 then,
VARCHAR(MAX)
BINARY
Single-byte characters up to 8,388,608
bytes; 1 byte per character.
VARCHAR(MAX)
BINARY(p)
Single-byte characters up to 65,535
bytes; 1 byte per character.
VARCHAR(p)
BINARY(p)
Single-byte characters up to 8,388,608
bytes; 1 byte per character.
VARCHAR(MAX)
BOOLEAN BOOLEAN
DATE DATE
TIME
Time values between 00:00:00 and
23:59:59.999999999.
VARCHAR(18)
TIME(f)
Time values between 00:00:00 and
23:59:59.9(f).
VARCHAR(n) – 9 + dt-attr-1
TIMESTAMP_NTZ TIMESTAMP
TIMESTAMP_TZ TIMESTAMPTZ
Snowflake Version 1.0.672 226

AWS Schema Conversion Tool User Guide
Snowflake to Amazon Redshift conversion settings
To edit Snowflake to Amazon Redshift conversion settings, choose Settings in AWS SCT, and then
choose Conversion settings. From the upper list, choose Snowflake, and then choose Snowflake
– Amazon Redshift. AWS SCT displays all available settings for Snowflake to Amazon Redshift
conversion.
Snowflake to Amazon Redshift conversion settings in AWS SCT include options for the following:
• To limit the number of comments with action items in the converted code.
For Add comments in the converted code for the action items of selected severity and higher,
choose the severity of action items. AWS SCT adds comments in the converted code for action
items of the selected severity and higher.
For example, to minimize the number of comments in your converted code, choose Errors only.
To include comments for all action items in your converted code, choose All messages.
• To set the maximum number of tables that AWS SCT can apply to your target Amazon Redshift
cluster.
For The maximum number of tables for the target Amazon Redshift cluster, choose the
number of tables that AWS SCT can apply to your Amazon Redshift cluster.
Amazon Redshift has quotas that limit the use tables for different cluster node types. If you
choose Auto, AWS SCT determines the number of tables to apply to your target Amazon
Redshift cluster depending on the node type. Optionally, choose the value manually. For more
information, see Quotas and limits in Amazon Redshift in the Amazon Redshift Management
Guide.
AWS SCT converts all your source tables, even if this is more than your Amazon Redshift cluster
can store. AWS SCT stores the converted code in your project and doesn't apply it to the target
database. If you reach the Amazon Redshift cluster quota for the tables when you apply the
converted code, then AWS SCT displays a warning message. Also, AWS SCT applies tables to your
target Amazon Redshift cluster until the number of tables reaches the limit.
• To apply compression to Amazon Redshift table columns. To do so, select Use compression
encoding.
Snowflake Version 1.0.672 227

AWS Schema Conversion Tool User Guide
AWS SCT assigns compression encoding to columns automatically using the default Amazon
Redshift algorithm. For more information, see Compression encodings in the Amazon Redshift
Database Developer Guide.
By default, Amazon Redshift doesn't apply compression to columns that are defined as sort and
distribution keys. You can change this behavior and apply compression to these columns. To do
so, select Use compression encoding for KEY columns. You can select this option only when you
select the Use compression encoding option.
Snowflake to Amazon Redshift conversion optimization settings
To edit Snowflake to Amazon Redshift conversion optimization settings, choose Settings in AWS
SCT, and then choose Conversion settings. From the upper list, choose Snowflake, and then
choose Snowflake – Amazon Redshift. In the left pane, choose Optimization strategies. AWS SCT
displays conversion optimization settings for Snowflake to Amazon Redshift conversion.
Snowflake to Amazon Redshift conversion optimization settings in AWS SCT include options for the
following:
• To work with automatic table optimization. To do so, select Use Amazon Redshift automatic
table tuning.
Automatic table optimization is a self-tuning process in Amazon Redshift that automatically
optimizes the design of tables. For more information, see Working with automatic table
optimization in the Amazon Redshift Database Developer Guide.
To rely only on the automatic table optimization, choose None for Initial key selection strategy.
• To choose sort and distribution keys using your strategy.
You can choose sort and distribution keys using Amazon Redshift metadata, statistical
information, or both these options. For Initial key selection strategy on the Optimization
strategies tab, choose one of the following options:
• Use metadata, ignore statistical information
• Ignore metadata, use statistical information
• Use metadata and statistical information
Snowflake Version 1.0.672 228

AWS Schema Conversion Tool User Guide
Depending on the option that you choose, you can select optimization strategies. Then, for each
strategy, enter the value (0–100). These values define the weight of each strategy. Using these
weight values, AWS SCT defines how each rule influences on the choice of distribution and sort
keys. The default values are based on the AWS migration best practices.
You can define the size of small tables for the Find small tables strategy. For Min table row
count and Max table row count, enter the minimum and maximum number of rows in a table to
define it as a small table. AWS SCT applies the ALL distribution style to small tables. In this case,
a copy of the entire table is distributed to every node.
• To configure strategy details.
In addition to defining the weight for each optimization strategy, you can configure the
optimization settings. To do so, choose Conversion optimization.
• For Sort key columns limit, enter the maximum number of columns in the sort key.
• For Skewed threshold value, enter the percentage (0–100) of a skewed value for a column.
AWS SCT excludes columns with the skew value greater than the threshold from the list of
candidates for the distribution key. AWS SCT defines the skewed value for a column as the
percentage ratio of the number of occurrences of the most common value to the total number
of records.
• For Top N queries from the query history table, enter the number (1–100) of the most
frequently used queries to analyze.
• For Select statistics user, choose the database user for which you want to analyze the query
statistics.
Also, on the Optimization strategies tab, you can define the size of small tables for the Find
small tables strategy. For Min table row count and Max table row count, enter the minimum
and maximum number of rows in a table to consider it as a small table. AWS SCT applies the ALL
distribution style to small tables. In this case, a copy of the entire table is distributed to every
node.
Connecting to a SQL Server Data Warehouse with the AWS Schema
Conversion Tool
You can use AWS SCT to convert schemas, code objects, and application code from Microsoft SQL
Server DW to Amazon Redshift or Amazon Redshift and AWS Glue used in combination.
SQL Server Data Warehouses Version 1.0.672 229

AWS Schema Conversion Tool User Guide
Privileges for Microsoft SQL Server Data Warehouse as a source
The following privileges are required for using Microsoft SQL Server data warehouse as a source:
• VIEW DEFINITION
• VIEW DATABASE STATE
•
SELECT ON SCHEMA :: <schema_name>
In the preceding example, replace the <source_schema> placeholder with the name of the source
source_schema.
Repeat the grant for each database whose schema you are converting.
In addition, grant the following, and run the grant on the master database:
• VIEW SERVER STATE
Limitations for SQL Server Data Warehouse as a source
Using Microsoft SQL Server Parallel Data Warehouse (PDW) as a source isn't currently supported.
Connecting to SQL Server Data Warehouse as a source
Use the following procedure to connect to your SQL Server Data Warehouse source database with
the AWS Schema Conversion Tool.
To connect to a SQL Server Data Warehouse source database
1. In the AWS Schema Conversion Tool, choose Add source.
2. Choose Microsoft SQL Server, then choose Next.
The Add source dialog box appears.
3. For Connection name, enter a name for your database. AWS SCT displays this name in the tree
in the left panel.
4. Use database credentials from AWS Secrets Manager or enter them manually:
• To use database credentials from Secrets Manager, use the following instructions:
1. For AWS Secret, choose the name of the secret.
SQL Server Data Warehouses Version 1.0.672 230
AWS Schema Conversion Tool User Guide
2. Choose Populate to automatically fill in all values in the database connection dialog box
from Secrets Manager.
For information about using database credentials from Secrets Manager, see Configuring
AWS Secrets Manager in the AWS Schema Conversion Tool.
• To enter the Microsoft SQL Server source data warehouse connection information manually,
use the following instructions:
Parameter Action
Server name Enter the Domain Name Service (DNS) name or IP address
of your source database server.
Server port Enter the port used to connect to your source database
server.
Instance name Enter the instance name for the SQL Server data
warehouse.
User name and Password Enter the database credentials to connect to your source
database server.
AWS SCT uses the password to connect to your source
database only when you choose to connect to your
database in a project. To guard against exposing the
password for your source database, AWS SCT doesn't
store the password by default. If you close your AWS SCT
project and reopen it, you are prompted for the password
to connect to your source database as needed.
Use SSL Choose this option to use Secure Sockets Layer (SSL) to
connect to your database. Provide the following additional
information, as applicable, on the SSL tab:
• Trust server certificate: Select this option to trust the
server certificate.
• Trust store: A trust store that you set up in the Global
settings.
SQL Server Data Warehouses Version 1.0.672 231

AWS Schema Conversion Tool User Guide
Parameter Action
Store password AWS SCT creates a secure vault to store SSL certificates
and database passwords. By turning this option on, you
can store the database password and connect quickly to
the database without having to enter the password.
SQL Server driver path Enter the path to the driver to use to connect to the
source database. For more information, see Installing JDBC
drivers for AWS Schema Conversion Tool.
If you store the driver path in the global project settings,
the driver path doesn't appear on the connection dialog
box. For more information, see Storing driver paths in the
global settings.
5. Choose Test Connection to verify that AWS SCT can connect to your source database.
6. Choose Connect to connect to your source database.
SQL Server Data Warehouse to Amazon Redshift conversion settings
To edit SQL Server Data Warehouse to Amazon Redshift conversion settings, choose Settings in
AWS SCT, and then choose Conversion settings. From the upper list, choose Microsoft SQL Server,
and then choose Microsoft SQL Server – Amazon Redshift. AWS SCT displays all available settings
for SQL Server Data Warehouse to Amazon Redshift conversion.
SQL Server Data Warehouse to Amazon Redshift conversion settings in AWS SCT include options
for the following:
• To limit the number of comments with action items in the converted code.
For Add comments in the converted code for the action items of selected severity and higher,
choose the severity of action items. AWS SCT adds comments in the converted code for action
items of the selected severity and higher.
For example, to minimize the number of comments in your converted code, choose Errors only.
To include comments for all action items in your converted code, choose All messages.
• To set the maximum number of tables that AWS SCT can apply to your target Amazon Redshift
cluster.
SQL Server Data Warehouses Version 1.0.672 232

AWS Schema Conversion Tool User Guide
For The maximum number of tables for the target Amazon Redshift cluster, choose the
number of tables that AWS SCT can apply to your Amazon Redshift cluster.
Amazon Redshift has quotas that limit the use tables for different cluster node types. If you
choose Auto, AWS SCT determines the number of tables to apply to your target Amazon
Redshift cluster depending on the node type. Optionally, choose the value manually. For more
information, see Quotas and limits in Amazon Redshift in the Amazon Redshift Management
Guide.
AWS SCT converts all your source tables, even if this is more than your Amazon Redshift cluster
can store. AWS SCT stores the converted code in your project and doesn't apply it to the target
database. If you reach the Amazon Redshift cluster quota for the tables when you apply the
converted code, then AWS SCT displays a warning message. Also, AWS SCT applies tables to your
target Amazon Redshift cluster until the number of tables reaches the limit.
• To migrate partitions of the source table to separate tables in Amazon Redshift. To do so, select
Use the UNION ALL view and enter the maximum number of target tables that AWS SCT can
create for a single source table.
Amazon Redshift doesn't support table partitioning. To emulate this behavior and make queries
run faster, AWS SCT can migrate each partition of your source table to a separate table in
Amazon Redshift. Then, AWS SCT creates a view that includes data from all these tables.
AWS SCT automatically determines the number of partitions in your source table. Depending
on the type of source table partitioning, this number can exceed the quota for the tables that
you can apply to your Amazon Redshift cluster. To avoid reaching this quota, enter the maximum
number of target tables that AWS SCT can create for partitions of a single source table. The
default option is 368 tables, which represents a partition for 366 days of a year and two tables
for NO RANGE and UNKNOWN partitions.
• To apply compression to Amazon Redshift table columns. To do so, select Use compression
encoding.
AWS SCT assigns compression encoding to columns automatically using the default Amazon
Redshift algorithm. For more information, see Compression encodings in the Amazon Redshift
Database Developer Guide.
By default, Amazon Redshift doesn't apply compression to columns that are defined as sort and
distribution keys. You can change this behavior and apply compression to these columns. To do
SQL Server Data Warehouses Version 1.0.672 233

AWS Schema Conversion Tool User Guide
so, select Use compression encoding for KEY columns. You can select this option only when you
select the Use compression encoding option.
SQL Server Data Warehouse to Amazon Redshift conversion optimization settings
To edit SQL Server Data Warehouse to Amazon Redshift conversion optimization settings, choose
Settings in AWS SCT, and then choose Conversion settings. From the upper list, choose Microsoft
SQL Server, and then choose Microsoft SQL Server – Amazon Redshift. In the left pane, choose
Optimization strategies. AWS SCT displays conversion optimization settings for SQL Server Data
Warehouse to Amazon Redshift conversion.
SQL Server Data Warehouse to Amazon Redshift conversion optimization settings in AWS SCT
include options for the following:
• To work with automatic table optimization. To do so, select Use Amazon Redshift automatic
table tuning.
Automatic table optimization is a self-tuning process in Amazon Redshift that automatically
optimizes the design of tables. For more information, see Working with automatic table
optimization in the Amazon Redshift Database Developer Guide.
To rely only on the automatic table optimization, choose None for Initial key selection strategy.
• To choose sort and distribution keys using your strategy.
You can choose sort and distribution keys using Amazon Redshift metadata, statistical
information, or both these options. For Initial key selection strategy on the Optimization
strategies tab, choose one of the following options:
• Use metadata, ignore statistical information
• Ignore metadata, use statistical information
• Use metadata and statistical information
Depending on the option that you choose, you can select optimization strategies. Then, for each
strategy, enter the value (0–100). These values define the weight of each strategy. Using these
weight values, AWS SCT defines how each rule influences on the choice of distribution and sort
keys. The default values are based on the AWS migration best practices.
You can define the size of small tables for the Find small tables strategy. For Min table row
count and Max table row count, enter the minimum and maximum number of rows in a table to
SQL Server Data Warehouses Version 1.0.672 234

AWS Schema Conversion Tool User Guide
define it as a small table. AWS SCT applies the ALL distribution style to small tables. In this case,
a copy of the entire table is distributed to every node.
• To configure strategy details.
In addition to defining the weight for each optimization strategy, you can configure the
optimization settings. To do so, choose Conversion optimization.
• For Sort key columns limit, enter the maximum number of columns in the sort key.
• For Skewed threshold value, enter the percentage (0–100) of a skewed value for a column.
AWS SCT excludes columns with the skew value greater than the threshold from the list of
candidates for the distribution key. AWS SCT defines the skewed value for a column as the
percentage ratio of the number of occurrences of the most common value to the total number
of records.
• For Top N queries from the query history table, enter the number (1–100) of the most
frequently used queries to analyze.
• For Select statistics user, choose the database user for which you want to analyze the query
statistics.
Also, on the Optimization strategies tab, you can define the size of small tables for the Find
small tables strategy. For Min table row count and Max table row count, enter the minimum
and maximum number of rows in a table to consider it as a small table. AWS SCT applies the ALL
distribution style to small tables. In this case, a copy of the entire table is distributed to every
node.
Connecting to a Teradata Data Warehouse with the AWS Schema
Conversion Tool
You can use AWS SCT to convert schemas, code objects, and application code from Teradata to
Amazon Redshift or Amazon Redshift and AWS Glue used in combination.
Privileges for Teradata as a source
The following privileges are required for using Teradata as a source:
• SELECT ON DBC
• SELECT ON SYSUDTLIB
• SELECT ON SYSLIB
Teradata databases Version 1.0.672 235

AWS Schema Conversion Tool User Guide
•
SELECT ON <source_database>
•
CREATE PROCEDURE ON <source_database>
In the preceding example, replace the <source_database> placeholder with the name of the
source database.
AWS SCT requires the CREATE PROCEDURE privilege to perform HELP PROCEDURE against all
procedures in the source database. AWS SCT doesn't use this privilege to create any new objects in
your source Teradata database.
Connecting to Teradata as a source
Use the following procedure to connect to your Teradata source database with the AWS Schema
Conversion Tool.
To connect to a Teradata source database
1. In the AWS Schema Conversion Tool, choose Add source.
2. Choose Teradata, then choose Next.
The Add source dialog box appears.
3. For Connection name, enter a name for your database. AWS SCT displays this name in the tree
in the left panel.
4. Use database credentials from AWS Secrets Manager or enter them manually:
• To use database credentials from Secrets Manager, use the following instructions:
1. For AWS Secret, choose the name of the secret.
2. Choose Populate to automatically fill in all values in the database connection dialog box
from Secrets Manager.
For information about using database credentials from Secrets Manager, see Configuring
AWS Secrets Manager in the AWS Schema Conversion Tool.
• To enter the Teradata source database connection information manually, use the following
instructions:
Teradata databases Version 1.0.672 236

AWS Schema Conversion Tool User Guide
Parameter Action
Connection name Enter a name for your database. AWS SCT displays this
name in the tree in the left panel.
Server name Enter the Domain Name System (DNS) name or IP address
of your source database server.
Server port Enter the port used to connect to your source database
server.
Database Enter the name of the Teradata database.
User name and Password Enter the database credentials to connect to your source
database server.
AWS SCT uses the password to connect to your source
database only when you choose to connect to your
database in a project. To guard against exposing the
password for your source database, AWS SCT doesn't
store the password by default. If you close your AWS SCT
project and reopen it, you are prompted for the password
to connect to your source database as needed.
Store password AWS SCT creates a secure vault to store SSL certificates
and database passwords. By turning this option on, you
can store the database password and connect quickly to
the database without having to enter the password.
Encrypt data Choose this option to encrypt data that you exchange
with the database. If you choose this option, then the port
number 443 is used to transfer encrypted data between
AWS SCT and your Teradata database.
Teradata databases Version 1.0.672 237

AWS Schema Conversion Tool User Guide
Parameter Action
Teradata driver path Enter the path to the driver to use to connect to the
source database. For more information, see Installing JDBC
drivers for AWS Schema Conversion Tool.
If you store the driver path in the global project settings,
the driver path doesn't appear on the connection dialog
box. For more information, see Storing driver paths in the
global settings.
5. Choose Test Connection to verify that AWS SCT can connect to your source database.
6. Choose Connect to connect to your source database.
Using LDAP authentication with a Teradata source
To set up Lightweight Directory Access Protocol (LDAP) authentication for Teradata users who run
Microsoft Active Directory in Windows, use the following procedure.
In the following procedure, the Active Directory domain is test.local.com. The Windows server
is DC, and it's configured with default settings. The following script creates the test_ldap Active
Directory account, and this account uses the test_ldap password.
To set up LDAP authentication for Teradata users who run Microsoft Active Directory in
Windows
1.
In the /opt/teradata/tdat/tdgss/site directory, edit the file
TdgssUserConfigFile.xml . Change the LDAP section to the following.
AuthorizationSupported="no"
LdapServerName="DC.test.local.com"
LdapServerPort="389"
LdapServerRealm="test.local.com"
LdapSystemFQDN="dc= test, dc= local, dc=com"
LdapBaseFQDN="dc=test, dc=local, dc=com"
2. Apply the changes by running the configuration as follows.
#cd /opt/teradata/tdgss/bin
Teradata databases Version 1.0.672 238

AWS Schema Conversion Tool User Guide
#./run_tdgssconfig
3. Test the configuration by running the following command.
# /opt/teradata/tdat/tdgss/14.10.03.01/bin/tdsbind -u test_ldap -w test_ldap
The output should be similar to the following.
LdapGroupBaseFQDN: dc=Test, dc=local, dc=com
LdapUserBaseFQDN: dc=Test, dc=local, dc=com
LdapSystemFQDN: dc= test, dc= local, dc=com
LdapServerName: DC.test.local.com
LdapServerPort: 389
LdapServerRealm: test.local.com
LdapClientUseTls: no
LdapClientTlsReqCert: never
LdapClientMechanism: SASL/DIGEST-MD5
LdapServiceBindRequired: no
LdapClientTlsCRLCheck: none
LdapAllowUnsafeServerConnect: yes
UseLdapConfig: no
AuthorizationSupported: no
FQDN: CN=test, CN=Users, DC=Anthem, DC=local, DC=com
AuthUser: ldap://DC.test.local.com:389/CN=test1,CN=Users,DC=test,DC=local,DC=com
DatabaseName: test
Service: tdsbind
4. Restart TPA using the following command.
#tpareset -f "use updated TDGSSCONFIG GDO"
5. Create the same user in the Teradata database as in Active Directory, as shown following.
CREATE USER test_ldap AS PERM=1000, PASSWORD=test_ldap;
GRANT LOGON ON ALL TO test WITH NULL PASSWORD;
If you change the user password in Active Directory for your LDAP user, specify this new password
during connection to Teradata in LDAP mode. In DEFAULT mode, you connect to Teradata by using
the LDAP user name and any password.
Teradata databases Version 1.0.672 239

AWS Schema Conversion Tool User Guide
Configuring statistics collection in your source Teradata data warehouse
To convert your source Teradata data warehouse, AWS SCT uses statistics to optimize your
converted Amazon Redshift data warehouse. You can collect statistics in AWS SCT or upload the
statistics file. For more information, see Collecting or uploading statistics.
To make sure that AWS SCT can collect statistics from your data warehouse, complete the
following prerequisite tasks.
To collect statistics from your Teradata data warehouse
1. Run the following query to recollect statistics for all tables in your data warehouse.
collect summary statistics on table_name;
In the preceding example, replace table_name with the name of your source table. Repeat
the query for each table that you convert.
2. Run the following query to determine the account string for the user, which you use to convert
your data warehouse.
select * from dbc.accountinfo where username ='user_name'
3. Turn on query logging for a specific user using the account string from the previous example.
BEGIN QUERY LOGGING WITH OBJECTS, SQL ON ALL ACCOUNT=('$M$BUSI$S$D$H');
Alternatively, turn on query logging for all database users.
BEGIN QUERY LOGGING WITH SQL, OBJECTS LIMIT SQLTEXT=0 ON ALL;
After you complete collecting data warehouse statistics, turn off query logging. To do so, you can
use the following code example.
end query logging with explain, objects, sql on all account=(' $M$BUSI$S$D$H');
Teradata databases Version 1.0.672 240

AWS Schema Conversion Tool User Guide
Collecting statistics in an offline mode from your source Teradata data warehouse
After you configure the statistics collection in your Teradata data warehouse, you can collect
statistics in your AWS SCT project. Alternatively, you can use Basic Teradata Query (BTEQ) scripts to
collect statistics in an offline mode. Then, you can upload the files with collected statistics to your
AWS SCT project. For more information, see Collecting or uploading statistics.
To collect statistics from your Teradata data warehouse in an offline mode
1.
Create the off-line_stats.bteq script with the following content.
.OS IF EXIST column-stats-tera.csv del /F column-stats-tera.csv
.OS IF EXIST table-stats-tera.csv del /F table-stats-tera.csv
.OS IF EXIST column-skew-script-tera.csv del /F column-skew-script-tera.csv
.OS IF EXIST column-skew-stats-tera.csv del /F column-skew-stats-tera.csv
.OS IF EXIST query-stats-tera.csv del /F query-stats-tera.csv
.LOGON your_teradata_server/your_login, your_password
.EXPORT REPORT FILE = table-stats-tera.csv
.SET TITLEDASHES OFF
.SET WIDTH 10000
SELECT
'"' || OREPLACE(COALESCE(c.DatabaseName, ''), '"', '""') || '";' ||
'"' || OREPLACE(COALESCE(c.TableName, ''), '"', '""') || '";' ||
'"' || TRIM(COALESCE(s.reference_count, '0')) || '";' ||
'"' || TRIM(COALESCE(CAST(p.RowCount AS BIGINT), '0')) || '";' ||
'"' || CAST(CAST(w.size_in_mb AS DECIMAL (38,1) FORMAT 'Z9.9') AS VARCHAR(38))
|| '";' ||
'"' || TRIM(COALESCE(r.stat_fk_dep_count, '0')) || '";' ||
'"' || CAST(CAST(current_timestamp(0) as timestamp(0) format 'YYYY-MM-
DDBHH:MI:SS') as VARCHAR(19)) || '"'
(TITLE
'"database_name";"table_name";"reference_count";"row_count";"size_in_mb";"stat_fk_dep_count";"current_ts"')
FROM (select databasename, tablename
from DBC.tablesv
where tablekind IN ('T','O')
and databasename = 'your_database_name'
) c
left join
(select DatabaseName, TableName, max(RowCount) RowCount
from dbc.tableStatsv
group by 1,2)p
on p.databasename = c.databasename
Teradata databases Version 1.0.672 241

AWS Schema Conversion Tool User Guide
and p.tablename = c.tablename
left join
(SELECT r.ChildDB as DatabaseName,
r.ChildTable as TableName,
COUNT(DISTINCT r.ParentTable) reference_count
FROM DBC.All_RI_ChildrenV r
GROUP BY r.ChildDB, r.ChildTable) s
on s.databasename = c.databasename
and s.tablename = c.tablename
left join
(SELECT r.ParentDB as DatabaseName,
r.ParentTable as TableName,
COUNT(DISTINCT r.ChildTable) stat_fk_dep_count
FROM DBC.All_RI_ParentsV r
GROUP BY r.ParentDB, r.ParentTable) r
on r.databasename = c.databasename
and r.tablename = c.tablename
left join
(select databasename, tablename,
sum(currentperm)/1024/1024 as size_in_mb
from dbc.TableSizeV
group by 1,2) w
on w.databasename = c.databasename
and w.tablename = c.tablename
WHERE COALESCE(r.stat_fk_dep_count,0) + COALESCE(CAST(p.RowCount AS BIGINT),0) +
COALESCE(s.reference_count,0) > 0;
.EXPORT RESET
.EXPORT REPORT FILE = column-stats-tera.csv
.SET TITLEDASHES OFF
.SET WIDTH 10000
'"' || TRIM(COALESCE(CAST(t2.card AS BIGINT), '0')) || '";' ||
SELECT
'"' || OREPLACE(COALESCE(trim(tv.DatabaseName), ''), '"', '""') || '";' ||
'"' || OREPLACE(COALESCE(trim(tv.TableName), ''), '"', '""') || '";' ||
'"' || OREPLACE(COALESCE(trim(tv.columnname), ''), '"', '""') || '";' ||
'"' || TRIM(COALESCE(CAST(t2.card AS BIGINT), '0')) ||
'";' ||
'"' || CAST(current_timestamp AS VARCHAR(19)) || '"' (TITLE
'"database_name";"table_name";"column_name";"cardinality";"current_ts"')
FROM dbc.columnsv tv
Teradata databases Version 1.0.672 242

AWS Schema Conversion Tool User Guide
LEFT JOIN
(
SELECT
c.DatabaseName AS DATABASE_NAME,
c.TABLENAME AS TABLE_NAME,
c.ColumnName AS COLUMN_NAME,
c.UniqueValueCount AS CARD
FROM dbc.tablestatsv c
WHERE c.DatabaseName = 'your_database_name'
AND c.RowCount <> 0
) t2
ON tv.DATABASENAME = t2.DATABASE_NAME
AND tv.TABLENAME = t2.TABLE_NAME
AND tv.COLUMNNAME = t2.COLUMN_NAME
WHERE t2.card > 0;
.EXPORT RESET
.EXPORT REPORT FILE = column-skew-script-tera.csv
.SET TITLEDASHES OFF
.SET WIDTH 10000
SELECT
'SELECT CAST(''"' || TRIM(c.DatabaseName) || '";"' || TRIM(c.TABLENAME) || '";"'
|| TRIM(c.COLUMNNAME) || '";"'' ||
TRIM(CAST(COALESCE(MAX(cnt) * 1.0 / SUM(cnt), 0) AS NUMBER FORMAT ''9.9999'')) ||
''";"'' ||
CAST(CURRENT_TIMESTAMP(0) AS VARCHAR(19)) || ''"'' AS VARCHAR(512))
AS """DATABASE_NAME"";""TABLE_NAME"";""COLUMN_NAME"";""SKEWED"";""CURRENT_TS"""
FROM(
SELECT COUNT(*) AS cnt
FROM "' || c.DATABASENAME || '"."' || c.TABLENAME ||
'" GROUP BY "' || c.COLUMNNAME || '") t' ||
CASE WHEN ROW_NUMBER() OVER(PARTITION BY c.DATABASENAME
ORDER BY c.TABLENAME DESC, c.COLUMNNAME DESC) <> 1
THEN ' UNION ALL'
ELSE ';' END (TITLE '--SKEWED--')
FROM dbc.columnsv c
INNER JOIN
(SELECT databasename, TABLENAME
FROM dbc.tablesv WHERE tablekind = 'T'
AND databasename = 'your_database_name') t
ON t.databasename = c.databasename
AND t.TABLENAME = c.TABLENAME
Teradata databases Version 1.0.672 243

AWS Schema Conversion Tool User Guide
INNER JOIN
(SELECT databasename, TABLENAME, columnname FROM dbc.indices GROUP BY 1,2,3
WHERE TRANSLATE_CHK (databasename USING LATIN_TO_UNICODE) + TRANSLATE_CHK
(TABLENAME USING LATIN_TO_UNICODE) + TRANSLATE_CHK (columnname USING
LATIN_TO_UNICODE) = 0
) i
ON i.databasename = c.databasename
AND i.TABLENAME = c.TABLENAME
AND i.columnname = c.columnname
WHERE c.ColumnType NOT IN ('CO','JN','N','++','VA','UT','AN','XM','A1','BO')
ORDER BY c.TABLENAME, c.COLUMNNAME;
.EXPORT RESET
.EXPORT REPORT FILE = column-skew-stats-tera.csv
.SET TITLEDASHES OFF
.SET WIDTH 10000
.RUN FILE = column-skew-script-tera.csv
.EXPORT RESET
.EXPORT REPORT FILE = query-stats-tera.csv
.SET TITLEDASHES OFF
.SET WIDTH 32000
SELECT
'"' || RTRIM(CAST(SqlTextInfo AS VARCHAR(31900)), ';') || '";"' ||
TRIM(QueryCount) || '";"' ||
TRIM(QueryId) || '";"' ||
TRIM(SqlRowNo) || '";"' ||
TRIM(QueryParts) || '";"' ||
CAST(CURRENT_TIMESTAMP(0) AS VARCHAR(19)) || '"'
(TITLE
'"query_text";"query_count";"query_id";"sql_row_no";"query_parts";"current_ts"')
FROM
(
SELECT QueryId, SqlTextInfo, SqlRowNo, QueryParts, QueryCount,
SUM(QueryFirstRow) OVER (ORDER BY QueryCount DESC, QueryId ASC, SqlRowNo ASC
ROWS UNBOUNDED PRECEDING) AS topN
FROM
(SELECT QueryId, SqlTextInfo, SqlRowNo, QueryParts, QueryCount,
CASE WHEN
Teradata databases Version 1.0.672 244

AWS Schema Conversion Tool User Guide
ROW_NUMBER() OVER (PARTITION BY QueryCount, SqlTextInfo ORDER BY QueryId,
SqlRowNo) = 1 AND SqlRowNo = 1
THEN 1 ELSE 0 END AS QueryFirstRow
FROM (
SELECT q.QueryId, q.SqlTextInfo, q.SqlRowNo,
MAX(q.SqlRowNo) OVER (PARTITION BY q.QueryId) QueryParts,
COUNT(q.SqlTextInfo) OVER (PARTITION BY q.SqlTextInfo) QueryCount
FROM DBC.dbqlsqltbl q
INNER JOIN
(
SELECT QueryId
FROM DBC.DBQLogTbl t
WHERE TRIM(t.StatementType) IN ('SELECT')
AND TRIM(t.AbortFlag) = '' AND t.ERRORCODE = 0
AND (CASE WHEN 'All users' IN ('All users') THEN 'All users' ELSE
TRIM(t.USERNAME) END) IN ('All users') --user_name list
AND t.StartTime > CURRENT_TIMESTAMP - INTERVAL '30' DAY
GROUP BY 1
) t
ON q.QueryId = t.QueryId
INNER JOIN
(
SELECT QueryId
FROM DBC.QryLogObjectsV
WHERE ObjectDatabaseName = 'your_database_name'
AND ObjectType = 'Tab'
AND CollectTimeStamp > CURRENT_TIMESTAMP - INTERVAL '30' DAY
GROUP BY 1
) r
ON r.QueryId = t.QueryId
WHERE q.CollectTimeStamp > CURRENT_TIMESTAMP - INTERVAL '30' DAY
) t
) t
WHERE SqlTextInfo NOT LIKE '%";"%'
) q
WHERE
QueryParts >=1
AND topN <= 50
ORDER BY QueryCount DESC, QueryId, SqlRowNo
QUALIFY COUNT(QueryId) OVER (PARTITION BY QueryId) = QueryParts;
.EXPORT RESET
.LOGOFF
Teradata databases Version 1.0.672 245

AWS Schema Conversion Tool User Guide
.QUIT
2.
Create the td_run_bteq.bat file that runs the BTEQ script that you created in the previous
step. Use the following content for this file.
@echo off > off-line_stats1.bteq & setLocal enableDELAYedexpansion
@echo off > off-line_stats2.bteq & setLocal enableDELAYedexpansion
set old1=your_teradata_server
set new1=%1
set old2=your_login
set new2=%2
set old3=your_database_name
set new3=%3
set old4=your_password
set /p new4=Input %2 pass?
for /f "tokens=* delims= " %%a in (off-line_stats.bteq) do (
set str1=%%a
set str1=!str1:%old1%=%new1%!
>> off-line_stats1.bteq echo !str1!
)
for /f "tokens=* delims= " %%a in (off-line_stats1.bteq) do (
set str2=%%a
set str2=!str2:%old2%=%new2%!
>> off-line_stats2.bteq echo !str2!
)
type nul > off-line_stats1.bteq
for /f "tokens=* delims= " %%a in (off-line_stats2.bteq) do (
set str3=%%a
set str3=!str3:%old3%=%new3%!
>> off-line_stats1.bteq echo !str3!
)
type nul > off-line_stats2.bteq
for /f "tokens=* delims= " %%a in (off-line_stats1.bteq) do (
set str4=%%a
set str4=!str4:%old4%=%new4%!
Teradata databases Version 1.0.672 246

AWS Schema Conversion Tool User Guide
>> off-line_stats2.bteq echo !str4!
)
del .\off-line_stats1.bteq
echo export starting...
bteq -c UTF8 < off-line_stats.bteq > metadata_export.log
pause
3.
Create the runme.bat file that runs the batch file that you created in the previous step. Use
the following content for this file.
.\td_run_bteq.bat ServerName UserName DatabaseName
In the runme.bat file, replace ServerName, UserName, and DatabaseName with your
applicable values.
Then, run the runme.bat file. Repeat this step for each data warehouse that you convert to
Amazon Redshift.
After you run this script, you receive three files with statistics for each database. You can upload
these files to your AWS SCT project. To do so, choose your data warehouse from the left panel of
your project, and open the context (right-click) menu. Choose Upload Statistics.
Teradata to Amazon Redshift conversion settings
To edit Teradata to Amazon Redshift conversion settings, choose Settings in AWS SCT, and then
choose Conversion settings. From the upper list, choose Teradata, and then choose Teradata
– Amazon Redshift. AWS SCT displays all available settings for Teradata to Amazon Redshift
conversion.
Teradata to Amazon Redshift conversion settings in AWS SCT include options for the following:
• To limit the number of comments with action items in the converted code.
For Add comments in the converted code for the action items of selected severity and higher,
choose the severity of action items. AWS SCT adds comments in the converted code for action
items of the selected severity and higher.
Teradata databases Version 1.0.672 247

AWS Schema Conversion Tool User Guide
For example, to minimize the number of comments in your converted code, choose Errors only.
To include comments for all action items in your converted code, choose All messages.
• To set the maximum number of tables that AWS SCT can apply to your target Amazon Redshift
cluster.
For The maximum number of tables for the target Amazon Redshift cluster, choose the
number of tables that AWS SCT can apply to your Amazon Redshift cluster.
Amazon Redshift has quotas that limit the use tables for different cluster node types. If you
choose Auto, AWS SCT determines the number of tables to apply to your target Amazon
Redshift cluster depending on the node type. Optionally, choose the value manually. For more
information, see Quotas and limits in Amazon Redshift in the Amazon Redshift Management
Guide.
AWS SCT converts all your source tables, even if this is more than your Amazon Redshift cluster
can store. AWS SCT stores the converted code in your project and doesn't apply it to the target
database. If you reach the Amazon Redshift cluster quota for the tables when you apply the
converted code, then AWS SCT displays a warning message. Also, AWS SCT applies tables to your
target Amazon Redshift cluster until the number of tables reaches the limit.
• To migrate partitions of the source table to separate tables in Amazon Redshift. To do so, select
Use the UNION ALL view and enter the maximum number of target tables that AWS SCT can
create for a single source table.
Amazon Redshift doesn't support table partitioning. To emulate this behavior and make queries
run faster, AWS SCT can migrate each partition of your source table to a separate table in
Amazon Redshift. Then, AWS SCT creates a view that includes data from all these tables.
AWS SCT automatically determines the number of partitions in your source table. Depending
on the type of source table partitioning, this number can exceed the quota for the tables that
you can apply to your Amazon Redshift cluster. To avoid reaching this quota, enter the maximum
number of target tables that AWS SCT can create for partitions of a single source table. The
default option is 368 tables, which represents a partition for 366 days of a year and two tables
for NO RANGE and UNKNOWN partitions.
• To apply compression to Amazon Redshift table columns. To do so, select Use compression
encoding.
Teradata databases Version 1.0.672 248

AWS Schema Conversion Tool User Guide
AWS SCT assigns compression encoding to columns automatically using the default Amazon
Redshift algorithm. For more information, see Compression encodings in the Amazon Redshift
Database Developer Guide.
By default, Amazon Redshift doesn't apply compression to columns that are defined as sort and
distribution keys. You can change this behavior and apply compression to these columns. To do
so, select Use compression encoding for KEY columns. You can select this option only when you
select the Use compression encoding option.
•
To use an explicit list of columns in converted code for SELECT * statements, select Use explicit
column declaration.
• To emulate the behavior of primary and unique keys in your Amazon Redshift cluster, select
Emulate the behavior of primary and unique keys.
Amazon Redshift doesn't enforce unique and primary keys and uses them for informational
purposes only. If you use these constraints in your code, then make sure that AWS SCT emulates
their behavior in the converted code.
• To ensure data uniqueness in the target Amazon Redshift tables. To do so, select Emulate the
behavior of SET tables.
Teradata creates tables using the SET syntax element as a default option. You can't add
duplicate rows in a SET table. If your source code doesn't use this uniqueness constraint, then
turn off this option. In this case, the converted code works faster.
If your source code uses the SET option in tables as a uniqueness constraint, turn on this option.
In this case, AWS SCT rewrites INSERT..SELECT statements in the converted code to emulate
the behavior of your source database.
Teradata to Amazon Redshift conversion optimization settings
To edit Teradata to Amazon Redshift conversion optimization settings, choose Settings in AWS
SCT, and then choose Conversion settings. From the upper list, choose Teradata, and then choose
Teradata – Amazon Redshift. In the left pane, choose Optimization strategies. AWS SCT displays
conversion optimization settings for Teradata to Amazon Redshift conversion.
Teradata to Amazon Redshift conversion optimization settings in AWS SCT include options for the
following:
Teradata databases Version 1.0.672 249

AWS Schema Conversion Tool User Guide
• To work with automatic table optimization. To do so, select Use Amazon Redshift automatic
table tuning.
Automatic table optimization is a self-tuning process in Amazon Redshift that automatically
optimizes the design of tables. For more information, see Working with automatic table
optimization in the Amazon Redshift Database Developer Guide.
To rely only on the automatic table optimization, choose None for Initial key selection strategy.
• To choose sort and distribution keys using your strategy.
You can choose sort and distribution keys using Amazon Redshift metadata, statistical
information, or both these options. For Initial key selection strategy on the Optimization
strategies tab, choose one of the following options:
• Use metadata, ignore statistical information
• Ignore metadata, use statistical information
• Use metadata and statistical information
Depending on the option that you choose, you can select optimization strategies. Then, for each
strategy, enter the value (0–100). These values define the weight of each strategy. Using these
weight values, AWS SCT defines how each rule influences on the choice of distribution and sort
keys. The default values are based on the AWS migration best practices.
You can define the size of small tables for the Find small tables strategy. For Min table row
count and Max table row count, enter the minimum and maximum number of rows in a table to
define it as a small table. AWS SCT applies the ALL distribution style to small tables. In this case,
a copy of the entire table is distributed to every node.
• To configure strategy details.
In addition to defining the weight for each optimization strategy, you can configure the
optimization settings. To do so, choose Conversion optimization.
• For Sort key columns limit, enter the maximum number of columns in the sort key.
• For Skewed threshold value, enter the percentage (0–100) of a skewed value for a column.
AWS SCT excludes columns with the skew value greater than the threshold from the list of
candidates for the distribution key. AWS SCT defines the skewed value for a column as the
percentage ratio of the number of occurrences of the most common value to the total number
of records.
Teradata databases Version 1.0.672 250

AWS Schema Conversion Tool User Guide
• For Top N queries from the query history table, enter the number (1–100) of the most
frequently used queries to analyze.
• For Select statistics user, choose the database user for which you want to analyze the query
statistics.
Also, on the Optimization strategies tab, you can define the size of small tables for the Find
small tables strategy. For Min table row count and Max table row count, enter the minimum
and maximum number of rows in a table to consider it as a small table. AWS SCT applies the ALL
distribution style to small tables. In this case, a copy of the entire table is distributed to every
node.
Connecting the AWS Schema Conversion Tool to Vertica databases
You can use AWS SCT to convert schemas, code objects, and application code from Vertica to
Amazon Redshift.
Privileges for Vertica as a source
The following privileges are required for using Vertica as a source:
•
USAGE ON SCHEMA <schema_name>
• USAGE ON SCHEMA PUBLIC
•
SELECT ON ALL TABLES IN SCHEMA <schema_name>
•
SELECT ON ALL SEQUENCES IN SCHEMA <schema_name>
•
EXECUTE ON ALL FUNCTIONS IN SCHEMA <schema_name>
•
EXECUTE ON PROCEDURE <schema_name.procedure_name(procedure_signature)>
In the preceding example, replace placeholders as following:
•
Replace schema_name with the name of the source schema.
•
Replace procedure_name with the name of a source procedure. Repeat the grant for each
procedure that you are converting.
•
Replace procedure_signature with the comma-delimited list of procedure argument types.
Vertica databases Version 1.0.672 251

AWS Schema Conversion Tool User Guide
Connecting to Vertica as a source
Use the following procedure to connect to your Vertica source database with the AWS Schema
Conversion Tool.
To connect to a Vertica source database
1. In the AWS Schema Conversion Tool, choose Add source.
2. Choose Vertica, then choose Next.
The Add source dialog box appears.
3. For Connection name, enter a name for your database. AWS SCT displays this name in the tree
in the left panel.
4. Use database credentials from AWS Secrets Manager or enter them manually:
• To use database credentials from Secrets Manager, use the following instructions:
1. For AWS Secret, choose the name of the secret.
2. Choose Populate to automatically fill in all values in the database connection dialog box
from Secrets Manager.
For information about using database credentials from Secrets Manager, see Configuring
AWS Secrets Manager in the AWS Schema Conversion Tool.
• To enter the Vertica source database connection information manually, use the following
instructions:
Parameter Action
Server name Enter the Domain Name System (DNS) name or IP address
of your source database server.
Server port Enter the port used to connect to your source database
server.
Database Enter the name of the Vertica database.
User name and Password Enter the database credentials to connect to your source
database server.
Vertica databases Version 1.0.672 252

AWS Schema Conversion Tool User Guide
Parameter Action
AWS SCT uses the password to connect to your source
database only when you choose to connect to your
database in a project. To guard against exposing the
password for your source database, AWS SCT doesn't
store the password by default. If you close your AWS SCT
project and reopen it, you are prompted for the password
to connect to your source database as needed.
Use SSL Choose this option to use Secure Sockets Layer (SSL) to
connect to your database. Provide the following additional
information, as applicable, on the SSL tab:
• Verify server certificate: Choose this option to verify
the server certificate by using a trust store.
• Trust store: A trust store that you set up in the Global
settings.
• Key store: A key store that you set up in the Global
settings.
Store password AWS SCT creates a secure vault to store SSL certificates
and database passwords. By turning this option on, you
can store the database password and connect quickly to
the database without having to enter the password.
Vertica driver path Enter the path to the driver to use to connect to the
source database. For more information, see Installing JDBC
drivers for AWS Schema Conversion Tool.
If you store the driver path in the global project settings,
the driver path doesn't appear on the connection dialog
box. For more information, see Storing driver paths in the
global settings.
5. Choose Test Connection to verify that AWS SCT can connect to your source database.
6. Choose Connect to connect to your source database.
Vertica databases Version 1.0.672 253

AWS Schema Conversion Tool User Guide
Vertica to Amazon Redshift conversion settings
To edit Vertica to Amazon Redshift conversion settings, choose Settings in AWS SCT, and then
choose Conversion settings. From the upper list, choose Vertica, and then choose Vertica
– Amazon Redshift. AWS SCT displays all available settings for Vertica to Amazon Redshift
conversion.
Vertica to Amazon Redshift conversion settings in AWS SCT include options for the following:
• To limit the number of comments with action items in the converted code.
For Add comments in the converted code for the action items of selected severity and higher,
choose the severity of action items. AWS SCT adds comments in the converted code for action
items of the selected severity and higher.
For example, to minimize the number of comments in your converted code, choose Errors only.
To include comments for all action items in your converted code, choose All messages.
• To set the maximum number of tables that AWS SCT can apply to your target Amazon Redshift
cluster.
For The maximum number of tables for the target Amazon Redshift cluster, choose the
number of tables that AWS SCT can apply to your Amazon Redshift cluster.
Amazon Redshift has quotas that limit the use tables for different cluster node types. If you
choose Auto, AWS SCT determines the number of tables to apply to your target Amazon
Redshift cluster depending on the node type. Optionally, choose the value manually. For more
information, see Quotas and limits in Amazon Redshift in the Amazon Redshift Management
Guide.
AWS SCT converts all your source tables, even if this is more than your Amazon Redshift cluster
can store. AWS SCT stores the converted code in your project and doesn't apply it to the target
database. If you reach the Amazon Redshift cluster quota for the tables when you apply the
converted code, then AWS SCT displays a warning message. Also, AWS SCT applies tables to your
target Amazon Redshift cluster until the number of tables reaches the limit.
• To migrate partitions of the source table to separate tables in Amazon Redshift. To do so, select
Use the UNION ALL view and enter the maximum number of target tables that AWS SCT can
create for a single source table.
Vertica databases Version 1.0.672 254

AWS Schema Conversion Tool User Guide
Amazon Redshift doesn't support table partitioning. To emulate this behavior and make queries
run faster, AWS SCT can migrate each partition of your source table to a separate table in
Amazon Redshift. Then, AWS SCT creates a view that includes data from all these tables.
AWS SCT automatically determines the number of partitions in your source table. Depending
on the type of source table partitioning, this number can exceed the quota for the tables that
you can apply to your Amazon Redshift cluster. To avoid reaching this quota, enter the maximum
number of target tables that AWS SCT can create for partitions of a single source table. The
default option is 368 tables, which represents a partition for 366 days of a year and two tables
for NO RANGE and UNKNOWN partitions.
• To apply compression to Amazon Redshift table columns. To do so, select Use compression
encoding.
AWS SCT assigns compression encoding to columns automatically using the default Amazon
Redshift algorithm. For more information, see Compression encodings in the Amazon Redshift
Database Developer Guide.
By default, Amazon Redshift doesn't apply compression to columns that are defined as sort and
distribution keys. You can change this behavior and apply compression to these columns. To do
so, select Use compression encoding for KEY columns. You can select this option only when you
select the Use compression encoding option.
Vertica to Amazon Redshift conversion optimization settings
To edit Vertica to Amazon Redshift conversion optimization settings, choose Settings in AWS SCT,
and then choose Conversion settings. From the upper list, choose Vertica, and then choose Vertica
– Amazon Redshift. In the left pane, choose Optimization strategies. AWS SCT displays conversion
optimization settings for Vertica to Amazon Redshift conversion.
Vertica to Amazon Redshift conversion optimization settings in AWS SCT include options for the
following:
• To work with automatic table optimization. To do so, select Use Amazon Redshift automatic
table tuning.
Automatic table optimization is a self-tuning process in Amazon Redshift that automatically
optimizes the design of tables. For more information, see Working with automatic table
optimization in the Amazon Redshift Database Developer Guide.
Vertica databases Version 1.0.672 255

AWS Schema Conversion Tool User Guide
To rely only on the automatic table optimization, choose None for Initial key selection strategy.
• To choose sort and distribution keys using your strategy.
You can choose sort and distribution keys using Amazon Redshift metadata, statistical
information, or both these options. For Initial key selection strategy on the Optimization
strategies tab, choose one of the following options:
• Use metadata, ignore statistical information
• Ignore metadata, use statistical information
• Use metadata and statistical information
Depending on the option that you choose, you can select optimization strategies. Then, for each
strategy, enter the value (0–100). These values define the weight of each strategy. Using these
weight values, AWS SCT defines how each rule influences on the choice of distribution and sort
keys. The default values are based on the AWS migration best practices.
You can define the size of small tables for the Find small tables strategy. For Min table row
count and Max table row count, enter the minimum and maximum number of rows in a table to
define it as a small table. AWS SCT applies the ALL distribution style to small tables. In this case,
a copy of the entire table is distributed to every node.
• To configure strategy details.
In addition to defining the weight for each optimization strategy, you can configure the
optimization settings. To do so, choose Conversion optimization.
• For Sort key columns limit, enter the maximum number of columns in the sort key.
• For Skewed threshold value, enter the percentage (0–100) of a skewed value for a column.
AWS SCT excludes columns with the skew value greater than the threshold from the list of
candidates for the distribution key. AWS SCT defines the skewed value for a column as the
percentage ratio of the number of occurrences of the most common value to the total number
of records.
• For Top N queries from the query history table, enter the number (1–100) of the most
frequently used queries to analyze.
• For Select statistics user, choose the database user for which you want to analyze the query
statistics.
Also, on the Optimization strategies tab, you can define the size of small tables for the Find
small tables strategy. For Min table row count and Max table row count, enter the minimum
Vertica databases Version 1.0.672 256

AWS Schema Conversion Tool User Guide
and maximum number of rows in a table to consider it as a small table. AWS SCT applies the ALL
distribution style to small tables. In this case, a copy of the entire table is distributed to every
node.
Vertica databases Version 1.0.672 257

AWS Schema Conversion Tool User Guide
Mapping data types in the AWS Schema Conversion Tool
You can add multiple source and target databases in a single AWS SCT project. Doing this simplifies
the management of projects, when you migrate multiple databases to different target platforms.
After you create a new project and add source and target databases, create mapping rules. AWS
SCT requires at least one mapping rule to create a migration assessment report and convert
database schemas.
A mapping rule describes a source-target pair that includes a source database schema or source
database and a target database platform. You can create multiple mapping rules in a single AWS
SCT project. Use mapping rules to convert every source database schema to the right target
database platform.
To change the name of your schema in the converted code, set up a migration rule. For example,
with migrations rules, you can rename your schema, add a prefix to object names, change column
collation, or change data types. To apply these changes to your converted code, make sure that you
create migration rules before you convert your source schema. For more information, see Applying
migration rules.
You can create mapping rules only for supported database conversion pairs. For the list of
supported conversion pairs, see Connecting to source databases with the AWS Schema Conversion
Tool.
If you open a project saved in AWS SCT version 1.0.655 or before, AWS SCT automatically creates
mapping rules for all source database schemas to the target database platform. To add other
target database platforms, delete existing mapping rules and then create new mapping rules.
Topics
• Mapping new data types in the AWS Schema Conversion Tool
• Editing data type mappings in the AWS Schema Conversion Tool
• Mapping to virtual targets in the AWS Schema Conversion Tool
• Limitations of data type mapping in the AWS Schema Conversion Tool
Version 1.0.672 258

AWS Schema Conversion Tool User Guide
Mapping new data types in the AWS Schema Conversion Tool
You can create multiple mapping rules in a single project. AWS SCT saves mapping rules as part of
your project. With your project open, use the following procedure to add a new mapping rule.
To create mapping rules
1. On the View menu, choose Mapping view.
2. In the left panel, choose a schema or a database to add to the mapping rule.
3. In the right panel, choose a target database platform for the selected source schema or
database.
You can choose a virtual database platform as a target. For more information, see Mapping to
virtual targets in the AWS Schema Conversion Tool.
4. Choose Create mapping.
AWS SCT adds this new mapping rule to the Server mappings list.
Add mapping rules for all conversion pairs. To create an assessment report or convert database
schemas, choose Main view on the View menu.
AWS SCT highlights in bold all schema objects that are part of a mapping rule.
Editing data type mappings in the AWS Schema Conversion
Tool
You can filter or delete existing mapping rules, and add a new mapping rule in your AWS Schema
Conversion Tool (AWS SCT) project.
When you create a mapping rule for the whole source database, AWS SCT creates one mapping rule
for each source database schema. For projects that involve dozens of schemas or even databases,
it may be hard to understand, which target is used for a certain schema. To quickly find a mapping
rule for your schema, use one or several of the following filter options in AWS SCT.
To filter mapping rules
1. On the View menu, choose Mapping view.
New data type mapping Version 1.0.672 259

AWS Schema Conversion Tool User Guide
2. For Source servers, choose the source database.
The filter default is All, which means that AWS SCT displays mapping rules for all source
databases.
3.
For Source schema, enter the source schema name. Use the percent (%) as a wildcard to
replace any number of any symbols in the schema name.
The filter default is the % wildcard, which means that AWS SCT displays mapping rules for all
source database schema names.
4. For Has migration rules, choose Yes to display mapping rules for which the data migration
rules are created. Choose No to display mapping rules which don't have data migration rules.
For more information, see Creating data migration rules in AWS SCT.
The filter default is All, which means that AWS SCT displays all mapping rules.
5. For Target servers, choose the target database.
The filter default is All, which means that AWS SCT displays mapping rules for all target
databases.
With your project open, use the following procedure to delete a mapping rule. For more
information on adding mapping rules, see Mapping new data types in the AWS Schema Conversion
Tool.
To delete mapping rules
1. On the View menu, choose Mapping view.
2. For Server mappings, choose the mapping rules to delete.
3. Choose Delete selected mappings.
AWS SCT deletes the selected mapping rules.
Mapping to virtual targets in the AWS Schema Conversion Tool
You can see how AWS SCT converts your source database schema to any supported target database
platform. To do so, you don't need to connect to an existing target database. Instead, you can
choose a virtual target database platform in the right panel when you create a mapping rule. For
more information, see Mapping new data types in the AWS Schema Conversion Tool. Make sure
Virtual target mapping Version 1.0.672 260

AWS Schema Conversion Tool User Guide
that you expand the Servers, NoSQL clusters, and ETL nodes in the right panel to see the list of
virtual target database platforms.
AWS SCT supports the following virtual target database platforms:
• Amazon Aurora MySQL-Compatible Edition
• Amazon Aurora PostgreSQL-Compatible Edition
• Amazon DynamoDB
• Amazon Redshift
• Amazon Redshift and AWS Glue
• AWS Glue
• AWS Glue Studio
• Babelfish for Aurora PostgreSQL
• MariaDB
• Microsoft SQL Server
• MySQL
• Oracle
• PostgreSQL
If you use Babelfish for Aurora PostgreSQL as a target database platform, you can only create a
database migration assessment report. For more information, see the section called “Assessment
report”.
If you use a virtual target database platform, you can save converted code to a file. For more
information, see the section called “Saving your converted schema”.
Limitations of data type mapping in the AWS Schema
Conversion Tool
The following limitations apply when converting schemas using multiple servers in a single AWS
SCT project:
• You can add the same server to a project only once.
• You can't map server schemas to a specific target schema, only to a target server. AWS SCT
creates the target schema during conversion.
Data type mapping limitations Version 1.0.672 261

AWS Schema Conversion Tool User Guide
• You can't map lower-level source objects to the target server.
• You can map one source schema to only one target server in a project.
• Make sure to map a source to a target server to create an assessment report, convert schemas, or
extract data.
Data type mapping limitations Version 1.0.672 262

AWS Schema Conversion Tool User Guide
Working with reports in the AWS Schema Conversion
Tool
When you are planning a database conversion, it is helpful to create some reports to help you
understand what is involved. You can create reports using AWS Schema Conversion Tool.
You can use AWS SCT to create a database migration assessment report. With this report, you get
a summary of your schema conversion tasks and the details for items that can't be automatically
converted to your target database. You can use this report to evaluate how much of the project can
be completed by using AWS SCT, and what else you need to complete the conversion. To create an
assessment report, use Create Report from the context (right-click) menu of the database in AWS
SCT.
Topics
• Using the assessment report in the AWS Schema Conversion Tool
Using the assessment report in the AWS Schema Conversion
Tool
An important part of the AWS Schema Conversion Tool is the assessment report that it generates
to estimate the complexity of your schema conversion. This database migration assessment report
summarizes all of the schema conversion tasks and details the action items for schema that
can't be converted to the DB engine of your target DB instance. You can view the report in the
application or export it as a comma-separated value (CSV) or PDF file.
If you add multiple source and target databases in a single project, AWS SCT aggregates the
reports for all conversion pairs into one database migration assessment report.
You can use virtual target database platforms to generate an assessment report and understand
the complexity of migration to a selected database platform. In this case, you don't need
to connect to your target database platform. For example, you can use Babelfish for Aurora
PostgreSQL as a virtual target database platform to create a database migration assessment
report. For more information on virtual target database platforms, see the section called “Virtual
target mapping”.
The migration assessment report includes the following:
Assessment report Version 1.0.672 263

AWS Schema Conversion Tool User Guide
• Executive summary
• License evaluation
• Cloud support, indicating any features in the source database not available on the target.
• Recommendations, including conversion of server objects, backup suggestions, and linked server
changes
The report also includes estimates of the amount of effort that it will take to write the equivalent
code for your target DB instance that can't be converted automatically.
If you use AWS SCT to migrate your existing schema to an Amazon RDS DB instance, then you can
use the report to help you analyze requirements for moving to the AWS Cloud and change your
license type.
Topics
• Creating an assessment report in AWS Schema Conversion Tool
• Viewing an assessment report in AWS Schema Conversion Tool
• Saving the assessment report in AWS Schema Conversion Tool
• Configuring an assessment report in AWS Schema Conversion Tool
• Creating a multiserver assessment report in AWS Schema Conversion Tool
Creating an assessment report in AWS Schema Conversion Tool
Use the following procedure to create a database migration assessment report.
To create a database migration assessment report
1. Make sure that you created a mapping rule for the source database schema to create an
assessment report for. For more information, see Mapping new data types in the AWS Schema
Conversion Tool.
2. On the View menu, choose Main view.
3. In the left panel that displays your source database schema, choose a schema object to create
an assessment report for. To include multiple database schemas into the report, choose the
parent node, for example Schemas.
Make sure that you selected the check boxes for all schema objects to create an assessment
report for.
Create assessment report Version 1.0.672 264
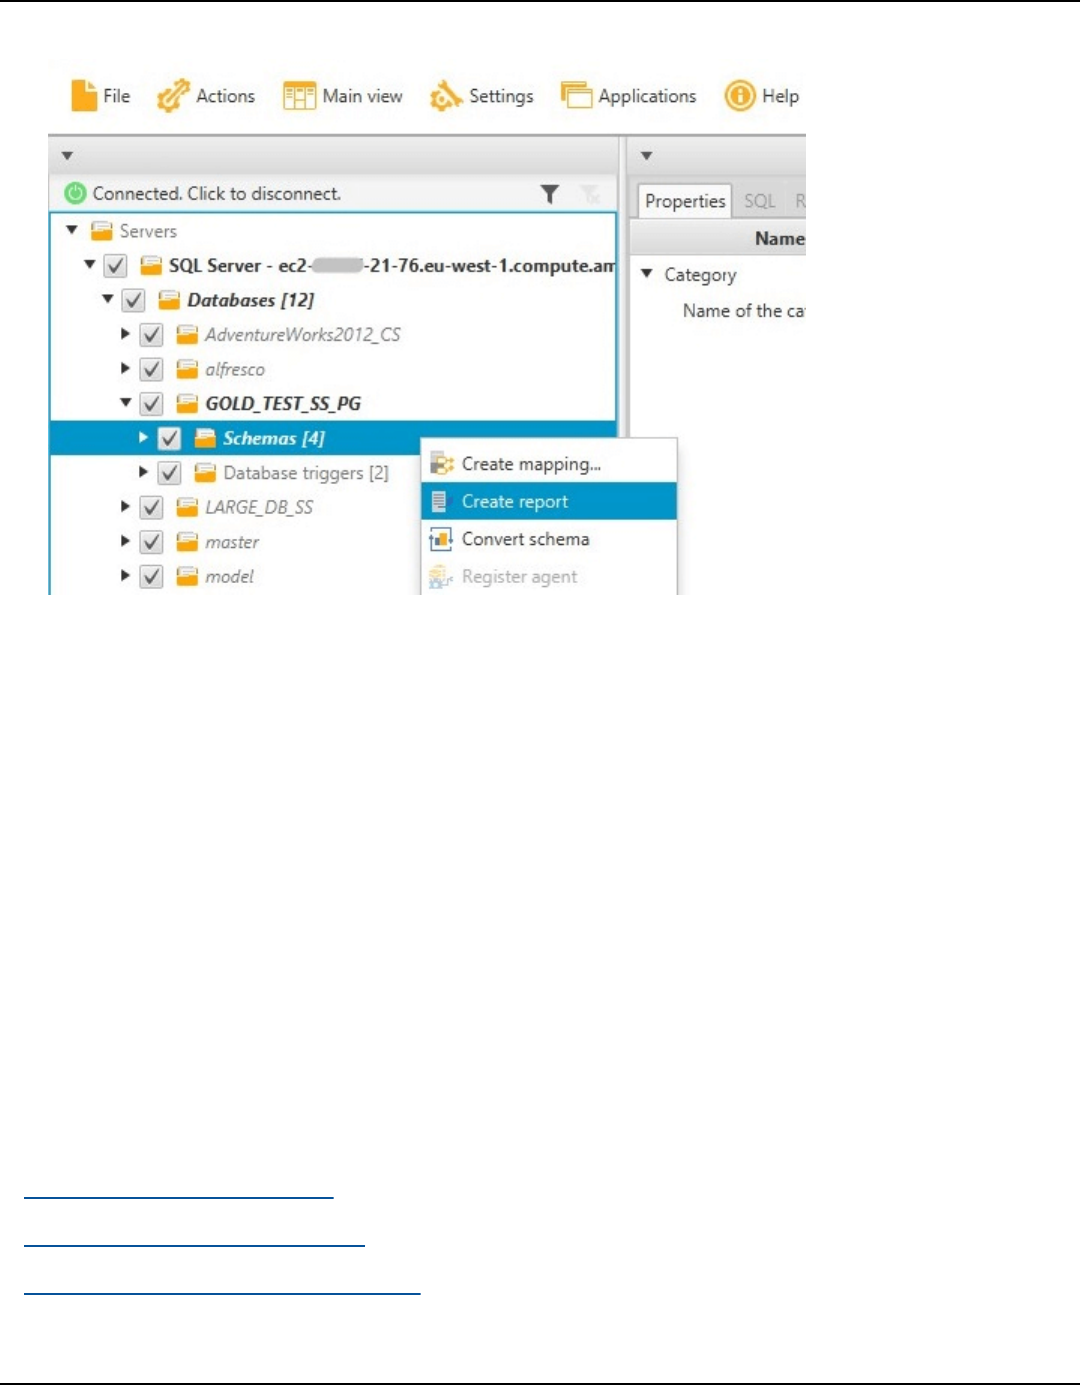
AWS Schema Conversion Tool User Guide
4. Open the context (right-click) menu for the object, and then choose Create report.
Viewing an assessment report in AWS Schema Conversion Tool
After you create an assessment report, the assessment report view opens, showing the following
tabs:
• Summary
• Action Items
The Summary tab shows items that were automatically converted or not converted.
The Action Items tab shows items that couldn't be converted automatically, and recommendations
on what to do about them.
Topics
• Assessment report summary
• Assessment report action items
• Assessment report warning message
Viewing assessment report Version 1.0.672 265
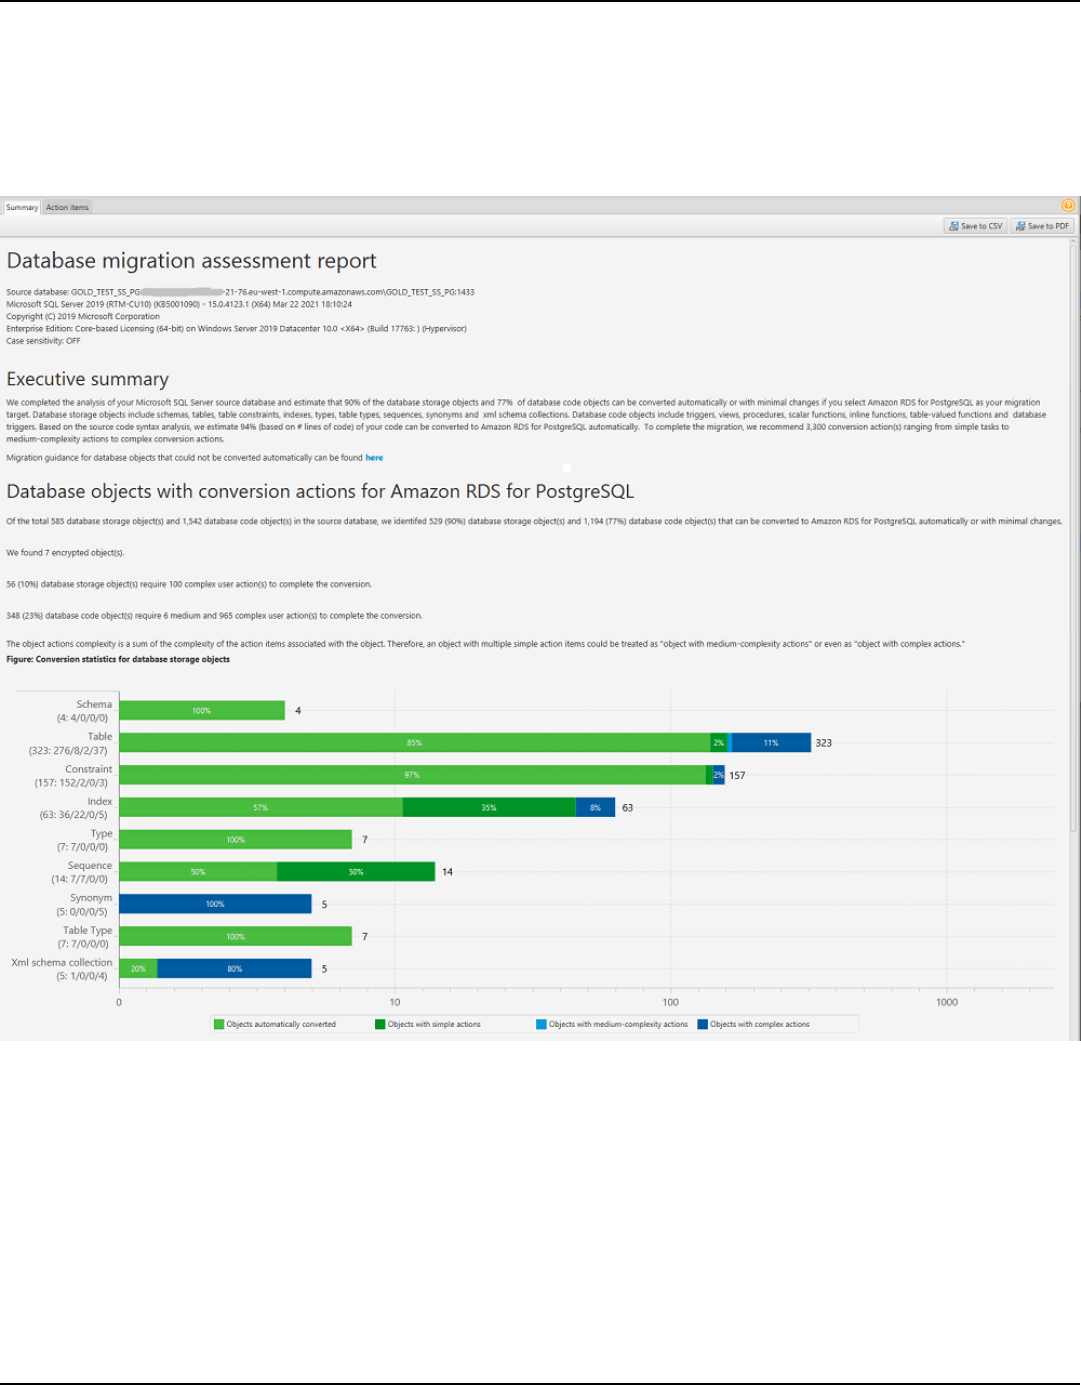
AWS Schema Conversion Tool User Guide
Assessment report summary
The Summary tab displays the summary information from the database migration assessment
report. It shows items that were converted automatically, and items that were not converted
automatically.
For schema items that can't be converted automatically to the target database engine, the
summary includes an estimate of the effort required to create schema items in your target DB
instance that are equivalent to those in your source.
The report categorizes the estimated time to convert these schema items as follows:
• Simple – Actions that can be completed in less than two hours.
• Medium – Actions that are more complex and can be completed in two to six hours.
Viewing assessment report Version 1.0.672 266
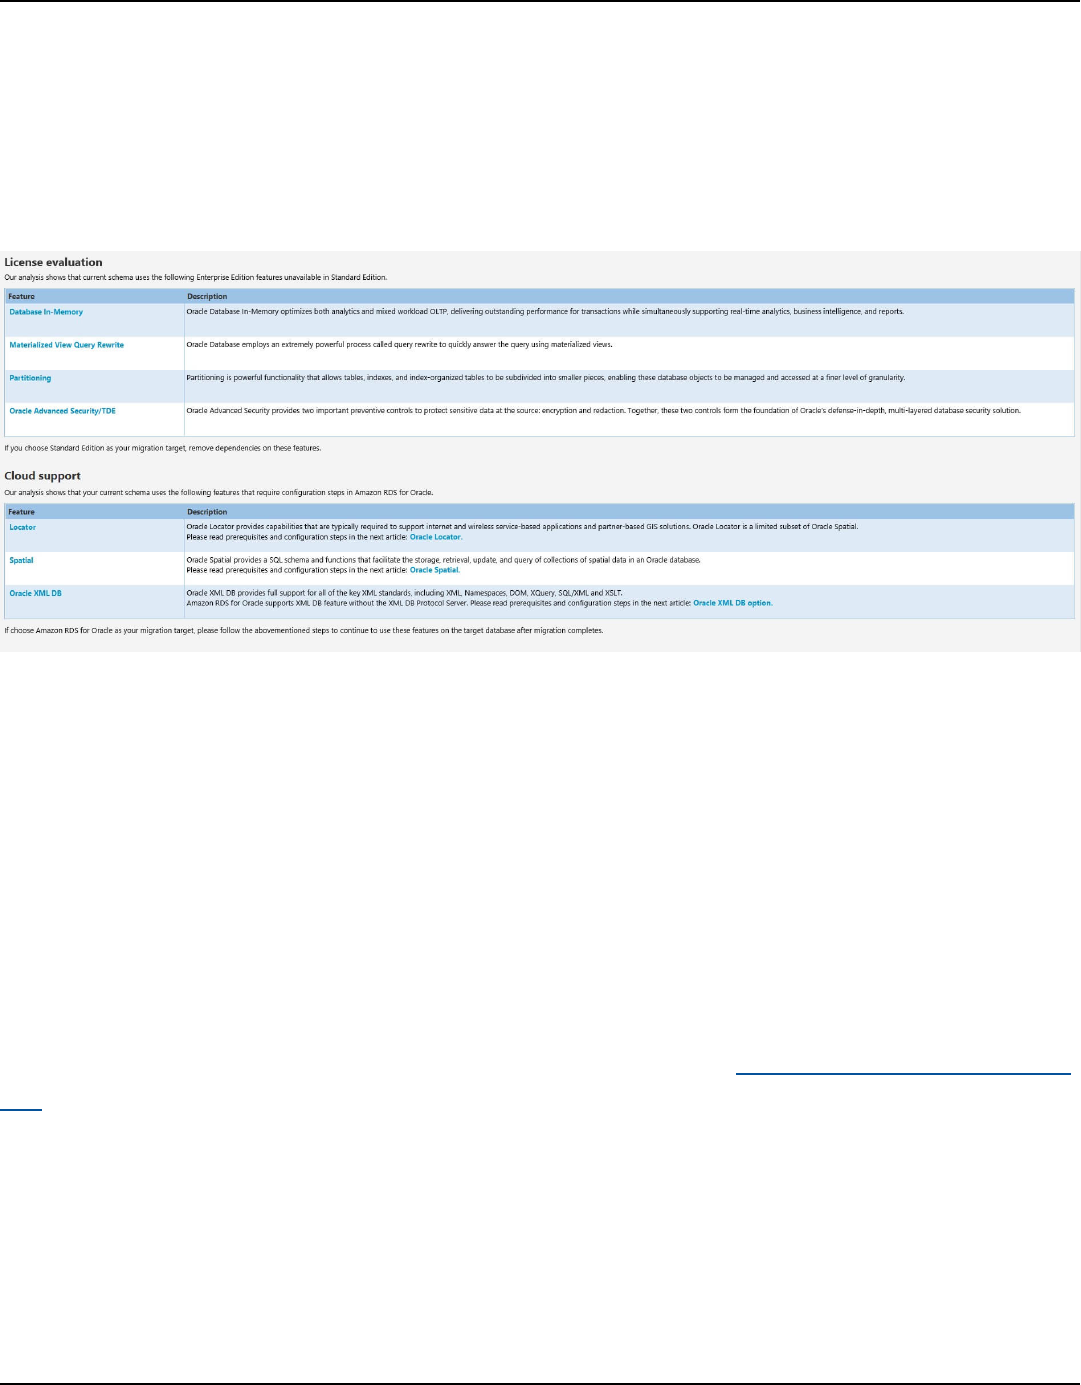
AWS Schema Conversion Tool User Guide
• Significant – Actions that are very complex and take more than six hours to complete.
The section License Evaluation and Cloud Support contains information about moving your
existing on-premises database schema to an Amazon RDS DB instance running the same engine.
For example, if you want to change license types, this section of the report tells you which features
from your current database should be removed.
Assessment report action items
The assessment report view also includes an Action Items tab. This tab contains a list of items that
can't be converted automatically to the database engine of your target Amazon RDS DB instance.
If you select an action item from the list, AWS SCT highlights the item from your schema that the
action item applies to.
The report also contains recommendations for how to manually convert the schema item. For
example, after the assessment runs, detailed reports for the database/schema show you the effort
required to design and implement the recommendations for converting Action items. For more
information about deciding how to handle manual conversions, see Converting schemas usinf AWS
SCT.
Viewing assessment report Version 1.0.672 267
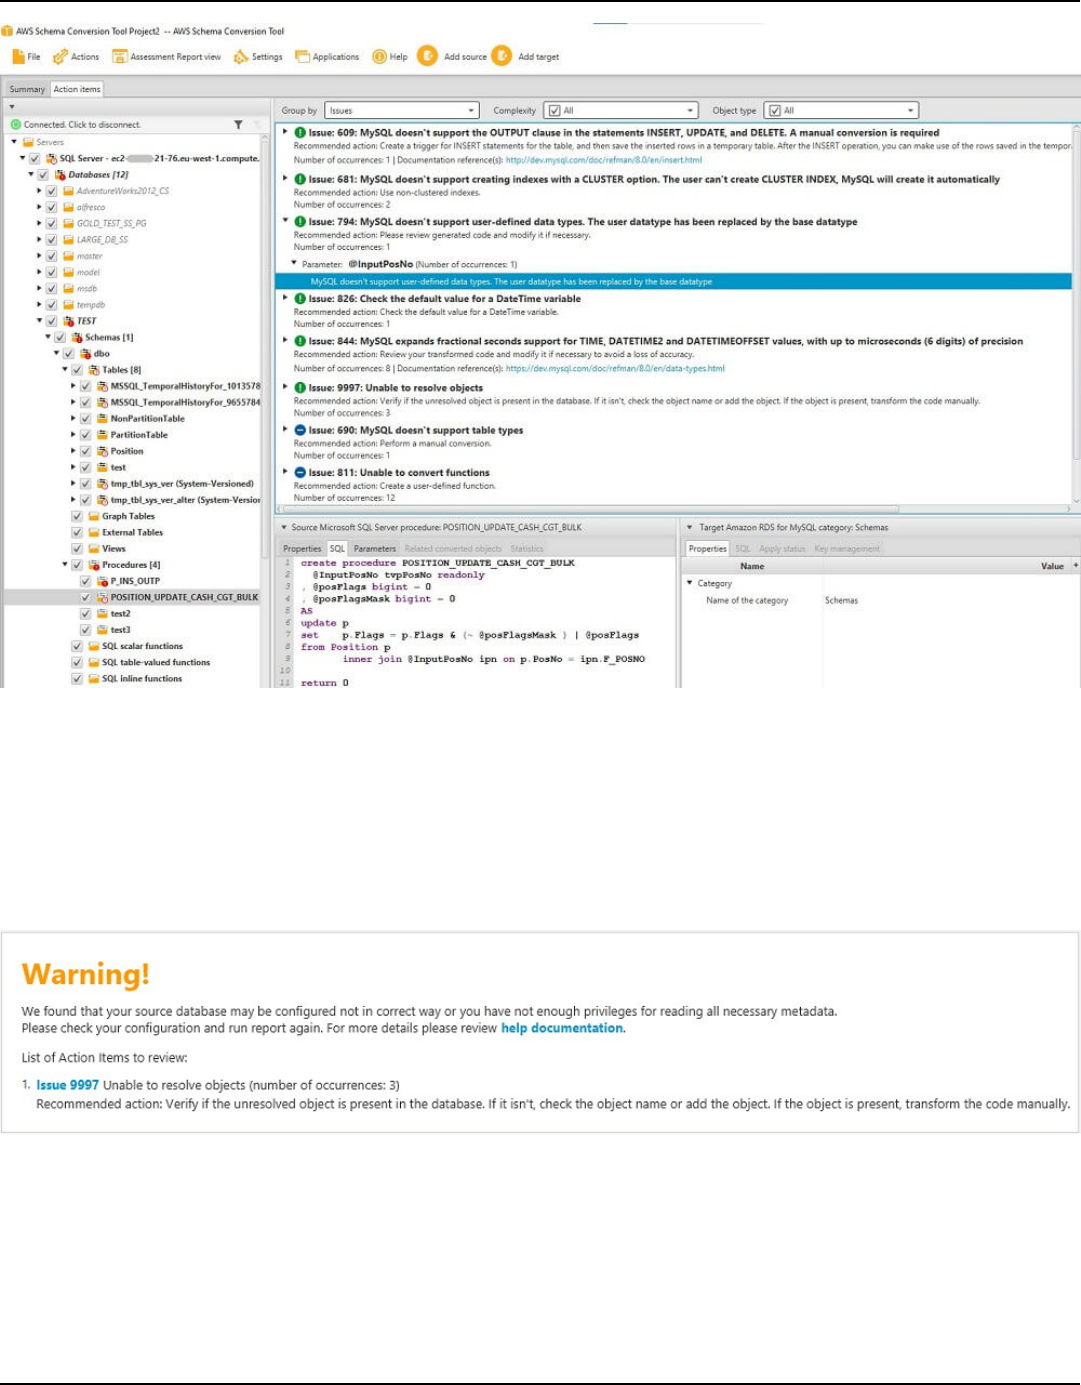
AWS Schema Conversion Tool User Guide
Assessment report warning message
To assess the complexity of converting to another database engine, AWS SCT requires access
to objects in your source database. When SCT can’t perform an assessment because problems
were encountered during scanning, a warning message is issued that indicates overall conversion
percentage is reduced.
Following are reasons why AWS SCT might encounter problems during scanning:
• The user account connected to the database doesn’t have access to all of the needed objects.
• An object cited in the schema no longer exists in the database.
• SCT is trying to assess an object that is encrypted.
Viewing assessment report Version 1.0.672 268

AWS Schema Conversion Tool User Guide
For more information about SCT required security permissions and privileges for your database, see
Connecting to source databases with the AWS Schema Conversion Tool for the appropriate source
database section in this guide.
Saving the assessment report in AWS Schema Conversion Tool
After you create a database migration assessment report, you can save a local copy of the database
migration assessment report as either a PDF file or a comma-separated value (CSV) file.
To save a database migration assessment report as a PDF file
1. In the top menu, choose View, and then choose Assessment report view.
2. Choose the Summary tab.
3. Choose Save to PDF at upper right.
To save a database migration assessment report as a CSV file
1. In the top menu, choose View, and then choose Assessment report view.
2. Choose the Summary tab.
3. Choose Save to CSV at upper right.
The PDF file contains both the summary and action item information, as shown in the following
example.
Saving the assessment report Version 1.0.672 269
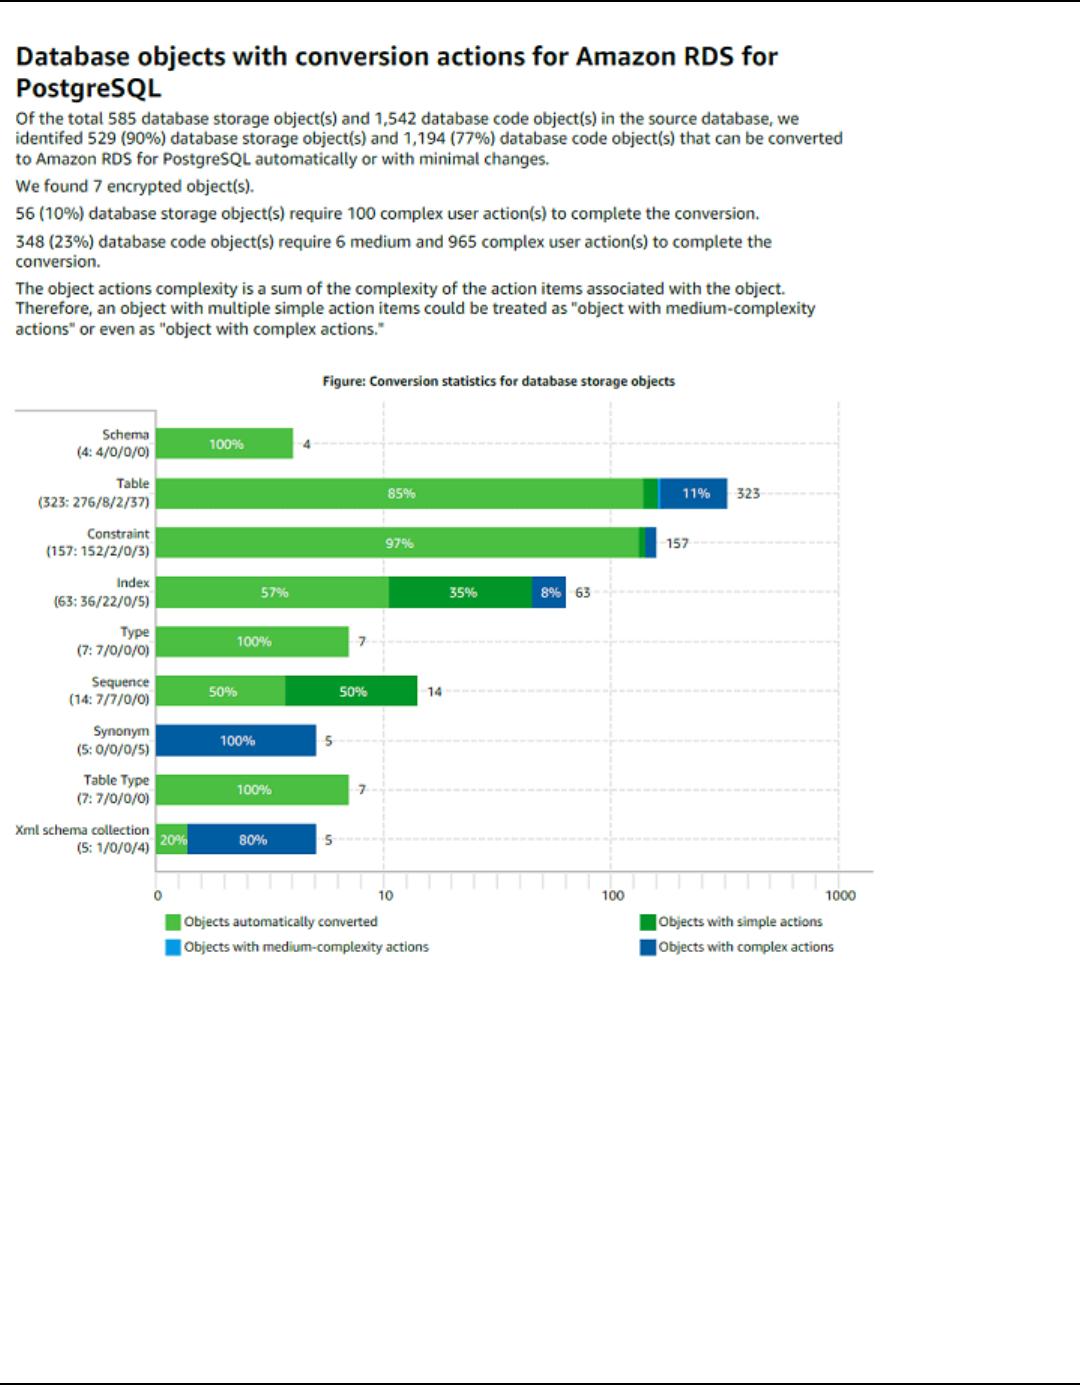
AWS Schema Conversion Tool User Guide
When you choose the Save to CSV option, AWS SCT creates three CSV files.
The first CSV file contains the following information about action items:
• Category
• Occurrence – The file name, line number, and position for the item
• Action item number
• Subject
• Group
Saving the assessment report Version 1.0.672 270
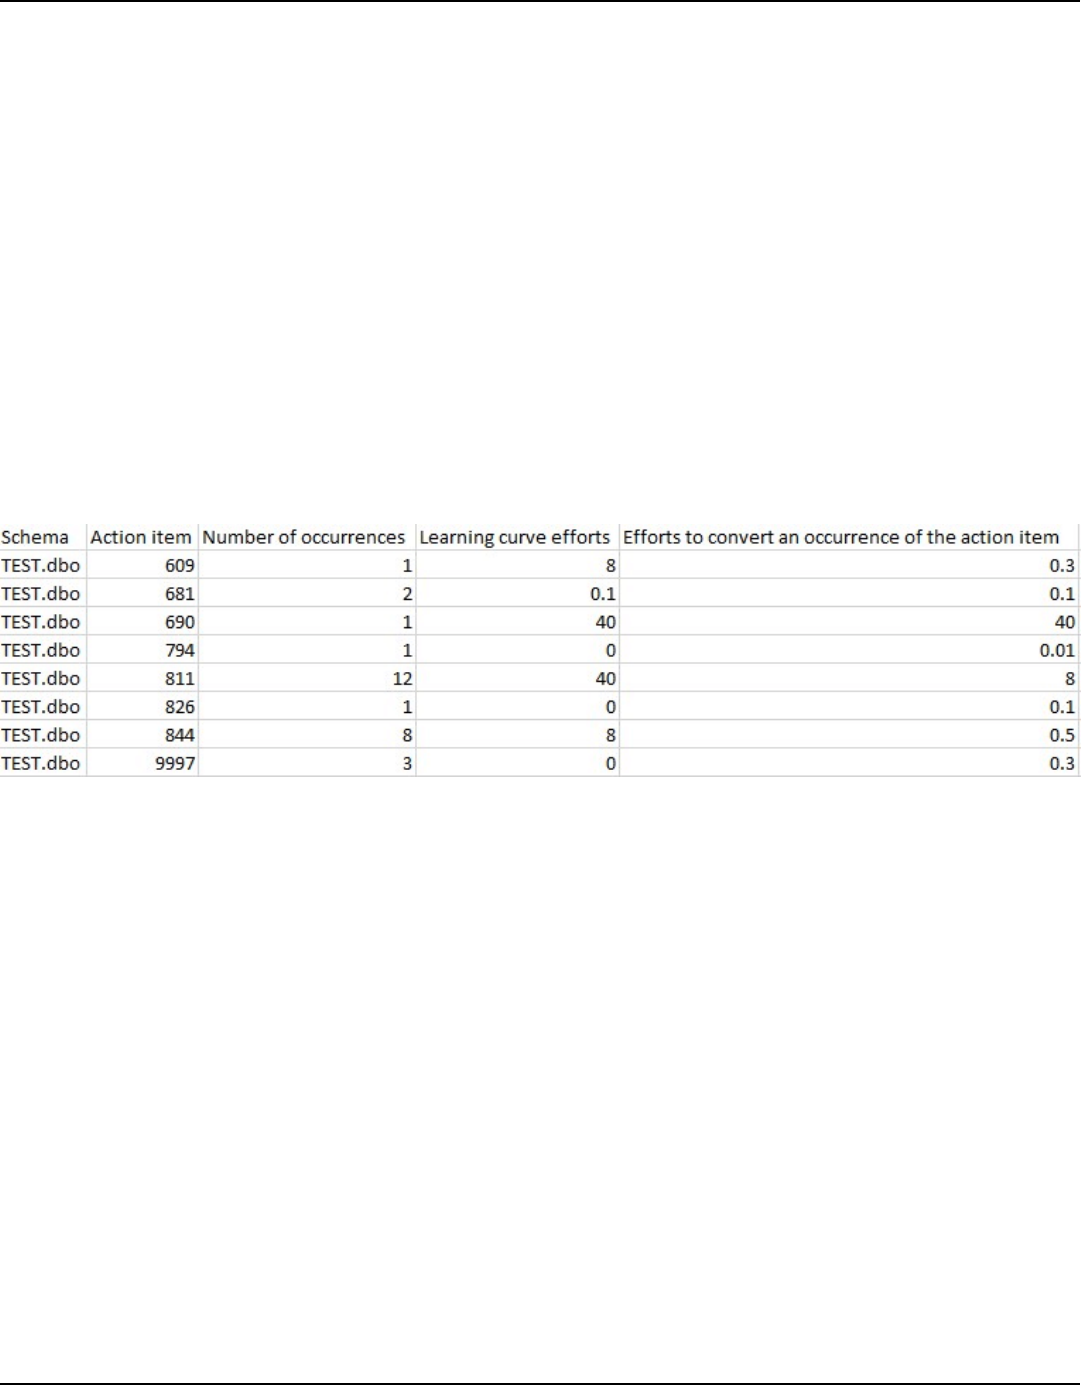
AWS Schema Conversion Tool User Guide
• Description
• Documentation references
• Recommended action
• Estimated complexity
The second CSV file includes the Action_Items_Summary suffix in its name and contains the
information about the number of occurrences of all action items.
In the following example, values in the Learning curve effort column indicate the amount of effort
needed to design an approach to converting each action item. Values in the Effort to convert an
occurrence of the action item column indicate the effort needed to convert each action item,
following the designed approach. The values used to indicate the level of effort needed are based
on a weighted scale, ranging from low (least) to high (most).
The third CSV file includes Summary in its name and contains the following summary:
• Category
• Number of objects
• Objects automatically converted
• Objects with simple actions
• Objects with medium-complexity actions
• Objects with complex actions
• Total lines of code
Configuring an assessment report in AWS Schema Conversion Tool
You can configure the amount of details that AWS SCT includes into assessment reports.
Configuring an assessment report Version 1.0.672 271

AWS Schema Conversion Tool User Guide
To configure a database migration assessment report
1. On the Settings menu, choose Global settings, and then choose Assessment report.
2. For Action item occurrences, choose First five issues only to limit the number of action items
of a single type in the assessment report. Choose All issues to include all action items of each
type in the assessment report.
3.
For SQL script analyzed files, choose List not more than X files to limit the number of SQL
script files in the assessment report to X. Enter the number of files. Choose List all analyzed
files to include all SQL script files in the assessment report.
4. Select Open reports after saving to automatically open the file after you save a local copy of
the database migration assessment report. For more information, see
After you create a database migration assessment report, you can save a local copy of the
database migration assessment report as either a PDF file or a comma-separated value
(CSV) file.
To save a database migration assessment report as a PDF file
1. In the top menu, choose View, and then choose Assessment report view.
2. Choose the Summary tab.
3. Choose Save to PDF at upper right.
To save a database migration assessment report as a CSV file
1. In the top menu, choose View, and then choose Assessment report view.
2. Choose the Summary tab.
3. Choose Save to CSV at upper right.
The PDF file contains both the summary and action item information, as shown in the
following example.
Configuring an assessment report Version 1.0.672 272
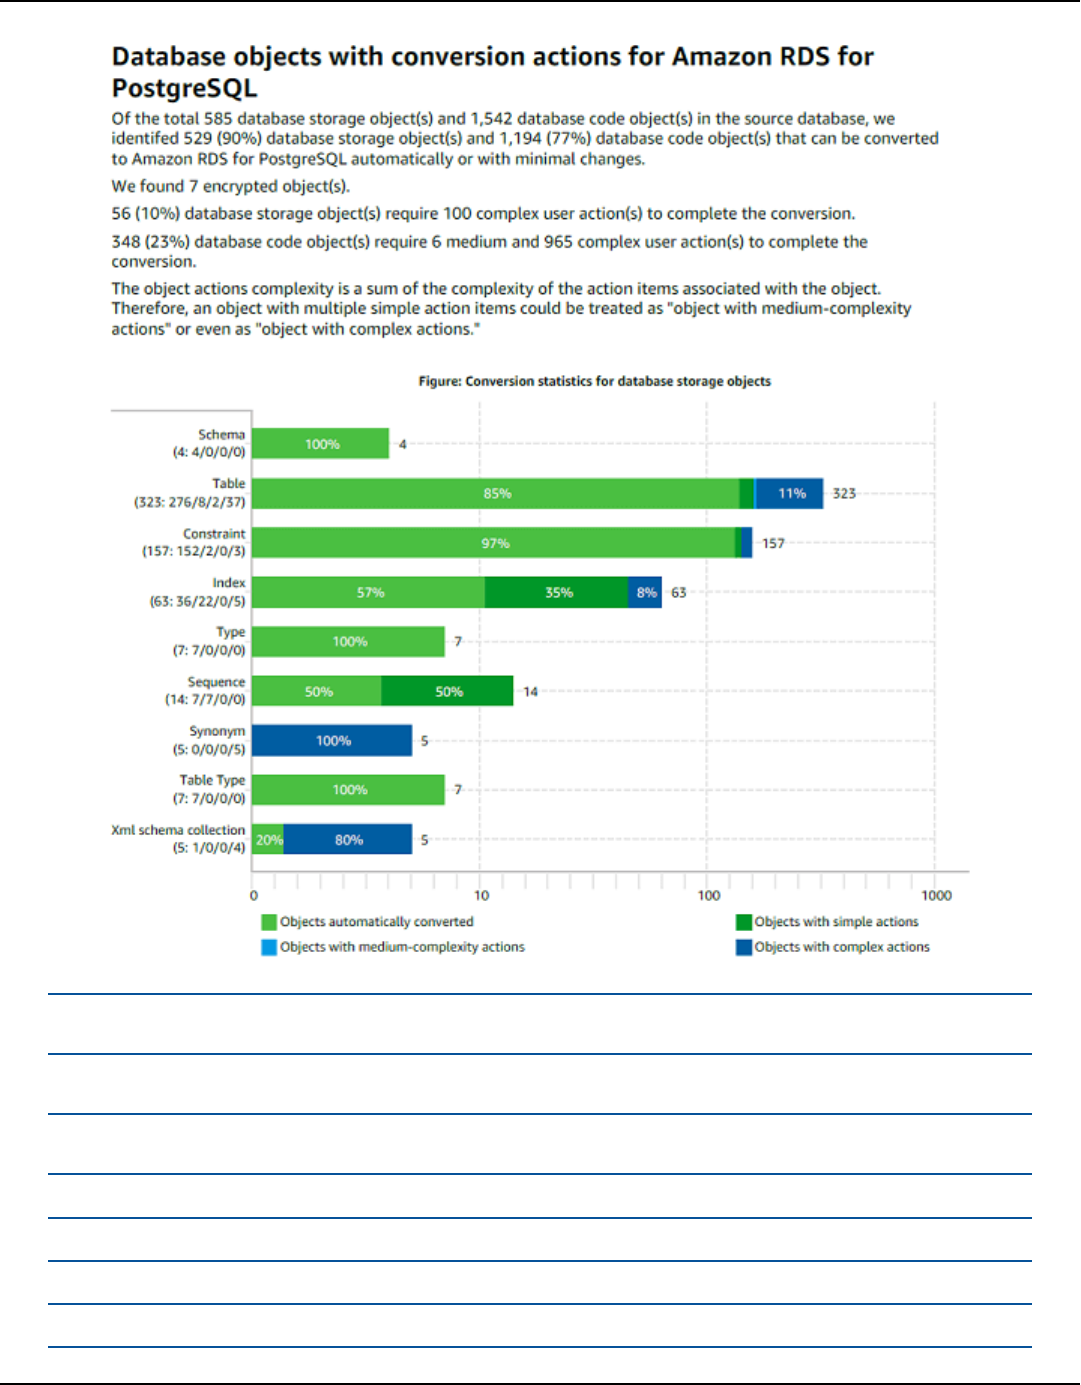
AWS Schema Conversion Tool User Guide
When you choose the Save to CSV option, AWS SCT creates three CSV files.
The first CSV file contains the following information about action items:
• Category
• Occurrence – The file name, line number, and position for the item
• Action item number
• Subject
• Group
Configuring an assessment report Version 1.0.672 273
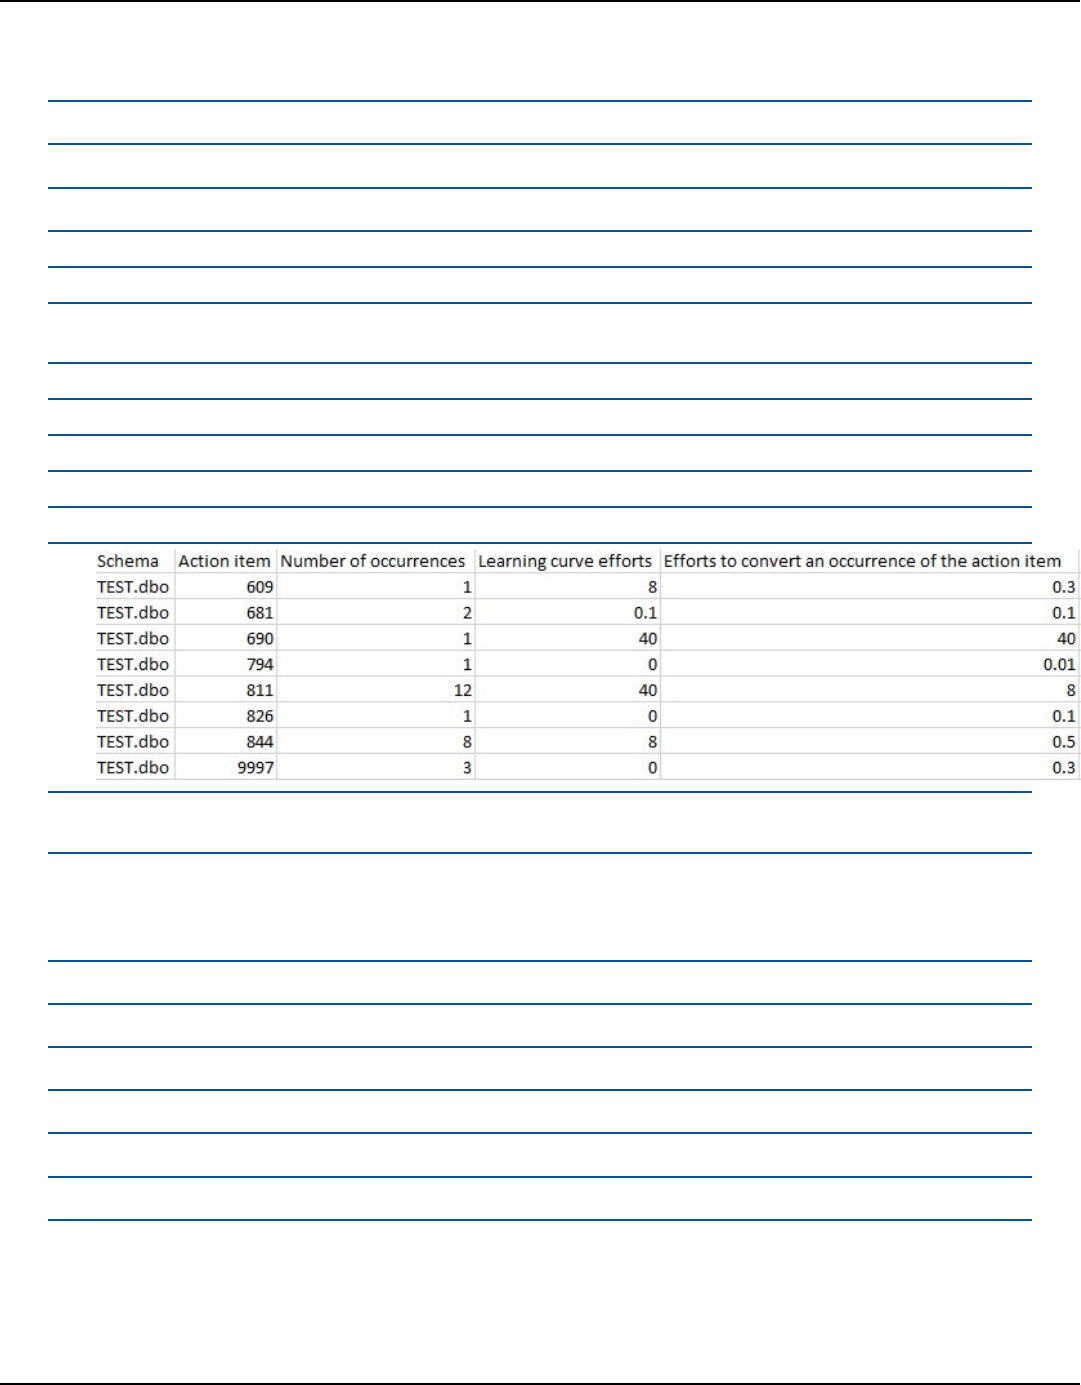
AWS Schema Conversion Tool User Guide
• Description
• Documentation references
• Recommended action
• Estimated complexity
The second CSV file includes the Action_Items_Summary suffix in its name and contains
the information about the number of occurrences of all action items.
In the following example, values in the Learning curve effort column indicate the amount
of effort needed to design an approach to converting each action item. Values in the
Effort to convert an occurrence of the action item column indicate the effort needed to
convert each action item, following the designed approach. The values used to indicate
the level of effort needed are based on a weighted scale, ranging from low (least) to high
(most).
The third CSV file includes Summary in its name and contains the following summary:
• Category
• Number of objects
• Objects automatically converted
• Objects with simple actions
• Objects with medium-complexity actions
• Objects with complex actions
• Total lines of code
.
Configuring an assessment report Version 1.0.672 274
AWS Schema Conversion Tool User Guide
Creating a multiserver assessment report in AWS Schema Conversion
Tool
To determine the best target direction for your overall environment, create a multiserver
assessment report.
A multiserver assessment report evaluates multiple servers based on input that you provide for
each schema definition that you want to assess. Your schema definition contains database server
connection parameters and the full name of each schema. After assessing each schema, AWS SCT
produces a summary, aggregated assessment report for database migration across your multiple
servers. This report shows the estimated complexity for each possible migration target.
You can use AWS SCT to create a multiserver assessment report for the following source and target
databases.
Source database Target database
Amazon Redshift Amazon Redshift
Azure SQL Database Aurora MySQL, Aurora PostgreSQL, MySQL,
PostgreSQL
Azure Synapse Analytics Amazon Redshift
BigQuery Amazon Redshift
Greenplum Amazon Redshift
IBM Db2 for z/OS Amazon Aurora MySQL-Compatible Edition
(Aurora MySQL), Amazon Aurora PostgreSQ
L-Compatible Edition (Aurora PostgreSQL),
MySQL, PostgreSQL
IBM Db2 LUW Aurora MySQL, Aurora PostgreSQL, MariaDB,
MySQL, PostgreSQL
Microsoft SQL Server Aurora MySQL, Aurora PostgreSQL, Amazon
Redshift, Babelfish for Aurora PostgreSQ
Multiserver assessment report Version 1.0.672 275

AWS Schema Conversion Tool User Guide
Source database Target database
L, MariaDB, Microsoft SQL Server, MySQL,
PostgreSQL
MySQL Aurora PostgreSQL, MySQL, PostgreSQL
Netezza Amazon Redshift
Oracle Aurora MySQL, Aurora PostgreSQL, Amazon
Redshift, MariaDB, MySQL, Oracle, PostgreSQL
PostgreSQL Aurora MySQL, Aurora PostgreSQL, MySQL,
PostgreSQL
SAP ASE Aurora MySQL, Aurora PostgreSQL, MariaDB,
MySQL, PostgreSQL
Snowflake Amazon Redshift
Teradata Amazon Redshift
Vertica Amazon Redshift
Performing a multiserver assessment
Use the following procedure to perform a multiserver assessment with AWS SCT. You don't need
to create a new project in AWS SCT to perform a multiserver assessment. Before you get started,
make sure that you have prepared a comma-separated value (CSV) file with database connection
parameters. Also, make sure that you have installed all required database drivers and set the
location of the drivers in the AWS SCT settings. For more information, see Installing JDBC drivers
for AWS Schema Conversion Tool.
To perform a multiserver assessment and create an aggregated summary report
1. In AWS SCT, choose File, New multiserver assessment. The New multiserver assessment
dialog box opens.
Multiserver assessment report Version 1.0.672 276

AWS Schema Conversion Tool User Guide
2. Choose Download a connections file example to download an empty template of a CSV file
with database connection parameters.
3. Enter values for Project name, Location (to store reports), and Connections file (a CSV file).
4. Choose Create AWS SCT projects for each source database to automatically create migration
projects after generating the assessment report.
5. With the Create AWS SCT projects for each source database turned on, you can choose Add
mapping rules to these projects and save conversion statistics for offline use. In this case,
AWS SCT will add mapping rules to each project and save the source database metadata in the
project. For more information, see Using offline mode in AWS Schema Conversion Tool.
6. Choose Run.
A progress bar appears indicating the pace of database assessment. The number of target
engines can affect the assessment runtime.
7. Choose Yes if the following message is displayed: Full analysis of all Database servers may
take some time. Do you want to proceed?
When the multiserver assessment report is done, a screen appears indicating so.
8. Choose Open Report to view the aggregated summary assessment report.
Multiserver assessment report Version 1.0.672 277

AWS Schema Conversion Tool User Guide
By default, AWS SCT generates an aggregated report for all source databases and a detailed
assessment report for each schema name in a source database. For more information, see Locating
and viewing reports.
With the Create AWS SCT projects for each source database option turned on, AWS SCT creates
an empty project for each source database. AWS SCT also creates assessment reports as described
earlier. After you analyze these assessment reports and choose migration destination for each
source database, add target databases to these empty projects.
With the Add mapping rules to these projects and save conversion statistics for offline use
option turned on, AWS SCT creates a project for each source database. These projects include the
following information:
• Your source database and a virtual target database platform. For more information, see Mapping
to virtual targets in the AWS Schema Conversion Tool.
• A mapping rule for this source-target pair. For more information, see Data type mapping.
• A database migration assessment report for this source-target pair.
• Source schema metadata, which enables you to use this AWS SCT project in an offline mode. For
more information, see Using offline mode in AWS Schema Conversion Tool.
Preparing an input CSV file
To provide connection parameters as input for multiserver assessment report, use a CSV file as
shown in the following example.
Name,Description,Secret Manager Key,Server IP,Port,Service Name,Database name,BigQuery
path,Source Engine,Schema Names,Use Windows Authentication,Login,Password,Use
SSL,Trust store,Key store,SSL authentication,Target Engines
Sales,,,192.0.2.0,1521,pdb,,,ORACLE,Q4_2021;FY_2021,,user,password,,,,,POSTGRESQL;AURORA_POSTGRESQL
Marketing,,,ec2-a-b-c-d.eu-
west-1.compute.amazonaws.com,1433,,target_audience,,MSSQL,customers.dbo,,user,password,,,,,AURORA_MYSQL
HR,,,192.0.2.0,1433,,employees,,MSSQL,employees.%,true,,,,,,,AURORA_POSTGRESQL
Customers,,secret-name,,,,,,MYSQL,customers,,,,,,,,AURORA_POSTGRESQL
Analytics,,,198.51.100.0,8195,,STATISTICS,,DB2LUW,BI_REPORTS,,user,password,,,,,POSTGRESQL
Products,,,203.0.113.0,8194,,,,TERADATA,new_products,,user,password,,,,,REDSHIFT
The preceding example uses a semicolon to separate the two schema names for the Sales
database. It also uses a semicolon to separate the two target database migration platforms for the
Sales database.
Multiserver assessment report Version 1.0.672 278
AWS Schema Conversion Tool User Guide
Also, the preceding example uses AWS Secrets Manager to connect to the Customers database
and Windows Authentication to connect to the HR database.
You can create a new CSV file or download a template for a CSV file from AWS SCT and fill in the
required information. Make sure that the first row of your CSV file includes the same column names
as shown in the preceding example.
To download a template of the input CSV file
1. Start AWS SCT.
2. Choose File, then choose New multiserver assessment.
3. Choose Download a connections file example.
Make sure that your CSV file includes the following values, provided by the template:
• Name – The text label that helps identify your database. AWS SCT displays this text label in the
assessment report.
• Description – An optional value, where you can provide additional information about the
database.
• Secret Manager Key – The name of the secret that stores your database credentials in the AWS
Secrets Manager. To use Secrets Manager, make sure that you store AWS profiles in AWS SCT. For
more information, see Configuring AWS Secrets Manager in the AWS Schema Conversion Tool.
Important
AWS SCT ignores the Secret Manager Key parameter if you include Server IP, Port,
Login, and Password parameters in the input file.
• Server IP – The Domain Name Service (DNS) name or IP address of your source database server.
• Port – The port used to connect to your source database server.
• Service Name – If you use a service name to connect to your Oracle database, the name of the
Oracle service to connect to.
• Database name – The database name. For Oracle databases, use the Oracle System ID (SID).
• BigQuery path – the path to the service account key file for your source BigQuery database. For
more information about creating this file, see Privileges for BigQuery as a source.
• Source Engine – The type of your source database. Use one of the following values:
Multiserver assessment report Version 1.0.672 279

AWS Schema Conversion Tool User Guide
• AZURE_MSSQL for an Azure SQL Database.
• AZURE_SYNAPSE for an Azure Synapse Analytics database.
• GOOGLE_BIGQUERY for a BigQuery database.
• DB2ZOS for an IBM Db2 for z/OS database.
• DB2LUW for an IBM Db2 LUW database.
• GREENPLUM for a Greenplum database.
• MSSQL for a Microsoft SQL Server database.
• MYSQL for a MySQL database.
• NETEZZA for a Netezza database.
• ORACLE for an Oracle database.
• POSTGRESQL for a PostgreSQL database.
• REDSHIFT for an Amazon Redshift database.
• SNOWFLAKE for a Snowflake database.
• SYBASE_ASE for an SAP ASE database.
• TERADATA for a Teradata database.
• VERTICA for a Vertica database.
• Schema Names – The names of the database schemas to include in the assessment report.
For Azure SQL Database, Azure Synapse Analytics, BigQuery, Netezza, SAP ASE, Snowflake, and
SQL Server, use the following format of the schema name:
db_name.schema_name
Replace db_name with the name of the source database.
Replace schema_name with the name of the source schema.
Enclose database or schema names that include a dot in double quotation marks as shown
following: "database.name"."schema.name".
Separate multiple schema names by using semicolons as shown following: Schema1;Schema2.
The database and schema names are case-sensitive.
Multiserver assessment report Version 1.0.672 280

AWS Schema Conversion Tool User Guide
Use the percent (%) as a wildcard to replace any number of any symbols in the database or
schema name. The preceding example uses the percent (%) as a wildcard to include all schemas
from the employees database in the assessment report.
• Use Windows Authentication – If you use Windows Authentication to connect to your Microsoft
SQL Server database, enter true. For more information, see Using Windows Authentication when
using Microsoft SQL Server as a source.
• Login – The user name to connect to your source database server.
• Password – The password to connect to your source database server.
• Use SSL – If you use Secure Sockets Layer (SSL) to connect to your source database, enter true.
• Trust store – The trust store to use for your SSL connection.
• Key store – The key store to use for your SSL connection.
• SSL authentication – If you use SSL authentication by certificate, enter true.
• Target Engines – The target database platforms. Use the following values to specify one or more
targets in the assessment report:
• AURORA_MYSQL for an Aurora MySQL-Compatible database.
• AURORA_POSTGRESQL for an Aurora PostgreSQL-Compatible database.
• BABELFISH for a Babelfish for Aurora PostgreSQL database.
• MARIA_DB for a MariaDB database.
• MSSQL for a Microsoft SQL Server database.
• MYSQL for a MySQL database.
• ORACLE for an Oracle database.
• POSTGRESQL for a PostgreSQL database.
• REDSHIFT for an Amazon Redshift database.
Separate multiple targets by using semicolons like this: MYSQL;MARIA_DB. The number of
targets affects the time it takes to run the assessment.
Locating and viewing reports
The multiserver assessment generates two types of reports:
• An aggregated report of all source databases.
• A detailed assessment report of target databases for each schema name in a source database.
Multiserver assessment report Version 1.0.672 281
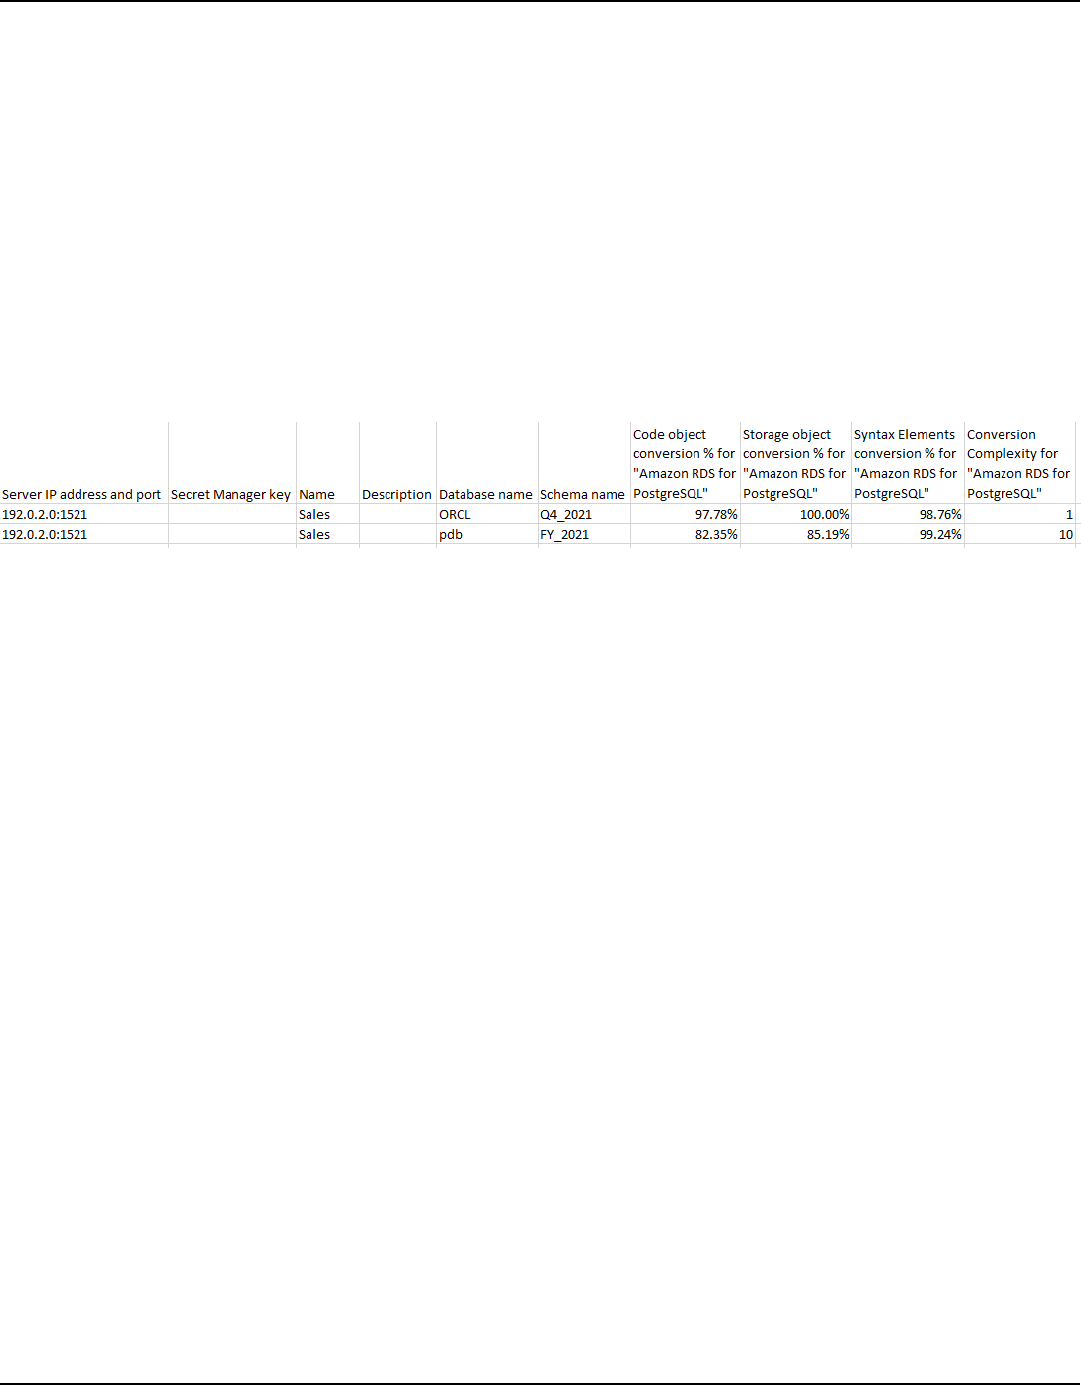
AWS Schema Conversion Tool User Guide
Reports are stored in the directory that you chose for Location in the New multiserver assessment
dialog box.
To access the detailed reports, you can navigate the subdirectories, which are organized by source
database, schema name, and target database engine.
Aggregated reports show information in four columns about conversion complexity of a target
database. The columns include information about conversion of code objects, storage objects,
syntax elements, and conversion complexity.
The following example shows information for conversion of two Oracle database schemas to
Amazon RDS for PostgreSQL.
The same four columns are appended to the reports for each additional target database engine
specified.
For details on how to read this information, see following.
Output for an aggregated assessment report
The aggregated multiserver database migration assessment report in AWS Schema Conversion Tool
is a CSV file with the following columns:
•
Server IP address and port
•
Secret Manager key
•
Name
•
Description
•
Database name
•
Schema name
•
Code object conversion % for target_database
•
Storage object conversion % for target_database
•
Syntax elements conversion % for target_database
•
Conversion complexity for target_database
Multiserver assessment report Version 1.0.672 282

AWS Schema Conversion Tool User Guide
To gather information, AWS SCT runs full assessment reports and then aggregates reports by
schemas.
In the report, the following three fields show the percentage of possible automatic conversion
based on the assessment:
Code object conversion %
The percentage of code objects in the schema that AWS SCT can convert automatically or with
minimal change. Code objects include procedures, functions, views, and similar.
Storage object conversion %
The percentage of storage objects that SCT can convert automatically or with minimal change.
Storage objects include tables, indexes, constraints, and similar.
Syntax elements conversion %
The percentage of syntax elements that SCT can convert automatically. Syntax elements include
SELECT, FROM, DELETE, and JOIN clauses, and similar.
The conversion complexity calculation is based on the notion of action items. An action item
reflects a type of problem found in source code that you need to fix manually during migration to a
particular target. An action item can have multiple occurrences.
A weighted scale identifies the level of complexity for performing a migration. The number 1
represents the lowest level of complexity, and the number 10 represents the highest level of
complexity.
Multiserver assessment report Version 1.0.672 283

AWS Schema Conversion Tool User Guide
Converting database schemas in AWS Schema Conversion
Tool
You can use the AWS Schema Conversion Tool (AWS SCT) to convert your existing database
schemas from one database engine to another. Converting a database using the AWS SCT user
interface can be fairly simple, but there are several things to consider before you do the conversion.
For example, you can use AWS SCT to do the following:
• You can use AWS SCT to copy an existing on-premises database schema to an Amazon RDS DB
instance running the same engine. You can use this feature to analyze potential cost savings of
moving to the cloud and of changing your license type.
• In some cases, database features can't be converted to equivalent Amazon RDS features. If you
host and self-manage a database on the Amazon Elastic Compute Cloud (Amazon EC2) platform,
you can emulate these features by substituting AWS services for them.
• AWS SCT automates much of the process of converting your online transaction processing (OLTP)
database schema to an Amazon Relational Database Service (Amazon RDS) MySQL DB instance,
an Amazon Aurora DB cluster, or a PostgreSQL DB instance. The source and target database
engines contain many different features and capabilities, and AWS SCT attempts to create an
equivalent schema in your Amazon RDS DB instance wherever possible. If no direct conversion is
possible, AWS SCT provides a list of possible actions for you to take.
Topics
• Applying migration rules in AWS Schema Conversion Tool
• Converting schemas usinf AWS SCT
• Manually converting schemas in AWS SCT
• Updating and refreshing converted schemas in AWS SCT
• Saving and applying converted schemas in AWS SCT
• Comparing schemas in AWS Schema Conversion Tool
• Viewing related transformed objects in AWS Schema Conversion Tool
AWS SCT supports the following online transaction processing (OLTP) conversions.
Version 1.0.672 284
AWS Schema Conversion Tool User Guide
Source database Target database
IBM Db2 for z/OS (version 12) Amazon Aurora MySQL-Compatible Edition,
Amazon Aurora PostgreSQL-Compatible
Edition, MySQL, PostgreSQL
IBM Db2 LUW (versions 9.1, 9.5, 9.7, 10.5,
11.1, and 11.5)
Aurora MySQL, Aurora PostgreSQL, MariaDB,
MySQL, PostgreSQL
Microsoft Azure SQL Database Aurora MySQL, Aurora PostgreSQL, MySQL,
PostgreSQL
Microsoft SQL Server (version 2008 R2 and
higher)
Aurora MySQL, Aurora PostgreSQL, Babelfish
for Aurora PostgreSQL, MariaDB, Microsoft
SQL Server, MySQL, PostgreSQL
MySQL (version 5.5 and higher) Aurora PostgreSQL, MySQL, PostgreSQL
You can migrate schema and data from
MySQL to an Aurora MySQL DB cluster
without using AWS SCT. For more information,
see Migrating data to an Amazon Aurora DB
cluster.
Oracle (version 10.2 and higher) Aurora MySQL, Aurora PostgreSQL, MariaDB,
MySQL, Oracle, PostgreSQL
PostgreSQL (version 9.1 and higher) Aurora MySQL, Aurora PostgreSQL, MySQL,
PostgreSQL
SAP ASE (12.5, 15.0, 15.5, 15.7, and 16.0) Aurora MySQL, Aurora PostgreSQL, MariaDB,
MySQL, PostgreSQL
For information about converting a data warehouse schema, see Converting data warehouse
schemas to Amazon RDS using AWS SCT.
To convert your database schema to Amazon RDS, you take the following high-level steps:
Version 1.0.672 285
AWS Schema Conversion Tool User Guide
• Creating migration rules in AWS SCT – Before you convert your schema with AWS SCT, you can
set up rules that change the data type of columns, move objects from one schema to another,
and change the names of objects.
• ??? – AWS SCT creates a local version of the converted schema for you to review, but it doesn't
apply it to your target DB instance until you are ready.
• Using the assessment report in the AWS Schema Conversion Tool – AWS SCT creates a database
migration assessment report that details the schema elements that can't be converted
automatically. You can use this report to identify where you need to create a schema in your
Amazon RDS DB instance that is compatible with your source database.
• Converting schemas usinf AWS SCT – If you have schema elements that can't be converted
automatically, you have two choices: update the source schema and then convert again, or create
equivalent schema elements in your target Amazon RDS DB instance.
• Updating and refreshing converted schemas in AWS SCT – You can update your AWS SCT project
with the most recent schema from your source database.
• Saving and applying converted schemas in AWS SCT – When you are ready, have AWS SCT apply
the converted schema in your local project to your target Amazon RDS DB instance.
Applying migration rules in AWS Schema Conversion Tool
Before you convert your schema with AWS SCT, you can set up migration rules. Migration rules in
AWS SCT can do such transformations as change the data type of columns, move objects from one
schema to another, and change the names of objects. For example, suppose that you have a set of
tables in your source schema named test_TABLE_NAME. You can set up a rule that changes the
prefix test_ to the prefix demo_ in the target schema.
Note
You can only create migration rules for different source and target database engines.
You can create migration rules that perform the following tasks:
• Add, remove, or replace a prefix
• Add, remove, or replace a suffix
• Change column collation
Applying migration rules Version 1.0.672 286

AWS Schema Conversion Tool User Guide
• Change data type
•
Change the length of char, varchar, nvarchar, and string data types
• Move objects
• Rename objects
You can create migration rules for the following objects:
• Database
• Schema
• Table
• Column
Creating migration rules
You can create migration rules and save the rules as part of your project. With your project open,
use the following procedure to create migration rules.
To create migration rules
1. On the View menu, choose Mapping view.
2. In Server mappings, choose a pair of source and target servers.
3. Choose New migration rule. The Transformation rules dialog box appears.
4. Choose Add new rule. A new row is added to the list of rules.
5. Configure your rule:
a. For Name, enter a name for your rule.
b. For For, choose the type of object that the rule applies to.
c. For where, enter a filter to apply to objects before applying the migration rule. The where
clause is evaluated by using a like clause. You can enter an exact name to select one
object, or you can enter a pattern to select multiple objects.
The fields available for the where clause are different depending on the type of the
object. For example, if the object type is schema there is only one field available, for the
schema name.
d. For Actions, choose the type of migration rule that you want to create.
Creating migration rules Version 1.0.672 287
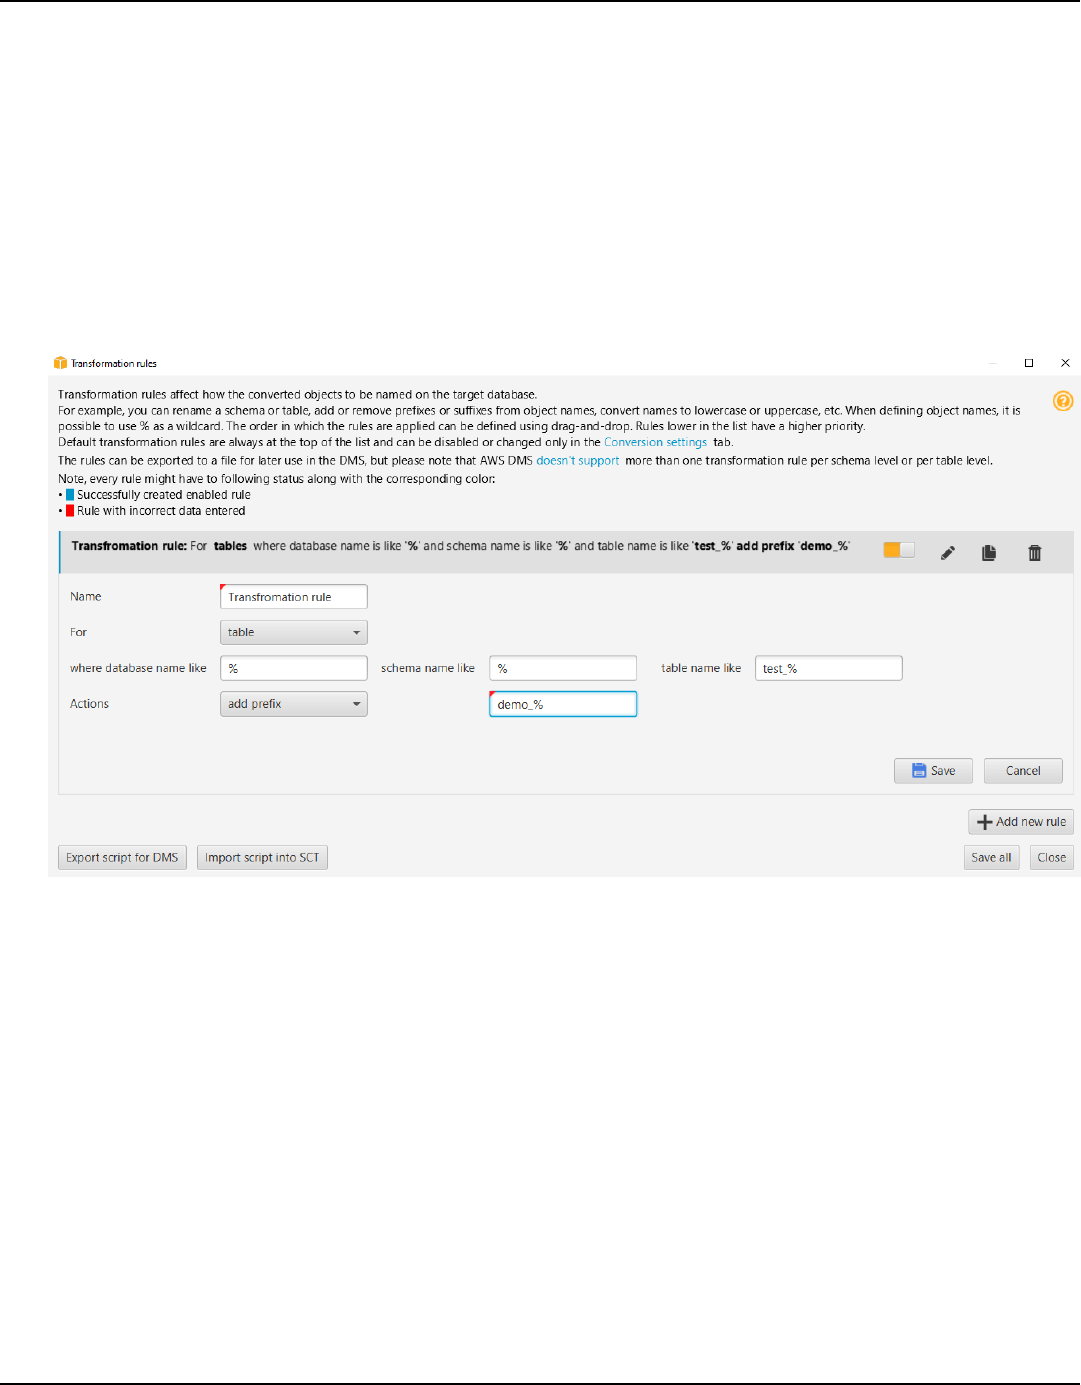
AWS Schema Conversion Tool User Guide
e. Depending on the rule type, enter one or two additional values. For example, to rename
an object, enter the new name of the object. To replace a prefix, enter the old prefix and
the new prefix.
For char, varchar, nvarchar, and string data types, you can change the data type
length using the multiplication operator. For example, the %*4 value transforms the
varchar(10) data type into varchar(40).
6. After you have configured your migration rule, choose Save to save your rule. You can also
choose Cancel to cancel your changes.
7. After you are done adding, editing, and deleting rules, choose Save All to save all your
changes.
8. Choose Close to close the Transformation rules dialog box.
You can use the toggle icon to turn off a migration rule without deleting it. You can use the
copy icon to duplicate an existing migration rule. You can use the pencil icon to edit an existing
migration rule. You can use the delete icon to delete an existing migration rule. To save any
changes you make to your migration rules, choose Save All.
Creating migration rules Version 1.0.672 288

AWS Schema Conversion Tool User Guide
Exporting migration rules
If you use AWS DMS to migrate your data from your source database to your target database, you
can provide information about your migration rules to AWS DMS. For more information about
tasks, see Working with AWS Database Migration Service replication tasks.
To export migration rules
1. In the AWS Schema Conversion Tool, choose Mapping View on the View menu.
2. In Migration rules, choose a migration rule and then choose Modify migration rule.
3. Choose Export script for AWS DMS.
4. Browse to the location where you want to save your script, and then choose Save. Your
migration rules are saved as a JSON script that can be consumed by AWS DMS.
Converting schemas usinf AWS SCT
After you have connected your project to both your source database and your target Amazon RDS
DB instance, your AWS Schema Conversion Tool project displays the schema from your source
database in the left panel. The schema is presented in a tree-view format, and each node of
the tree is lazy loaded. When you choose a node in the tree view, AWS SCT requests the schema
information from your source database at that time.
You can choose schema items from your source database and then convert the schema to
equivalent schema for the DB engine of your target DB instance. You can choose any schema item
from your source database to convert. If the schema item that you choose depends on a parent
item, then AWS SCT also generates the schema for the parent item. For example, suppose that you
choose a table to convert. If so, AWS SCT generates the schema for the table, and the database
that the table is in.
Converting schema
To convert a schema from your source database, select the check box for the name of schema to
convert. Next, choose this schema from the left panel of your project. AWS SCT highlights the
schema name in blue. Open the context (right-click) menu for the schema, and choose Convert
schema, as shown following.
Exporting migration rules Version 1.0.672 289

AWS Schema Conversion Tool User Guide
After you have converted the schema from your source database, you can choose schema items
from the left panel of your project and view the converted schema in the center panels of your
project. The lower-center panel displays the properties of and the SQL command to create the
converted schema, as shown following.
Converting schema Version 1.0.672 290
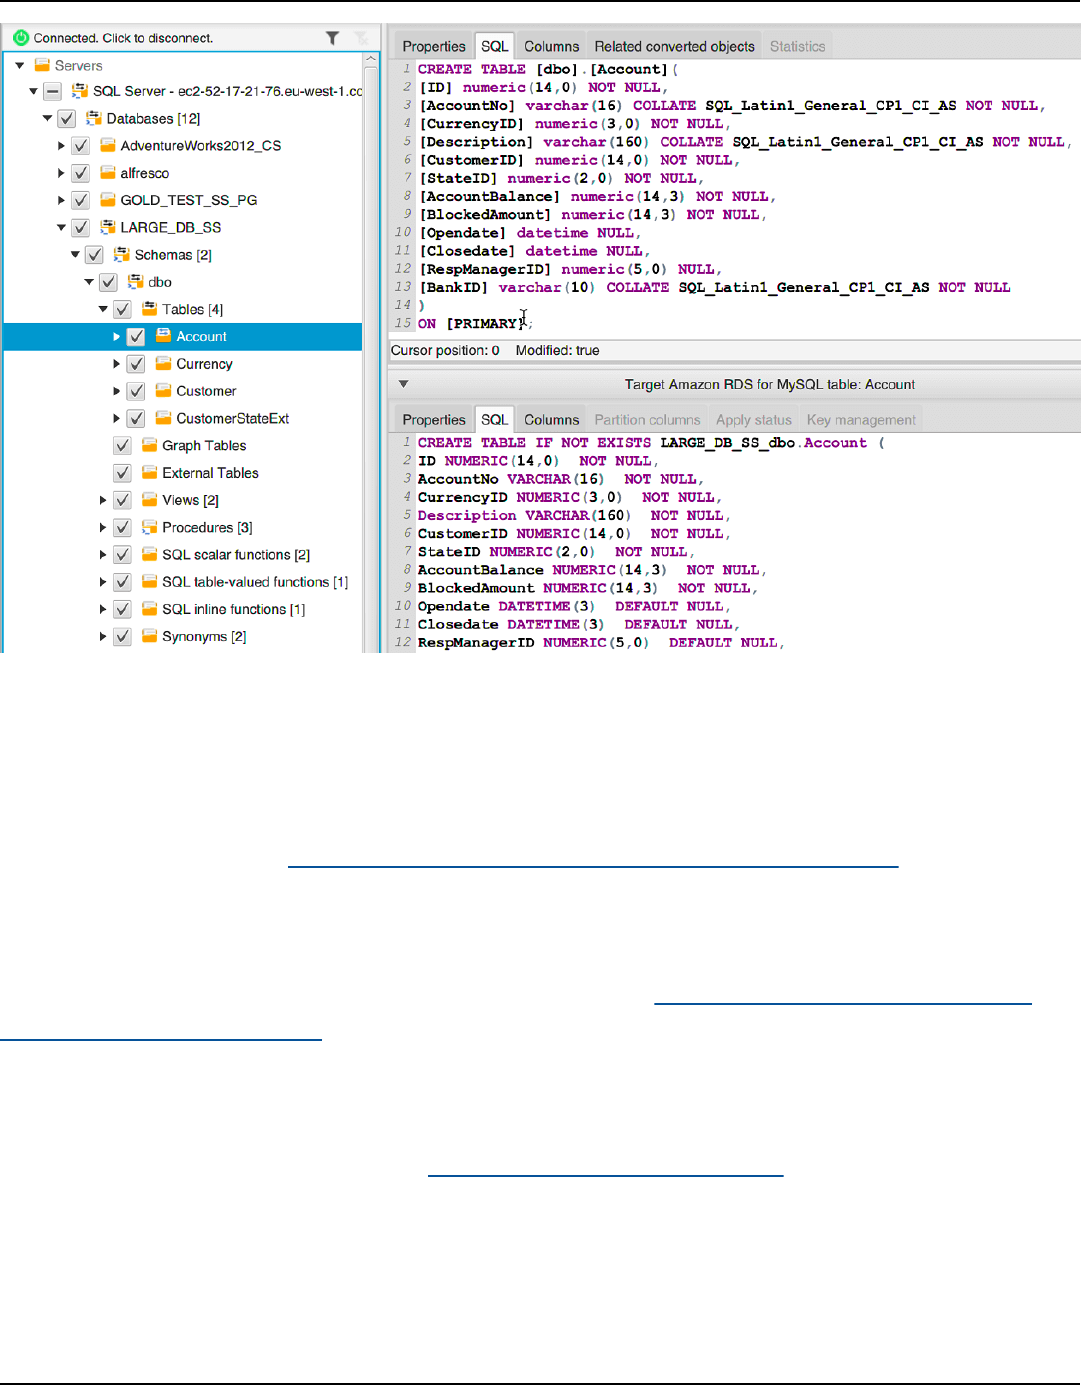
AWS Schema Conversion Tool User Guide
After you have converted your schema, you can save your project. The schema information from
your source database is saved with your project. This functionality means that you can work offline
without being connected to your source database. AWS SCT connects to your source database to
update the schema in your project if you choose Refresh from Database for your source database.
For more information, see Updating and refreshing converted schemas in AWS SCT.
You can create a database migration assessment report of the items that can't be converted
automatically. The assessment report is useful for identifying and resolving schema items that
can't be converted automatically. For more information, see Using the assessment report in the
AWS Schema Conversion Tool.
When AWS SCT generates a converted schema, it doesn't immediately apply it to the target DB
instance. Instead, the converted schema is stored locally until you are ready to apply it to the target
DB instance. For more information, see Applying your converted schema.
Editing converted schema
You can edit converted schema and save the changes as part of your project.
Editing converted schema Version 1.0.672 291
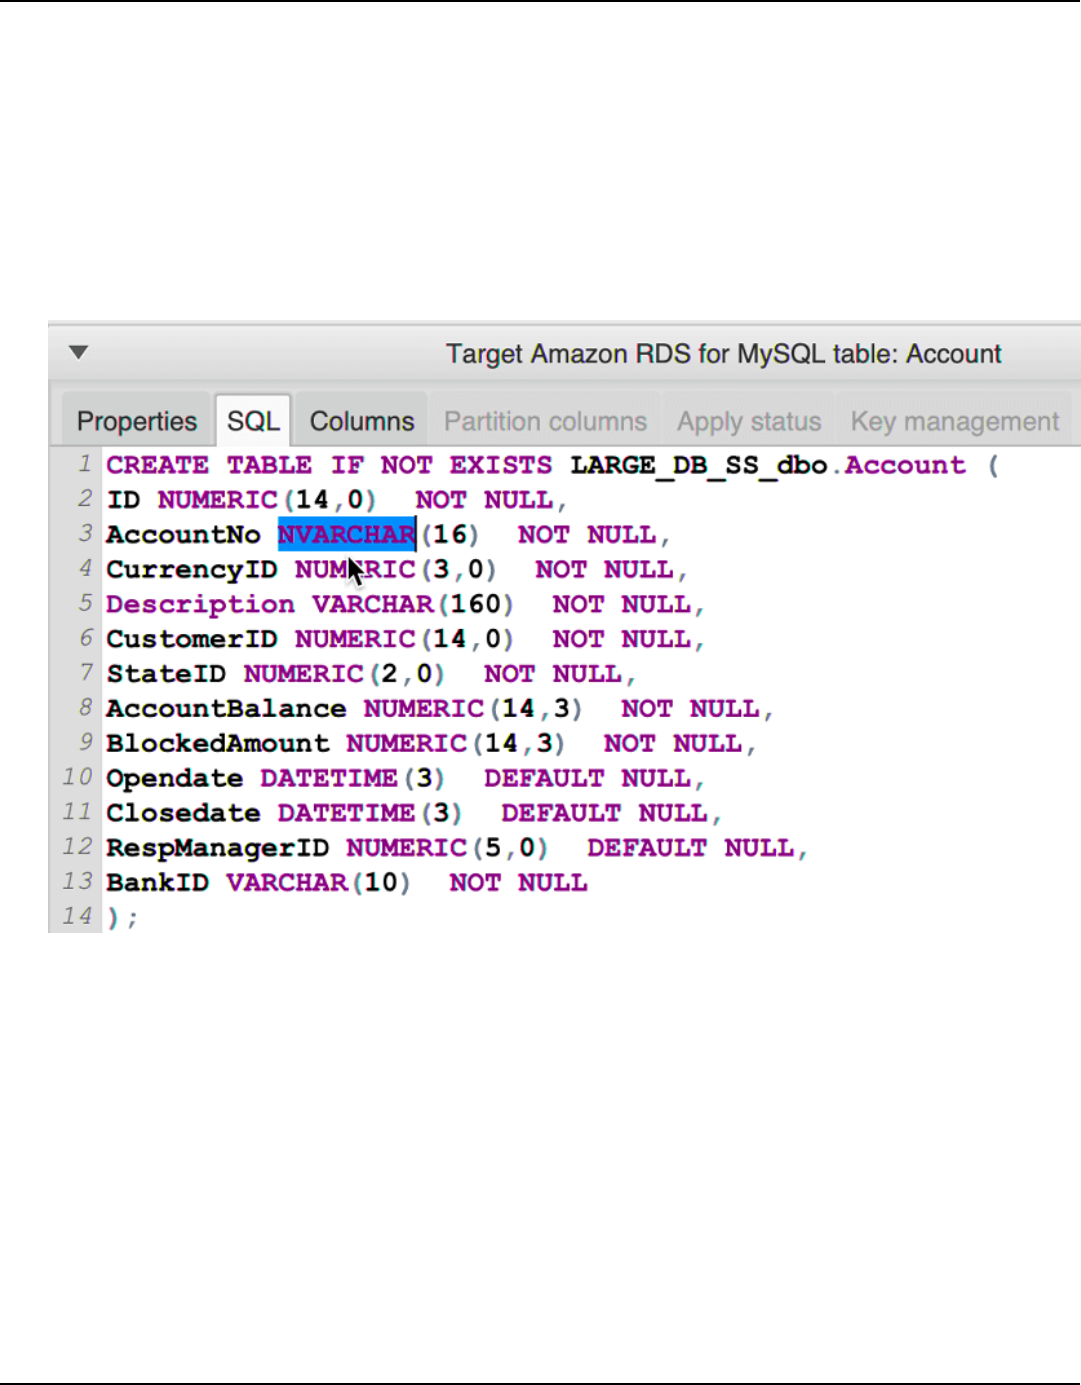
AWS Schema Conversion Tool User Guide
To edit converted schema
1. In the left panel that displays the schema from your source database, choose the schema item
that you want to edit the converted schema for.
2. In the lower-center panel that displays the converted schema for the selected item, choose the
SQL tab.
3. In the text displayed for the SQL tab, change the schema as needed. The schema is
automatically saved with your project as you update it.
The changes that you make to converted schema are stored with your project as you make updates.
If you newly convert a schema item from your source database, and you have made updates to
previously converted schema for that item, those existing updates are replaced by the newly
converted schema item based on your source database.
Clearing a converted schema
Until you apply the schema to your target DB instance, AWS SCT only stores the converted schema
locally in your project. You can clear the planned schema from your project by choosing the tree-
view node for your DB instance, and then choosing Refresh from Database. Because no schema
Clearing a converted schema Version 1.0.672 292

AWS Schema Conversion Tool User Guide
has been written to your target DB instance, refreshing from the database removes the planned
schema elements in your AWS SCT project to match what exists in your source DB instance.
Manually converting schemas in AWS SCT
The assessment report includes a list of items that can't be converted automatically to the
database engine of your target Amazon RDS DB instance. For each item that can't be converted,
there is an action item on the Action Items tab.
You can respond to the action items in the assessment report in the following ways:
• Modify your source database schema.
• Modify your target database schema.
Modifying your source schema
For some items, it might be easier to modify the database schema in your source database to a
schema that can be converted automatically. First, verify that the new changes are compatible with
your application architecture, then update the schema in your source database. Finally, refresh your
project with the updated schema information. You can then convert your updated schema, and
generate a new database migration assessment report. The action items no longer appear for the
items that changed in the source schema.
The advantage of this process is that your updated schema is always available when you refresh
from your source database.
Modifying your target schema
For some items, it might be easier to apply the converted schema to your target database, and
then add equivalent schema items manually to your target database for the items that couldn't be
converted automatically. You can write all of the schema that can be converted automatically to
your target DB instance by applying the schema. For more information, see Saving and applying
converted schemas in AWS SCT.
The schema that are written to your target DB instance don't contain the items that can't be
converted automatically. After applying the schema to your target DB instance, you can then
manually create schema in your target DB instance that are equivalent to those in the source
Manually converting schemas Version 1.0.672 293
AWS Schema Conversion Tool User Guide
database. The action items in the database migration assessment report contain suggestions for
how to create the equivalent schema.
Warning
If you manually create schema in your target DB instance, save a copy of any manual
work that you do. If you apply the converted schema from your project to your target DB
instance again, it overwrites the manual work you have done.
In some cases, you can't create equivalent schema in your target DB instance. You might need to
re-architect a portion of your application and database to use the functionality that is available
from the DB engine for your target DB instance. In other cases, you can simply ignore the schema
that can't be converted automatically.
Updating and refreshing converted schemas in AWS SCT
You can update both the source schema and the target schema in your AWS Schema Conversion
Tool project.
• Source – If you update the schema for your source database, AWS SCT replaces the schema in
your project with the latest schema from your source database. Using this functionality, you can
update your project if changes have been made to the schema of your source database.
• Target – If you update the schema for your target Amazon RDS DB instance, AWS SCT replaces
the schema in your project with the latest schema from your target DB instance. If you haven't
applied any schema to your target DB instance, AWS SCT clears the converted schema from
your project. You can then convert the schema from your source database for a clean target DB
instance.
You update the schema in your AWS SCT project by choosing Refresh from Database.
Note
When you refresh your schema, AWS SCT loads metadata only as it is needed. To fully
load all of your database's schema, open the context (right-click) menu for your schema,
and choose Load schema. For example, you can use this option to load metadata for your
database all at once, and then work offline.
Updating and refreshing schemas Version 1.0.672 294

AWS Schema Conversion Tool User Guide
Saving and applying converted schemas in AWS SCT
When the AWS Schema Conversion Tool generates converted schema (as shown in ???), it doesn't
immediately apply the converted schema to the target DB instance. Instead, converted schema are
stored locally in your project until you are ready to apply them to the target DB instance. Using
this functionality, you can work with schema items that can't be converted automatically to your
target DB engine. For more information on items that can't be converted automatically, see Using
the assessment report in the AWS Schema Conversion Tool.
You can optionally have the tool save your converted schema to a file as a SQL script prior to
applying the schema to your target DB instance. You can also have the tool apply the converted
schema directly to your target DB instance.
Saving your converted schema to a file
You can save your converted schema as SQL scripts in a text file. By using this approach, you can
modify the generated SQL scripts from AWS SCT to address items that the tool can't convert
automatically. You can then run your updated scripts on your target DB instance to apply your
converted schema to your target database.
To save your converted schema as SQL scripts
1. Choose your schema and open the context (right-click) menu.
2. Choose Save as SQL.
3. Enter the name of the file and choose Save.
4. Save your converted schema using one of the following options:
• Single file
• Single file per stage
• Single file per statement
To choose the format of the SQL script
1. On the Settings menu, choose Project settings.
2. Choose Save scripts.
3. For Vendor, choose the database platform.
4. For Save SQL scripts to, choose how you want to save your database schema script.
Saving and applying converted schemas Version 1.0.672 295
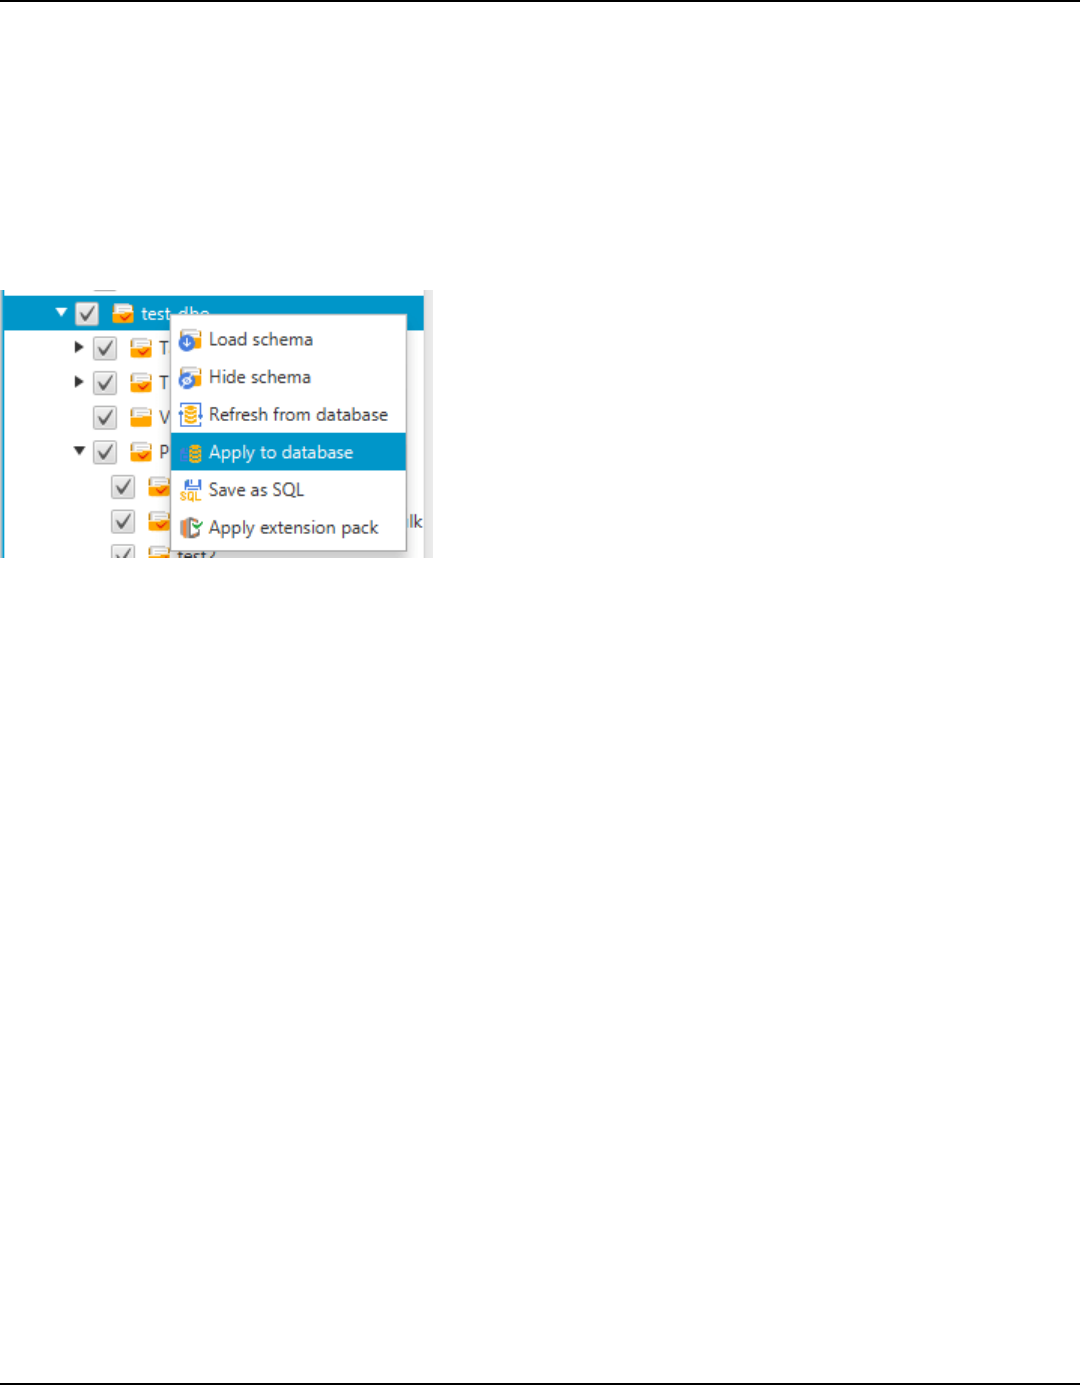
AWS Schema Conversion Tool User Guide
5. Choose OK to save the settings.
Applying your converted schema
When you are ready to apply your converted schema to your target Amazon RDS DB instance,
choose the schema element from the right panel of your project. Open the context (right-click)
menu for the schema element, and then choose Apply to database, as shown following.
The extension pack schema
The first time that you apply your converted schema to your target DB instance, AWS SCT adds an
additional schema to your target DB instance. This schema implements system functions of the
source database that are required when writing your converted schema to your target DB instance.
The schema is called the extension pack schema.
Don't modify the extension pack schema, or you might encounter unexpected results in the
converted schema that is written to your target DB instance. When your schema is fully migrated
to your target DB instance, and you no longer need AWS SCT, you can delete the extension pack
schema.
The extension pack schema is named according to your source database as follows:
•
IBM Db2 LUW: aws_db2_ext
•
Microsoft SQL Server: aws_sqlserver_ext
•
MySQL: aws_mysql_ext
•
Oracle: aws_oracle_ext
•
PostgreSQL: aws_postgresql_ext
•
SAP ASE: aws_sapase_ext
Applying your converted schema Version 1.0.672 296
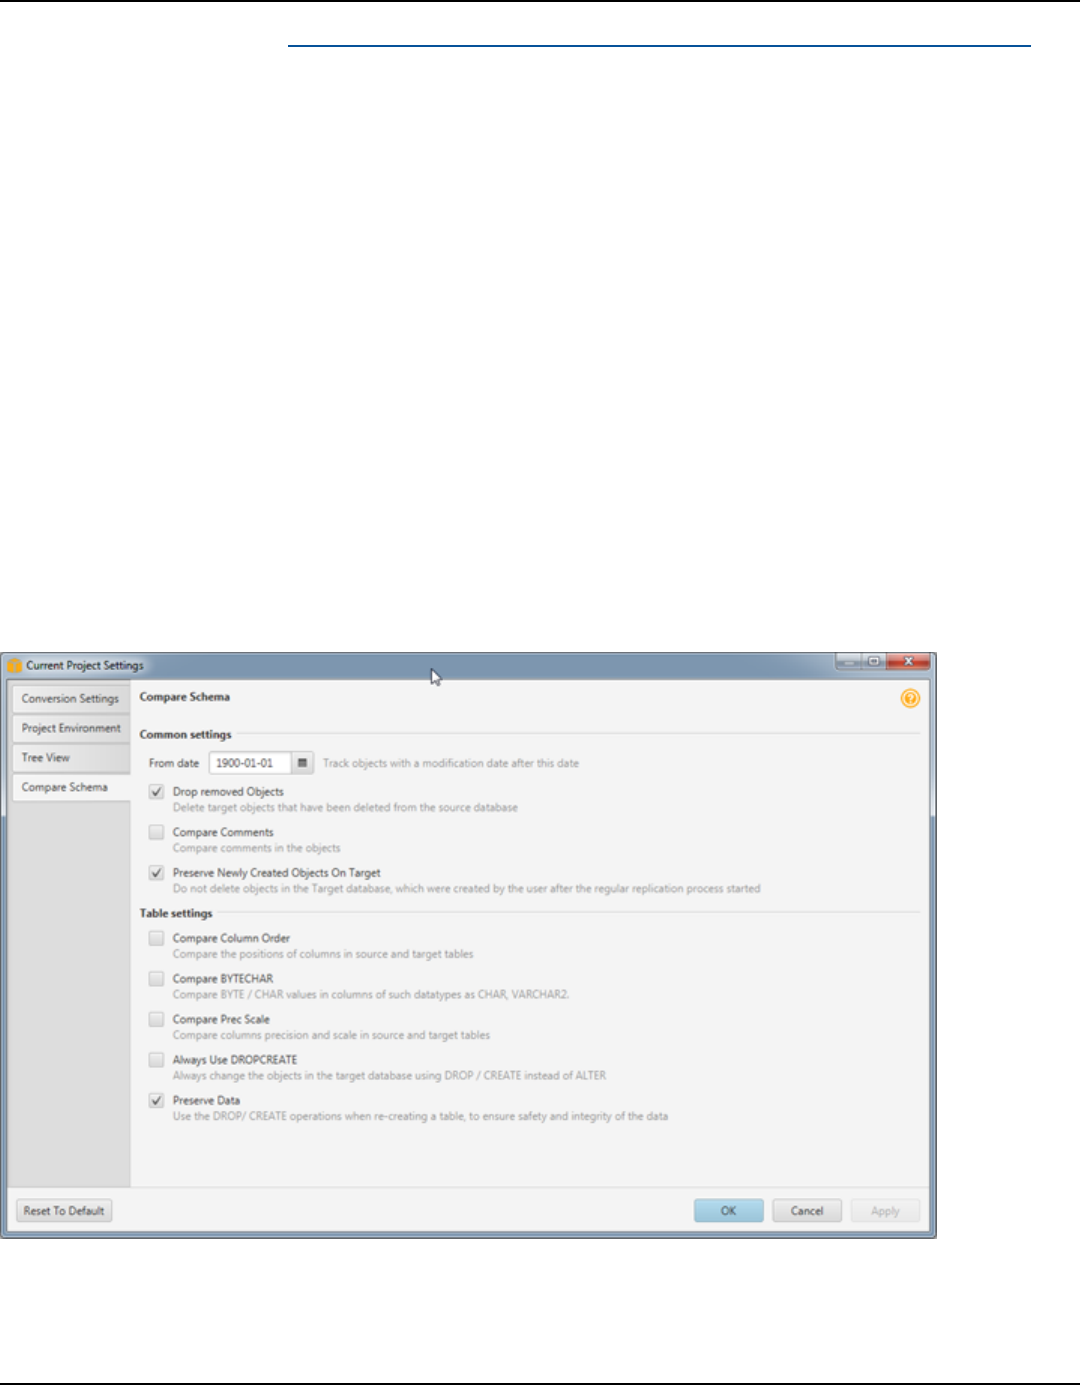
AWS Schema Conversion Tool User Guide
For more information, see Using the AWS Lambda functions from the AWS SCT extension pack .
Comparing schemas in AWS Schema Conversion Tool
If you made changes to your source or target schema after you migrated, you can compare the two
database schemas using AWS SCT. You can compare schemas for versions the same as or earlier
than the source schema.
The following schema comparisons are supported:
• Oracle to Oracle, versions 12.1.0.2.0, 11.1.0.7.0, 11.2.0.1.0, 10
• SQL Server to SQL Server, versions 2016, 2014, 2012, 2008 RD2, 2008
• PostgreSQL to PostgreSQL and Aurora PostgreSQL-Compatible Edition, versions 9.6, 9.5.9, 9.5.4
• MySQL to MySQL, versions 5.6.36, 5.7.17, 5.5
You specify settings for the schema comparison on the Compare Schema tab of the Project
Settings page.
To compare schemas, you select the schemas, and AWS SCT indicates the objects that differ
between the two schemas and the objects that don't.
Comparing schemas Version 1.0.672 297
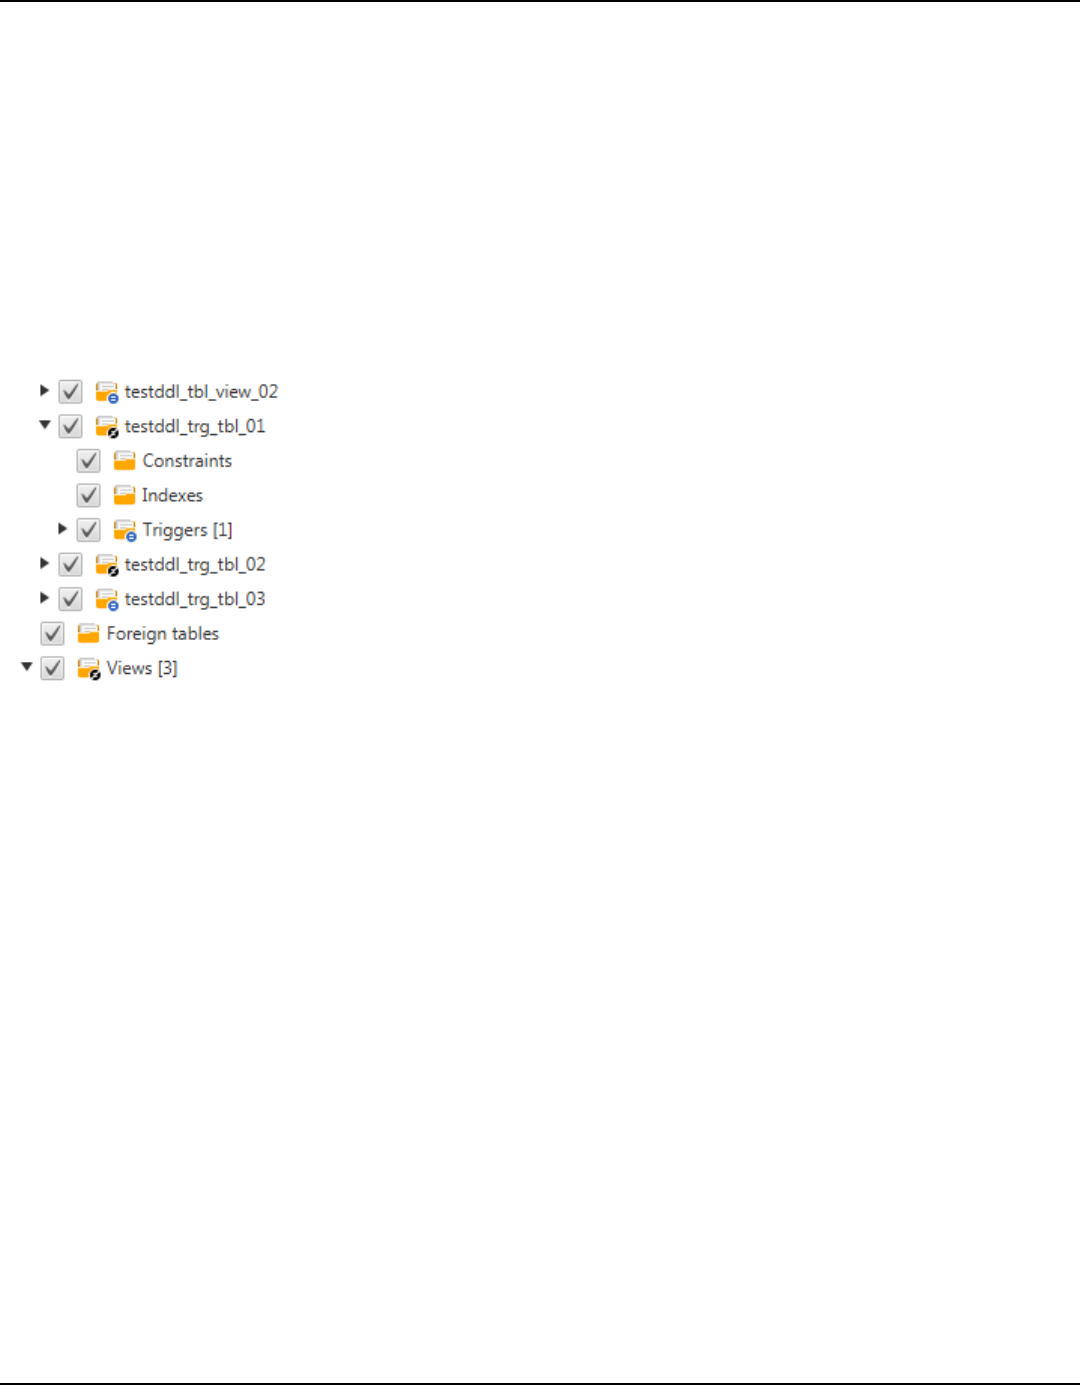
AWS Schema Conversion Tool User Guide
To compare two schemas
1. Open an existing AWS SCT project, or create a project and connect to the source and target
endpoints.
2. Choose the schema you want to compare.
3. Open the context menu (right-click) and choose Compare Schema.
AWS SCT indicates objects that are different between the two schemas by adding a black circle to
the object's icon.
You can apply the results of the schema comparison to a single object, to a single category of
objects, or to the entire schema. Choose the box next to the category, object, or schema that you
want to apply the results to.
Viewing related transformed objects in AWS Schema
Conversion Tool
After a schema conversion, in some cases AWS SCT might have created several objects for one
schema object on the source database. For example, when performing an Oracle to PostgreSQL
conversion, AWS SCT takes each Oracle trigger and transforms it into a trigger and trigger function
on PostgreSQL target. Also, when AWS SCT converts an Oracle package function or procedure to
PostgreSQL, it creates an equivalent function and an INIT function that should be run as init block
before the procedure or function can be run.
The following procedure lets you see all related objects that were created after a schema
conversion.
Viewing related transformed objects Version 1.0.672 298

AWS Schema Conversion Tool User Guide
To view related objects that were created during a schema conversion
1. After the schema conversion, choose the converted object in the target tree view.
2. Choose the Related Converted Objects tab.
3. View the list of related target objects.
Viewing related transformed objects Version 1.0.672 299

AWS Schema Conversion Tool User Guide
Converting data warehouse schemas to Amazon RDS
using AWS SCT
The AWS Schema Conversion Tool (AWS SCT) automates much of the process of converting your
data warehouse schema to an Amazon RDS or Aurora database schema. Because the source and
target database engines can have many different features and capabilities, AWS SCT attempts to
create an equivalent schema in your target database wherever possible. If no direct conversion is
possible, AWS SCT provides an assessment report with a list of possible actions for you to take.
Using AWS SCT, you can manage keys, map data types and objects, and create manual conversions.
AWS SCT can convert the following data warehouse schemas.
• Amazon Redshift
• Azure Synapse Analytics (version 10)
• BigQuery
• Greenplum Database (version 4.3)
• Microsoft SQL Server (version 2008 and higher)
• Netezza (version 7.0.3 and higher)
• Oracle (version 10.2 and higher)
• Snowflake (version 3)
• Teradata (version 13 and higher)
• Vertica (version 7.2 and higher)
For information about converting an online transaction processing (OLTP) database schema, see
Converting database schemas in AWS Schema Conversion Tool.
To convert a data warehouse schema, take the following steps:
1. Specify the optimization strategy and rules, and specify the migration rules that you want AWS
SCT to use. You can set up rules that change the data type of columns, move objects from one
schema to another, and change the names of objects.
You can specify optimization and migration rules in Settings. For more information on
optimization strategies, see Choosing optimization strategies and rules for use with AWS SCT.
for more information about migration rules, see Creating migration rules in AWS SCT
Version 1.0.672 300

AWS Schema Conversion Tool User Guide
2. Provide statistics on your source data warehouse so that AWS SCT can optimize how your data
warehouse is converted. You can either collect statistics directly from the database, or upload
an existing statistics file. For more information about providing data warehouse statistics, see
Collecting or uploading statistics for AWS SCT.
3. Create a database migration assessment report that details the schema elements that can't
be converted automatically. You can use this report to identify where you need to manually
create a schema in your target database that is compatible with your source database. For more
information about the assessment report, see Using the assessment report in the AWS Schema
Conversion Tool.
4. Convert the schema. AWS SCT creates a local version of the converted schema for you to review,
but it doesn't apply it to your target database until you are ready. For more information about
converting, see Converting your schema using AWS SCT
5. After you convert your schema, you can manage and edit your keys. Key management is
the heart of a data warehouse conversion. For more information about managing keys, see
Managing and customizing keys in AWS SCT.
6. If you have schema elements that can't be converted automatically, you have two choices:
update the source schema and then convert again, or create equivalent schema elements in your
target database. For more information on manually converting schema elements, see Handling
manual conversions in AWS SCT. For more information about updating your source schema, see
Updating and refreshing your converted schema in AWS SCT.
7. When you are ready, you can apply the converted schema to your target database. For more
information about saving and applying the converted schema, see Saving and applying your
converted schema in AWS SCT.
Permissions for Amazon Redshift as a target
The permissions required for Amazon Redshift as a target are listed following:
• CREATE ON DATABASE – allows to create new schemas in the database.
• CREATE ON SCHEMA – allows to create objects in the database schema.
• GRANT USAGE ON LANGUAGE – allows to create new functions and procedures in the database.
• GRANT SELECT ON ALL TABLES IN SCHEMA pg_catalog – provides the user with system
information about the Amazon Redshift cluster.
• GRANT SELECT ON pg_class_info – provides the user with information about tables distribution
style.
Permissions for Amazon Redshift Version 1.0.672 301

AWS Schema Conversion Tool User Guide
You can use the following code example to create a database user and grant the permissions.
CREATE USER user_name PASSWORD your_password;
GRANT CREATE ON DATABASE db_name TO user_name;
GRANT CREATE ON SCHEMA schema_name TO user_name;
GRANT USAGE ON LANGUAGE plpythonu TO user_name;
GRANT USAGE ON LANGUAGE plpgsql TO user_name;
GRANT SELECT ON ALL TABLES IN SCHEMA pg_catalog TO user_name;
GRANT SELECT ON pg_class_info TO user_name;
GRANT SELECT ON sys_serverless_usage TO user_name;
GRANT SELECT ON pg_database_info TO user_name;
GRANT SELECT ON pg_statistic TO user_name;
In the example preceding, replace user_name with the name of your user. Then, replace db_name
with the name of your target Amazon Redshift database. Next, replace schema_name with the
name of your Amazon Redshift schema. Repeat the GRANT CREATE ON SCHEMA operation for
each target schema where you will apply the converted code or migrate data. Finally, replace
your_password with a secure password.
You can apply an extension pack on your target Amazon Redshift database. An extension pack is
an add-on module that emulates source database functions that are required when converting
objects to Amazon Redshift. For more information, see Using extension packs with AWS Schema
Conversion Tool.
For this operation, AWS SCT needs permission to access the Amazon S3 bucket on your behalf.
To provide this permission, create an AWS Identity and Access Management (IAM) user with the
following policy.
{
"Version":"2012-10-17",
"Statement":[
{
"Effect":"Allow",
"Action":[
"s3:DeleteObject",
"s3:GetObject",
"s3:ListBucket",
"s3:PutObject"
],
"Resource":[
"arn:aws:s3:::aws-sct-*"
]
Permissions for Amazon Redshift Version 1.0.672 302

AWS Schema Conversion Tool User Guide
},
{
"Effect":"Allow",
"Action":[
"s3:ListAllMyBuckets"
],
"Resource":""
}
]
}
Choosing optimization strategies and rules for use with AWS
SCT
To optimize how the AWS Schema Conversion Tool converts your data warehouse schema, you
can choose the strategies and rules you want the tool to use. After converting your schema, and
reviewing the suggested keys, you can adjust your rules or change your strategy to get the results
you want.
To choose your optimization strategies and rules
1. Choose Settings, and then choose Project Settings. The Current project settings dialog box
appears.
2. In the left pane, choose Optimization Strategies. The optimization strategies appear in the
right pane with the defaults selected.
3. For Strategy Sector, choose the optimization strategy you want to use. You can choose from
the following:
• Use metadata, ignore statistical information – In this strategy, only information from the
metadata is used for optimization decisions. For example, if there is more than one index
on a source table, the source database sort order is used, and the first index becomes a
distribution key.
• Ignore metadata, use statistical information – In this strategy, optimization decisions are
derived from statistical information only. This strategy applies only to tables and columns
for which statistics are provided. For more information, see Collecting or uploading statistics
for AWS SCT.
Choosing optimization strategies and rules Version 1.0.672 303

AWS Schema Conversion Tool User Guide
• Use metadata and use statistical information – In this strategy, both metadata and
statistics are used for optimization decisions.
4. After you choose your optimization strategy, you can choose the rules you want to use. You
can choose from the following:
• Choose Distribution Key and Sort Keys using metadata
• Choose fact table and appropriate dimension for collation
• Analyze cardinality of indexes' columns
• Find the most used tables and columns from the query log table
For each rule, you can enter a weight for the sort key and a weight for the distribution key.
AWS SCT uses the weights you choose when it converts your schema. Later, when you review
the suggested keys, if you are not satisfied with the results, you can return here and change
your settings. For more information, see Managing and customizing keys in AWS SCT.
Collecting or uploading statistics for AWS SCT
To optimize how the AWS Schema Conversion Tool converts your data warehouse schema, you can
provide statistics from your source database that the tool can use. You can either collect statistics
directly from the database, or upload an existing statistics file.
To provide and review statistics
1. Open your project and connect to your source database.
2. Choose a schema object from the left panel of your project, and open the context (right-click)
menu for the object. Choose Collect Statistics or Upload Statistics as shown following.
Collecting or uploading statistics Version 1.0.672 304
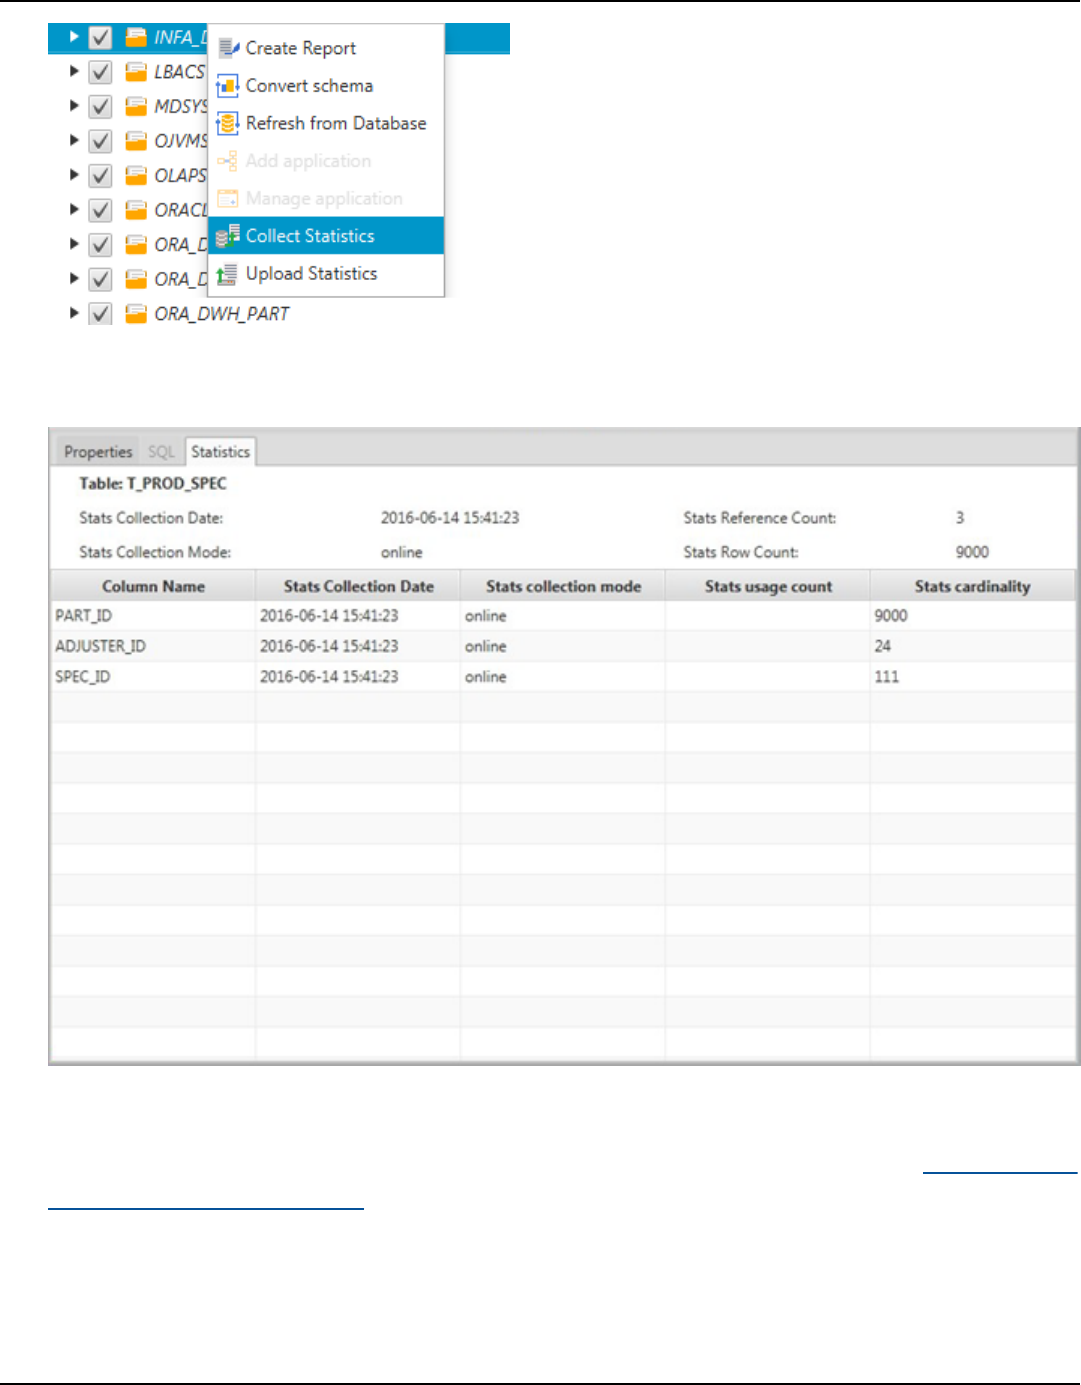
AWS Schema Conversion Tool User Guide
3. Choose a schema object from the left panel of your project, and then choose the Statistics tab.
You can review the statistics for the object.
Later, when you review the suggested keys, if you are not satisfied with the results, you can
collect additional statistics and repeat this procedure. For more information, see Managing and
customizing keys in AWS SCT.
Collecting or uploading statistics Version 1.0.672 305

AWS Schema Conversion Tool User Guide
Creating migration rules in AWS SCT
Before you convert your schema with AWS SCT, you can set up migration rules. Migration rules can
do such things as change the data type of columns, move objects from one schema to another, and
change the names of objects. For example, suppose that you have a set of tables in your source
schema named test_TABLE_NAME. You can set up a rule that changes the prefix test_ to the
prefix demo_ in the target schema.
Note
You can create migration rules only for different source and target database engines.
You can create migration rules that perform the following tasks:
• Add, remove, or replace a prefix
• Add, remove, or replace a suffix
• Change column collation
• Change data type
•
Change the length of char, varchar, nvarchar, and string data types
• Move objects
• Rename objects
You can create migration rules for the following objects:
• Database
• Schema
• Table
• Column
Creating migration rules
You can create migration rules and save the rules as part of your project. With your project open,
use the following procedure to create migration rules.
Creating migration rules Version 1.0.672 306

AWS Schema Conversion Tool User Guide
To create migration rules
1. On the View menu, choose Mapping view.
2. In Server mappings, choose a pair of source and target servers.
3. Choose New migration rule. The Transformation rules dialog box appears.
4. Choose Add new rule. A new row is added to the list of rules.
5. Configure your rule:
a. For Name, enter a name for your rule.
b. For For, choose the type of object that the rule applies to.
c. For where, enter a filter to apply to objects before applying the migration rule. The where
clause is evaluated by using a like clause. You can enter an exact name to select one
object, or you can enter a pattern to select multiple objects.
The fields available for the where clause are different depending on the type of the
object. For example, if the object type is schema there is only one field available, for the
schema name.
d. For Actions, choose the type of migration rule that you want to create.
e. Depending on the rule type, enter one or two additional values. For example, to rename
an object, enter the new name of the object. To replace a prefix, enter the old prefix and
the new prefix.
6. After you have configured your migration rule, choose Save to save your rule. You can also
choose Cancel to cancel your changes.
Creating migration rules Version 1.0.672 307
AWS Schema Conversion Tool User Guide
7. After you are done adding, editing, and deleting rules, choose Save All to save all your
changes.
8. Choose Close to close the Transformation rules dialog box.
You can use the toggle icon to turn off a migration rule without deleting it. You can use the
copy icon to duplicate an existing migration rule. You can use the pencil icon to edit an existing
migration rule. You can use the delete icon to delete an existing migration rule. To save any
changes you make to your migration rules, choose Save All.
Exporting migration rules
If you use AWS Database Migration Service (AWS DMS) to migrate your data from your source
database to your target database, you can provide information about your migration rules to
AWS DMS. For more information about tasks, see Working with AWS Database Migration Service
replication tasks.
To export migration rules
1. In the AWS Schema Conversion Tool, choose Mapping View on the View menu.
2. In Migration rules, choose a migration rule and then choose Modify migration rule.
3. Choose Export script for AWS DMS.
Exporting migration rules Version 1.0.672 308

AWS Schema Conversion Tool User Guide
4. Browse to the location where you want to save your script, and then choose Save. Your
migration rules are saved as a JSON script that can be consumed by AWS DMS.
Converting your schema using AWS SCT
After you have connected your project to both your source database and your target database, your
AWS Schema Conversion Tool project displays the schema from your source database in the left
panel. The schema is presented in a tree-view format, and each node of the tree is lazy loaded.
When you choose a node in the tree view, AWS SCT requests the schema information from your
source database at that time.
You can choose schema items from your source database and then convert the schema to
equivalent schema for the database engine of your target database. You can choose any schema
item from your source database to convert. If the schema item that you choose depends on a
parent item, then AWS SCT also generates the schema for the parent item. For example, if you
choose a column from a table to convert, then AWS SCT generates the schema for the column, the
table that the column is in, and the database that the table is in.
Converting schema
To convert a schema from your source database, select the check box for the name of schema to
convert. Next, choose this schema from the left panel of your project. AWS SCT highlights the
schema name in blue. Open the context (right-click) menu for the schema, and choose Convert
schema, as shown following.
Converting your schema Version 1.0.672 309
AWS Schema Conversion Tool User Guide
After you have converted the schema from your source database, you can choose schema items
from the left panel of your project and view the converted schema in the center panels of your
project. The lower-center panel displays the properties of and the SQL command to create the
converted schema, as shown following.
Converting schema Version 1.0.672 310
AWS Schema Conversion Tool User Guide
After you have converted your schema, you can save your project. The schema information from
your source database is saved with your project. This functionality means that you can work offline
without being connected to your source database. AWS SCT connects to your source database to
update the schema in your project if you choose Refresh from Database for your source database.
For more information, see Updating and refreshing your converted schema in AWS SCT.
You can create a database migration assessment report of the items that can't be converted
automatically. The assessment report is useful for identifying and resolving schema items that
can't be converted automatically. For more information, see Using the assessment report in the
AWS Schema Conversion Tool.
When AWS SCT generates a converted schema, it doesn't immediately apply it to the target
database. Instead, the converted schema is stored locally until you are ready to apply it to the
target database. For more information, see Applying your converted schema.
Editing converted schema
You can edit converted schema and save the changes as part of your project.
Editing converted schema Version 1.0.672 311

AWS Schema Conversion Tool User Guide
To edit converted schema
1. In the left panel that displays the schema from your source database, choose the schema item
that you want to edit the converted schema for.
2. In the lower-center panel that displays the converted schema for the selected item, choose the
SQL tab.
3. In the text displayed for the SQL tab, change the schema as needed. The schema is
automatically saved with your project as you update it.
The changes that you make to converted schema are stored with your project as you make updates.
If you newly convert a schema item from your source database, and you have made updates to
previously converted schema for that item, those existing updates are replaced by the newly
converted schema item based on your source database.
Clearing a converted schema
Until you apply the schema to your target database, AWS SCT only stores the converted schema
locally in your project. You can clear the planned schema from your project by choosing the
tree-view node for your target database, and then choosing Refresh from Database. Because
Clearing a converted schema Version 1.0.672 312
AWS Schema Conversion Tool User Guide
no schema has been written to your target database, refreshing from the database removes the
planned schema elements in your AWS SCT project to match what exists in your target database.
Managing and customizing keys in AWS SCT
After you convert your schema with the AWS Schema Conversion Tool, you can manage and edit
your keys. Key management is the heart of a data warehouse conversion.
To manage keys, select a table in your target database, and then choose the Key Management tab
as shown following.
The left pane contains key suggestions, and includes the confidence rating for each suggestion. You
can choose one of the suggestions, or you can customize the key by editing it in the right pane.
If the choices for the key don't look like what you expected, you can edit your edit your
optimization strategies, and then retry the conversion. For more information, see Choosing
optimization strategies and rules for use with AWS SCT.
Related topics
• Choose the best sort key
Managing and customizing keys Version 1.0.672 313
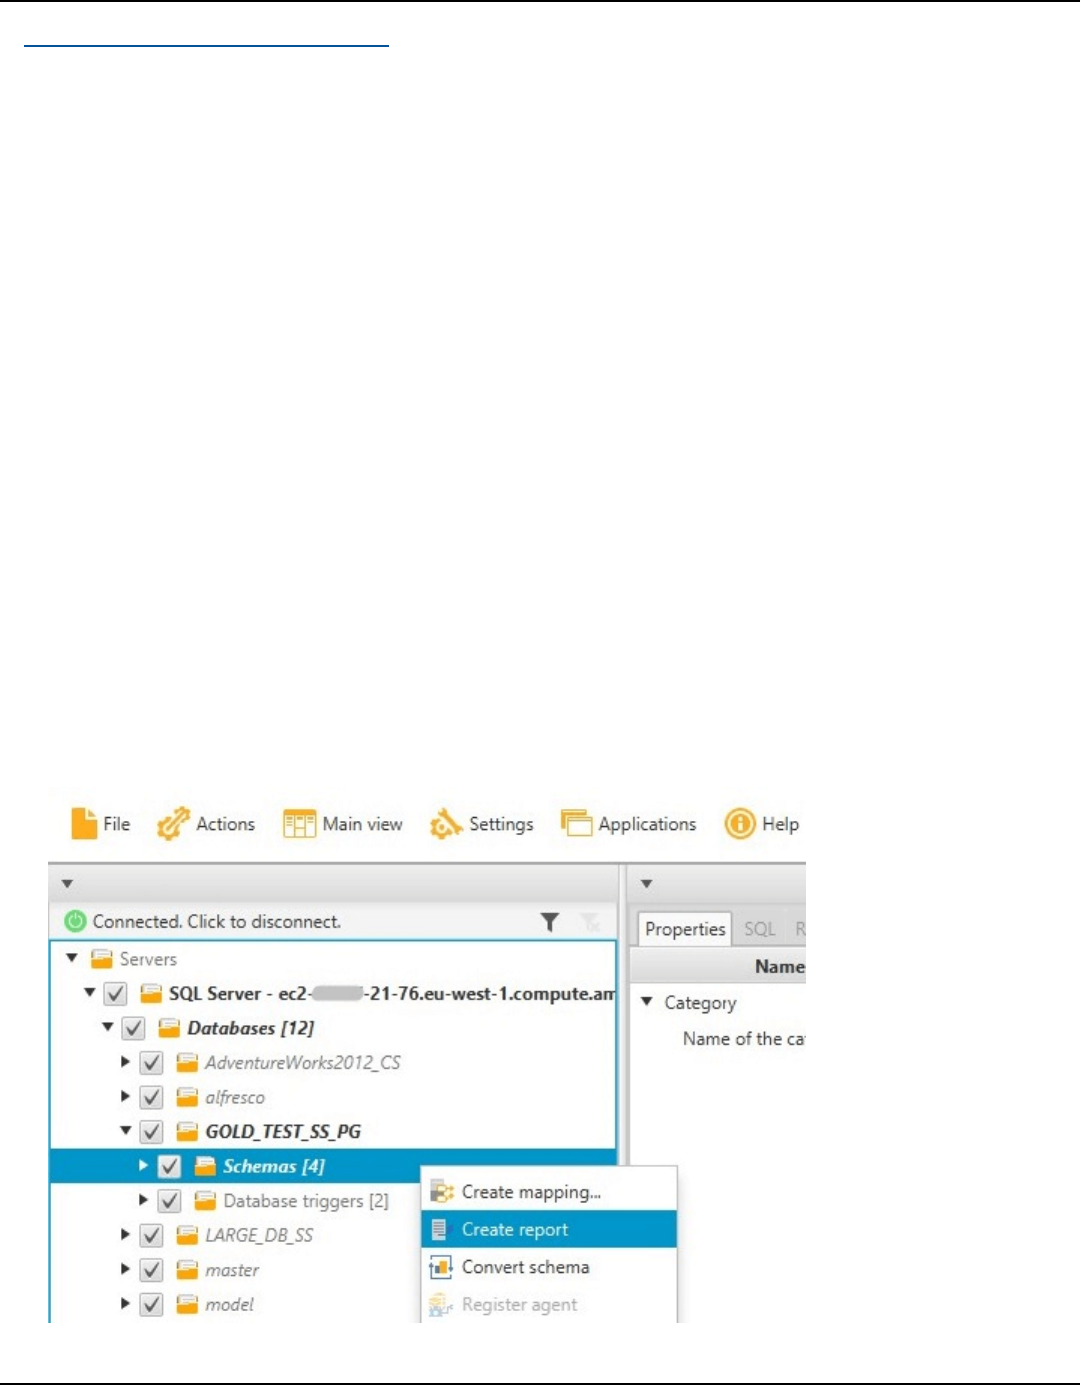
AWS Schema Conversion Tool User Guide
• Choose the best distribution style
Creating and using the assessment report in AWS SCT
The AWS Schema Conversion Tool creates a database migration assessment report to help you
convert your schema. The database migration assessment report provides important information
about the conversion of the schema from your source database to your target database. The report
summarizes all of the schema conversion tasks and details the action items for schema that can't
be converted to the DB engine of your target database. The report also includes estimates of the
amount of effort that it will take to write the equivalent code in your target database that can't be
converted automatically.
Creating a database migration assessment report
Use the following procedure to create a database migration assessment report.
To create a database migration assessment report
1. In the left panel that displays the schema from your source database, choose a schema object
to create an assessment report for.
2. Open the context (right-click) menu for the object, and then choose Create Report.
Creating and using the assessment report Version 1.0.672 314
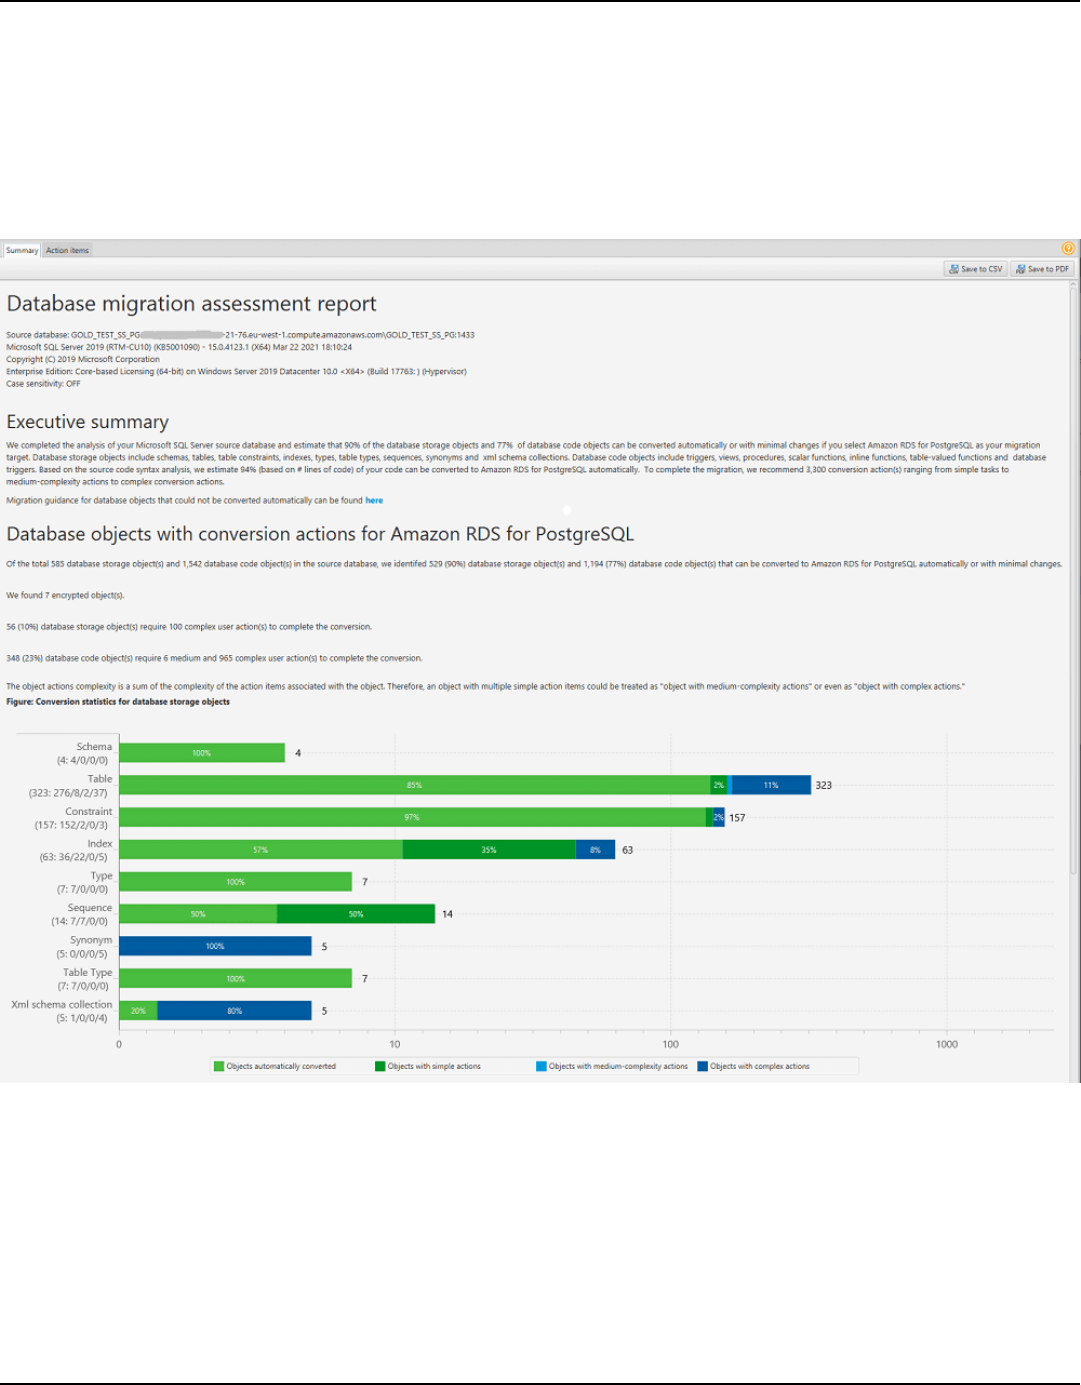
AWS Schema Conversion Tool User Guide
Assessment report summary
After you create an assessment report, the assessment report view opens, showing the Summary
tab. The Summary tab displays the summary information from the database migration assessment
report. It shows items that were converted automatically, and items that were not converted
automatically.
For schema items that can't be converted automatically to the target database engine, the
summary includes an estimate of the effort required to create schema items in your target DB
instance that are equivalent to those in your source.
The report categorizes the estimated time to convert these schema items as follows:
• Simple – Actions that can be completed in less than one hour.
Summary Version 1.0.672 315
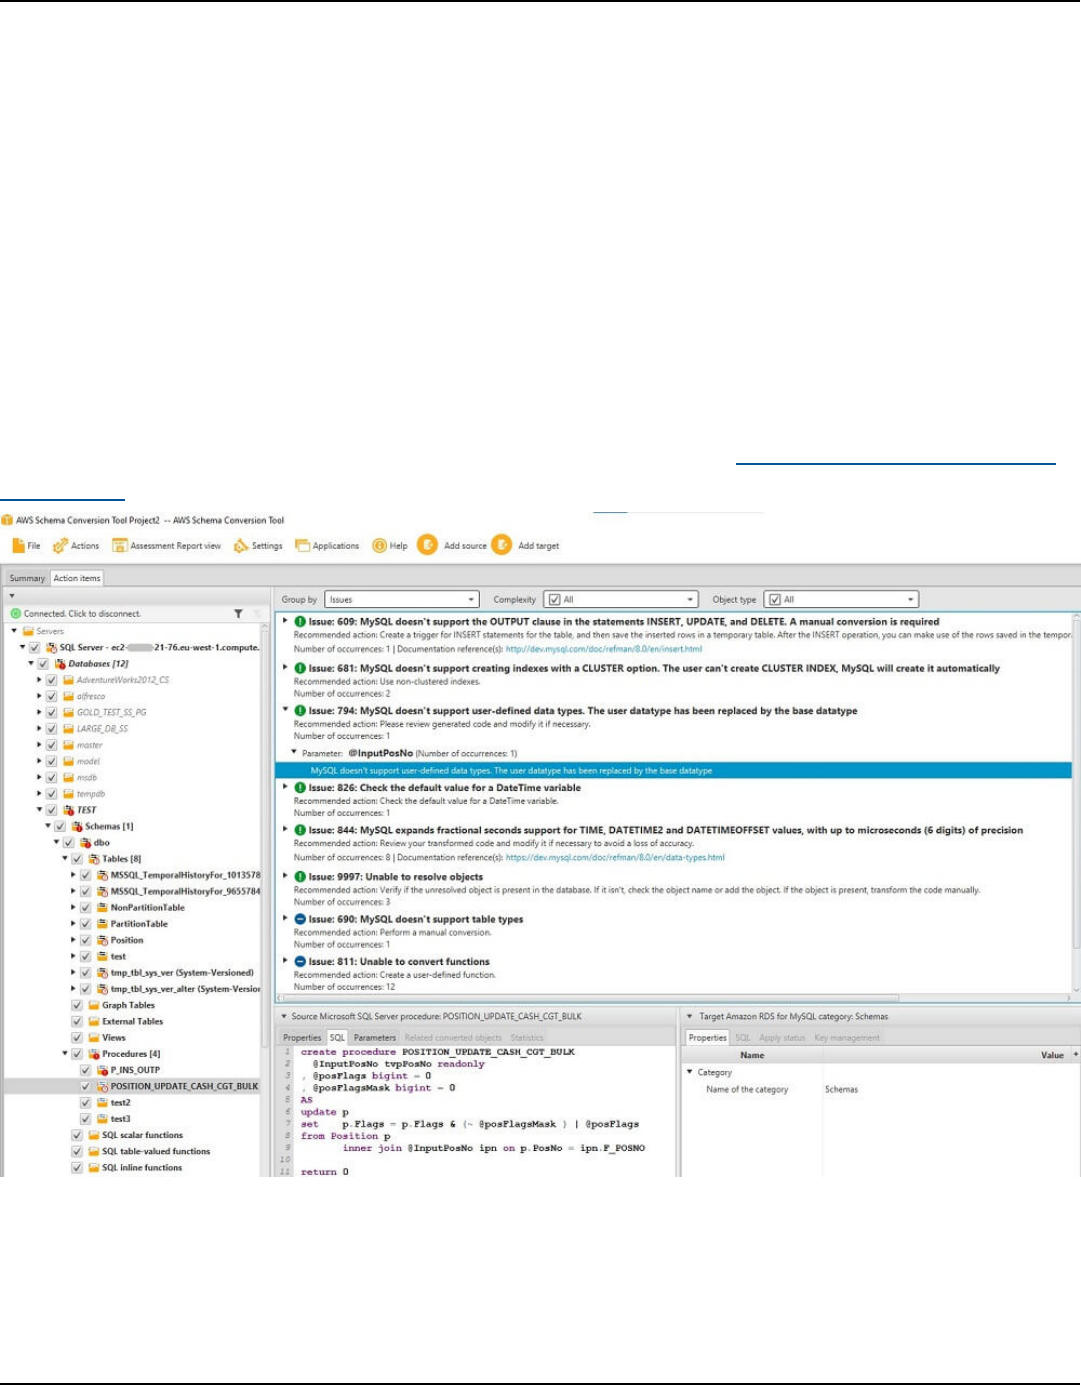
AWS Schema Conversion Tool User Guide
• Medium – Actions that are more complex and can be completed in one to four hours.
• Significant – Actions that are very complex and take more than four hours to complete.
Assessment report action items
The assessment report view also includes an Action Items tab. This tab contains a list of items
that can't be converted automatically to the database engine of your target database. If you select
an action item from the list, AWS SCT highlights the item from your schema that the action item
applies to.
The report also contains recommendations for how to manually convert the schema item. For more
information about deciding how to handle manual conversions, see Handling manual conversions
in AWS SCT.
Action items Version 1.0.672 316
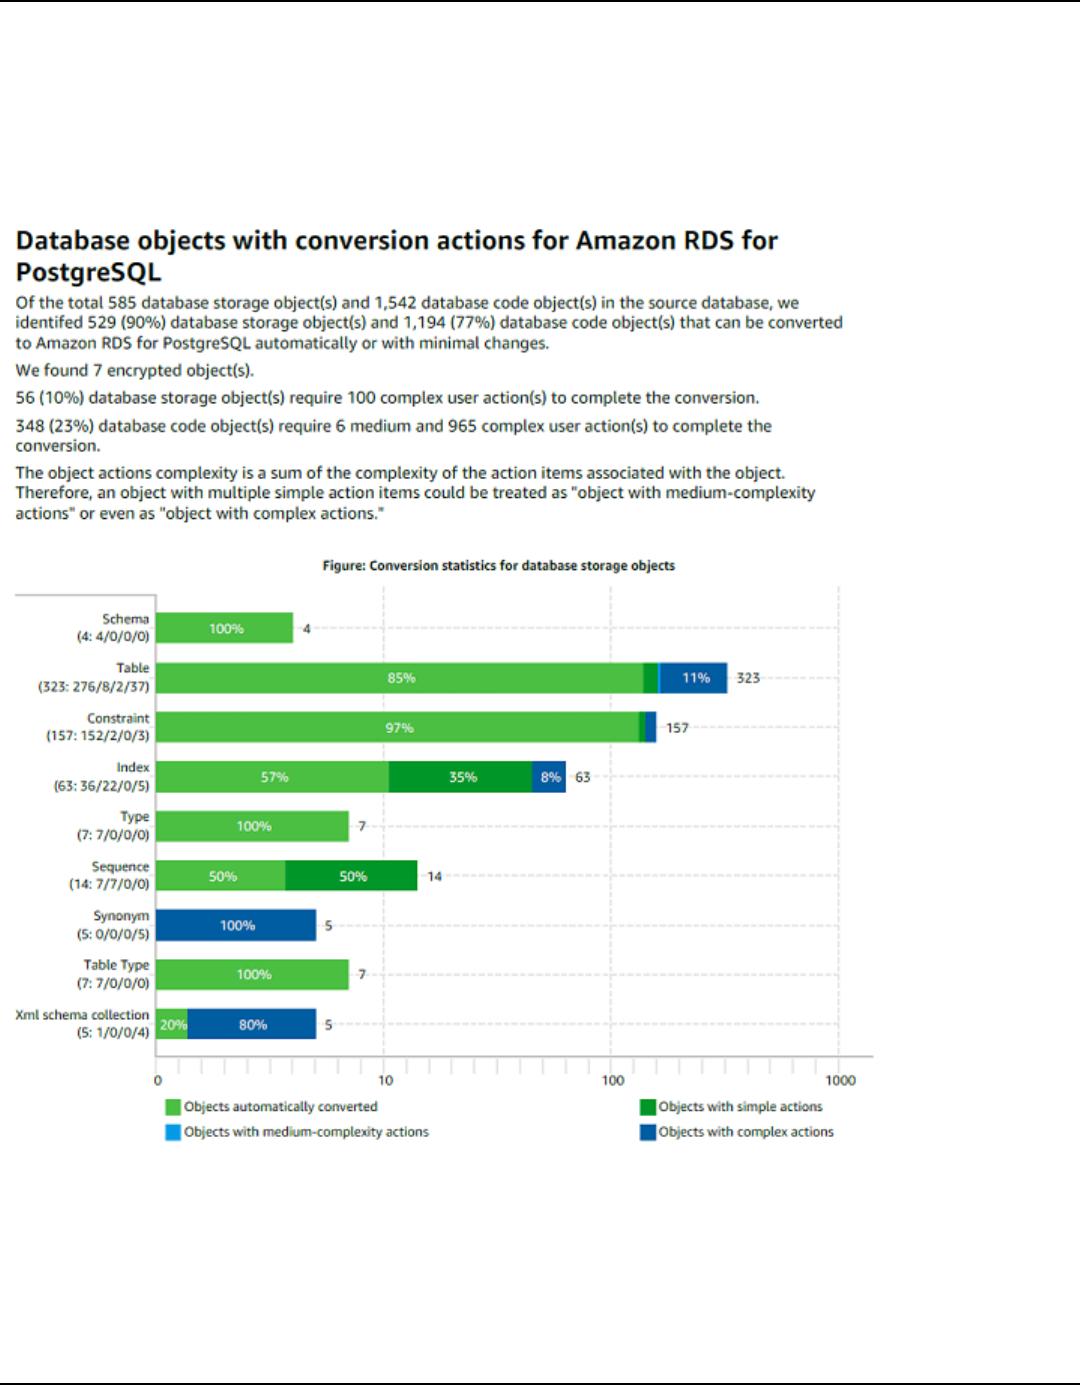
AWS Schema Conversion Tool User Guide
Saving the assessment report
You can save a local copy of the database migration assessment report as either a PDF file or a
comma-separated values (CSV) file. The CSV file contains only action item information. The PDF
file contains both the summary and action item information, as shown in the following example.
Saving the assessment report Version 1.0.672 317

AWS Schema Conversion Tool User Guide
Handling manual conversions in AWS SCT
The assessment report includes a list of items that can't be converted automatically to the
database engine of your target database. For each item that can't be converted, there is an action
item on the Action Items tab.
You can respond to the action items in the assessment report in the following ways:
• Modify your source database schema.
• Modify your target database schema.
Modifying your source schema
For some items, it might be easier to modify the database schema in your source database to
schema that can be converted automatically. First, verify that the new changes are compatible with
your application architecture, then update the schema in your source database. Finally, refresh your
project with the updated schema information. You can then convert your updated schema, and
generate a new database migration assessment report. The action items no longer appear for the
items that changed in the source schema.
The advantage of this process is that your updated schema is always available when you refresh
from your source database.
Modifying your target schema
For some items, it might be easier to apply the converted schema to your target database, and
then add equivalent schema items manually to your target database for the items that couldn't be
converted automatically. You can write all of the schema that can be converted automatically to
your target database by applying the schema. For more information, see Saving and applying your
converted schema in AWS SCT.
The schema that are written to your target database don't contain the items that can't be
converted automatically. After applying the schema to your target database, you can then
manually create schema in your target database that are equivalent to those in the source
database. The action items in the database migration assessment report contain suggestions for
how to create the equivalent schema.
Handling manual conversions Version 1.0.672 318

AWS Schema Conversion Tool User Guide
Warning
If you manually create schema in your target database, save a copy of any manual work
that you do. If you apply the converted schema from your project to your target database
again, it overwrites the manual work you have done.
In some cases, you can't create equivalent schema in your target database. You might need to
rearchitect a portion of your application and database to use the functionality that is available
from the engine for your target database. In other cases, you can simply ignore the schema that
can't be converted automatically.
Updating and refreshing your converted schema in AWS SCT
You can update both the source schema and the target schema in your AWS Schema Conversion
Tool project.
• Source – If you update the schema for your source database, AWS SCT replaces the schema in
your project with the latest schema from your source database. Using this functionality, you can
update your project if changes have been made to the schema of your source database.
• Target – If you update the schema for your target database, AWS SCT replaces the schema in
your project with the latest schema from your target database. If you haven't applied any schema
to your target database, AWS SCT clears the converted schema from your project. You can then
convert the schema from your source database for a clean target database.
You update the schema in your AWS SCT project by choosing Refresh from database.
Saving and applying your converted schema in AWS SCT
When the AWS Schema Conversion Tool generates converted schema (as shown in Converting
your schema using AWS SCT), it doesn't immediately apply the converted schema to the target
database. Instead, converted schema are stored locally in your project until you are ready to apply
them to the target database. Using this functionality, you can work with schema items that can't be
converted automatically to your target database engine. For more information on items that can't
be converted automatically, see Using the assessment report in the AWS Schema Conversion Tool.
Updating and refreshing your converted schema Version 1.0.672 319

AWS Schema Conversion Tool User Guide
You can optionally have the tool save your converted schema to a file as a SQL script prior to
applying the schema to your target database. You can also have the tool apply the converted
schema directly to your target database.
Saving your converted schema to a file
You can save your converted schema as SQL scripts in a text file. By using this approach, you can
modify the generated SQL scripts from AWS SCT to address items that the tool can't convert
automatically. You can then run your updated scripts on your target DB instance to apply your
converted schema to your target database.
To save your converted schema as SQL scripts
1. Choose your schema and open the context (right-click) menu.
2. Choose Save as SQL.
3. Enter the name of the file and choose Save.
4. Save your converted schema using one of the following options:
• Single file
• Single file per stage
• Single file per statement
To choose the format of the SQL script
1. On the Settings menu, choose Project settings.
2. Choose Save scripts.
3. For Vendor, choose the database platform.
4. For Save SQL scripts to, choose how you want to save your database schema script.
5. Choose OK to save the settings.
Applying your converted schema
When you are ready to apply your converted schema to your target database, choose the schema
element from the right panel of your project. Open the context (right-click) menu for the schema
element, and then choose Apply to database, as shown following.
Saving your converted schema to a file Version 1.0.672 320

AWS Schema Conversion Tool User Guide
The extension pack schema
The first time that you apply your converted schema to your target DB instance, AWS SCT adds an
additional schema to your target DB instance. This schema implements system functions of the
source database that are required when writing your converted schema to your target DB instance.
The schema is called the extension pack schema.
Don't modify the extension pack schema, or you might encounter unexpected results in the
converted schema that is written to your target DB instance. When your schema is fully migrated
to your target DB instance, and you no longer need AWS SCT, you can delete the extension pack
schema.
The extension pack schema is named according to your source database as follows:
•
Greenplum: aws_greenplum_ext
•
Microsoft SQL Server: aws_sqlserver_ext
•
Netezza: aws_netezza_ext
•
Oracle: aws_oracle_ext
•
Snowflake: aws_snowflake_ext
•
Teradata: aws_teradata_ext
•
Vertica: aws_vertica_ext
For more information, see Using extension packs with AWS Schema Conversion Tool.
The extension pack schema Version 1.0.672 321

AWS Schema Conversion Tool User Guide
Python libraries
To create custom functions in Amazon Redshift, you use the Python language. Use the AWS
SCT extension pack to install python libraries for your Amazon Redshift database. For more
information, see Using extension packs with AWS Schema Conversion Tool.
Converting data from Amazon Redshift using AWS Schema
Conversion Tool
You can use the AWS Schema Conversion Tool to optimize your Amazon Redshift database. Using
your Amazon Redshift database as a source, and a test Amazon Redshift database as the target,
AWS SCT recommends sort keys and distribution keys to optimize your database.
Optimizing your Amazon Redshift database
Use the following procedure to optimize your Amazon Redshift database.
To optimize your Amazon Redshift database
1. Take a manual snapshot of your Amazon Redshift cluster as a backup. You can delete the
snapshot after you are done optimizing your Amazon Redshift cluster and testing any changes
that you make. For more information, see Amazon Redshift snapshots.
2. Choose a schema object to convert from the left panel of your project. Open the context
(right-click) menu for the object, and then choose Collect Statistics.
AWS SCT uses the statistics to make suggestions for sort keys and distribution keys.
3. Choose a schema object to optimize from the left panel of your project. Open the context
(right-click) menu for the object, and then choose Run Optimization.
AWS SCT makes suggestions for sort keys and distribution keys.
4. To review the suggestions, expand the tables node under your schema in the left panel of your
project, and then choose a table. Choose the Key Management tab as shown following.
Python libraries Version 1.0.672 322
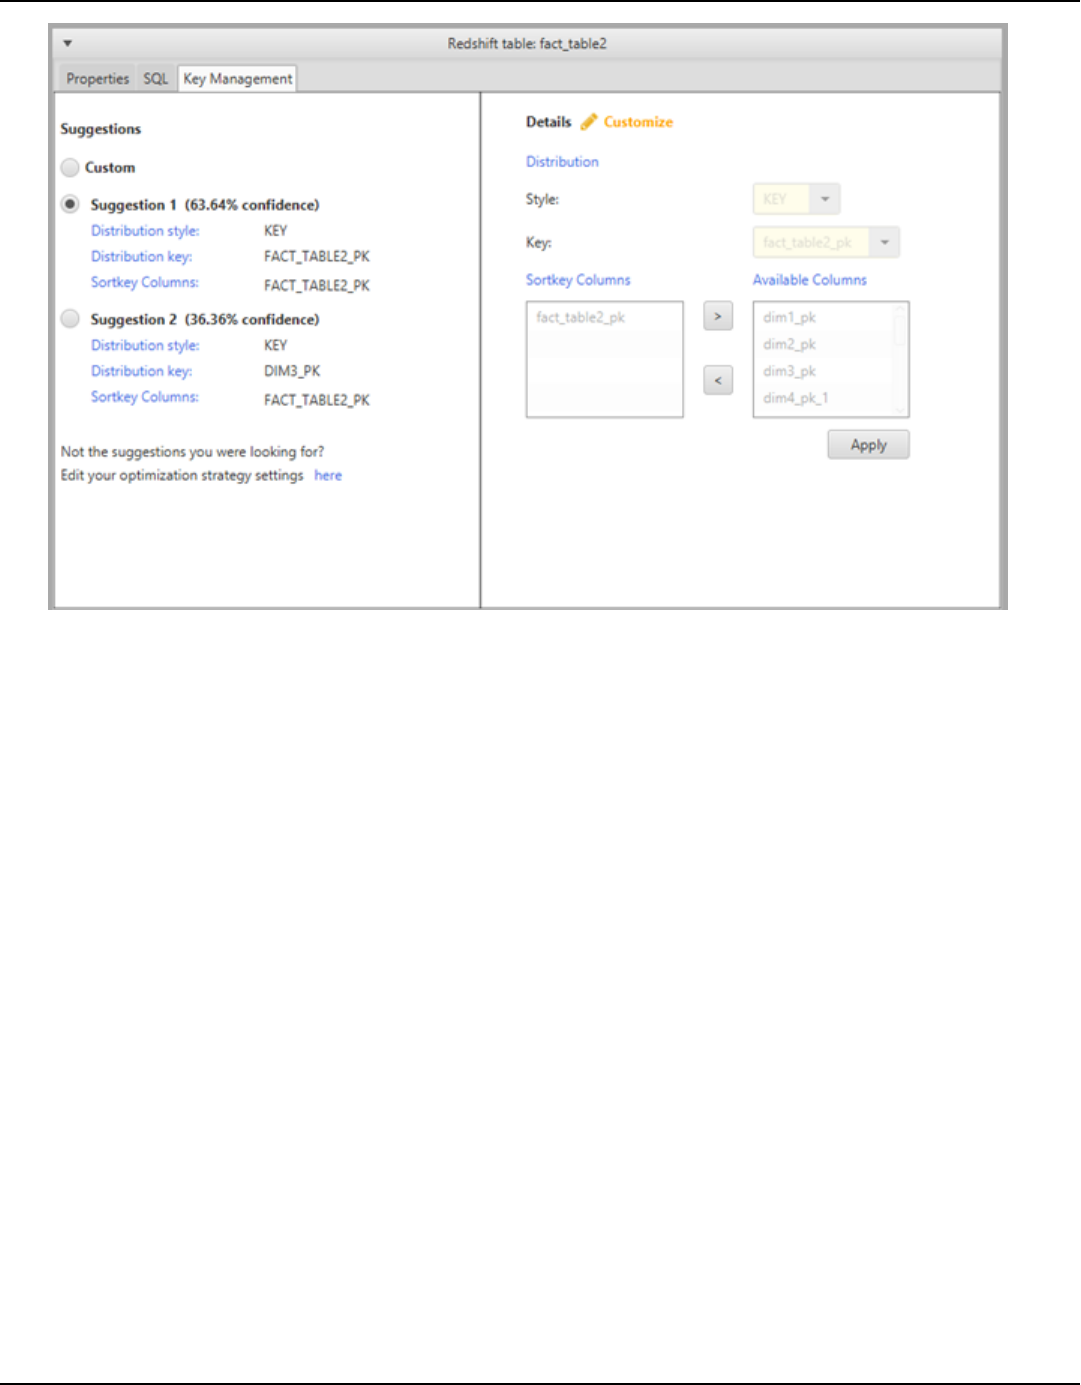
AWS Schema Conversion Tool User Guide
The left pane contains key suggestions, and includes the confidence rating for each
suggestion. You can choose one of the suggestions, or you can customize the key by editing it
in the right pane.
5. You can create a report that contains the optimization suggestions. To create the report, do
the following:
a. Choose a schema object that you optimized from the left panel of your project. Open the
context (right-click) menu for the object, and then choose Create Report.
The report opens in the main window, and the Summary tab appears. The number of
objects with optimization suggestions appears in the report.
b. Choose the Action Items tab to see the key suggestions in a report format.
c. You can save a local copy of the optimization report as either a PDF file or a comma-
separated values (CSV) file. The CSV file contains only action item information. The PDF
file contains both the summary and action item information.
6. To apply suggested optimizations to your database, choose an object in the right panel of
your project. Open the context (right-click) menu for the object, and then choose Apply to
database.
Optimizing your Amazon Redshift database Version 1.0.672 323

AWS Schema Conversion Tool User Guide
Converting Data Using ETL Processes in AWS Schema
Conversion Tool
You can use the AWS Schema Conversion Tool (AWS SCT) to migrate extract, transform, and load
(ETL) processes. This type of migration includes the conversion of ETL-related business logic.
This logic can reside either inside your source data warehouses or in external scripts that you run
separately.
Currently, AWS SCT supports the conversion of ETL scripts to objects to AWS Glue and Amazon
Redshift RSQL, as shown in the following table.
Source Target
Informatica ETL scripts Informatica
Microsoft SQL Server Integration Services
(SSIS) ETL packages
AWS Glue or AWS Glue Studio
Shell scripts with embedded commands from
Teradata Basic Teradata Query (BTEQ)
Amazon Redshift RSQL
Teradata BTEQ ETL scripts AWS Glue or Amazon Redshift RSQL
Teradata FastExport job scripts Amazon Redshift RSQL
Teradata FastLoad job scripts Amazon Redshift RSQL
Teradata MultiLoad job scripts Amazon Redshift RSQL
Topics
• Converting ETL processes to AWS Glue in AWS Schema Conversion Tool
• Converting ETL processes to AWS Glue in AWS Schema Conversion Tool
• Converting Informatica ETL scripts with AWS Schema Conversion Tool
• Converting SSIS to AWS Glue with AWS SCT
• Converting SSIS pacakges to AWS Glue Studio with AWS Schema Conversion Tool
Version 1.0.672 324

AWS Schema Conversion Tool User Guide
• Converting Teradata BTEQ scripts to Amazon Redshift RSQL with AWS SCT
• Converting shell scripts with embedded BTEQ commands to Amazon Redshift RSQL with AWS
Schema Conversion Tool
• Converting FastExport scripts to Amazon Redshift RSQL with AWS Schema Conversion Tool
• Converting FastLoad job scripts to Amazon Redshift RSQL with AWS Schema Conversion Tool
• Converting MultiLoad scripts to Amazon Redshift RSQL with AWS Schema Conversion Tool
Converting ETL processes to AWS Glue in AWS Schema
Conversion Tool
Following, you can find an outline of the process to convert ETL scripts to AWS Glue with AWS SCT.
For this example, we convert an Oracle database to Amazon Redshift, along with the ETL processes
used with the source databases and data warehouses.
Topics
• Prerequisites
• Understanding the AWS Glue Data Catalog
• Limitations for converting using AWS SCT with AWS Glue
• Step 1: Create a new project
• Step 2: Create an AWS Glue job
The following architecture diagram shows an example database migration project that includes the
conversion of ETL scripts to AWS Glue.
ETL processes Version 1.0.672 325
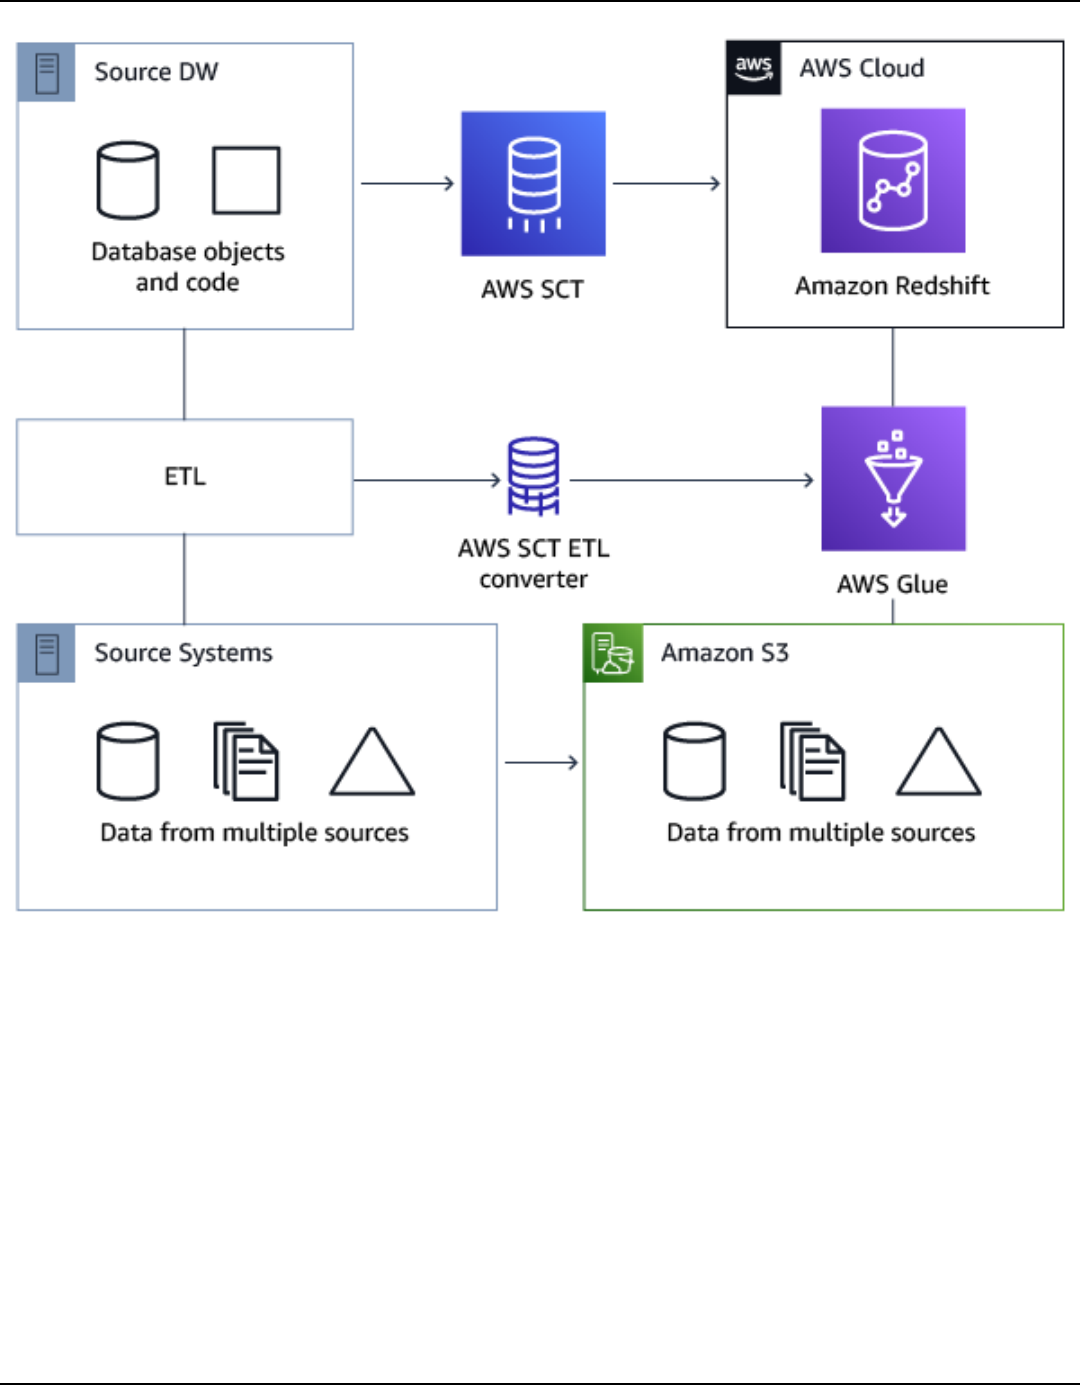
AWS Schema Conversion Tool User Guide
Prerequisites
Before you begin, do the following:
• Migrate any source databases that you intend to migrate to AWS.
• Migrate the target data warehouses to AWS.
• Collect a list of all the code involved in your ETL process.
• Collect a list of all the necessary connection information for each database.
Prerequisites Version 1.0.672 326

AWS Schema Conversion Tool User Guide
Also, AWS Glue needs permissions to access other AWS resources on your behalf. You provide those
permissions by using AWS Identity and Access Management (IAM). Make sure that you created an
IAM policy for AWS Glue. For more information, see Create an IAM policy for the AWS Glueservice
in the AWS Glue Developer Guide.
Understanding the AWS Glue Data Catalog
As part of the process of conversion, AWS Glue loads information regarding the source and target
databases. It organizes this information into categories, in a structure called a tree. The structure
includes the following:
• Connections – Connection parameters
• Crawlers – A list of crawlers, one crawler for each schema
• Databases – Containers that hold tables
• Tables – Metadata definitions that represent the data in the tables
• ETL jobs – Business logic that performs the ETL work
• Triggers – Logic that controls when an ETL job runs in AWS Glue (whether on demand, by
schedule, or triggered by job events)
The AWS Glue Data Catalog is an index to the location, schema, and runtime metrics of your data.
When you work with AWS Glue and AWS SCT, the AWS Glue Data Catalog contains references
to data that is used as sources and targets of your ETL jobs in AWS Glue. To create your data
warehouse, catalog this data.
You use the information in the Data Catalog to create and monitor your ETL jobs. Typically, you
run a crawler to take inventory of the data in your data stores, but there are other ways to add
metadata tables into your Data Catalog.
When you define a table in your Data Catalog, you add it to a database. A database is used to
organize tables in AWS Glue.
Limitations for converting using AWS SCT with AWS Glue
The following limitations apply when converting using AWS SCT with AWS Glue.
Resource Default limit
AWS Glue Data Catalog Version 1.0.672 327

AWS Schema Conversion Tool User Guide
Number of databases for each account 10,000
Number of tables for each database 100,000
Number of partitions for each table 1,000,000
Number of table versions for each table 100,000
Number of tables for each account 1,000,000
Number of partitions for each account 10,000,000
Number of table versions for each account 1,000,000
Number of connections for each account 1,000
Number of crawlers for each account 25
Number of jobs for each account 25
Number of triggers for each account 25
Number of concurrent job runs for each
account
30
Number of concurrent job runs for each job 3
Number of jobs for each trigger 10
Number of development endpoints for each
account
5
Maximum data processing units (DPUs) used
by a development endpoint at one time
5
Maximum DPUs used by a role at one time 100
Limitations Version 1.0.672 328

AWS Schema Conversion Tool User Guide
Database name length
Unlimited
For compatibility with other metadata stores,
such as Apache Hive, the name is changed to
use lowercase characters.
If you plan to access the database from
Amazon Athena, provide a name with only
alphanumeric and underscore characters.
Connection name length Unlimited
Crawler name length Unlimited
Step 1: Create a new project
To create a new project, take these high-level steps:
1. Create a new project in AWS SCT. For more information, see Starting and managing Projects in
AWS SCT.
2. Add your source and target databases to the project. For more information, see Adding servers
to project in AWS SCT.
Make sure that you have chosen Use AWS Glue in the target database connection settings.
To do so, choose the AWS Glue tab. For Copy from AWS profile, choose the profile that you
want to use. The profile should automatically fill in the AWS access key, secret key, and Amazon
S3 bucket folder. If it doesn't, enter this information yourself. After you choose OK, AWS Glue
analyzes the objects and loads metadata into the AWS Glue Data Catalog.
Depending on your security settings, you might get a warning message that says your account
doesn't have sufficient privileges for some of the schemas on the server. If you have access to
the schemas that you're using, you can safely ignore this message.
3. To finish preparing to import your ETL, connect to your source and target databases. To do so,
choose your database in the source or target metadata tree, and then choose Connect to the
server.
Step 1: Create a new project Version 1.0.672 329

AWS Schema Conversion Tool User Guide
AWS Glue creates a database on the source database server and one on the target database server
to help with the ETL conversion. The database on the target server contains the AWS Glue Data
Catalog. To find specific objects, use search on the source or target panels.
To see how a specific object converts, find an item you want to convert, and choose Convert
schema from its context (right-click) menu. AWS SCT transforms this selected object into a script.
You can review the converted script from the Scripts folder in the right panel. Currently, the script
is a virtual object, which is available only as part of your AWS SCT project.
To create an AWS Glue job with your converted script, upload your script to Amazon S3. To upload
the script to Amazon S3, choose the script, then choose Save to S3 from its context (right-click)
menu.
Step 2: Create an AWS Glue job
After you save the script to Amazon S3, you can choose it and then choose Configure AWS Glue
Job to open the wizard to configure the AWS Glue job. The wizard makes it easier to set this up:
1. On the first tab of the wizard, Design Data Flow, you can choose an execution strategy and the
list of scripts you want to include in this one job. You can choose parameters for each script. You
can also rearrange the scripts so that they run in the correct order.
2. On the second tab, you can name your job, and directly configure settings for AWS Glue. On this
screen, you can configure the following settings:
• AWS Identity and Access Management (IAM) role
• Script file names and file paths
• Encrypt the script using server-side encryption with Amazon S3–managed keys (SSE-S3)
• Temporary directory
• Generated Python library path
• User Python library path
• Path for the dependent .jar files
• Referenced files path
• Concurrent DPUs for each job run
• Maximum concurrency
• Job timeout (in minutes)
• Delay notification threshold (in minutes)
Step 2: Create an AWS Glue job Version 1.0.672 330

AWS Schema Conversion Tool User Guide
• Number of retries
• Security configuration
• Server-side encryption
3. On the third step, or tab, you choose the configured connection to the target endpoint.
After you finish configuring the job, it displays under the ETL jobs in the AWS Glue Data Catalog.
If you choose the job, the settings display so you can review or edit them. To create a new job in
AWS Glue, choose Create AWS Glue Job from the context (right-click) menu for the job. Doing
this applies the schema definition. To refresh the display, choose Refresh from database from the
context (right-click) menu.
At this point, you can view your job in the AWS Glue console. To do so, sign in to the AWS
Management Console and open the AWS Glue console at https://console.aws.amazon.com/glue/.
You can test the new job to make sure that it's working correctly. To do so, first check the data in
your source table, then verify that the target table is empty. Run the job, and check again. You can
view error logs from the AWS Glue console.
Converting ETL processes to AWS Glue in AWS Schema
Conversion Tool
In the following sections, you can find a description of a conversion that calls AWS Glue API
operations in Python. For more information, see Program AWS Glue ETL scripts in Python in the
AWS Glue Developer Guide.
Topics
• Step 1: Create a database
• Step 2: Create a connection
• Step 3: Create an AWS Glue crawler
Step 1: Create a database
The first step is to create a new database in an AWS Glue Data Catalog by using the AWS SDK
API. When you define a table in the Data Catalog, you add it to a database. A database is used to
organize the tables in AWS Glue.
ETL processes using Python Version 1.0.672 331

AWS Schema Conversion Tool User Guide
The following example demonstrates the create_database method of the Python API for AWS
Glue.
response = client.create_database(
DatabaseInput={
'Name': 'database_name’,
'Description': 'description',
'LocationUri': 'string',
'Parameters': {
'parameter-name': 'parameter value'
}
}
)
If you are using Amazon Redshift, the database name is formed as follows.
{redshift_cluster_name}_{redshift_database_name}_{redshift_schema_name}
The full name of Amazon Redshift cluster for this example is as follows.
rsdbb03.apq1mpqso.us-west-2.redshift.amazonaws.com
The following shows an example of a well-formed database name. In this case rsdbb03 is the
name, which is the first part of the full name of the cluster endpoint. The database is named dev
and the schema is ora_glue.
rsdbb03_dev_ora_glue
Step 2: Create a connection
Create a new connection in a Data Catalog by using the AWS SDK API.
The following example demonstrates using the create_connection method of the Python API
for AWS Glue.
response = client.create_connection(
ConnectionInput={
'Name': 'Redshift_abcde03.aabbcc112233.us-west-2.redshift.amazonaws.com_dev',
'Description': 'Created from SCT',
Step 2: Create a connection Version 1.0.672 332

AWS Schema Conversion Tool User Guide
'ConnectionType': 'JDBC',
'ConnectionProperties': {
'JDBC_CONNECTION_URL': 'jdbc:redshift://aabbcc03.aabbcc112233.us-
west-2.redshift.amazonaws.com:5439/dev',
'USERNAME': 'user_name',
'PASSWORD': 'password'
},
'PhysicalConnectionRequirements': {
'AvailabilityZone': 'us-west-2c',
'SubnetId': 'subnet-a1b23c45',
'SecurityGroupIdList': [
'sg-000a2b3c', 'sg-1a230b4c', 'sg-aba12c3d', 'sg-1abb2345'
]
}
}
)
The parameters used in create_connection are as follows:
•
Name (UTF-8 string) – required. For Amazon Redshift, the connection name is formed as
follows: Redshift_<Endpoint-name>_<redshift-database-name>, for example:
Redshift_abcde03_dev
•
Description (UTF-8 string) – Your description of the connection.
•
ConnectionType (UTF-8 string) – Required. The type of connection. Currently, only JDBC is
supported; SFTP is not supported.
•
ConnectionProperties (dict) – Required. A list of key-value pairs used as parameters for this
connection, including the JDBC connection URL, the user name, and the password.
•
PhysicalConnectionRequirements (dict) – Physical connection requirements, which include
the following:
•
SubnetId (UTF-8 string) – The ID of the subnet used by the connection.
•
SecurityGroupIdList (list) – The security group ID list used by the connection.
•
AvailabilityZone (UTF-8 string) – Required. The Availability Zone that contains the
endpoint. This parameter is deprecated.
Step 3: Create an AWS Glue crawler
Next, you create an AWS Glue crawler to populate the AWS Glue catalog. For more information, see
Cataloging tables with a crawler in the AWS Glue Developer Guide.
Step 3: Create an AWS Glue crawler Version 1.0.672 333

AWS Schema Conversion Tool User Guide
The first step in adding a crawler is to create a new database in a Data Catalog by using the
AWS SDK API. Before you begin, make sure to first delete any previous version of it by using the
delete_crawler operation.
When you create your crawler, a few considerations apply:
• For the crawler name, use the format
<redshift_node_name>_<redshift_database_name>_<redshift_shema_name>, for
example: abcde03_dev_ora_glue
• Use an IAM role that already exists. For more information on creating IAM roles, see Creating IAM
roles in the IAM User Guide.
• Use the name of the database that you created in the previous steps.
•
Use the ConnectionName parameter, which is required.
•
For the path parameter, use the path to the JDBC target, for example: dev/ora_glue/%
The following example deletes an existing crawler and then creates a new one by using the Python
API for AWS Glue.
response = client.delete_crawler(
Name='crawler_name'
)
response = client.create_crawler(
Name='crawler_name',
Role= ‘IAM_role’,
DatabaseName='database_name’,
Description='string',
Targets={
'S3Targets': [
{
'Path': 'string',
'Exclusions': [
'string',
]
},
],
'JdbcTargets': [
{
'ConnectionName': ‘ConnectionName’,
'Path': ‘Include_path’,
Step 3: Create an AWS Glue crawler Version 1.0.672 334

AWS Schema Conversion Tool User Guide
'Exclusions': [
'string',
]
},
]
},
Schedule='string',
Classifiers=[
'string',
],
TablePrefix='string',
SchemaChangePolicy={
'UpdateBehavior': 'LOG'|'UPDATE_IN_DATABASE',
'DeleteBehavior': 'LOG'|'DELETE_FROM_DATABASE'|'DEPRECATE_IN_DATABASE'
},
Configuration='string'
)
Create and then run a crawler that connects to one or more data stores, determines the data
structures, and writes tables into the Data Catalog. You can run your crawler on a schedule, as
shown following.
response = client.start_crawler(
Name='string'
)
This example uses Amazon Redshift as the target. Amazon Redshift data types map to AWS Glue
data types in the following way after the crawler runs.
Amazon Redshift data type AWS Glue data type
smallint smallint
integer int
bigint bigint
decimal decimal(18,0)
decimal(p,s) decimal(p,s)
Step 3: Create an AWS Glue crawler Version 1.0.672 335

AWS Schema Conversion Tool User Guide
real double
double precision double
boolean boolean
char string
varchar string
varchar(n) string
date date
timestamp timestamp
timestamptz timestamp
Converting Informatica ETL scripts with AWS Schema
Conversion Tool
You can use AWS SCT command line interface (CLI) to convert your Informatica ETL scripts so that
you can use the scripts with your new target database. This conversion includes three key steps.
First, AWS SCT converts the SQL code that is embedded in your Informatica objects. Next, AWS
SCT changes the names of database objects according to the migration rules that you specified in
your project. Finally, AWS SCT redirects the connections of your Informatica ETL scripts to the new
target database.
You can convert Informatica ETL scripts as part of AWS SCT database conversion project. Make sure
that you add your source and target databases to the project when you convert Informatica ETL
scripts.
To convert Informatica ETL scripts, make sure that you use AWS SCT version 1.0.667 or higher. Also,
familiarize yourself with the command line interface of AWS SCT. For more information, see CLI
Reference for AWS Schema Conversion Tool.
Informatica ETL scripts Version 1.0.672 336

AWS Schema Conversion Tool User Guide
To convert Informatica ETL scripts using AWS SCT
1. Create a new AWS SCT CLI script or edit an existing scenario template. For example, you
can download and edit the InformaticConversionTemplate.scts template. For more
information, see Getting CLI scenarios.
2. Download the required JDBC drivers for your source and target databases. Specify the location
of these drivers using the SetGlobalSettings command. Also, specify the folders where
AWS SCT can save log files.
The following code example shows you how to add the path to Oracle and PostgreSQL
drivers to the AWS SCT settings. After you run this code example, AWS SCT stores log
files in the C:\sct_log folder. Also, AWS SCT stores console log files in the C:\Temp
\oracle_postgresql folder.
SetGlobalSettings
-save: 'true'
-settings: '{"oracle_driver_file": "C:\\drivers\\ojdbc8.jar",
"postgresql_driver_file": "C:\\drivers\\postgresql-42.2.19.jar" }'
/
SetGlobalSettings
-save: 'false'
-settings: '{
"log_folder": "C:\\sct_log",
"console_log_folder": "C:\\Temp\\oracle_postgresql"}'
/
3. Create a new AWS SCT project. Enter the name and location of your project.
The following code example creates the oracle_postgresql project in the C:\Temp folder.
CreateProject
-name: 'oracle_postgresql'
-directory: 'C:\Temp'
/
4. Add connection information about your source and target databases.
The following code example adds Oracle and PostgreSQL databases as a source and target for
your AWS SCT project.
Informatica ETL scripts Version 1.0.672 337

AWS Schema Conversion Tool User Guide
AddSource
-password: 'source_password'
-port: '1521'
-vendor: 'ORACLE'
-name: 'ORACLE'
-host: 'source_address'
-database: 'ORCL'
-user: 'source_user'
/
AddTarget
-database: 'postgresql'
-password: 'target_password'
-port: '5432'
-vendor: 'POSTGRESQL'
-name: 'POSTGRESQL'
-host: 'target_address'
-user: 'target_user'
/
In the preceding example, replace source_user and target_user with the names of
your database users. Next, replace source_password and target_password with your
passwords. For source_address and target_address, enter the IP addresses of your
source and target database servers.
To connect to an Oracle database version 19 and higher, use the Oracle service name in the
AddSource command. To do so, add the -connectionType parameter and set its value to
'basic_service_name'. Then, add the -servicename parameter and set its value to your
Oracle service name. For more information about the AddSource command, see the AWS
Schema Conversion Tool CLI Reference.
5. Create a new AWS SCT mapping rule, which defines the target database engines for each
source database schema. For more information, see Mapping data types in the AWS Schema
Conversion Tool.
The following code example creates a mapping rule that includes all source Oracle database
schemas and defines PostgreSQL as a migration target.
AddServerMapping
-sourceTreePath: 'Servers.ORACLE'
-targetTreePath: 'Servers.POSTGRESQL'
Informatica ETL scripts Version 1.0.672 338

AWS Schema Conversion Tool User Guide
/
6. Add connection information about your Informatica source and target XML files.
The following code example adds the Informatica XML files from the C:
\Informatica_source and C:\Informatica_target folders.
AddSource
-name: 'INFA_SOURCE'
-vendor: 'INFORMATICA'
-mappingsFolder: 'C:\Informatica_source'
/
AddTarget
-name: 'INFA_TARGET'
-vendor: 'INFORMATICA'
-mappingsFolder: 'C:\Informatica_target'
/
7. Create another mapping rule to define the target Informatica XML file for your source
Informatica XML file.
The following code example creates a mapping rule that includes source and target
Informatica XML files used in the preceding example.
AddServerMapping
-sourceTreePath: 'ETL.INFA_SOURCE'
-targetTreePath: 'ETL.INFA_TARGET'
/
8. Specify the database server connection that corresponds to the Informatica connection name
reference.
The following code example configures the redirect of your Informatica ETL scripts from your
source to the new target database. This example also configures connection variables.
ConfigureInformaticaConnectionsRedirect
-treePath: 'ETL.INFA_SOURCE.Files'
-connections: '{
"ConnectionNames": [
{
"name": "Oracle_src",
"newName": "postgres",
Informatica ETL scripts Version 1.0.672 339

AWS Schema Conversion Tool User Guide
"treePath": "Servers.ORACLE"
}
]
"ConnectionVariables": [
{
"name": "$Source",
"treePath": "Servers.ORACLE"
}
]
}'
/
9. Convert your source database schemas and Informatica ETL scripts.
The following code example converts all your source Oracle database schemas and your
Informatica XML file.
Convert
-treePath: 'Servers.ORACLE.Schemas.%'
/
Convert
-treePath: 'ETL.INFA_SOURCE.Files'
/
10. (Optional) Save your conversion project and the assessment report. This report includes the
conversion action items and recommendations about how to address each.
The following code example saves your project and saves a copy of the assessment report as a
PDF file in the C:\Temp folder.
SaveProject
/
SaveReportPDF
-treePath: 'ETL.INFA_SOURCE.Files'
-file:'C:\Temp\Informatica.pdf'
/
11. Save your converted Informatica XML file.
The following code example saves the converted XML file in the C:\Temp folder. You specified
this folder in the previous step using the AddTarget command.
Informatica ETL scripts Version 1.0.672 340

AWS Schema Conversion Tool User Guide
SaveTargetInformaticaXML
-treePath: 'ETL.INFA_TARGET.Files'
/
12.
Save your script as an .scts file and run it using the RunSCTBatch command in the AWS SCT
CLI. For more information, see AWS SCT CLI script mode.
The following example runs the Informatica.scts script in the C:\Temp folder. You can
use this example in Windows.
RunSCTBatch.cmd --pathtoscts "C:\Temp\Informatica.scts"
If you edit your source Informatica ETL scripts, then run the AWS SCT CLI script again.
Converting SSIS to AWS Glue with AWS SCT
Following, you can find how to convert Microsoft SQL Server Integration Services (SSIS) packages
to AWS Glue using AWS SCT.
To convert Microsoft SSIS packages to AWS Glue, make sure that you use AWS SCT version 1.0.642
or higher. You also need to have an SSIS project with ETL packages – .dtsx, .conmgr, and
.params files in the local folder.
You don't need an installed SSIS server. The conversion process goes through the local SSIS files.
To convert an SSIS package to AWS Glue using AWS SCT
1. Create a new project in AWS SCT or open an existing project. For more information, see the
section called “Starting and Managing projects”.
2. Choose Add source from the menu to add a new source SSIS package to your project.
3. Choose SQL Server Integration Services and complete the following:
• Connection name – Enter the name for your connection. AWS SCT displays this name in the
metadata tree.
• SSIS packages folder – Choose the path to your SSIS project folder with packages.
SSIS packages Version 1.0.672 341

AWS Schema Conversion Tool User Guide
AWS SCT reads the project files (files with the extensions .dtsx, .conmgr or .params) from
the local folder and parses them. It then organizes them into an AWS SCT tree of categories.
4. Choose Add target from the menu to add a new target platform to convert your source SSIS
packages.
5. Choose AWS Glue and complete the following:
• Connection name – Enter the name for your connection. AWS SCT displays this name in the
metadata tree.
• Copy from AWS profile – Choose the profile to use.
• AWS access key – Enter your AWS access key.
• AWS secret key – Enter your AWS secret key.
• Region – Choose the AWS Region that you want to use from the list.
• Amazon S3 bucket folder – Enter the folder path for the Amazon S3 bucket that you plan to
use.
You can use a virtual AWS Glue target. In this case, you don't need to specify the connection
credentials. For more information, see the section called “Virtual target mapping”.
6. Create a new mapping rule that includes your source SSIS package and your AWS Glue target.
For more information, see the section called “New data type mapping”.
7. On the View menu, choose Main view.
8. In the SSIS tree view, open the context (right-click) menu for Connection managers, and then
choose Configure connections.
9. Configure the project connection manager.
To configure a connection mapping for SSIS connection managers, specify the AWS Glue
connection for the corresponding SSIS connection manager. Make sure that your AWS Glue
connections are already created.
a. Under Connections, choose Project connections.
b. For Glue catalog connection, choose the appropriate AWS Glue connection.
10. Configure the package connection manager:
a. Under Connections, choose your package.
SSIS packages Version 1.0.672 342

AWS Schema Conversion Tool User Guide
b. For Glue catalog connection, choose the appropriate AWS Glue connection.
c. Repeat these actions for all connections available for your package.
11. Choose Apply.
12. Convert your package. In the source tree view, find Packages. Open the context (right-click)
menu for your package, then choose Convert package.
13. Save the converted script to Amazon S3. In the target tree view, find Package scripts. Open
the context (right-click) menu for your converted script, then choose Save to S3.
14. Configure your AWS Glue job. In the target tree view, find Package scripts. Open the context
(right-click) menu for your converted script, then choose Configure AWS Glue job.
15. Complete the three configuration sections:
a. Complete the Design data flow section:
• Execution strategy – Choose how your job will run ETL scripts. Choose SEQUENTIAL to
run the scripts in the order that is specified in the wizard. Choose PARALLEL to run the
scripts in parallel, disregarding the order that is specified in the wizard.
• Scripts – Choose the name of your converted script.
• Choose Next.
b. Complete the Job properties section:
• Name – Enter the name of your AWS Glue job.
• IAM Role – Choose the IAM role that is used for authorization to resources used to run
the job and access data stores.
• Script file name – Enter the name of your converted script.
• Script file S3 path – Enter the Amazon S3 path to your converted script.
• Encrypt script using SSE-S3 – Choose this option to protect data using server-side
encryption with Amazon S3-managed encryption keys (SSE-S3).
• Temporary directory – Enter the Amazon S3 path to a temporary directory for
intermediate results. AWS Glue and AWS Glue built-in transforms use this directory to
read or write to Amazon Redshift.
• AWS SCT automatically generates the path for Python libraries. You can review this path
in Generated python library path. You can't edit this automatically generated path. To
use additional Python libraries, enter the path in User python library path.
SSIS packages Version 1.0.672 343

AWS Schema Conversion Tool User Guide
• User python library path – Enter the paths for additional user Python libraries.
Separate Amazon S3 paths with commas.
• Dependent jars path – Enter the paths for dependent jar files. Separate Amazon S3
paths with commas.
• Referenced files path – Enter the paths for additional files, such as configuration files,
that are required by your script. Separate Amazon S3 paths with commas.
• Maximum capacity – Enter the maximum number of AWS Glue data processing units
(DPUs) that can be allocated when this job runs. You can enter an integer from 2 to 100.
The default is 2.
• Max concurrency – Enter the maximum number of concurrent runs that are allowed for
this job. The default is 1. AWS Glue returns an error when this threshold is reached.
• Job timeout (minutes) – Enter the timeout value on your ETL job as a safeguard against
runaway jobs. The default is 2880 minutes (48 hours) for batch jobs. If the job exceeds
this limit, the job run state changes to TIMEOUT.
• Delay notification threshold (minutes) – Enter the threshold in minutes before AWS
SCT sends a delay notification.
• Number of retries – Enter the number of times (0–10) that AWS Glue should
automatically restart the job if it fails. Jobs that reach the timeout limit aren't restarted.
The default is 0.
• Choose Next.
c. Configure the required connections:
i. From All connections, choose the required AWS Glue connections and add them to
the list of Selected connections.
ii. Choose Finish.
16. Create a configured AWS Glue job. In the target tree view, find and expand ETL Jobs. Open the
context (right-click) menu for ETL job that you configured, and then choose Create AWS Glue
Job.
17. Run the AWS Glue job:
a. Open the AWS Glue console at https://console.aws.amazon.com/glue/.
b. In the navigation pane, choose Jobs.
c. Choose Add job, and then choose the job that you want to run.
d. On the Actions tab, choose Run job.
SSIS packages Version 1.0.672 344

AWS Schema Conversion Tool User Guide
SSIS components that AWS SCT can convert to AWS Glue
You can use AWS SCT to convert data flow and control flow components, as well as containers,
parameters, and variables.
Supported data flow components include the following:
• ADO NET Destination
• ADO NET Source
• Aggregate
• Cache Transformation
• Character Map Transformation
• Conditional Split Transformation
• Copy Column Transformation
• Data Conversion Transformation
• Derived Column Transformation
• Excel Destination
• Excel Source
• Export Column Transformation
• Flat File Destination
• Flat File Source
• Fuzzy Lookup Transformation
• Import Column Transformation
• Lookup Transformation
• Merge Join Transformation
• Merge Transformation
• Multicast Transformation
• ODBC Destination
• ODBC Source
• OLE DB Command Transformation
• OLE DB Destination
Supported SSIS components Version 1.0.672 345

AWS Schema Conversion Tool User Guide
• OLE DB Source
• Percentage Sampling Transformation
• Pivot Transformation
• Raw File Destination
• Raw File Source
• RecordSet Destination
• Row Count Transformation
• Row Sampling Transformation
• Sort Transformation
• SQL Server Destination
• Union All Transformation
• Unpivot Transformation
• XML Source
Supported control flow components include the following:
• Bulk Insert Task
• Execute Package Task
• Execute SQL Task
• Execute T-SQL Statement Task
• Expression Task
• File System Task
• Notify Operator Task
• Send Mail Task
Supported SSIS containers include the following:
• For Loop Container
• Foreach Loop Container
• Sequence Container
Supported SSIS components Version 1.0.672 346

AWS Schema Conversion Tool User Guide
Converting SSIS pacakges to AWS Glue Studio with AWS
Schema Conversion Tool
You can use AWS SCT to convert Microsoft SQL Server Integration Services (SSIS) packages to AWS
Glue Studio.
An SSIS package includes the necessary components, such as the connection manager, tasks,
control flow, data flow, parameters, event handlers, and variables, to run a specific extract,
transform, and load (ETL) task. AWS SCT converts SSIS packages to a format compatible with
AWS Glue Studio. After you migrate your source database to the AWS Cloud, you can run these
converted AWS Glue Studio jobs to perform ETL tasks.
To convert Microsoft SSIS packages to AWS Glue Studio, make sure that you use AWS SCT version
1.0.661 or higher.
Topics
• Prerequisites
• Adding SSIS packages to your AWS SCT project
• Converting SSIS packages to AWS Glue Studio with AWS SCT
• Creating AWS Glue Studio jobs using the converted code
• Creating an assessment report for an SSIS package with AWS SCT
• SSIS components that AWS SCT can convert to AWS Glue Studio
Prerequisites
In this section, learn about the prerequisite tasks for the conversion of SSIS packages to AWS Glue.
These tasks include creating required AWS resources in your account.
You can use AWS Identity and Access Management (IAM) to define policies and roles that are
needed to access resources that AWS Glue Studio uses. For more information, see IAM permissions
for the AWS Glue Studio user.
After AWS SCT converts your source scripts to AWS Glue Studio, upload the converted scripts to
an Amazon S3 bucket. Make sure that you create this Amazon S3 bucket and select it in the AWS
service profile settings. For more information about creating an S3 bucket, see Create your first S3
bucket in the Amazon Simple Storage Service User Guide.
SSIS to AWS Glue Studio Version 1.0.672 347

AWS Schema Conversion Tool User Guide
To make sure that AWS Glue Studio can connect to your data store, create a custom connector and
a connection. Also, store database credentials in AWS Secrets Manager.
To create a custom connector
1. Download the JDBC driver for your data store. For more information about JDBC drivers that
AWS SCT uses, see Installing JDBC drivers for AWS Schema Conversion Tool.
2. Upload this driver file to your Amazon S3 bucket. For more information, see Upload an object
to your bucket in the Amazon Simple Storage Service User Guide.
3. Sign in to the AWS Management Console and open the AWS Glue Studio console at https://
console.aws.amazon.com/gluestudio/.
4. Choose Connectors, then choose Create custom connector.
5. For Connector S3 URL, choose Browse S3, and choose the JDBC driver file that you uploaded
to your Amazon S3 bucket.
6.
Enter a descriptive Name for your connector. For example, enter SQLServer.
7. For Connector type, choose JDBC.
8. For Class name, enter the name of the main class for your JDBC driver. For SQL Server, enter
com.microsoft.sqlserver.jdbc.SQLServerDriver.
9. For JDBC URL base, enter the JDBC base URL. The syntax of the JDBC base URL depends on
your source database engine. For SQL Server, use the following format: jdbc:sqlserver://
$<host>:$<port>;databaseName=$<dbname>;user=$<username>;password=
$<password>.
Make sure that you replace <host>, <port>, <dbname>, <username>, and <password> with
your values.
10.
For URL parameter delimiter, enter the semicolon (;).
11. Choose Create connector.
To store database credentials in AWS Secrets Manager
1. Sign in to the AWS Management Console and open the AWS Secrets Manager console at
https://console.aws.amazon.com/secretsmanager/.
2. Choose Store a new secret.
3. On the Choose secret type page, do the following:
Prerequisites Version 1.0.672 348

AWS Schema Conversion Tool User Guide
a. For Secret type, choose the Other type of secret.
b.
For Key/value pairs, enter the following keys: host, port, dbname, username, and
password.
Next, enter your values for these keys.
4. On the Configure secret page, enter a descriptive Secret name. For example, enter
SQL_Server_secret.
5. Choose Next. Then, on the Configure rotation page, choose Next again.
6. On the Review page, review your secret details, and then choose Store.
To create a connection for your connector
1. Sign in to the AWS Management Console and open the AWS Glue Studio console at https://
console.aws.amazon.com/gluestudio/.
2. Choose the connector for which you want to create a connection, and then choose Create
connection.
3. On the Create connection page, enter a descriptive Name for your connection. For example,
enter SQL-Server-connection.
4. For AWS Secret, choose the secret that you created in AWS Secrets Manager.
5. Configure Network options, then choose Create connection.
Now, you can create an AWS Glue Studio job with a custom connector. For more information, see
Creating AWS Glue Studio jobs.
Adding SSIS packages to your AWS SCT project
You can add multiple SSIS packages to a single AWS SCT project.
To add an SSIS package to your AWS SCT project
1. Create a new project with AWS SCT or open an existing project. For more information, see the
section called “Starting and Managing projects”.
2. Choose Add source from the menu, and then choose SQL Server Integration Services.
3. For Connection name, enter a name for your SSIS packages. AWS SCT displays this name in
the tree in the left panel.
Adding SSIS packages to your AWS SCT project Version 1.0.672 349

AWS Schema Conversion Tool User Guide
4. For SSIS packages folder, enter the path to the folder with source SSIS packages.
5. Choose Add target from the menu, and then choose AWS Glue Studio.
To connect to AWS Glue Studio, AWS SCT uses your AWS profile. For more information, see
Managing Profiles in the AWS Schema Conversion Tool.
6. Create a mapping rule, which includes your source SSIS package and your AWS Glue Studio
target. For more information, see Mapping data types in the AWS Schema Conversion Tool.
7. Create AWS Glue Studio connections in the AWS Glue Studio console. For more information,
see Creating connections for connectors.
8. Choose Connection managers in the left tree, open the context (right-click) menu, and then
choose Configure connections.
AWS SCT displays the Configure connections window.
9. For each source SSIS connection, choose an AWS Glue Studio connection.
Converting SSIS packages to AWS Glue Studio with AWS SCT
Following, find how to convert SSIS packages to AWS Glue Studio using AWS SCT.
To convert an SSIS package to AWS Glue Studio
1. Add your SSIS package to your AWS SCT project. For more information, see Adding SSIS
packages to your AWS SCT project.
2. In the left panel, expand the ETL and SSIS nodes.
3. Choose Packages, open the context (right-click) menu, and then choose Convert package.
AWS SCT converts your selected SSIS packages to JSON files. These JSON objects represent a
node in a directed acyclic graph (DAG). Find your converted files in the Package DAGs node in
the right tree.
4. Choose Package DAGs, open the context (right-click) menu, and then choose Save to Amazon
S3.
Now you can use these scripts to create jobs in the AWS Glue Studio.
Converting SSIS packages Version 1.0.672 350

AWS Schema Conversion Tool User Guide
Creating AWS Glue Studio jobs using the converted code
After you convert your source SSIS packages, you can use the converted JSON files to create AWS
Glue Studio jobs.
To create an AWS Glue Studio job
1. Choose Package DAGs in the right tree, open the context (right-click) menu, and then choose
Configure AWS Glue Studio job.
2. (Optional) Apply the extension pack that emulates SSIS functions in AWS Glue Studio.
3. The Configure AWS Glue Studio job window opens.
Complete the Basic job properties section:
• Name – Enter a name of your AWS Glue Studio job.
• Script file name – Enter a name of your job script.
• Job parameters – Add parameters and enter their values.
Choose Next.
4. Complete the Advanced job properties section:
• IAM Role – Choose the IAM role that is used for authorization to AWS Glue Studio and access
data stores.
• Script file S3 path – Enter the Amazon S3 path to your converted script.
• Temporary directory – Enter the Amazon S3 path to a temporary directory for intermediate
results. AWS Glue Studio uses this directory to read or write to Amazon Redshift.
• AWS SCT automatically generates the path for Python libraries. You can review this path in
Generated python library path. You can't edit this automatically generated path. To use
additional Python libraries, enter the path in User python library path.
• User python library path – Enter the paths for additional user Python libraries. Separate
Amazon S3 paths with commas.
•
Dependent jars path – Enter the paths for dependent *.jar files. Separate Amazon S3
paths with commas.
• Referenced files path – Enter the paths for additional files, such as configuration files, that
are required by your script. Separate Amazon S3 paths with commas.
•
Worker type – Choose G.1X or G.2X.
Creating AWS Glue Studio jobs Version 1.0.672 351

AWS Schema Conversion Tool User Guide
When you choose G.1X each worker maps to 1 DPU (4 vCPU, 16 GB of memory, and 64 GB
disk).
When you choose G.2X each worker maps to 2 DPU (8 vCPU, 32 GB of memory, and 128 GB
disk).
• Requested number of workers – Enter the number of workers that are allocated when the
job runs.
• Max concurrency – Enter the maximum number of concurrent runs that are allowed for this
job. The default is 1. AWS Glue returns an error when this threshold is reached.
• Job timeout (minutes) – Enter the timeout value on your ETL job as a safeguard against
runaway jobs. The default is 2,880 minutes (48 hours) for batch jobs. If the job exceeds this
limit, the job run state changes to TIMEOUT.
• Delay notification threshold (minutes) – Enter the threshold in minutes before AWS SCT
sends a delay notification.
• Number of retries – Enter the number of times (0–10) that AWS Glue should automatically
restart the job if it fails. Jobs that reach the timeout limit aren't restarted. The default is 0.
Choose Finish.
AWS SCT configures your selected AWS Glue Studio jobs.
5. Find your configured jobs under ETL jobs in the right tree. Choose your configured job, open
the context (right-click) menu, and then choose Create AWS Glue Studio job.
6. Choose Apply status and make sure that the Status value for your job is Success.
7. Open the AWS Glue Studio console, choose Refresh, and choose your job. Then choose Run.
Creating an assessment report for an SSIS package with AWS SCT
The ETL migration assessment report provides information about converting your SSIS packages to
a format compatible with AWS Glue Studio. The assessment report includes action items for the
components of your SSIS packages. These action items show which components AWS SCT can't
automatically convert.
To create an ETL migration assessment report
1. Expand the SSIS node under ETL in the left panel.
Creating an SSIS conversion assessment report Version 1.0.672 352

AWS Schema Conversion Tool User Guide
2. Choose Packages, open the context (right-click) menu, and then choose Create report.
3. View the Summary tab. Here, AWS SCT displays the executive summary information from the
ETL migration assessment report. It includes conversion results for all components of your SSIS
packages.
4. (Optional) Save a local copy of the ETL migration assessment report as either a PDF file or a
comma-separated values (CSV) file:
• To save the ETL migration assessment report as a PDF file, choose Save to PDF at upper
right.
The PDF file contains the executive summary, action items, and recommendations for scripts
conversion.
• To save the ETL migration assessment report as a CSV file, choose Save to CSV at upper
right.
AWS SCT creates three CSV files. These files contain action items, recommended actions, and
an estimated complexity of manual effort required to convert the scripts.
5. Choose the Action items tab. This tab contains a list of items that require manual conversion
to AWS Glue Studio. When you choose an action item from the list, AWS SCT highlights the
item from your source SSIS package that the action item applies to.
SSIS components that AWS SCT can convert to AWS Glue Studio
You can use AWS SCT to convert SSIS data flow components and parameters to AWS Glue Studio.
Supported data flow components include the following:
• ADO NET Destination
• ADO NET Source
• Aggregate
• Character Map
• Conditional Split
• Copy Column
• Data Conversion
• Derived Column
Supported SSIS components Version 1.0.672 353

AWS Schema Conversion Tool User Guide
• Lookup
• Merge
• Merge Join
• Multicast
• ODBCDestination
• ODBCSource
• OLEDBDestination
• OLEDBSource
• Row Count
• Sort
• SQL Server Destination
• Union All
AWS SCT can convert more SSIS components to AWS Glue. For more information, see SSIS
components that AWS SCT can convert to AWS Glue.
Converting Teradata BTEQ scripts to Amazon Redshift RSQL
with AWS SCT
You can use the AWS Schema Conversion Tool (AWS SCT) to convert Teradata Basic Teradata Query
(BTEQ) scripts to Amazon Redshift RSQL.
The following architecture diagram shows the database migration project that includes the
conversion of extract, transform, and load (ETL) scripts to Amazon Redshift RSQL.
Teradata BTEQ scripts Version 1.0.672 354
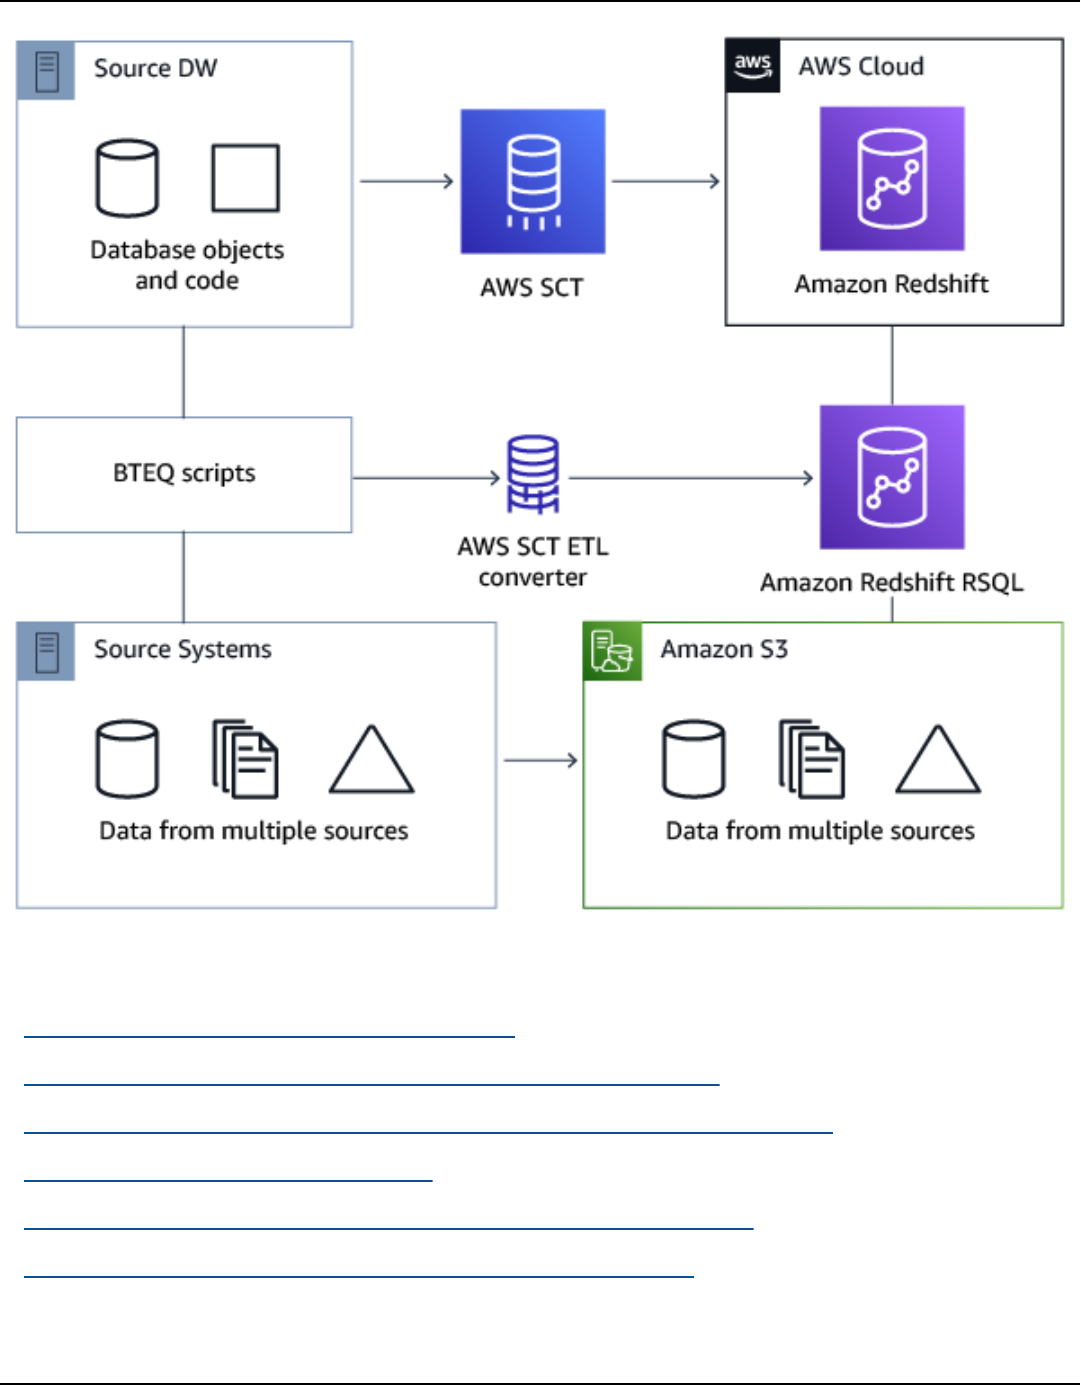
AWS Schema Conversion Tool User Guide
Topics
• Adding BTEQ scripts to your AWS SCT project
• Configuring substitution variables in BTEQ scripts with AWS SCT
• Converting Teradata BTEQ scripts to Amazon Redshift RSQL with AWS SCT
• Managing BTEQ scripts with AWS SCT
• Creating a BTEQ script conversion assessment report with AWS SCT
• Editing and saving your converted BTEQ scripts with AWS SCT
Teradata BTEQ scripts Version 1.0.672 355

AWS Schema Conversion Tool User Guide
Adding BTEQ scripts to your AWS SCT project
You can add multiple scripts to a single AWS SCT project.
To add a BTEQ script to your AWS SCT project
1. Create a new project in AWS SCT or open an existing project. For more information, see the
section called “Starting and Managing projects”.
2. Choose Add source from the menu, and then choose Teradata to add your source database to
the project. For more information, see Teradata databases.
3. Choose Add target from the menu to add a target Amazon Redshift database to your AWS SCT
project.
You can use a virtual Amazon Redshift target database platform. For more information, see
Mapping to virtual targets in the AWS Schema Conversion Tool.
4. Create a new mapping rule that includes your source Teradata database and your Amazon
Redshift target. For more information, see Mapping new data types in the AWS Schema
Conversion Tool.
5. On the View menu, choose Main view.
6. In the left panel, expand the Scripts node.
7. Choose BTEQ scripts, open the context (right-click) menu, and then choose Load scripts.
8. Enter the location of the source code for your Teradata BTEQ scripts and choose Select folder.
AWS SCT displays the Load scripts window.
9. Do one of the following:
a. If your Teradata BTEQ scripts don't include the substitution variables, choose No
substitution variables, and then choose OK to add scripts to your AWS SCT project.
b. If your Teradata BTEQ scripts include the substitution variables, configure the substitution
variables. For more information, see Configuring substitution variables in BTEQ scripts.
Configuring substitution variables in BTEQ scripts with AWS SCT
Your Teradata BTEQ scripts can include substitution variables. For example, you can use one
BTEQ script with substitution variables to run the same set of commands on multiple database
environments. You can use AWS SCT to configure substitution variables in your BTEQ scripts.
Adding BTEQ scripts to your AWS SCT project Version 1.0.672 356

AWS Schema Conversion Tool User Guide
Before you run a BTEQ script with substitution variables, make sure to assign the values for all
variables. To do this, you can use other tools or applications such as a Bash script, UC4 (Automic),
and so on. AWS SCT can resolve and convert substitution variables only after you assign their
values.
To configure substitution variables in your BTEQ script
1. Add your BTEQ scripts to your AWS SCT project. For more information, see Adding BTEQ
scripts to your AWS SCT project.
When you add your scripts, choose Substitution variables are used.
2. For Define variable format, enter a regular expression that matches all substitution variables
in your script.
For example, if the names of your substitution variables start with ${ and end with }, use the
\$\{\w+\} regular expression. To match substitution variables that start either with a dollar
sign or a percent sign, use the \$\w+|\%\w+ regular expression.
Regular expressions in AWS SCT conform to the Java regular expression syntax. For more
information, see java.util.regex Class Pattern in the Java documentation.
3. Choose OK to load scripts to your AWS SCT project, and then choose OK to close the Load
scripts window.
4. Choose Variables to view all discovered substitution variables and their values.
5. For Value, enter the value for the substitution variable.
Converting Teradata BTEQ scripts to Amazon Redshift RSQL with AWS
SCT
Following, find how to convert BTEQ ETL scripts to Amazon Redshift RSQL using AWS SCT.
To convert a Teradata BTEQ script to Amazon Redshift RSQL
1. Add your BTEQ scripts to your AWS SCT project. For more information, see Adding BTEQ
scripts to your AWS SCT project.
2. Configure the substitution variables. For more information, see Configuring substitution
variables in BTEQ scripts.
3. In the left panel, expand the Scripts node.
Converting BTEQ scripts Version 1.0.672 357

AWS Schema Conversion Tool User Guide
4. Do one of the following:
• To convert a single BTEQ script, expand the BTEQ scripts node, choose the script to convert,
and then choose Convert to RSQL from the context (right-click) menu.
• To covert multiple scripts, make sure that you select all scripts to convert. Then choose
BTEQ scripts, open the context (right-click) menu, and then choose Convert to RSQL under
Convert script.
AWS SCT converts all your selected Teradata BTEQ scripts to a format compatible with Amazon
Redshift RSQL. Find your converted scripts in the Scripts node in the target database panel.
5. Edit your converted Amazon Redshift RSQL scripts, or save them. For more information, see
Editing and saving your converted BTEQ scripts.
Managing BTEQ scripts with AWS SCT
You can add multiple BTEQ scripts or remove a BTEQ script from your AWS SCT project.
To add an additional BTEQ script to your AWS SCT project
1. Expand the Scripts node in the left panel.
2. Choose the BTEQ scripts node, and open the context (right-click) menu.
3. Choose Load scripts.
4. Enter the information that is required to add a new BTEQ script and configure substitution
variables. For more information, see Adding BTEQ scripts to your AWS SCT project and
Configuring substitution variables in BTEQ scripts.
To remove a BTEQ script from your AWS SCT project
1. Expand the BTEQ scripts node under Scripts in the left panel.
2. Choose the script to remove, and open the context (right-click) menu.
3. Choose Delete script.
Managing BTEQ scripts Version 1.0.672 358

AWS Schema Conversion Tool User Guide
Creating a BTEQ script conversion assessment report with AWS SCT
A BTEQ script conversion assessment report provides information about converting the BTEQ
commands and SQL statements from your BTEQ scripts to a format compatible with Amazon
Redshift RSQL. The assessment report includes action items for BTEQ commands and SQL
statements that AWS SCT can't convert.
To create a BTEQ script conversion assessment report
1. Expand the BTEQ scripts node under Scripts in the left panel.
2. Choose the script to convert, and open the context (right-click) menu.
3. Choose Conversion to RSQL under Create report.
4. View the Summary tab. The Summary tab displays the executive summary information from
the BTEQ script assessment report. It includes conversion results for all BTEQ commands and
SQL statements from your BTEQ scripts.
5. (Optional) Save a local copy of the BTEQ script conversion assessment report as either a PDF
file or a comma-separated values (CSV) file:
• To save the BTEQ script conversion assessment report as a PDF file, choose Save to PDF at
upper right.
The PDF file contains the executive summary, action items, and recommendations for scripts
conversion.
• To save the BTEQ script conversion assessment report as a CSV file, choose Save to CSV at
upper right.
The CSV file contains action items, recommended actions, and an estimated complexity of
manual effort required to convert the scripts.
6. Choose the Action items tab. This tab contains a list of items that require manual conversion
to Amazon Redshift RSQL. When you choose an action item from the list, AWS SCT highlights
the item from your source BTEQ script that the action item applies to.
Editing and saving your converted BTEQ scripts with AWS SCT
You can edit your converted scripts in the lower panel of your AWS SCT project. AWS SCT stores the
edited script as part of your project.
Creating a BTEQ script conversion assessment report Version 1.0.672 359

AWS Schema Conversion Tool User Guide
To save your converted scripts
1. Expand the RSQL scripts node under Scripts in the target database panel.
2. Choose your converted script, open the context (right-click) menu, and choose Save script.
3. Enter the path to the folder to save the converted script and choose Save.
AWS SCT saves the converted script to a file and opens this file.
Converting shell scripts with embedded BTEQ commands to
Amazon Redshift RSQL with AWS Schema Conversion Tool
You can use the AWS Schema Conversion Tool (AWS SCT) to convert shell scripts with embedded
Teradata Basic Teradata Query (BTEQ) commands to shell scripts with embedded Amazon Redshift
RSQL commands.
AWS SCT extracts Teradata BTEQ commands from your shell scripts and converts them to a format
compatible with Amazon Redshift. After you migrate the Teradata database to Amazon Redshift,
you can use these converted scripts to manage your new Amazon Redshift database.
You can also use AWS SCT to convert files with Teradata BTEQ ETL scripts to Amazon Redshift
RSQL. For more information, see Converting Teradata BTEQ scripts to Amazon Redshift RSQL with
AWS SCT.
Topics
• Adding shell scripts with embedded Teradata BTEQ commands to your AWS SCT project
• Configuring substitution variables in shell scripts with embedded Teradata BTEQ commands with
AWS SCT
• Converting shell scripts with embedded Teradata BTEQ commands with AWS SCT
• Managing shell scripts with embedded Teradata BTEQ commands with AWS SCT
• Creating an assessment report for a shell script conversion with AWS SCT
• Editing and saving your converted shell scripts with AWS SCT
Shell scripts Version 1.0.672 360

AWS Schema Conversion Tool User Guide
Adding shell scripts with embedded Teradata BTEQ commands to your
AWS SCT project
You can add multiple scripts to a single AWS SCT project.
To add a shell script to your AWS SCT project
1. Create a new project in AWS SCT or open an existing project. For more information, see the
section called “Starting and Managing projects”.
2. Choose Add source from the menu, and then choose Teradata to add your source database to
the project. For more information, see Teradata databases.
3. Choose Add target from the menu and to add a target Amazon Redshift database to your AWS
SCT project.
You can use a virtual Amazon Redshift target database platform. For more information, see
Mapping to virtual targets in the AWS Schema Conversion Tool.
4. Create a new mapping rule that includes your source Teradata database and your Amazon
Redshift target. For more information, see Mapping new data types in the AWS Schema
Conversion Tool.
5. On the View menu, choose Main view.
6. In the left panel, expand the Scripts node.
7. Choose Shell, open the context (right-click) menu, and then choose Load scripts.
8. Enter the location of your source shell scripts with embedded Teradata BTEQ commands and
choose Select folder.
AWS SCT displays the Load scripts window.
9. Do one of the following:
• If your shell scripts don't include the substitution variables, choose No substitution
variables, and then choose OK to add scripts to your AWS SCT project.
• If your shell scripts include the substitution variables, configure the substitution variables.
For more information, see Configuring substitution variables in shell scripts.
Adding shell scripts to your AWS SCT project Version 1.0.672 361

AWS Schema Conversion Tool User Guide
Configuring substitution variables in shell scripts with embedded
Teradata BTEQ commands with AWS SCT
Your shell scripts can include substitution variables. For example, you can use a single script with
substitution variables to manage databases in different environments. You can use AWS SCT to
configure substitution variables in your shell scripts.
Before you run BTEQ commands with substitution variables from a shell script, make sure to assign
the values for all variables inside this shell script. AWS SCT can resolve and convert substitution
variables only after you assign their values.
To configure substitution variables in your shell script
1. Add your source shell scripts to your AWS SCT project. For more information, see Adding shell
scripts to your AWS SCT project.
When you add your scripts, choose Substitution variables are used.
2. For Define variable format, enter a regular expression that matches all substitution variables
in your script.
For example, if the names of your substitution variables start with ${ and end with }, use the
\$\{\w+\} regular expression. To match substitution variables that start either with a dollar
sign or a percent sign, use the \$\w+|\%\w+ regular expression.
Regular expressions in AWS SCT conform to the Java regular expression syntax. For more
information, see java.util.regex Class Pattern in the Java documentation.
3. Choose OK to load scripts to your AWS SCT project, and then choose OK to close the Load
scripts window.
4. Choose Variables to view all discovered substitution variables and their values.
5. For Value, enter the value for the substitution variable.
Converting shell scripts with embedded Teradata BTEQ commands with
AWS SCT
Following, find how to convert shell scripts with embedded Teradata BTEQ commands to shell
scripts with embedded Amazon Redshift RSQL commands using AWS SCT.
Configuring substitution variables in shell scripts Version 1.0.672 362

AWS Schema Conversion Tool User Guide
To convert a shell script
1. Add your shell scripts to your AWS SCT project. For more information, see Adding shell scripts
to your AWS SCT project.
2. Configure the substitution variables. For more information, see Configuring substitution
variables in shell scripts.
3. In the left panel, expand the Scripts node.
4. Do one of the following:
• To convert BTEQ commands from a single shell script, expand the Shell node, choose the
script to convert, and then choose Convert script from the context (right-click) menu.
• To covert multiple scripts, make sure that you select all scripts to convert. Then choose
Shell, open the context (right-click) menu, and then choose Convert script.
5. Choose OK.
AWS SCT converts BTEQ commands in your selected shell scripts to a format compatible with
Amazon Redshift RSQL. Find your converted scripts in the Scripts node in the target database
panel.
6. Edit your converted Amazon Redshift RSQL scripts or save them. For more information, see
Editing and saving your converted shell scripts.
Managing shell scripts with embedded Teradata BTEQ commands with
AWS SCT
You can add multiple shell scripts or remove a shell script from your AWS SCT project.
To add a new shell script to your AWS SCT project
1. Expand the Scripts node in the left panel.
2. Choose the Shell node, and open the context (right-click) menu.
3. Choose Load scripts.
4. Enter the information that is required to add a new shell script and configure substitution
variables. For more information, see Adding shell scripts to your AWS SCT project and
Configuring substitution variables in shell scripts.
Managing shell scripts Version 1.0.672 363

AWS Schema Conversion Tool User Guide
To remove a shell script from your AWS SCT project
1. Expand the Shell node under Scripts in the left panel.
2. Choose the script to remove, and open the context (right-click) menu.
3. Choose Delete script.
Creating an assessment report for a shell script conversion with AWS
SCT
The shell script conversion assessment report provides information about converting the BTEQ
commands and SQL statements. The conversion is from your source scripts to a format compatible
with Amazon Redshift RSQL. The assessment report includes action items for BTEQ commands and
SQL statements that AWS SCT can't convert.
To create a shell script conversion assessment report
1. Expand the Shell node under Scripts in the left panel.
2. Choose the script to convert, open the context (right-click) menu, and then choose Create
report.
3. View the Summary tab. The Summary tab displays the executive summary information from
the shell script assessment report. It includes conversion results for all BTEQ commands and
SQL statements from your source scripts.
4. (Optional) Save a local copy of the shell script conversion assessment report as either a PDF
file or a comma-separated values (CSV) file:
• To save the shell script conversion assessment report as a PDF file, choose Save to PDF at
upper right.
The PDF file contains the executive summary, action items, and recommendations for scripts
conversion.
• To save the shell script conversion assessment report as a CSV file, choose Save to CSV at
upper right.
The CSV file contains action items, recommended actions, and an estimated complexity of
manual effort required to convert the scripts.
Creating a shell script conversion assessment report Version 1.0.672 364

AWS Schema Conversion Tool User Guide
5. Choose the Action items tab. This tab contains a list of items that require manual conversion
to Amazon Redshift RSQL. When you select an action item from the list, AWS SCT highlights
the item from your source shell script that the action item applies to.
Editing and saving your converted shell scripts with AWS SCT
You can edit your converted scripts in the lower panel of your AWS SCT project. AWS SCT stores the
edited script as part of your project.
To save your converted scripts
1. Expand the RSQL scripts node under Scripts in the target database panel.
2. Choose your converted script, open the context (right-click) menu, and choose Save script.
3. Enter the path to the folder to save the converted script and choose Save.
AWS SCT saves the converted script to a file and opens this file.
Converting FastExport scripts to Amazon Redshift RSQL with
AWS Schema Conversion Tool
You can use the AWS Schema Conversion Tool (AWS SCT) to convert Teradata FastExport job scripts
to Amazon Redshift RSQL.
A FastExport job script is a set of FastExport commands and SQL statements that select and export
data from the Teradata database. AWS SCT converts FastExport commands and SQL statements
to a format compatible with Amazon Redshift RSQL. After you migrate the Teradata database to
Amazon Redshift, you can use these converted scripts to export data from the Amazon Redshift
database.
Topics
• Adding FastExport job scripts to your AWS SCT project
• Configuring substitution variables in Teradata FastExport job scripts with AWS SCT
• Converting Teradata FastExport job scripts with AWS SCT
• Managing Teradata FastExport job scripts with AWS SCT
• Creating an assessment report for a Teradata FastExport job script conversion with AWS SCT
Editing and saving your converted shell scripts Version 1.0.672 365

AWS Schema Conversion Tool User Guide
• Editing and saving your converted Teradata FastExport job scripts with AWS SCT
Adding FastExport job scripts to your AWS SCT project
You can add multiple scripts to a single AWS SCT project.
To add a FastExport job script to your AWS SCT project
1. Create a new project in AWS SCT or open an existing project. For more information, see the
section called “Starting and Managing projects”.
2. Choose Add source from the menu, and then choose Teradata to add your source database to
the project. For more information, see Teradata databases.
3. Choose Add target from the menu and to add a target Amazon Redshift database to your AWS
SCT project.
You can use a virtual Amazon Redshift target database platform. For more information, see
Mapping to virtual targets in the AWS Schema Conversion Tool.
4. Create a new mapping rule that includes your source Teradata database and your Amazon
Redshift target. For more information, see Mapping new data types in the AWS Schema
Conversion Tool.
5. On the View menu, choose Main view.
6. In the left panel, expand the Scripts node.
7. Choose FastExport, open the context (right-click) menu, and then choose Load scripts.
8. Enter the location of the source code for your Teradata FastExport job scripts and choose
Select folder.
AWS SCT displays the Load scripts window.
9. Do one of the following:
• If your Teradata FastExport job scripts don't include the substitution variables, choose No
substitution variables and then choose OK to add scripts to your AWS SCT project.
• If your Teradata FastExport job scripts include the substitution variables, configure the
substitution variables. For more information, see Configuring substitution variables in
FastExport job scripts.
Adding FastExport job scripts to your AWS SCT project Version 1.0.672 366

AWS Schema Conversion Tool User Guide
Configuring substitution variables in Teradata FastExport job scripts
with AWS SCT
Your Teradata FastExport job scripts can include substitution variables. For example, you can use a
single script with substitution variables to export data from multiple databases. You can use AWS
SCT to configure substitution variables in your Teradata scripts.
Before you run a FastExport job script with substitution variables, make sure to assign the values
for all variables. To do this, you can use other tools or applications such as a Bash script, UC4
(Automic), and so on. AWS SCT can resolve and convert substitution variables only after you assign
their values.
To configure substitution variables in your FastExport job script
1. Add your source Teradata FastExport job scripts to your AWS SCT project. For more
information, see Adding BTEQ scripts to your AWS SCT project.
When you add your scripts, choose Substitution variables are used.
2. For Define variable format, enter a regular expression that matches all substitution variables
in your script.
For example, if the names of your substitution variables start with ${ and end with }, use the
\$\{\w+\} regular expression. To match substitution variables that start either with a dollar
sign or a percent sign, use the \$\w+|\%\w+ regular expression.
Regular expressions in AWS SCT conform to the Java regular expression syntax. For more
information, see java.util.regex Class Pattern in the Java documentation.
3. Choose OK to load scripts to your AWS SCT project, and then choose OK to close the Load
scripts window.
4. In the left panel, expand the Scripts node. Choose FastExport, and then choose your folder
with scripts. Open the context (right-click) menu, and then choose Export variables under
Substitution variables.
5. Export substitution variables for one script. Expand your folder with scripts, choose your
script, open the context (right-click) menu, and choose Export variables under Substitution
variables.
6. Enter the name of the comma-separated values (CSV) file to save the substitution variables
and choose Save.
Configuring substitution variables in FastExport job scripts Version 1.0.672 367

AWS Schema Conversion Tool User Guide
7. Open this CSV file and fill in the values for the substitution variables.
Depending on the operating system, AWS SCT uses different formats for CSV files. The values
in the file might be either enclosed in quotation marks or not. Make sure that you use the
same format for the values of substitution variables as the other values in the file. AWS SCT
can't import the CSV file with values in different formats.
8. Save the CSV file.
9. In the left panel, expand the Scripts node. Choose FastExport, and then choose your script.
Open the context (right-click) menu, and then choose Import variables under Substitution
variables.
10. Choose your CSV file, and then choose Open.
11. Choose Variables to view all discovered substitution variables and their values.
Converting Teradata FastExport job scripts with AWS SCT
Following, find how to convert Teradata FastExport job to Amazon Redshift RSQL using AWS SCT.
To convert a Teradata FastExport job script to Amazon Redshift RSQL
1. Add your FastExport job scripts to your AWS SCT project. For more information, see Adding
FastExport job scripts to your AWS SCT project.
2. Configure the substitution variables. For more information, see Configuring substitution
variables in FastExport job scripts.
3. In the left panel, expand the Scripts node.
4. Do one of the following:
• To convert a single FastExport job script, expand the FastExport node, choose the script to
convert, and then choose Convert script from the context (right-click) menu.
• To covert multiple scripts, make sure that you select all scripts to convert. Then choose
FastExport, open the context (right-click) menu, and then choose Convert script.
AWS SCT converts all your selected Teradata FastExport job scripts to a format compatible
with Amazon Redshift RSQL. Find your converted scripts in the Scripts node in the target
database panel.
Converting FastExport job scripts Version 1.0.672 368

AWS Schema Conversion Tool User Guide
5. Edit your converted Amazon Redshift RSQL scripts or save them. For more information, see
Editing and saving your converted FastExport job scripts.
Managing Teradata FastExport job scripts with AWS SCT
You can add multiple Teradata FastExport job scripts or remove a FastExport job script from your
AWS SCT project.
To add a new FastExport job script to your AWS SCT project
1. Expand the Scripts node in the left panel.
2. Choose the FastExport node, and open the context (right-click) menu.
3. Choose Load scripts.
4. Enter the information that is required to add a new FastExport job script and configure
substitution variables. For more information, see Adding FastExport job scripts to your AWS
SCT project and Configuring substitution variables in FastExport job scripts.
To remove a FastExport job script from your AWS SCT project
1. Expand the FastExport node under Scripts in the left panel.
2. Choose the script to remove, and open the context (right-click) menu.
3. Choose Delete script.
Creating an assessment report for a Teradata FastExport job script
conversion with AWS SCT
The FastExport job script conversion assessment report provides information about converting the
FastExport commands and SQL statements from your FastExport scripts to a format compatible
with Amazon Redshift RSQL. The assessment report includes action items for FastExport
commands and SQL statements that AWS SCT can't convert.
To create a script conversion assessment report for a Teradata FastExport job
1. Expand the FastExport node under Scripts in the left panel.
2. Choose the script to convert, open the context (right-click) menu, and then choose Create
report.
Managing FastExport job scripts Version 1.0.672 369

AWS Schema Conversion Tool User Guide
3. View the Summary tab. The Summary tab displays the executive summary information from
the FastExport job script assessment report. It includes conversion results for all FastExport
commands and SQL statements from your source scripts.
4. You can save a local copy of the FastExport job script conversion assessment report as either a
PDF file or a comma-separated values (CSV) file.
a. To save the FastExport job script conversion assessment report as a PDF file, choose Save
to PDF at upper right.
The PDF file contains the executive summary, action items, and recommendations for
scripts conversion.
b. To save the FastExport job script conversion assessment report as a CSV file, choose Save
to CSV at upper right.
The CSV file contains action items, recommended actions, and an estimated complexity of
manual effort required to convert the scripts.
5. Choose the Action items tab. This tab contains a list of items that require manual conversion
to Amazon Redshift RSQL. When you select an action item from the list, AWS SCT highlights
the item from your source FastExport job script that the action item applies to.
Editing and saving your converted Teradata FastExport job scripts with
AWS SCT
You can edit your converted scripts in the lower panel of your AWS SCT project. AWS SCT stores the
edited script as part of your project.
To save your converted scripts
1. Expand the RSQL scripts node under Scripts in the target database panel.
2. Choose your converted script, open the context (right-click) menu, and choose Save script.
3. Enter the path to the folder to save the converted script and choose Save.
AWS SCT saves the converted script to a file and opens this file.
Editing and saving your converted FastExport job scripts Version 1.0.672 370

AWS Schema Conversion Tool User Guide
Converting FastLoad job scripts to Amazon Redshift RSQL with
AWS Schema Conversion Tool
You can use the AWS Schema Conversion Tool (AWS SCT) to convert Teradata FastLoad job scripts
to Amazon Redshift RSQL.
A Teradata FastLoad script is a set of commands that use multiple sessions to load data in an
empty table on a Teradata Database. Teradata FastLoad processes a series of Teradata FastLoad
commands and SQL statements. The Teradata FastLoad commands provide session control and
data handling of the data transfers. The SQL statements create, maintain, and drop tables.
AWS SCT converts Teradata FastLoad commands and SQL statements to a format compatible with
Amazon Redshift RSQL. After you migrate the Teradata database to Amazon Redshift, you can use
these converted scripts to load data to your Amazon Redshift database.
Topics
• Adding FastLoad job scripts to your AWS SCT project
• Configuring substitution variables in Teradata FastLoad job scripts with AWS SCT
• Converting Teradata FastLoad job scripts with AWS SCT
• Managing Teradata FastLoad job scripts with AWS SCT
• Creating an assessment report for a Teradata FastLoad job script conversion with AWS SCT
• Editing and saving your converted Teradata FastLoad job scripts with AWS SCT
Adding FastLoad job scripts to your AWS SCT project
You can add multiple scripts to a single AWS SCT project.
To add a FastLoad job script to your AWS SCT project
1. Create a new project in AWS SCT, or open an existing project. For more information, see the
section called “Starting and Managing projects”.
2. Choose Add source from the menu, and then choose Teradata to add your source database to
the project. For more information, see Teradata databases.
3. Choose Add target from the menu and add a target Amazon Redshift database to your AWS
SCT project.
FastLoad scripts Version 1.0.672 371

AWS Schema Conversion Tool User Guide
You can use a virtual Amazon Redshift target database platform. For more information, see
Mapping to virtual targets in the AWS Schema Conversion Tool.
4. Create a new mapping rule that includes your source Teradata database and your Amazon
Redshift target. For more information, see Mapping new data types in the AWS Schema
Conversion Tool.
5. On the View menu, choose Main view.
6. In the left panel, expand the Scripts node.
7. Choose FastLoad, open the context (right-click) menu, and then choose Load scripts.
8. Enter the location of your source Teradata FastLoad job scripts and choose Select folder.
AWS SCT displays the Load scripts window.
9. Do one of the following:
• If your Teradata FastLoad job scripts don't include the substitution variables, choose No
substitution variables, and then choose OK to add scripts to your AWS SCT project.
• If your Teradata FastLoad job scripts include the substitution variables, configure the
substitution variables. For more information, see Configuring substitution variables in
FastLoad job scripts.
Configuring substitution variables in Teradata FastLoad job scripts with
AWS SCT
Your Teradata FastLoad job scripts might include substitution variables. For example, you can use a
single script with substitution variables to load data to different databases.
Before you run a FastLoad job script with substitution variables, make sure to assign the values
for all variables. To do this, you can use other tools or applications such as a Bash script, UC4
(Automic), and so on.
AWS SCT can resolve and convert substitution variables only after you assign their values. Before
you start the conversion of your source Teradata FastLoad job scripts, make sure that you assign
values for all substitution variables. You can use AWS SCT to configure substitution variables in
your Teradata scripts.
Configuring substitution variables in FastLoad job scripts Version 1.0.672 372

AWS Schema Conversion Tool User Guide
To configure substitution variables in your FastLoad job script
1. When you add your source Teradata FastLoad job scripts to your AWS SCT project, choose
Substitution variables are used. For more information about adding these scripts, see Adding
FastLoad job scripts to your AWS SCT project.
2. For Define variable format, enter a regular expression that matches all substitution variables
in your script.
For example, if the names of your substitution variables start with ${ and end with }, use the
\$\{\w+\} regular expression. To match substitution variables that start either with a dollar
sign or a percent sign, use the \$\w+|\%\w+ regular expression.
Regular expressions in AWS SCT conform to the Java regular expression syntax. For more
information, see java.util.regex Class Pattern in the Java documentation.
3. Choose OK to load scripts to your AWS SCT project, and then choose OK to close the Load
scripts window.
4. In the left panel, expand the Scripts node. Choose FastLoad, and then choose your folder
with scripts. Open the context (right-click) menu, and then choose Export variables under
Substitution variables.
Also, you can export substitution variables for one script. Expand your folder with scripts,
choose your script, open the context (right-click) menu, and choose Export variables under
Substitution variables.
5. Enter the name of the comma-separated value (CSV) file to save the substitution variables, and
then choose Save.
6. Open this CSV file and fill in the values for the substitution variables.
Depending on the operating system, AWS SCT uses different formats for the CSV file. The
values in the file might be either enclosed in quotation marks or not. Make sure that you use
the same format for the values of substitution variables as the other values in the file. AWS
SCT can't import the CSV file with values in different formats.
7. Save the CSV file.
8. In the left panel, expand the Scripts node. Choose FastLoad, and then choose your script.
Open the context (right-click) menu, and then choose Import variables under Substitution
variables.
9. Choose your CSV file, and then choose Open.
Configuring substitution variables in FastLoad job scripts Version 1.0.672 373

AWS Schema Conversion Tool User Guide
10. Choose Variables to view all discovered substitution variables and their values.
Converting Teradata FastLoad job scripts with AWS SCT
Following, find how to convert Teradata FastLoad job to Amazon Redshift RSQL using AWS SCT.
To convert a Teradata FastLoad job script to Amazon Redshift RSQL
1. Add your FastLoad job scripts to your AWS SCT project. For more information, see Adding
FastLoad job scripts to your AWS SCT project.
2. Configure the substitution variables. For more information, see Configuring substitution
variables in FastLoad job scripts.
3. In the left panel, expand the Scripts node.
4. Do one of the following:
• To convert a single FastLoad job script, expand the FastLoad node, choose the script to
convert, and then choose Convert script from the context (right-click) menu.
• To covert multiple scripts, make sure that you select all scripts to convert. Choose FastLoad,
open the context (right-click) menu, and then choose Convert script. Then do one of the
following:
• If you store your source data file on Amazon S3, choose S3 object path for Source data
file location.
Enter values for Amazon S3 bucket folder and Amazon S3 bucket for manifest file for
your source data file.
• If you don't store your source data file on Amazon S3, choose Host address for Source
data file location.
Enter values for URL or IP address of the host, Host user login name, and Amazon S3
bucket for manifest file for your source data file.
5. Choose OK.
AWS SCT converts all your selected Teradata FastLoad job scripts to a format compatible with
Amazon Redshift RSQL. Find your converted scripts in the Scripts node in the target database
panel.
6. Edit your converted Amazon Redshift RSQL scripts or save them. For more information, see
Editing and saving your converted FastLoad job scripts.
Converting FastLoad job scripts Version 1.0.672 374

AWS Schema Conversion Tool User Guide
Managing Teradata FastLoad job scripts with AWS SCT
You can add multiple Teradata FastLoad job scripts or remove a FastLoad job script from your AWS
SCT project.
To add a new FastLoad job script to your AWS SCT project
1. Expand the Scripts node in the left panel.
2. Choose the FastLoad node and open the context (right-click) menu.
3. Choose Load scripts.
4. Enter the information that is required to add a new FastLoad job script and configure
substitution variables. For more information, see Adding FastLoad job scripts to your AWS SCT
project and Configuring substitution variables in FastLoad job scripts.
To remove a FastLoad job script from your AWS SCT project
1. Expand the FastLoad node under Scripts in the left panel.
2. Choose the script to remove, and open the context (right-click) menu.
3. Choose Delete script.
Creating an assessment report for a Teradata FastLoad job script
conversion with AWS SCT
The FastLoad job script conversion assessment report provides information about converting the
FastLoad commands and SQL statements. The conversion is from your source scripts to a format
compatible with Amazon Redshift RSQL. The assessment report includes action items for FastLoad
commands and SQL statements that AWS SCT can't convert.
To create a script conversion assessment report for a Teradata FastLoad job
1. Expand the FastLoad node under Scripts in the left panel.
2. Choose the script to convert, open the context (right-click) menu, and then choose Create
report.
3. View the Summary tab.
Managing FastLoad job scripts Version 1.0.672 375

AWS Schema Conversion Tool User Guide
The Summary tab displays the executive summary information from the FastLoad job
script assessment report. It includes conversion results for all FastLoad commands and SQL
statements from your source scripts.
4. (Optional) Save a local copy of the FastLoad job script conversion assessment report as either a
PDF file or a comma-separated value (CSV) file:
• To save the FastLoad job script conversion assessment report as a PDF file, choose Save to
PDF at upper right.
The PDF file contains the executive summary, action items, and recommendations for script
conversion.
• To save the FastLoad job script conversion assessment report as a CSV file, choose Save to
CSV at upper right.
The CSV file contains action items, recommended actions, and an estimated complexity of
manual effort required to convert the scripts.
5. Choose the Action items tab. This tab contains a list of items that require manual conversion
to Amazon Redshift RSQL. When you select an action item from the list, AWS SCT highlights
the item from your source FastLoad job script that the action item applies to.
Editing and saving your converted Teradata FastLoad job scripts with
AWS SCT
You can edit your converted scripts in the lower panel of your AWS SCT project. AWS SCT stores the
edited script as part of your project.
To save your converted scripts
1. Expand the RSQL scripts node under Scripts in the target database panel.
2. Choose your converted script, open the context (right-click) menu, and choose Save script.
3. Enter the path to the folder to save the converted script and choose Save.
AWS SCT saves the converted script to a file and opens this file.
Editing and saving your converted FastLoad job scripts Version 1.0.672 376

AWS Schema Conversion Tool User Guide
Converting MultiLoad scripts to Amazon Redshift RSQL with
AWS Schema Conversion Tool
You can use AWS SCT to convert Teradata MultiLoad job scripts to Amazon Redshift RSQL.
A Teradata MultiLoad job script is a set of commands for batch maintenance of your Teradata
Database. A Teradata MultiLoad import task performs a number of different insert, update, and
delete operations on up to five different tables and views. Teradata MultiLoad delete tasks can
remove large numbers of rows from a single table.
AWS SCT converts Teradata MultiLoad commands and SQL statements to a format compatible with
Amazon Redshift RSQL. After you migrate the Teradata database to Amazon Redshift, use these
converted scripts to manage data in your Amazon Redshift database.
Topics
• Adding MultiLoad job scripts to your AWS SCT project
• Configuring substitution variables in Teradata MultiLoad job scripts with AWS SCT
• Converting Teradata MultiLoad job scripts with AWS SCT
• Managing Teradata MultiLoad job scripts with AWS SCT
• Creating an assessment report for a Teradata MultiLoad job script conversion with AWS SCT
• Editing and saving your converted Teradata MultiLoad job scripts with AWS SCT
Adding MultiLoad job scripts to your AWS SCT project
You can add multiple scripts to a single AWS SCT project.
To add a MultiLoad job script to your AWS SCT project
1. Create a new project in AWS SCT or open an existing project. For more information, see the
section called “Starting and Managing projects”.
2. Choose Add source from the menu, and then choose Teradata to add your source database to
the project. For more information, see Teradata databases.
3. Choose Add target from the menu and to add a target Amazon Redshift database to your AWS
SCT project.
MultiLoad scripts Version 1.0.672 377

AWS Schema Conversion Tool User Guide
You can use a virtual Amazon Redshift target database platform. For more information, see
Mapping to virtual targets in the AWS Schema Conversion Tool.
4. Create a new mapping rule that includes your source Teradata database and your Amazon
Redshift target. For more information, see Mapping new data types in the AWS Schema
Conversion Tool.
5. On the View menu, choose Main view.
6. In the left panel, expand the Scripts node.
7. Choose MultiLoad, open the context (right-click) menu, and then choose Load scripts.
8. Enter the location of your source Teradata MultiLoad job scripts and choose Select folder.
AWS SCT displays the Load scripts window.
9. Do one of the following:
• If your Teradata MultiLoad job scripts don't include the substitution variables, choose No
substitution variables, and then choose OK to add scripts to your AWS SCT project.
• If your Teradata MultiLoad job scripts include the substitution variables, configure the
substitution variables. For more information, see Configuring substitution variables in
MultiLoad job scripts.
Configuring substitution variables in Teradata MultiLoad job scripts
with AWS SCT
Your Teradata MultiLoad job scripts might include substitution variables. For example, you can use
a single script with substitution variables to load data to different databases.
Before you run a MultiLoad job script with substitution variables, make sure to assign the values
for all variables. To do this, you can use other tools or applications such as a Bash script, UC4
(Automic), and so on.
AWS SCT can resolve and convert substitution variables only after you assign their values. Before
you start the conversion of your source Teradata MultiLoad job scripts, make sure that you assigned
values for all substitution variables. You can use AWS SCT to configure substitution variables in
your Teradata scripts.
Configuring substitution variables in MultiLoad job scripts Version 1.0.672 378

AWS Schema Conversion Tool User Guide
To configure substitution variables in your MultiLoad job script
1. When you add your source Teradata MultiLoad job scripts to your AWS SCT project, choose
Substitution variables are used. For more information about adding these scripts, see Adding
MultiLoad job scripts to your AWS SCT project.
2. For Define variable format, enter a regular expression that matches all substitution variables
in your script.
For example, if the names of your substitution variables start with ${ and end with }, use the
\$\{\w+\} regular expression. To match substitution variables that start either with a dollar
sign or a percent sign, use the \$\w+|\%\w+ regular expression.
Regular expressions in AWS SCT conform to the Java regular expression syntax. For more
information, see java.util.regex Class Pattern in the Java documentation.
3. Choose OK to load scripts to your AWS SCT project, and then choose OK to close the Load
scripts window.
4. Choose Variables to view all discovered substitution variables and their values.
5. For Value, enter the value for the substitution variable.
Converting Teradata MultiLoad job scripts with AWS SCT
Following, find how to convert Teradata MultiLoad job to Amazon Redshift RSQL using AWS SCT.
To convert a Teradata MultiLoad job script to Amazon Redshift RSQL
1. Add your MultiLoad job scripts to your AWS SCT project. For more information, see Adding
MultiLoad job scripts to your AWS SCT project.
2. Configure the substitution variables and enter their values. For more information, see
Configuring substitution variables in MultiLoad job scripts.
3. In the left panel, expand the Scripts node.
4. Do one of the following:
• To convert a single MultiLoad job script, expand the MultiLoad node, choose the script to
convert, and then choose Convert script from the context (right-click) menu.
• To covert multiple scripts, make sure that you select all scripts to convert. Choose
MultiLoad, open the context (right-click) menu, and then choose Convert script.
Converting MultiLoad job scripts Version 1.0.672 379

AWS Schema Conversion Tool User Guide
5. Do one of the following:
• If you store your source data file on Amazon S3, choose S3 object path for Source data file
location.
Enter Amazon S3 bucket folder and Amazon S3 bucket for manifest file for your source
data file.
• If you don't store your source data file on Amazon S3, choose Host address for Source data
file location.
Enter URL or IP address of the host, Host user login name, and Amazon S3 bucket for
manifest file for your source data file.
6. Choose OK.
AWS SCT converts all your selected Teradata MultiLoad job scripts to a format compatible with
Amazon Redshift RSQL. Find your converted scripts in the Scripts node in the target database
panel.
7. Edit your converted Amazon Redshift RSQL scripts or save them. For more information, see
Editing and saving your converted MultiLoad job scripts.
Managing Teradata MultiLoad job scripts with AWS SCT
You can add multiple Teradata MultiLoad job scripts or remove a MultiLoad job script from your
AWS SCT project.
To add a new MultiLoad job script to your AWS SCT project
1. Expand the Scripts node in the left panel.
2. Choose the MultiLoad node and open the context (right-click) menu.
3. Choose Load scripts.
4. Enter the information that is required to add a new MultiLoad job script and configure
substitution variables. For more information, see Adding MultiLoad job scripts to your AWS
SCT project and Configuring substitution variables in MultiLoad job scripts.
To remove a MultiLoad job script from your AWS SCT project
1. Expand the MultiLoad node under Scripts in the left panel.
Managing MultiLoad job scripts Version 1.0.672 380

AWS Schema Conversion Tool User Guide
2. Choose the script to remove, and open the context (right-click) menu.
3. Choose Delete script.
Creating an assessment report for a Teradata MultiLoad job script
conversion with AWS SCT
The MultiLoad job script conversion assessment report provides information about converting the
MultiLoad commands and SQL statements. The conversion is from your source scripts to Amazon
Redshift RSQL commands and SQL statements for Amazon Redshift. The assessment report
includes action items for MultiLoad commands and SQL statements that AWS SCT can't convert.
To create a script conversion assessment report for a Teradata MultiLoad job
1. Expand the MultiLoad node under Scripts in the left panel.
2. Choose the scripts to create the assessment report for, open the context (right-click) menu,
and then choose Create report.
3. View the Summary tab. The Summary tab displays the executive summary information from
the MultiLoad job script assessment report. It includes conversion results for all MultiLoad
commands and SQL statements from your source scripts.
4. (Optional) Save a local copy of the MultiLoad job script conversion assessment report as either
a PDF file or comma-separated value (CSV) files:
• To save the MultiLoad job script conversion assessment report as a PDF file, choose Save to
PDF at upper right.
The PDF file contains the executive summary, action items, and recommendations for scripts
conversion.
• To save the MultiLoad job script conversion assessment report as CSV files, choose Save to
CSV at upper right.
AWS SCT creates two CSV files. These files contain the executive summary, action items,
recommended actions, and an estimated complexity of manual effort required to convert
the scripts.
5. Choose the Action items tab. This tab contains a list of items that require manual conversion
to Amazon Redshift RSQL. When you select an action item from the list, AWS SCT highlights
the item from your source MultiLoad job script that the action item applies to.
Creating a MultiLoad job script conversion assessment report Version 1.0.672 381

AWS Schema Conversion Tool User Guide
Editing and saving your converted Teradata MultiLoad job scripts with
AWS SCT
You can edit your converted scripts in the lower panel of your AWS SCT project. AWS SCT stores the
edited script as part of your project.
To save your converted scripts
1. Expand the RSQL scripts node under Scripts in the target database panel.
2. Choose your converted script, open the context (right-click) menu, and choose Save script.
3. Enter the path to the folder to save the converted script and choose Save.
AWS SCT saves the converted script to a file and opens this file.
Editing and saving your converted MultiLoad job scripts Version 1.0.672 382

AWS Schema Conversion Tool User Guide
Migrating big data frameworks with AWS Schema
Conversion Tool
You can use the AWS Schema Conversion Tool (AWS SCT) to migrate big data frameworks to the
AWS Cloud.
Currently, AWS SCT supports the migration of Hadoop clusters to Amazon EMR and Amazon S3.
This migration process includes Hive and HDFS services.
Also, you can use AWS SCT to automate the conversion of your Apache Oozie orchestration
workflows to AWS Step Functions.
Topics
• Migrating Hadoop workloads to Amazon EMR with AWS Schema Conversion Tool
• Converting Oozie workflowas to AWS Step Functions with AWS Schema Conversion Tool
Migrating Hadoop workloads to Amazon EMR with AWS
Schema Conversion Tool
To migrate Apache Hadoop clusters, make sure that you use AWS SCT version 1.0.670 or higher.
Also, familiarize yourself with the command line interface (CLI) of AWS SCT. For more information,
see CLI Reference for AWS Schema Conversion Tool.
Topics
• Migration overview
• Step 1: Connect to your Hadoop clusters
• Step 2: Set up the mapping rules
• Step 3: Create an assessment report
• Step 4: Migrate your Apache Hadoop cluster to Amazon EMR with AWS SCT
• Running your CLI script
• Managing your big data migration project
Migrating Hadoop workloads Version 1.0.672 383
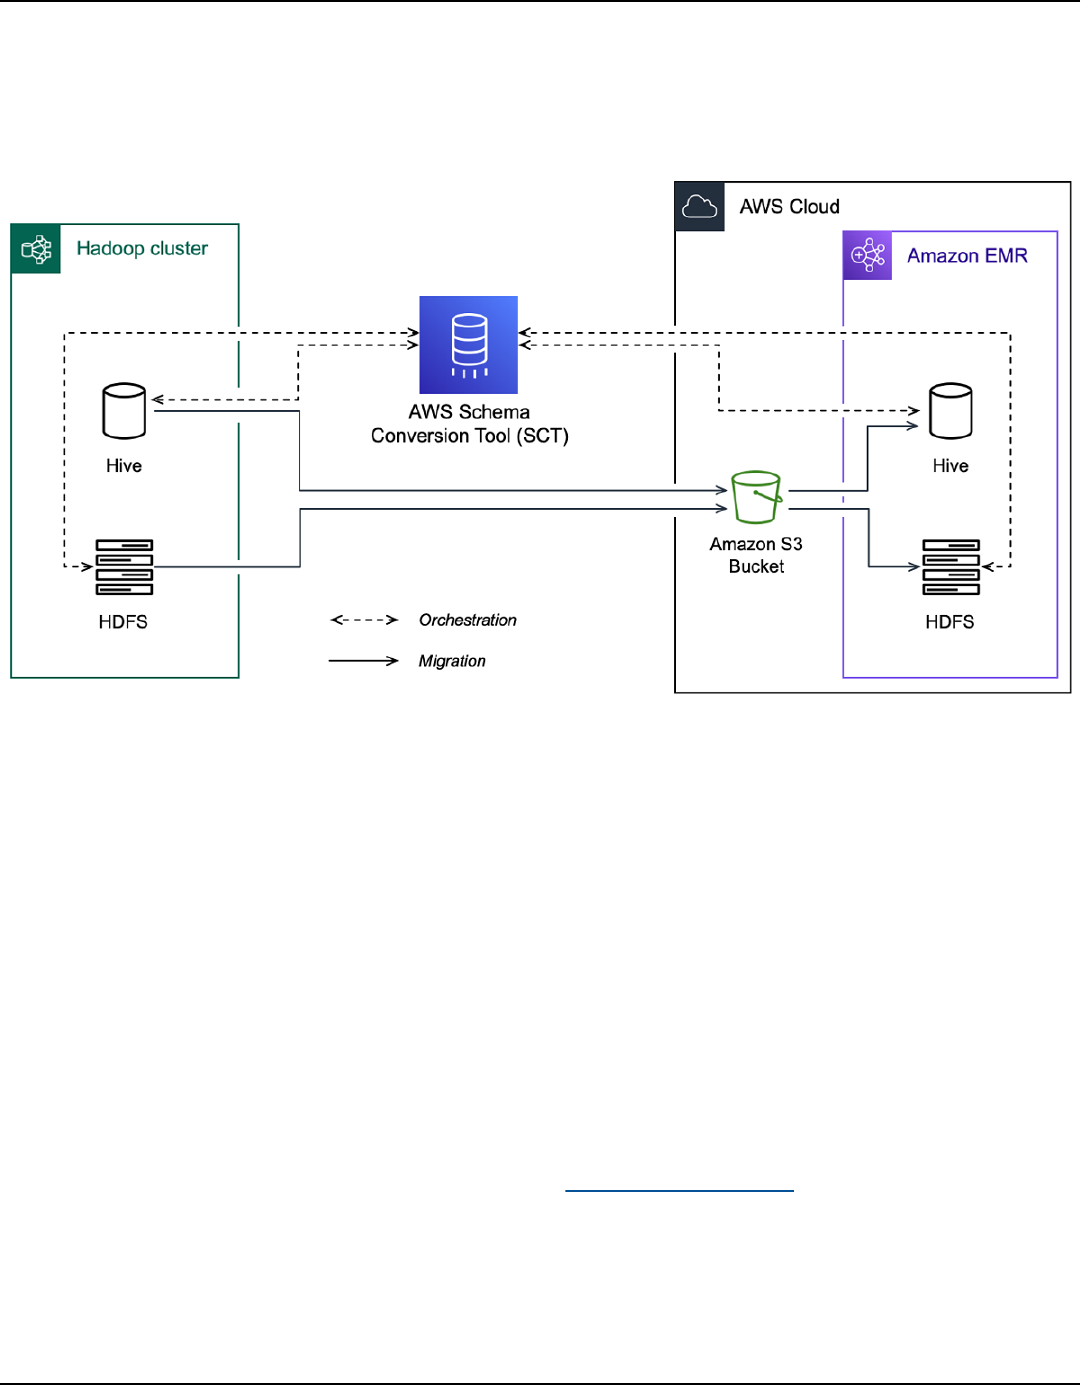
AWS Schema Conversion Tool User Guide
Migration overview
The following image shows the architecture diagram of the migration from Apache Hadoop to
Amazon EMR.
AWS SCT migrates data and metadata from your source Hadoop cluster to an Amazon S3 bucket.
Next, AWS SCT uses your source Hive metadata to create database objects in the target Amazon
EMR Hive service. Optionally, you can configure Hive to use the AWS Glue Data Catalog as its
metastore. In this case, AWS SCT migrates your source Hive metadata to the AWS Glue Data
Catalog.
Then, you can use AWS SCT to migrate the data from an Amazon S3 bucket to your target Amazon
EMR HDFS service. Alternatively, you can leave the data in your Amazon S3 bucket and use it as a
data repository for your Hadoop workloads.
To start the Hapood migration, you create and run your AWS SCT CLI script. This script includes
the complete set of commands to run the migration. You can download and edit a template of the
Hadoop migration script. For more information, see Getting CLI scenarios.
Make sure that your script includes the following steps so that you can run your migration from
Apache Hadoop to Amazon S3 and Amazon EMR.
Overview Version 1.0.672 384

AWS Schema Conversion Tool User Guide
Step 1: Connect to your Hadoop clusters
To start the migration of your Apache Hadoop cluster, create a new AWS SCT project. Next, connect
to your source and target clusters. Make sure that you create and provision your target AWS
resources before you start the migration.
In this step, you use the following AWS SCT CLI commands.
•
CreateProject – to create a new AWS SCT project.
•
AddSourceCluster – to connect to the source Hadoop cluster in your AWS SCT project.
•
AddSourceClusterHive – to connect to the source Hive service in your project.
•
AddSourceClusterHDFS – to connect to the source HDFS service in your project.
•
AddTargetCluster – to connect to the target Amazon EMR cluster in your project.
•
AddTargetClusterS3 – to add the Amazon S3 bucket to your project.
•
AddTargetClusterHive – to connect to the target Hive service in your project
•
AddTargetClusterHDFS – to connect to the target HDFS service in your project
For examples of using these AWS SCT CLI commands, see Connecting to Apache Hadoop.
When you run the command that connects to a source or target cluster, AWS SCT tries to establish
the connection to this cluster. If the connection attempt fails, then AWS SCT stops running the
commands from your CLI script and displays an error message.
Step 2: Set up the mapping rules
After you connect to your source and target clusters, set up the mapping rules. A mapping rule
defines the migration target for a source cluster. Make sure that you set up mapping rules for all
source clusters that you added in your AWS SCT project. For more information about mapping
rules, see Mapping data types in the AWS Schema Conversion Tool.
In this step, you use the AddServerMapping command. This command uses two parameters,
which define the source and target clusters. You can use the AddServerMapping command with
the explicit path to your database objects or with an object names. For the first option, you include
the type of the object and its name. For the second option, you include only the object names.
•
sourceTreePath – the explicit path to your source database objects.
targetTreePath – the explicit path to your target database objects.
Step 1: Connect to your Hadoop clusters Version 1.0.672 385

AWS Schema Conversion Tool User Guide
•
sourceNamePath – the path that includes only the names of your source objects.
targetNamePath – the path that includes only the names of your target objects.
The following code example creates a mapping rule using explicit paths for the source testdb Hive
database and the target EMR cluster.
AddServerMapping
-sourceTreePath: 'Clusters.HADOOP_SOURCE.HIVE_SOURCE.Databases.testdb'
-targetTreePath: 'Clusters.HADOOP_TARGET.HIVE_TARGET'
/
You can use this example and the following examples in Windows. To run the CLI commands in
Linux, make sure that you updated the file paths appropriately for your operating system.
The following code example creates a mapping rule using the paths that include only the object
names.
AddServerMapping
-sourceNamePath: 'HADOOP_SOURCE.HIVE_SOURCE.testdb'
-targetNamePath: 'HADOOP_TARGET.HIVE_TARGET'
/
You can choose Amazon EMR or Amazon S3 as a target for your source object. For each source
object, you can choose only one target in a single AWS SCT project. To change the migration target
for a source object, delete the existing mapping rule and then create a new mapping rule. To delete
a mapping rule, use the DeleteServerMapping command. This command uses one of the two
following parameters.
•
sourceTreePath – the explicit path to your source database objects.
•
sourceNamePath – the path that includes only the names of your source objects.
For more information about the AddServerMapping and DeleteServerMapping commands,
see the AWS Schema Conversion Tool CLI Reference.
Step 3: Create an assessment report
Before you start the migration, we recommend to create an assessment report. This report
summarizes all of the migration tasks and details the action items that will emerge during the
Step 3: Create an assessment report Version 1.0.672 386

AWS Schema Conversion Tool User Guide
migration. To make sure that your migration doesn't fail, view this report and address the action
items before the migration. For more information, see Assessment report.
In this step, you use the CreateMigrationReport command. This command uses two
parameters. The treePath parameter is mandatory, and the forceMigrate parameter is
optional.
•
treePath – the explicit path to your source database objects for which you save a copy of the
assessment report.
•
forceMigrate – when set to true, AWS SCT continues the migration even if your project
includes an HDFS folder and Hive table that refer to the same object. The default value is false.
You can then save a copy of the assessment report as a PDF or comma-separated value (CSV) files.
To do so, use the SaveReportPDF or SaveReportCSV command.
The SaveReportPDF command saves a copy of your assessment report as a PDF file. This
command uses four parameters. The file parameter is mandatory, other parameters are optional.
•
file – the path to the PDF file and its name.
•
filter – the name of the filter that you created before to define the scope of your source
objects to migrate.
•
treePath – the explicit path to your source database objects for which you save a copy of the
assessment report.
•
namePath – the path that includes only the names of your target objects for which you save a
copy of the assessment report.
The SaveReportCSV command saves your assessment report in three CSV files. This command
uses four parameters. The directory parameter is mandatory, other parameters are optional.
•
directory – the path to the folder where AWS SCT saves the CSV files.
•
filter – the name of the filter that you created before to define the scope of your source
objects to migrate.
•
treePath – the explicit path to your source database objects for which you save a copy of the
assessment report.
•
namePath – the path that includes only the names of your target objects for which you save a
copy of the assessment report.
Step 3: Create an assessment report Version 1.0.672 387
AWS Schema Conversion Tool User Guide
The following code example saves a copy of the assessment report in the c:\sct\ar.pdf file.
SaveReportPDF
-file:'c:\sct\ar.pdf'
/
The following code example saves a copy of the assessment report as CSV files in the c:\sct
folder.
SaveReportCSV
-file:'c:\sct'
/
For more information about the SaveReportPDF and SaveReportCSV commands, see the AWS
Schema Conversion Tool CLI Reference.
Step 4: Migrate your Apache Hadoop cluster to Amazon EMR with AWS
SCT
After you configure your AWS SCT project, start the migration of your on-premises Apache Hadoop
cluster to the AWS Cloud.
In this step, you use the Migrate, MigrationStatus, and ResumeMigration commands.
The Migrate command migrates your source objects to the target cluster. This command uses four
parameters. Make sure that you specify the filter or treePath parameter. Other parameters are
optional.
•
filter – the name of the filter that you created before to define the scope of your source
objects to migrate.
•
treePath – the explicit path to your source database objects for which you save a copy of the
assessment report.
•
forceLoad – when set to true, AWS SCT automatically loads database metadata trees during
migration. The default value is false.
•
forceMigrate – when set to true, AWS SCT continues the migration even if your project
includes an HDFS folder and Hive table that refer to the same object. The default value is false.
Step 4: Migrate your Apache Hadoop cluster to Amazon EMR Version 1.0.672 388

AWS Schema Conversion Tool User Guide
The MigrationStatus command returns the information about the migration progress. To run
this command, enter the name of your migration project for the name parameter. You specified this
name in the CreateProject command.
The ResumeMigration command resumes the interrupted migration that you launched using
the Migrate command. The ResumeMigration command doesn't use parameters. To resume
the migration, you must connect to your source and target clusters. For more information, see
Managing your migration project.
The following code example migrates data from your source HDFS service to Amazon EMR.
Migrate
-treePath: 'Clusters.HADOOP_SOURCE.HDFS_SOURCE'
-forceMigrate: 'true'
/
Running your CLI script
After you finish editing your AWS SCT CLI script, save it as a file with the .scts extension. Now,
you can run your script from the app folder of your AWS SCT installation path. To do so, use the
following command.
RunSCTBatch.cmd --pathtoscts "C:\script_path\hadoop.scts"
In the preceding example, replace script_path with the path to your file with the CLI script. For
more information about running CLI scripts in AWS SCT, see Script mode.
Managing your big data migration project
After you complete the migration, you can save and edit your AWS SCT project for the future use.
To save your AWS SCT project, use the SaveProject command. This command doesn't use
parameters.
The following code example saves your AWS SCT project.
SaveProject
/
Running your CLI script Version 1.0.672 389

AWS Schema Conversion Tool User Guide
To open your AWS SCT project, use the OpenProject command. This command uses one
mandatory parameter. For the file parameter, enter the path to your AWS SCT project file and its
name. You specified the project name in the CreateProject command. Make sure that you add
the .scts extension to the name of your project file to run the OpenProject command.
The following code example opens the hadoop_emr project from the c:\sct folder.
OpenProject
-file: 'c:\sct\hadoop_emr.scts'
/
After you open your AWS SCT project, you don't need to add the source and target clusters
because you have already added them to your project. To start working with your source and
target clusters, you must connect to them. To do so, you use the ConnectSourceCluster
and ConnectTargetCluster commands. These commands use the same parameters as the
AddSourceCluster and AddTargetCluster commands. You can edit your CLI script and replace
the name of these commands leaving the list of parameters without changes.
The following code example connects to the source Hadoop cluster.
ConnectSourceCluster
-name: 'HADOOP_SOURCE'
-vendor: 'HADOOP'
-host: 'hadoop_address'
-port: '22'
-user: 'hadoop_user'
-password: 'hadoop_password'
-useSSL: 'true'
-privateKeyPath: 'c:\path\name.pem'
-passPhrase: 'hadoop_passphrase'
/
The following code example connects to the target Amazon EMR cluster.
ConnectTargetCluster
-name: 'HADOOP_TARGET'
-vendor: 'AMAZON_EMR'
-host: 'ec2-44-44-55-66.eu-west-1.EXAMPLE.amazonaws.com'
-port: '22'
-user: 'emr_user'
-password: 'emr_password'
Managing your migration project Version 1.0.672 390

AWS Schema Conversion Tool User Guide
-useSSL: 'true'
-privateKeyPath: 'c:\path\name.pem'
-passPhrase: '1234567890abcdef0!'
-s3Name: 'S3_TARGET'
-accessKey: 'AKIAIOSFODNN7EXAMPLE'
-secretKey: 'wJalrXUtnFEMI/K7MDENG/bPxRfiCYEXAMPLEKEY'
-region: 'eu-west-1'
-s3Path: 'doc-example-bucket/example-folder'
/
In the preceding example, replace hadoop_address with the IP address of your Hadoop
cluster. If needed, configure the value of the port variable. Next, replace hadoop_user and
hadoop_password with the name of your Hadoop user and the password for this user. For
path\name, enter the name and path to the PEM file for your source Hadoop cluster. For more
information about adding your source and target clusters, see Connecting to Apache Hadoop
databases with the AWS Schema Conversion Tool.
After you connect to your source and target Hadoop clusters, you must connect to your
Hive and HDFS services, as well as to your Amazon S3 bucket. To do so, you use the
ConnectSourceClusterHive, ConnectSourceClusterHdfs, ConnectTargetClusterHive,
ConnectTargetClusterHdfs, and ConnectTargetClusterS3 commands. These commands
use the same parameters as the commands that you used to add Hive and HDFS services, and the
Amazon S3 bucket to your project. Edit the CLI script to replace the Add prefix with Connect in the
command names.
Converting Oozie workflowas to AWS Step Functions with AWS
Schema Conversion Tool
To convert Apache Oozie workflows, make sure that you use AWS SCT version 1.0.671 or higher.
Also, familiarize yourself with the command line interface (CLI) of AWS SCT. For more information,
see CLI Reference for AWS Schema Conversion Tool.
Topics
• Conversion overview
• Step 1: Connect to your source and target services
• Step 2: Set up the mapping rules
• Step 3: Configure parameters
Converting Oozie workflows; Version 1.0.672 391

AWS Schema Conversion Tool User Guide
• Step 4: Create an assessment report
• Step 5: Convert your Apache Oozie workflows to AWS Step Functions with AWS SCT
• Running your CLI script
• Apache Oozie nodes that AWS SCT can convert to AWS Step Functions
Conversion overview
Your Apache Oozie source code includes action nodes, control flow nodes, and job properties.
Action nodes define the jobs, which you run in your Apache Oozie workflow. When you use Apache
Oozie to orchestrate your Apache Hadoop cluster, then an action node includes a Hadoop job.
Control flow nodes provide a mechanism to control the workflow path. The control flow nodes
include such nodes as start, end, decision, fork, and join.
AWS SCT converts your source action nodes and control flow nodes to AWS Step Functions. In AWS
Step Functions, you define your workflows in the Amazon States Language (ASL). AWS SCT uses
ASL to define your state machine, which is a collection of states, that can do work, determine which
states to transition to next, stop with an error, and so on. Next, AWS SCT uploads the JSON files
with state machines definitions. Then, AWS SCT can use your AWS Identity and Access Management
(IAM) role to configure your state machines in AWS Step Functions. For more information, see What
is AWS Step Functions? in the AWS Step Functions Developer Guide.
Also, AWS SCT creates an extension pack with AWS Lambda functions which emulate the source
functions that AWS Step Functions doesn't support. For more information, see Using extension
packs with AWS Schema Conversion Tool.
AWS SCT migrates your source job properties to AWS Systems Manager. To store parameter names
and values, AWS SCT uses Parameter Store, a capability of AWS Systems Manager. For more
information, see What is AWS Systems Manager? in the AWS Systems Manager User Guide.
You can use AWS SCT to automatically update the values and the names of your parameters.
Because of the architecture differences between Apache Oozie and AWS Step Functions, you might
need to configure your parameters. AWS SCT can find a specified parameter name or value in
your source files and replace them with new values. For more information, see Step 3: Configure
parameters.
The following image shows the architecture diagram of the Apache Oozie conversion to AWS Step
Functions.
Overview Version 1.0.672 392
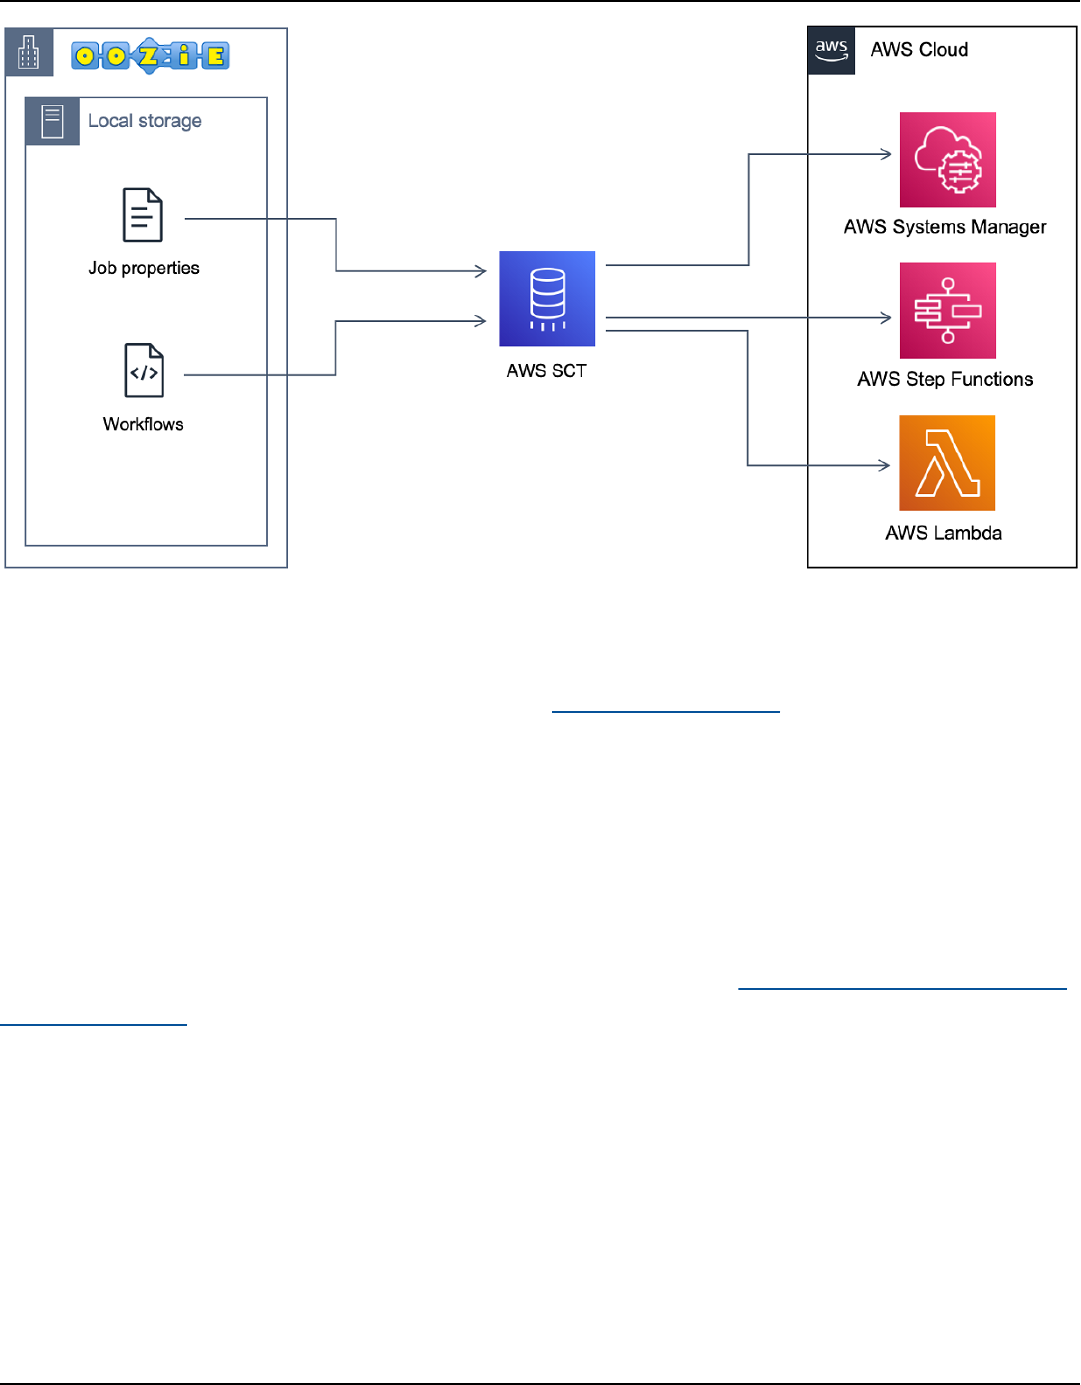
AWS Schema Conversion Tool User Guide
To start the conversion, create and run your AWS SCT CLI script. This script includes the complete
set of commands to run the conversion. You can download and edit a template of the Apache
Oozie conversion script. For more information, see Getting CLI scenarios.
Make sure that your script includes the following steps.
Step 1: Connect to your source and target services
To start the conversion of your Apache Oozie cluster, create a new AWS SCT project. Next, connect
to your source and target services. Make sure that you create and provision your target AWS
resources before you start the migration. For more information, see Prerequisites for using Apache
Oozie as a source.
In this step, you use the following AWS SCT CLI commands.
•
CreateProject – to create a new AWS SCT project.
•
AddSource – to add your source Apache Oozie files in your AWS SCT project.
•
ConnectSource – to connect to Apache Oozie as a source.
•
AddTarget – to add AWS Step Functions as a migration target in your project.
•
ConnectTarget – to connect to AWS Step Functions.
Step 1: Connect to your source and target services Version 1.0.672 393

AWS Schema Conversion Tool User Guide
For examples of using these AWS SCT CLI commands, see Connecting to Apache Oozie.
When you run the ConnectSource or ConnectTarget commands, AWS SCT tries to establish
the connection to your services. If the connection attempt fails, then AWS SCT stops running the
commands from your CLI script and displays an error message.
Step 2: Set up the mapping rules
After you connect to your source and target services, set up the mapping rules. A mapping rule
defines the migration target for your source Apache Oozie workflows and parameters. For more
information about mapping rules, see Mapping data types in the AWS Schema Conversion Tool.
To define source and target objects for conversion, use the AddServerMapping command. This
command uses two parameters: sourceTreePath and targetTreePath. The values of these
parameters include an explicit path to your source and target objects. For Apache Oozie to AWS
Step Functions conversion, these parameters must start with ETL.
The following code example creates a mapping rule for OOZIE and AWS_STEP_FUNCTIONS objects.
You added these objects to your AWS SCT project using AddSource and AddTarget commands in
the previous step.
AddServerMapping
-sourceTreePath: 'ETL.APACHE_OOZIE'
-targetTreePath: 'ETL.AWS_STEP_FUNCTIONS'
/
For more information about the AddServerMapping command, see the AWS Schema Conversion
Tool CLI Reference.
Step 3: Configure parameters
If your source Apache Oozie workflows use parameters, you might need to change their values
after the conversion to AWS Step Functions. Also, you might need to add new parameters to use
with your AWS Step Functions.
In this step, you use the AddParameterMapping and AddTargetParameter commands.
To replace the parameter values in your source files, use the AddParameterMapping command.
AWS SCT scans your source files, finds the parameters by name or value, and changes their values.
You can run a single command to scan all your source files. You define the scope of files to scan
Step 2: Set up the mapping rules Version 1.0.672 394

AWS Schema Conversion Tool User Guide
using one of the first three parameters from the following list. This command uses up to six
parameters.
•
filterName – the name of the filter for your source objects. You can create a filter using the
CreateFilter command.
•
treePath – the explicit path to your source objects.
•
namePath – the explicit path to a specific source object.
•
sourceParameterName – the name of your source parameter.
•
sourceValue – the value of your source parameter.
•
targetValue – the value of your target parameter.
The following code example replaces all parameters where the value is equal to c:\oozie
\hive.py with the s3://bucket-oozie/hive.py value.
AddParameterMapping
-treePath: 'ETL.OOZIE.Applications'
-sourceValue: 'c:\oozie\hive.py'
-targetValue: 's3://bucket-oozie/hive.py'
/
The following code example replaces all parameters where the name is equal to nameNode with
the hdfs://ip-111-222-33-44.eu-west-1.compute.internal:8020 value.
AddParameterMapping
-treePath: 'ETL.OOZIE_SOURCE.Applications'
-sourceParameter: 'nameNode'
-targetValue: 'hdfs://ip-111-222-33-44.eu-west-1.compute.internal:8020'
/
The following code example replaces all parameters where the name is equal to nameNode and the
value is equal to hdfs://ip-55.eu-west-1.compute.internal:8020 with the value from the
targetValue parameter.
AddParameterMapping
-treePath: 'ETL.OOZIE_SOURCE.Applications'
-sourceParameter: 'nameNode'
-sourceValue: 'hdfs://ip-55-66-77-88.eu-west-1.compute.internal:8020'
-targetValue: 'hdfs://ip-111-222-33-44.eu-west-1.compute.internal:8020'
Step 3: Configure parameters Version 1.0.672 395

AWS Schema Conversion Tool User Guide
/
To add a new parameter in your target files in addition to an existing parameter from your source
files, use the AddTargetParameter command. This command uses the same set of parameters as
the AddParameterMapping command.
The following code example adds the clusterId target parameter instead of the nameNode
parameter.
AddTargetParameter
-treePath: 'ETL.OOZIE_SOURCE.Applications'
-sourceParameter: 'nameNode'
-sourceValue: 'hdfs://ip-55-66-77-88.eu-west-1.compute.internal:8020'
-targetParameter: 'clusterId'
-targetValue: '1234567890abcdef0'
/
For more information about the AddServerMapping, AddParameterMapping,
AddTargetParameter, and CreateFilter commands, see the AWS Schema Conversion Tool CLI
Reference.
Step 4: Create an assessment report
Before you start the conversion, we recommend to create an assessment report. This report
summarizes all of the migration tasks and details the action items that will emerge during the
migration. To make sure that your migration doesn't fail, view this report and address the action
items before the migration. For more information, see Assessment report.
In this step, you use the CreateReport command. This command uses two parameters. The
first parameter describes the source objects for which AWS SCT creates an assessment report.
To do so, use one of the following parameters: filterName, treePath, or namePath. This
parameter is mandatory. Also, you can add an optional Boolean parameter forceLoad. If you set
this parameter to true, then AWS SCT automatically loads all child objects for the source object
that you specify in the CreateReport command.
The following code example creates an assessment report for the Applications node of your
source Oozie files.
CreateReport
Step 4: Create an assessment report Version 1.0.672 396

AWS Schema Conversion Tool User Guide
-treePath: 'ETL.APACHE_OOZIE.Applications'
/
You can then save a copy of the assessment report as a PDF or comma-separated value (CSV) files.
To do so, use the SaveReportPDF or SaveReportCSV command.
The SaveReportPDF command saves a copy of your assessment report as a PDF file. This
command uses four parameters. The file parameter is mandatory, other parameters are optional.
•
file – the path to the PDF file and its name.
•
filter – the name of the filter that you created before to define the scope of your source
objects to migrate.
•
treePath – the explicit path to your source database objects for which you save a copy of the
assessment report.
•
namePath – the path that includes only the names of your target objects for which you save a
copy of the assessment report.
The SaveReportCSV command saves your assessment report in CSV files. This command uses four
parameters. The directory parameter is mandatory, other parameters are optional.
•
directory – the path to the folder where AWS SCT saves the CSV files.
•
filter – the name of the filter that you created before to define the scope of your source
objects to migrate.
•
treePath – the explicit path to your source database objects for which you save a copy of the
assessment report.
•
namePath – the path that includes only the names of your target objects for which you save a
copy of the assessment report.
The following code example saves a copy of the assessment report in the c:\sct\ar.pdf file.
SaveReportPDF
-file:'c:\sct\ar.pdf'
/
The following code example saves a copy of the assessment report as CSV files in the c:\sct
folder.
Step 4: Create an assessment report Version 1.0.672 397

AWS Schema Conversion Tool User Guide
SaveReportCSV
-file:'c:\sct'
/
For more information about the CreateReport, SaveReportPDF and SaveReportCSV
commands, see the AWS Schema Conversion Tool CLI Reference.
Step 5: Convert your Apache Oozie workflows to AWS Step Functions
with AWS SCT
After you configure your AWS SCT project, convert your source code and apply it to the AWS Cloud.
In this step, you use the Convert, SaveOnS3, ConfigureStateMachine, and ApplyToTarget
commands.
The Migrate command migrates your source objects to the target cluster. This command uses four
parameters. Make sure that you specify the filter or treePath parameter. Other parameters are
optional.
•
filter – the name of the filter that you created before to define the scope of your source
objects to migrate.
•
namePath – the explicit path to a specific source object.
•
treePath – the explicit path to your source database objects for which you save a copy of the
assessment report.
•
forceLoad – when set to true, AWS SCT automatically loads database metadata trees during
migration. The default value is false.
The following code example converts files from the Applications folder in your source Oozie
files.
Convert
-treePath: 'ETL.APACHE_OOZIE.Applications'
/
The SaveOnS3 uploads the state machines definitions to your Amazon S3 bucket. This command
uses the treePath parameter. To run this command, use the target folder with state machines
definitions as the value of this parameter.
Step 5: Convert your Apache Oozie workflows to AWS Step Functions Version 1.0.672 398

AWS Schema Conversion Tool User Guide
The following uploads the State machine definitions folder of your AWS_STEP_FUNCTIONS
target object to the Amazon S3 bucket. AWS SCT uses the Amazon S3 bucket that you stored in the
AWS service profile in the Prerequisites step.
SaveOnS3
-treePath: 'ETL.AWS_STEP_FUNCTIONS.State machine definitions'
/
The ConfigureStateMachine command configures state machines. This command uses up to
six parameters. Make sure that you define the target scope using one of the first three parameters
from the following list.
•
filterName – the name of the filter for your target objects. You can create a filter using the
CreateFilter command.
•
treePath – the explicit path to your target objects.
•
namePath – the explicit path to a specific target object.
•
iamRole – the Amazon Resource Name (ARN) of the IAM role that provides access to your step
machines. This parameter is required.
The following code example configures state machines defined in AWS_STEP_FUNCTIONS using
the role_name IAM role.
ConfigureStateMachine
-treePath: 'ETL.AWS_STEP_FUNCTIONS.State machine definitions'
-role: 'arn:aws:iam::555555555555:role/role_name'
/
The ApplyToTarget command applies your converted code to the target server. To run this
command, use one of the following parameters: filterName, treePath, or namePath to define
the target objects to apply.
The following code example applies the app_wp state machine to AWS Step Functions.
ApplyToTarget
-treePath: 'ETL.AWS_STEP_FUNCTIONS.State machines.app_wp'
/
Step 5: Convert your Apache Oozie workflows to AWS Step Functions Version 1.0.672 399

AWS Schema Conversion Tool User Guide
To make sure that your converted code produces the same results as your source code, you can use
the AWS SCT extension pack. This is a set of AWS Lambda functions which emulate your Apache
Oozie functions that AWS Step Functions doesn't support. To install this extension pack, you can
use the CreateLambdaExtPack command.
This command uses up to five parameters. Make sure that you use Oozie2SF for extPackId. In
this case, AWS SCT creates an extension pack for source Apache Oozie functions.
•
extPackId – the unique identifier for a set of Lambda functions. This parameter is required.
•
tempDirectory – the path where AWS SCT can store temporary files. This parameter is
required.
•
awsProfile – the name of your AWS profile.
•
lambdaExecRoles – the list of Amazon Resource Names (ARNs) of the execution roles to use for
Lambda functions.
•
createInvokeRoleFlag – the Boolean flag that indicates whether to create an execution role
for AWS Step Functions.
To install and use the extension pack, make sure that you provide the required permissions. For
more information, see Permissions for using AWS Lambda functions in the extension pack.
For more information about the Convert, SaveOnS3, ConfigureStateMachine,
ApplyToTarget, and CreateLambdaExtPack commands, see the AWS Schema Conversion Tool
CLI Reference.
Running your CLI script
After you finish editing your AWS SCT CLI script, save it as a file with the .scts extension. Now,
you can run your script from the app folder of your AWS SCT installation path. To do so, use the
following command.
RunSCTBatch.cmd --pathtoscts "C:\script_path\oozie.scts"
In the preceding example, replace script_path with the path to your file with the CLI script. For
more information about running CLI scripts in AWS SCT, see Script mode.
Running your CLI script Version 1.0.672 400

AWS Schema Conversion Tool User Guide
Apache Oozie nodes that AWS SCT can convert to AWS Step Functions
You can use AWS SCT to convert Apache Oozie action nodes and control flow nodes to AWS Step
Functions.
Supported action nodes include the following:
• Hive action
• Hive2 action
• Spark action
• MapReduce Streaming action
• Java action
• DistCp action
• Pig action
• Sqoop action
• FS action
• Shell action
Supported control flow nodes include the following:
• Start action
• End action
• Kill action
• Decision action
• Fork action
• Join action
Supported nodes Version 1.0.672 401

AWS Schema Conversion Tool User Guide
Integrating AWS Database Migration Service with AWS
Schema Conversion Tool
Using an AWS SCT replication agent with AWS DMS
For very large database migrations, you can use an AWS SCT replication agent (aws-schema-
conversion-tool-dms-agent) to copy data from your on-premises database to Amazon S3 or an
AWS Snowball Edge device. The replication agent works in conjunction with AWS DMS and can
work in the background while AWS SCT is closed.
When working with AWS Snowball Edge, the AWS SCT agent replicates data to the AWS Snowball
device. The device is then sent to AWS and the data is loaded to an Amazon S3 bucket. During this
time, the AWS SCT agent continues to run. The agent then takes the data on Amazon S3 and copies
the data to the target endpoint.
For more information, see Migrating data from on-premises data warehouse to Amazon Redshift
with AWS Schema Conversion Tool.
Using an AWS SCT data extraction agent with AWS DMS
In AWS SCT, you can find a data extraction agent (aws-schema-conversion-tool-extractor)
that helps make migrations from Apache Cassandra to Amazon DynamoDB easier. Cassandra and
DynamoDB are NoSQL databases, but they differ in system architecture and data representation.
You can use wizard-based workflows in AWS SCT to automate the Cassandra-to-DynamoDB
migration process. AWS SCT integrates with AWS Database Migration Service (AWS DMS) to
perform the actual migration.
For more information, see Migrating data from on-premises data warehouse to Amazon Redshift
with AWS Schema Conversion Tool.
Increasing logging levels when using AWS SCT with AWS DMS
You can increase logging levels when using AWS SCT with AWS DMS, for example if you need to
work with AWS Support.
Using an AWS SCT replication agent with AWS DMS Version 1.0.672 402

AWS Schema Conversion Tool User Guide
After installing AWS SCT and the required drivers, open the application by choosing the AWS SCT
icon. If you see an update notification, you can choose to update before or after your project is
complete. If an auto-project window opens, close the window and manually create a project.
To increase logging levels when using AWS SCT with AWS DMS
1. On the Settings menu, choose Global settings.
2. In the Global settings window, choose Logging.
3. For Debug mode, choose True.
4. From the Message level section, you can modify the following types of logs:
• General
• Loader
• Parser
• Printer
• Resolver
• Telemetry
• Converter
By default, all message levels are set to Info.
5. Choose a level of logging for any message level types that you want to change:
• Trace (most detailed logging)
• Debug
• Info
• Warning
• Error (least detailed logging)
• Critical
• Mandatory
6. Choose Apply to modify settings for your project.
7. Choose OK to close the Global settings window.
Increasing logging levels when using AWS SCT with AWS DMS Version 1.0.672 403

AWS Schema Conversion Tool User Guide
Migrating data from on-premises data warehouse to
Amazon Redshift with AWS Schema Conversion Tool
You can use an AWS SCT agent to extract data from your on-premises data warehouse and migrate
it to Amazon Redshift. The agent extracts your data and uploads the data to either Amazon S3 or,
for large-scale migrations, an AWS Snowball Edge device. You can then use an AWS SCT agent to
copy the data to Amazon Redshift.
Alternatively, you can use AWS Database Migration Service (AWS DMS) to migrate data to
Amazon Redshift. The advantage of AWS DMS is the support of ongoing replication (change data
capture). However, to increase the speed of data migration, use several AWS SCT agents in parallel.
According to our tests, AWS SCT agents migrate data faster than AWS DMS by 15–35 percent. The
difference in speed is due to data compression, support of migration of table partitions in parallel,
and different configuration settings. For more information, see Using an Amazon Redshift database
as a target for AWS Database Migration Service.
Amazon S3 is a storage and retrieval service. To store an object in Amazon S3, you upload the file
you want to store to an Amazon S3 bucket. When you upload a file, you can set permissions on the
object and also on any metadata.
Large-scale migrations
Large-scale data migrations can include many terabytes of information, and can be slowed by
network performance and by the sheer amount of data that has to be moved. AWS Snowball Edge
is an AWS service you can use to transfer data to the cloud at faster-than-network speeds using an
AWS-owned appliance. An AWS Snowball Edge device can hold up to 100 TB of data. It uses 256-
bit encryption and an industry-standard Trusted Platform Module (TPM) to ensure both security
and full chain-of-custody for your data. AWS SCT works with AWS Snowball Edge devices.
When you use AWS SCT and an AWS Snowball Edge device, you migrate your data in two stages.
First, you use AWS SCT to process the data locally and then move that data to the AWS Snowball
Edge device. You then send the device to AWS using the AWS Snowball Edge process, and then
AWS automatically loads the data into an Amazon S3 bucket. Next, when the data is available on
Amazon S3, you use AWS SCT to migrate the data to Amazon Redshift. Data extraction agents can
work in the background while AWS SCT is closed.
The following diagram shows the supported scenario.
Version 1.0.672 404
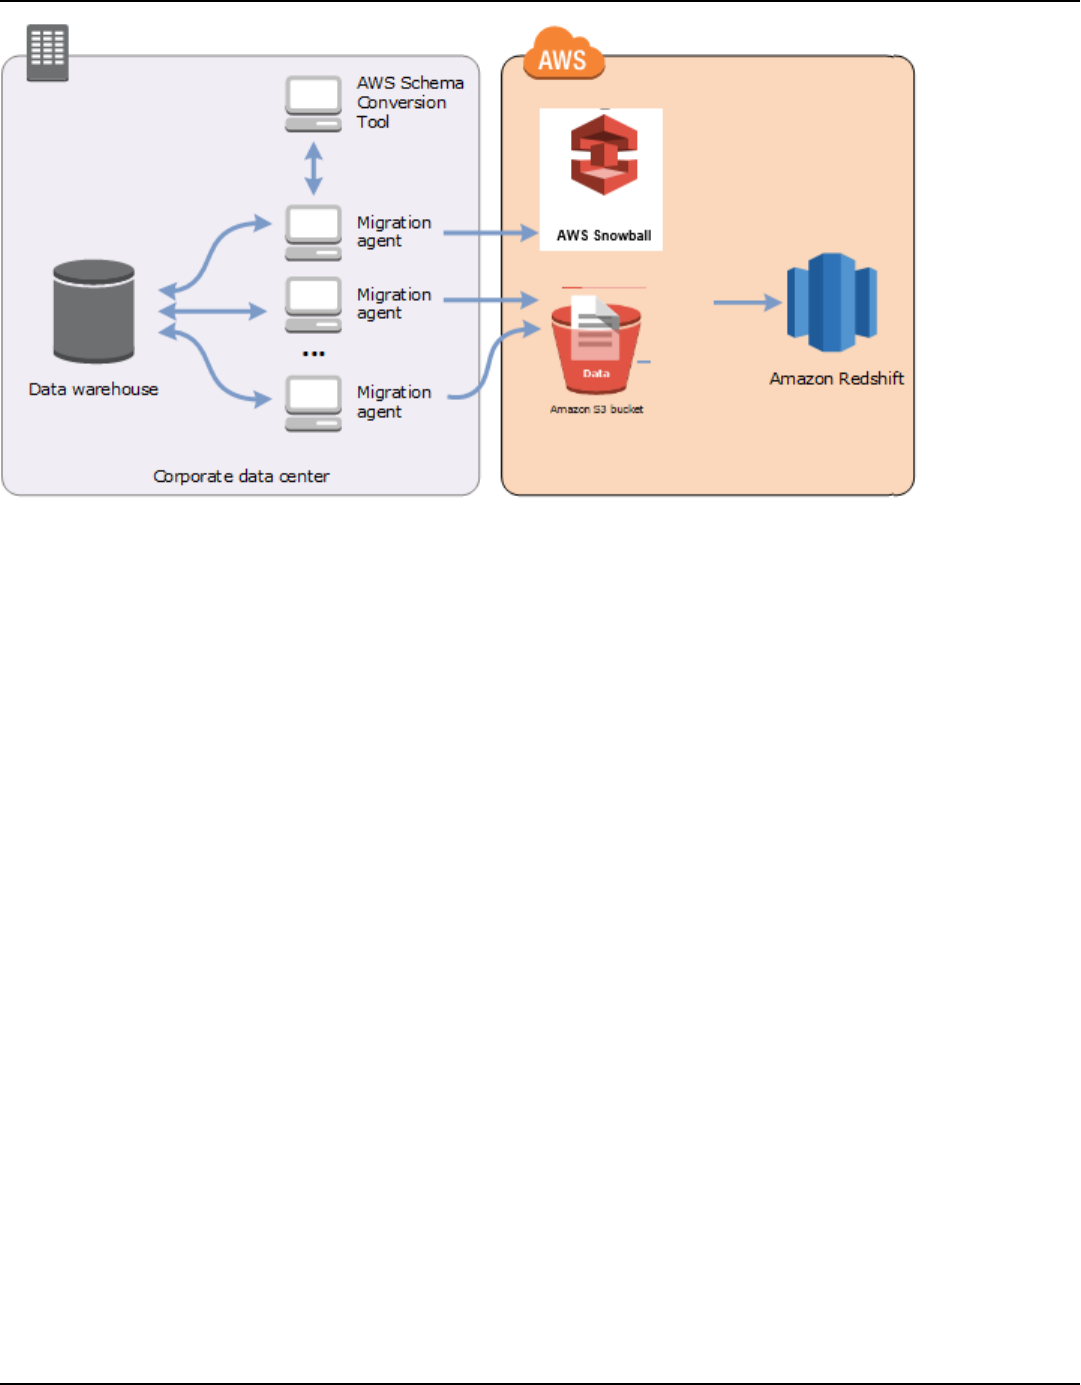
AWS Schema Conversion Tool User Guide
Data extraction agents are currently supported for the following source data warehouses:
• Azure Synapse Analytics
• BigQuery
• Greenplum Database (version 4.3)
• Microsoft SQL Server (version 2008 and higher)
• Netezza (version 7.0.3 and higher)
• Oracle (version 10 and higher)
• Snowflake (version 3)
• Teradata (version 13 and higher)
• Vertica (version 7.2.2 and higher)
You can connect to FIPS endpoints for Amazon Redshift if you need to comply with the Federal
Information Processing Standard (FIPS) security requirements. FIPS endpoints are available in the
following AWS Regions:
• US East (N. Virginia) Region (redshift-fips.us-east-1.amazonaws.com)
• US East (Ohio) Region (redshift-fips.us-east-2.amazonaws.com)
Version 1.0.672 405

AWS Schema Conversion Tool User Guide
• US West (N. California) Region (redshift-fips.us-west-1.amazonaws.com)
• US West (Oregon) Region (redshift-fips.us-west-2.amazonaws.com)
Use the information in the following topics to learn how to work with data extraction agents.
Topics
• Prerequisites for using data extraction agents
• Installing extraction agents
• Configuring extraction agents
• Registering extraction agents with the AWS Schema Conversion Tool
• Hiding and recovering information for an AWS SCT agent
• Creating data migration rules in AWS SCT
• Changing extractor and copy settings from project settings
• Sorting data before migrating using AWS SCT
• Creating, running, and monitoring an AWS SCT data extraction task
• Exporting and importing an AWS SCT data extraction task
• Data extraction using an AWS Snowball Edge device
• Data extraction task output
• Using virtual partitioning with AWS Schema Conversion Tool
• Using native partitioning
• Migrating LOBs to Amazon Redshift
• Best practices and troubleshooting for data extraction agents
Prerequisites for using data extraction agents
Before you work with data extraction agents, add the required permissions for Amazon Redshift as
a target to your Amazon Redshift user. For more information, see Permissions for Amazon Redshift
as a target.
Then, store your Amazon S3 bucket information and set up your Secure Sockets Layer (SSL) trust
and key store.
Prerequisites Version 1.0.672 406

AWS Schema Conversion Tool User Guide
Amazon S3 settings
After your agents extract your data, they upload it to your Amazon S3 bucket. Before you continue,
you must provide the credentials to connect to your AWS account and your Amazon S3 bucket. You
store your credentials and bucket information in a profile in the global application settings, and
then associate the profile with your AWS SCT project. If necessary, choose Global settings to create
a new profile. For more information, see Managing Profiles in the AWS Schema Conversion Tool.
To migrate data into your target Amazon Redshift database, the AWS SCT data extraction agent
needs permission to access the Amazon S3 bucket on your behalf. To provide this permission,
create an AWS Identity and Access Management (IAM) user with the following policy.
{
"Version": "2012-10-17",
"Statement": [
{
"Action": [
"s3:PutObject",
"s3:DeleteObject",
"s3:GetObject",
"s3:GetObjectTagging",
"s3:PutObjectTagging"
],
"Resource": [
"arn:aws:s3:::bucket_name/*",
"arn:aws:s3:::bucket_name"
],
"Effect": "Allow"
},
{
"Action": [
"s3:ListBucket",
"s3:GetBucketLocation"
],
"Resource": [
"arn:aws:s3:::bucket_name"
],
"Effect": "Allow"
},
{
"Effect": "Allow",
"Action": "s3:ListAllMyBuckets",
Amazon S3 settings Version 1.0.672 407

AWS Schema Conversion Tool User Guide
"Resource": "*"
},
{
"Action": [
"iam:GetUser"
],
"Resource": [
"arn:aws:iam::111122223333:user/DataExtractionAgentName"
],
"Effect": "Allow"
}
]
}
In the preceding example, replace bucket_name with the name of your Amazon S3 bucket. Then,
replace 111122223333:user/DataExtractionAgentName with the name of your IAM user.
Assuming IAM roles
For additional security, you can use AWS Identity and Access Management (IAM) roles to access
your Amazon S3 bucket. To do so, create an IAM user for your data extraction agents without
any permissions. Then, create an IAM role that enables Amazon S3 access, and specify the list of
services and users that can assume this role. For more information, see IAM roles in the IAM User
Guide.
To configure IAM roles to access your Amazon S3 bucket
1. Create a new IAM user. For user credentials, choose Programmatic access type.
2. Configure the host environment so that your data extraction agent can assume the role that
AWS SCT provides. Make sure that the user that you configured in the previous step enables
data extraction agents to use the credential provider chain. For more information, see Using
credentials in the AWS SDK for Java Developer Guide.
3. Create a new IAM role that has access to your Amazon S3 bucket.
4. Modify the trust section of this role to trust the user that you created before to assume the
role. In the following example, replace 111122223333:user/DataExtractionAgentName
with the name of your user.
{
"Effect": "Allow",
"Principal": {
Assuming IAM roles Version 1.0.672 408

AWS Schema Conversion Tool User Guide
"AWS": "arn:aws:iam::111122223333:user/DataExtractionAgentName"
},
"Action": "sts:AssumeRole"
}
5.
Modify the trust section of this role to trust redshift.amazonaws.com to assume the role.
{
"Effect": "Allow",
"Principal": {
"Service": [
"redshift.amazonaws.com"
]
},
"Action": "sts:AssumeRole"
}
6. Attach this role to your Amazon Redshift cluster.
Now, you can run your data extraction agent in AWS SCT.
When you use IAM role assuming, the data migration works the following way. The data extraction
agent starts and gets the user credentials using the credential provider chain. Next, you create a
data migration task in AWS SCT, then specify the IAM role for data extraction agents to assume,
and start the task. AWS Security Token Service (AWS STS) generates temporary credentials to
access Amazon S3. The data extraction agent uses these credentials to upload data to Amazon S3.
Then, AWS SCT provides Amazon Redshift with the IAM role. In turn, Amazon Redshift gets new
temporary credentials from AWS STS to access Amazon S3. Amazon Redshift uses these credentials
to copy data from Amazon S3 to your Amazon Redshift table.
Security settings
The AWS Schema Conversion Tool and the extraction agents can communicate through Secure
Sockets Layer (SSL). To enable SSL, set up a trust store and key store.
To set up secure communication with your extraction agent
1. Start the AWS Schema Conversion Tool.
2. Open the Settings menu, and then choose Global settings. The Global settings dialog box
appears.
Security settings Version 1.0.672 409

AWS Schema Conversion Tool User Guide
3. Choose Security.
4. Choose Generate trust and key store, or choose Select existing trust store.
If you choose Generate trust and key store, you then specify the name and password for the
trust and key stores, and the path to the location for the generated files. You use these files in
later steps.
If you choose Select existing trust store, you then specify the password and file name for the
trust and key stores. You use these files in later steps.
5. After you have specified the trust store and key store, choose OK to close the Global settings
dialog box.
Configuring the environment for data extraction agents
You can install several data extraction agents on a single host. However, we recommend that you
run one data extraction agent on one host.
To run your data extraction agent, make sure that you use a host with at least four vCPUs and 32
GB memory. Also, set the minimum memory available to AWS SCT to at least four GB. For more
information, see Configuring additional memory.
Optimal configuration and number of agent hosts depend on the specific situation of each
customer. Make sure that you consider such factors as amount of data to migrate, network
bandwidth, time to extract data, and so on. You can perform a proof of concept (PoC) first, and
then configure your data extraction agents and hosts according to the results of this PoC.
Installing extraction agents
We recommend that you install multiple extraction agents on individual computers, separate from
the computer that is running the AWS Schema Conversion Tool.
Extraction agents are currently supported on the following operating systems:
• Microsoft Windows
• Red Hat Enterprise Linux (RHEL) 6.0
• Ubuntu Linux (version 14.04 and higher)
Configuration settings Version 1.0.672 410
AWS Schema Conversion Tool User Guide
Use the following procedure to install extraction agents. Repeat this procedure for each computer
that you want to install an extraction agent on.
To install an extraction agent
1. If you have not already downloaded the AWS SCT installer file, follow the instructions at
Installing and Configuring AWS Schema Conversion Tool to download it. The .zip file that
contains the AWS SCT installer file also contains the extraction agent installer file.
2. Download and install the latest version of Amazon Corretto 11. For more information, see
Downloads for Amazon Corretto 11 in the Amazon Corretto 11 User Guide.
3. Locate the installer file for your extraction agent in a subfolder named agents. For each
computer operating system, the correct file to install the extraction agent is shown following.
Operating system File name
Microsoft Windows
aws-schema-conversion-tool-extractor
-2.0.1. build-number .msi
RHEL
aws-schema-conversion-tool-extractor
-2.0.1. build-number .x86_64.rpm
Ubuntu Linux
aws-schema-conversion-tool-extractor
-2.0.1. build-number .deb
4. Install the extraction agent on a separate computer by copying the installer file to the new
computer.
5. Run the installer file. Use the instructions for your operating system, shown following.
Operating system Installation instructions
Microsoft Windows Double-click the file to run the installer.
RHEL Run the following commands in the folder that you downloaded or
moved the file to.
sudo rpm -ivh aws-schema-conversion-tool-extractor
-2.0.1. build-number .x86_64.rpm
Installing agents Version 1.0.672 411

AWS Schema Conversion Tool User Guide
Operating system Installation instructions
sudo ./sct-extractor-setup.sh --config
Ubuntu Linux Run the following commands in the folder that you downloaded or
moved the file to.
sudo dpkg -i aws-schema-conversion-tool-extractor
-2.0.1. build-number .deb
sudo ./sct-extractor-setup.sh --config
6. Choose Next, accept the license agreement, and choose Next.
7. Enter the path to install the AWS SCT data extraction agent, and choose Next.
8. Choose Install to install your data extraction agent.
AWS SCT installs your data extraction agent. To complete the installation, configure your data
extraction agent. AWS SCT automatically launches the configuration setup program. For more
information, see Configuring extraction agents.
9. Choose Finish to close the installation wizard after you configure your data extraction agent.
Configuring extraction agents
Use the following procedure to configure extraction agents. Repeat this procedure on each
computer that has an extraction agent installed.
To configure your extraction agent
1. Launch the configuration setup program:
• In Windows, AWS SCT launches the configuration setup program automatically during the
installation of a data extraction agent.
As needed, you can launch the setup program manually. To do so, run the
ConfigAgent.bat file in Windows. You can find this file in the folder where you installed
the agent.
•
In RHEL and Ubuntu, run the sct-extractor-setup.sh file from the location where you
installed the agent.
Configuring agents Version 1.0.672 412

AWS Schema Conversion Tool User Guide
The setup program prompts you for information. For each prompt, a default value appears.
2. Accept the default value at each prompt, or enter a new value.
Specify the following information:
• For Listening port, enter the port number the agent listens on.
• For Add a source vendor, enter yes, and then enter your source data warehouse platform.
• For JDBC driver, enter the location where you installed the JDBC drivers.
• For Working folder, enter the path where the AWS SCT data extraction agent will store the
extracted data. The working folder can be on a different computer from the agent, and a
single working folder can be shared by multiple agents on different computers.
• For Enable SSL communication, enter yes.
• For Key store, enter the location of the key store file.
• For Key store password, enter the password for the key store.
• For Enable client SSL authentication, enter yes.
• For Trust store, enter the location of the trust store file.
• For Trust store password, enter the password for the trust store.
The setup program updates the settings file for the extraction agent. The settings file is named
settings.properties, and is located where you installed the extraction agent.
The following is a sample settings file.
$ cat settings.properties
#extractor.start.fetch.size=20000
#extractor.out.file.size=10485760
#extractor.source.connection.pool.size=20
#extractor.source.connection.pool.min.evictable.idle.time.millis=30000
#extractor.extracting.thread.pool.size=10
vendor=TERADATA
driver.jars=/usr/share/lib/jdbc/terajdbc4.jar
port=8192
redshift.driver.jars=/usr/share/lib/jdbc/RedshiftJDBC42-1.2.43.1067.jar
working.folder=/data/sct
extractor.private.folder=/home/ubuntu
ssl.option=OFF
Configuring agents Version 1.0.672 413
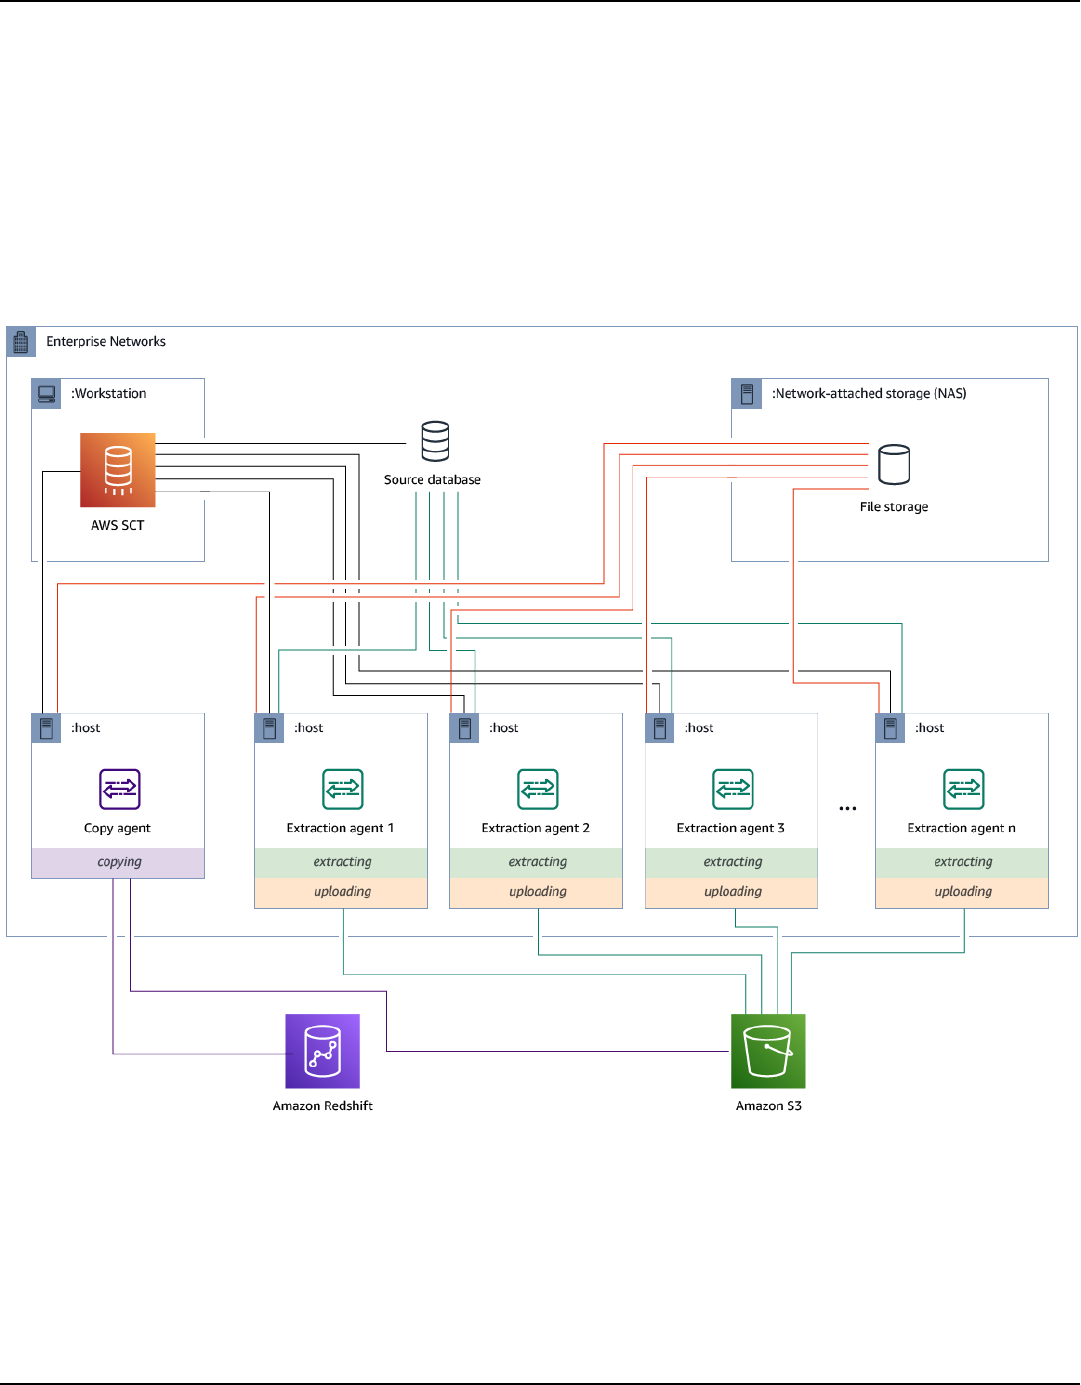
AWS Schema Conversion Tool User Guide
To change configuration settings, you can edit the settings.properties file using a text editor
or run the agent configuration again.
Installing and configuring extraction agents with dedicated copying
agents
You can install extraction agents in a configuration that has shared storage and a dedicated
copying agent. The following diagram illustrates this scenario.
That configuration can be useful when a source database server supports up to 120 connections,
and your network has ample storage attached. Use the procedure following to configure extraction
agents that have a dedicated copying agent.
Installing and configuring dedicated copying agents Version 1.0.672 414

AWS Schema Conversion Tool User Guide
To install and configure extraction agents and a dedicated copying agent
1. Make sure that the working directory of all extracting agents uses the same folder on shared
storage.
2. Install extractor agents by following the steps in Installing extraction agents.
3. Configure extraction agents by following the steps in Configuring extraction agents, but
specify only the source JDBC driver.
4. Configure a dedicated copying agent by following the steps in Configuring extraction agents,
but specify only an Amazon Redshift JDBC driver.
Starting extraction agents
Use the following procedure to start extraction agents. Repeat this procedure on each computer
that has an extraction agent installed.
Extraction agents act as listeners. When you start an agent with this procedure, the agent
starts listening for instructions. You send the agents instructions to extract data from your data
warehouse in a later section.
To start your extraction agent
• On the computer that has the extraction agent installed, run the command listed following for
your operating system.
Operating system Start command
Microsoft Windows
Double-click the StartAgent.bat batch file.
RHEL Run the following command in the path to the folder that you
installed the agent:
sudo initctl start sct-extractor
Ubuntu Linux Run the following command in the path to the folder that you
installed the agent. Use the command appropriate for your version
of Ubuntu.
Ubuntu 14.04: sudo initctl start sct-extractor
Starting agents Version 1.0.672 415

AWS Schema Conversion Tool User Guide
Operating system Start command
Ubuntu 15.04 and higher: sudo systemctl start sct-extra
ctor
To check the status of the agent, run the same command but replace start with status.
To stop an agent, run the same command but replace start with stop.
Registering extraction agents with the AWS Schema Conversion
Tool
You manage your extraction agents by using AWS SCT. The extraction agents act as listeners. When
they receive instructions from AWS SCT, they extract data from your data warehouse.
Use the following procedure to register extraction agents with your AWS SCT project.
To register an extraction agent
1. Start the AWS Schema Conversion Tool, and open a project.
2. Open the View menu, and then choose Data Migration view (other). The Agents tab appears.
If you have previously registered agents, AWS SCT displays them in a grid at the top of the tab.
3. Choose Register.
After you register an agent with an AWS SCT project, you can't register the same agent with a
different project. If you're no longer using an agent in an AWS SCT project, you can unregister
it. You can then register it with a different project.
4. Choose Redshift data agent, and then choose OK.
5. Enter your information on the Connection tab of the dialog box:
a. For Description, enter a description of the agent.
b. For Host Name, enter the host name or IP address of the computer of the agent.
c. For Port, enter the port number that the agent is listening on.
d. Choose Register to register the agent with your AWS SCT project.
6. Repeat the previous steps to register multiple agents with your AWS SCT project.
Registering agents Version 1.0.672 416

AWS Schema Conversion Tool User Guide
Hiding and recovering information for an AWS SCT agent
An AWS SCT agent encrypts a significant amount of information, for example passwords to user
key-trust stores, database accounts, AWS account information, and similar items. It does so using a
special file called seed.dat. By default, the agent creates this file in the working folder of the user
who first configures the agent.
Because different users can configure and run the agent, the path to seed.dat is stored in the
{extractor.private.folder} parameter of the settings.properties file. When the agent
starts, it can use this path to find the seed.dat file to access the key-trust store information for
the database it acts on.
You might need to recover passwords that an agent has stored in these cases:
•
If the user loses the seed.dat file and the AWS SCT agent's location and port didn't change.
•
If the user loses the seed.dat file and the AWS SCT agent's location and port has changed. In
this case, the change usually occurs because the agent was migrated to another host or port and
the information in the seed.dat file is no longer valid.
In these cases, if an agent is started without SSL, it starts and then accesses the previously created
agent storage. It then goes to the Waiting for recovery state.
However, in these cases, if an agent is started with SSL you can't restart it. This is because the
agent can't decrypt the passwords to certificates stored in the settings.properties file. In this
type of startup, the agent fails to start. An error similar to the following is written in the log: "The
agent could not start with SSL mode enabled. Please reconfigure the agent. Reason: The password
for keystore is incorrect."
To fix this, create a new agent and configure the agent to use the existing passwords for accessing
the SSL certificates. To do so, use the following procedure.
After you perform this procedure, the agent should run and go to the Waiting for recovery state.
AWS SCT automatically sends the needed passwords to an agent in the Waiting for recovery state.
When the agent has the passwords, it restarts any tasks. No further user action is required on the
AWS SCT side.
To reconfigure the agent and restore passwords for accessing SSL certificates
1. Install a new AWS SCT agent and run configuration.
Hiding and recovering information for an AWS SCT agent Version 1.0.672 417

AWS Schema Conversion Tool User Guide
2.
Change the agent.name property in the instance.properties file to the name of the
agent the storage was created for, to have the new agent work with existing agent storage.
The instance.properties file is stored in the agent's private folder, which is named using
the following convention: {output.folder}\dmt\{hostName}_{portNumber}\.
3.
Change the name of {output.folder} to that of the previous agent's output folder.
At this point, AWS SCT is still trying to access the old extractor at the old host and port. As
a result, the inaccessible extractor gets the status FAILED. You can then change the host and
port.
4. Modify the host, port, or both for the old agent by using the Modify command to redirect the
request flow to the new agent.
When AWS SCT can ping the new agent, AWS SCT receives the status Waiting for recovery from
the agent. AWS SCT then automatically recovers the passwords for the agent.
Each agent that works with the agent storage updates a special file called storage.lck located at
{output.folder}\{agentName}\storage\. This file contains the agent's network ID and the
time until which the storage is locked. When the agent works with the agent storage, it updates the
storage.lck file and extends the lease of the storage by 10 minutes every 5 minutes. No other
instance can work with this agent storage before the lease expires.
Creating data migration rules in AWS SCT
Before you extract your data with the AWS Schema Conversion Tool, you can set up filters that
reduce the amount of data that you extract. You can create data migration rules by using WHERE
clauses to reduce the data that you extract. For example, you can write a WHERE clause that selects
data from a single table.
You can create data migration rules and save the filters as part of your project. With your project
open, use the following procedure to create data migration rules.
To create data migration rules
1. Open the View menu, and then choose Data Migration view (other).
2. Choose Data migration rules, and then choose Add new rule.
3. Configure your data migration rule:
Creating data migration rules Version 1.0.672 418

AWS Schema Conversion Tool User Guide
a. For Name, enter a name for your data migration rule.
b.
For Where schema name is like, enter a filter to apply to schemas. In this filter, a WHERE
clause is evaluated by using a LIKE clause. To choose one schema, enter an exact schema
name. To choose multiple schemas, use the “%” character as a wildcard to match any
number of characters in the schema name.
c.
For table name like, enter a filter to apply to tables. In this filter, a WHERE clause is
evaluated by using a LIKE clause. To choose one table, enter an exact name. To choose
multiple tables, use the “%” character as a wildcard to match any number of characters in
the table name.
d.
For Where clause, enter a WHERE clause to filter data.
4. After you have configured your filter, choose Save to save your filter, or Cancel to cancel your
changes.
5. After you are done adding, editing, and deleting filters, choose Save all to save all your
changes.
To turn off a filter without deleting it, use the toggle icon. To duplicate an existing filter, use the
copy icon. To delete an existing filter, use the delete icon. To save any changes you make to your
filters, choose Save all.
Changing extractor and copy settings from project settings
From the Project settings window in AWS SCT, you can choose settings for data extraction agents
and the Amazon Redshift COPY command.
To choose these settings, choose Settings, Project settings, and then choose Data migration.
Here, you can edit Extraction settings, Amazon S3 settings, and Copy settings.
Use the instructions in the following table to provide the information for Extraction settings.
For this parameter Do this
Compression format Specify the compression format of the input files. Choose one
of the following options: GZIP, BZIP2, ZSTD, or No compressi
on.
Changing extractor and copy settings for data migration Version 1.0.672 419
AWS Schema Conversion Tool User Guide
For this parameter Do this
Delimiter character Specify the ASCII character that separates fields in the input
files. Nonprinting characters aren't supported.
NULL value as a string Turn this option on if your data includes a null terminator. If
this option is turned off, the Amazon Redshift COPY command
treats null as an end of the record and ends the load process.
Sorting strategy Use sorting to restart the extraction from the point of failure.
Choose one of the following sorting strategies: Use sorting
after the first fail (recommended), Use sorting if possible, or
Never use sorting. For more information, see the section called
“Sorting data”.
Source temp schema Enter the name of the schema in the source database, where
the extraction agent can create the temporary objects.
Out file size (in MB) Enter the size, in MB, of the files uploaded to Amazon S3.
Snowball out file size (in MB) Enter the size, in MB, of the files uploaded to AWS Snowball.
Files can be 1–1,000 MB in size.
Use automatic partition
ing. For Greenplum and
Netezza, enter the minimal
size of supported tables (in
megabytes)
Turn this option on to use table partitioning, and then enter
the size of tables to partition for Greenplum and Netezza
source databases. For Oracle to Amazon Redshift migration
s, you can keep this field empty because AWS SCT creates
subtasks for all partitioned tables.
Extract LOBs Turn this option on to extract large objects (LOBs) from your
source database. LOBs include BLOBs, CLOBs, NCLOBs, XML
files, and so on. For every LOB, AWS SCT extraction agents
create a data file.
Amazon S3 bucket LOBs
folder
Enter the location for AWS SCT extraction agents to store
LOBs.
Apply RTRIM to string
columns
Turn this option on to trim a specified set of characters from
the end of the extracted strings.
Changing extractor and copy settings for data migration Version 1.0.672 420
AWS Schema Conversion Tool User Guide
For this parameter Do this
Keep files locally after
upload to Amazon S3
Turn this option on to keep files on your local machine after
data extraction agents upload them to Amazon S3.
Use the instructions in the following table to provide the information for Amazon S3 settings.
For this parameter Do this
Use proxy Turn this option on to use a proxy server to upload data to
Amazon S3. Then choose the data transfer protocol, enter the
host name, port, user name, and password.
Endpoint type Choose FIPS to use the Federal Information Processing
Standard (FIPS) endpoint. Choose VPCE to use the virtual
private cloud (VPC) endpoint. Then for VPC endpoint, enter
the Domain Name System (DNS) of your VPC endpoint.
Keep files on Amazon S3
after copying to Amazon
Redshift
Turn this option on to keep extracted files on Amazon S3 after
copying these files to Amazon Redshift.
Use the instructions in the following table to provide the information for Copy settings.
For this parameter Do this
Maximum error count Enter the number of load errors. After the operation reaches
this limit, the AWS SCT data extraction agents end the data
load process. The default value is 0, which means that the AWS
SCT data extraction agents continue the data load regardless
of the failures.
Replace not valid UTF-8
characters
Turn this option on to replace not valid UTF-8 characters with
the specified character and continue the data load operation.
Changing extractor and copy settings for data migration Version 1.0.672 421
AWS Schema Conversion Tool User Guide
For this parameter Do this
Use blank as null value Turn this option on to load blank fields that consist of white
space characters as null.
Use empty as null value
Turn this option on to load empty CHAR and VARCHAR fields as
null.
Truncate columns Turn this option on to truncate data in columns to fit the data
type specification.
Automatic compression Turn this option on to apply compression encoding during a
copy operation.
Automatic statistics refresh Turn this option on to refresh the statistics at the end of a copy
operation.
Check file before load Turn this option on to validate data files before loading them
to Amazon Redshift.
Sorting data before migrating using AWS SCT
Sorting your data before migration with AWS SCT provides some benefits. If you sort data first,
AWS SCT can restart the extraction agent at the last saved point after a failure. Also, if you are
migrating data to Amazon Redshift and you sort data first, AWS SCT can insert data into to
Amazon Redshift faster.
These benefits have to do with how AWS SCT creates data extraction queries. In some cases, AWS
SCT uses the DENSE_RANK analytic function in these queries. However, DENSE_RANK can use lots
of time and server resources to sort the dataset that results from extraction, so if AWS SCT can
work without it, it does.
To sort data before migrating using AWS SCT
1. Open an AWS SCT project.
2. Open the context (right-click) menu for the object, and then choose Create Local task.
3. Choose the Advanced tab, and for Sorting strategy, choose an option:
Sorting data Version 1.0.672 422
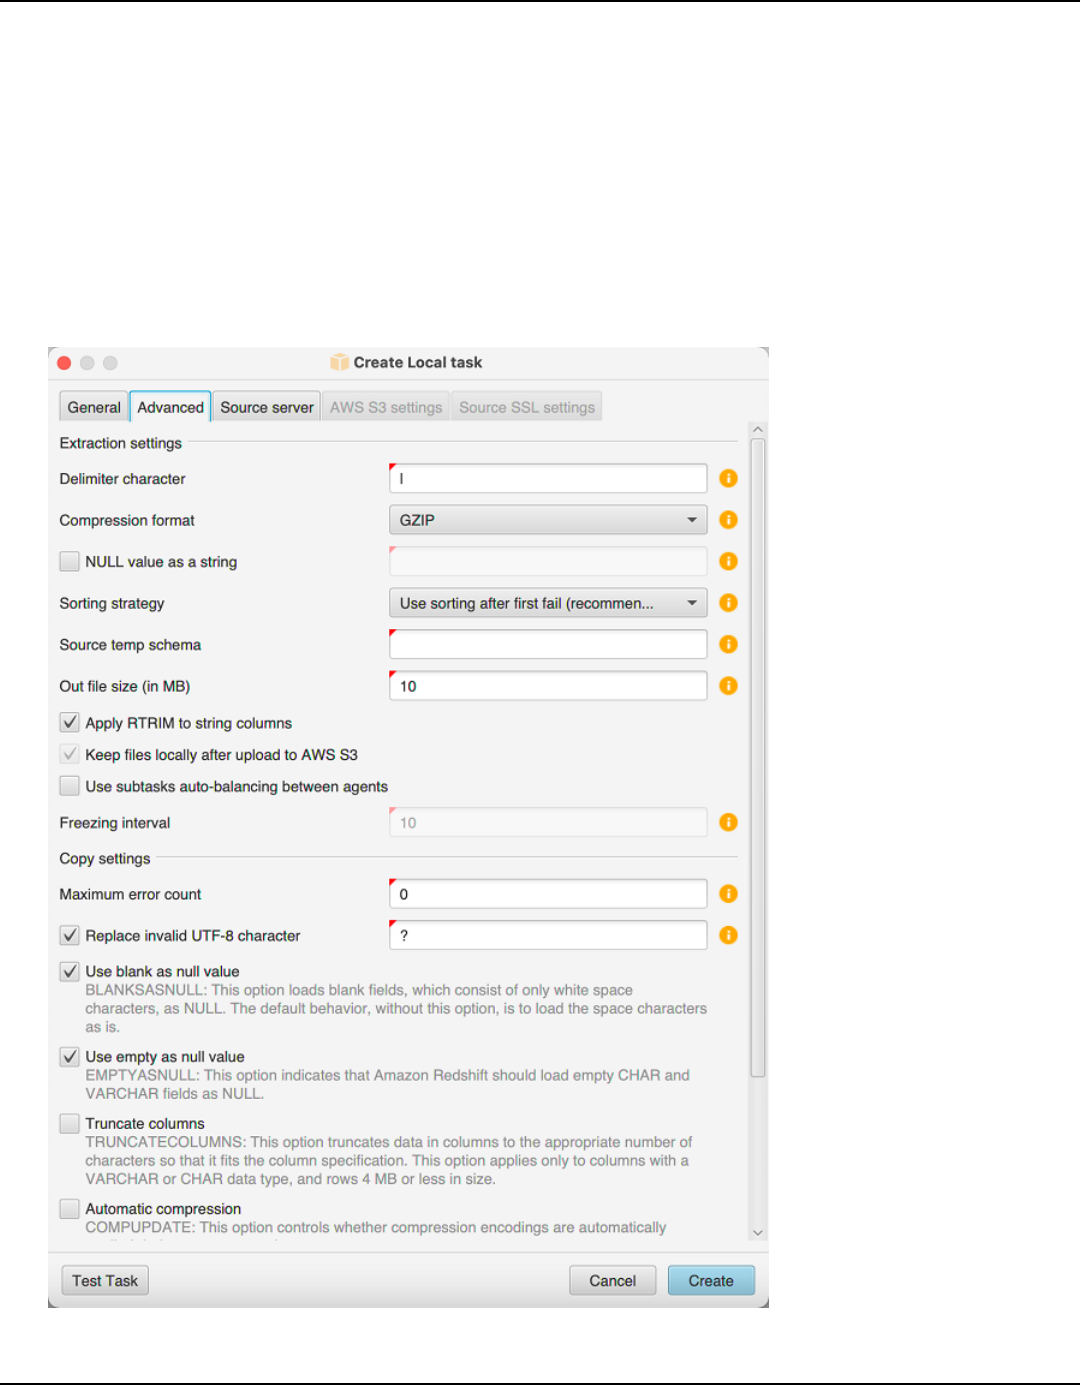
AWS Schema Conversion Tool User Guide
• Never use sorting – The extraction agent doesn't use the DENSE_RANK analytic function
and restarts from the beginning if a failure occurs.
• Use sorting if possible – The extraction agent uses DENSE_RANK if the table has a primary
key or a unique constraint.
• Use sorting after first fail (recommended) – The extraction agent first tries to get the data
without using DENSE_RANK. If the first attempt fails, the extraction agent rebuilds the
query using DENSE_RANK and preserves its location in case of failure.
Sorting data Version 1.0.672 423

AWS Schema Conversion Tool User Guide
4. Set additional parameters as described following, and then choose Create to create your data
extraction task.
Creating, running, and monitoring an AWS SCT data extraction
task
Use the following procedures to create, run, and monitor data extraction tasks.
To assign tasks to agents and migrate data
1. In the AWS Schema Conversion Tool, after you have converted your schema, choose one or
more tables from the left panel of your project.
You can choose all tables, but we recommend against that for performance reasons. We
recommend that you create multiple tasks for multiple tables based on the size of the tables in
your data warehouse.
2. Open the context (right-click) menu for each table, and then choose Create task. The Create
Local task dialog box opens.
3. For Task name, enter a name for the task.
4. For Migration mode, choose one of the following:
• Extract only – Extract your data, and save the data to your local working folders.
• Extract and upload – Extract your data, and upload your data to Amazon S3.
• Extract, upload and copy – Extract your data, upload your data to Amazon S3, and copy it
into your Amazon Redshift data warehouse.
5. For Encryption type, choose one of the following:
• NONE – Turn off data encryption for the entire data migration process.
• CSE_SK – Use client-side encryption with a symmetric key to migrate data. AWS SCT
automatically generates encryption keys and transmits them to data extraction agents
using Secure Sockets Layer (SSL). AWS SCT doesn't encrypt large objects (LOBs) during data
migration.
6. Choose Extract LOBs to extract large objects. If you don't need to extract large objects, you
can clear the check box. Doing this reduces the amount of data that you extract.
Creating, running, and monitoring an AWS SCT task Version 1.0.672 424

AWS Schema Conversion Tool User Guide
7. To see detailed information about a task, choose Enable task logging. You can use the task log
to debug problems.
If you enable task logging, choose the level of detail that you want to see. The levels are the
following, with each level including all messages from the previous level:
•
ERROR – The smallest amount of detail.
•
WARNING
•
INFO
•
DEBUG
•
TRACE – The largest amount of detail.
8. To export data from BigQuery, AWS SCT uses the Google Cloud Storage bucket folder. In this
folder, data extraction agents store your source data.
To enter the path to your Google Cloud Storage bucket folder, choose Advanced. For Google
CS bucket folder, enter the bucket name and the folder name.
9. To assume a role for your data extraction agent user, choose Amazon S3 settings. For IAM
role, enter the name of the role to use. For Region, choose the AWS Region for this role.
10. Choose Test task to verify that you can connect to your working folder, Amazon S3 bucket,
and Amazon Redshift data warehouse. The verification depends on the migration mode you
chose.
11. Choose Create to create the task.
12. Repeat the previous steps to create tasks for all the data that you want to migrate.
To run and monitor tasks
1. For View, choose Data Migration view. The Agents tab appears.
2. Choose the Tasks tab. Your tasks appear in the grid at the top as shown following. You can see
the status of a task in the top grid, and the status of its subtasks in the bottom grid.
Creating, running, and monitoring an AWS SCT task Version 1.0.672 425
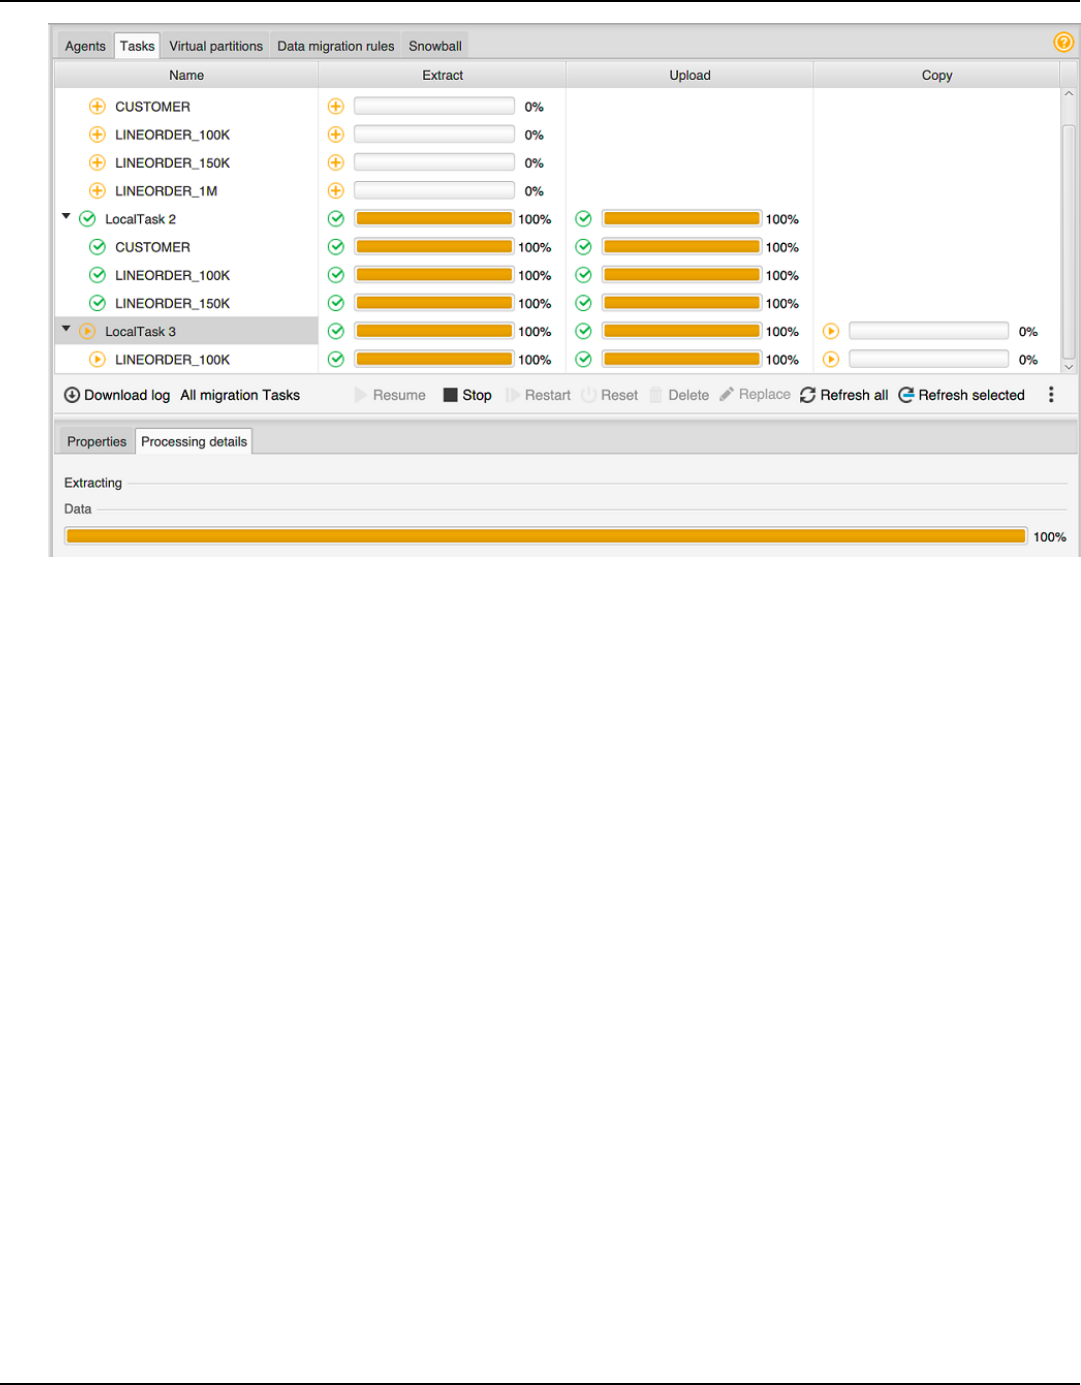
AWS Schema Conversion Tool User Guide
3. Choose a task in the top grid and expand it. Depending on the migration mode you chose, you
see the task divided into Extract, Upload, and Copy.
4. Choose Start for a task to start that task. You can monitor the status of your tasks while they
work. The subtasks run in parallel. The extract, upload, and copy also run in parallel.
5. If you enabled logging when you set up the task, you can view the log:
a. Choose Download log. A message appears with the name of the folder that contains the
log file. Dismiss the message.
b. A link appears in the Task details tab. Choose the link to open the folder that contains the
log file.
You can close AWS SCT, and your agents and tasks continue to run. You can reopen AWS SCT later
to check the status of your tasks and view the task logs.
You can save data extraction tasks to your local disk and restore them to the same or another
project by using export and import. To export a task, make sure that you have at least one
extraction task created in a project. You can import a single extraction task or all of the tasks
created in the project.
When you export an extraction task, AWS SCT creates a separate .xml file for that task. The .xml
file stores that task's metadata information, such as task properties, description, and subtasks. The
Creating, running, and monitoring an AWS SCT task Version 1.0.672 426

AWS Schema Conversion Tool User Guide
.xml file doesn't contain information about processing of an extraction task. Information like the
following is recreated when the task is imported:
• Task progress
• Subtask and stage states
• Distribution of extracting agents by subtasks and stages
• Task and subtask IDs
• Task name
Exporting and importing an AWS SCT data extraction task
You can quickly save an existing task from one project and restore it in another project (or the same
project) using AWS SCT export and import. Use the following procedure to export and import data
extraction tasks.
To export and import a data extraction task
1. For View, choose Data Migration view. The Agents tab appears.
2. Choose the Tasks tab. Your tasks are listed in the grid that appears.
3. Choose the three vertically aligned dots (ellipsis icon) located at the lower right corner under
the list of tasks.
4. Choose Export task from the pop-up menu.
5.
Choose the folder where you want AWS SCT to place the task export .xml file.
AWS SCT creates the task export file with a file name format of TASK-DESCRIPTION_TASK-
ID.xml.
6. Choose the three vertically aligned dots (ellipsis icon) at lower right under the list of tasks.
7. Choose Import task from the pop-up menu.
You can import an extraction task to a project connected to the source database, and the
project has at least one active registered extraction agent.
8.
Select the .xml file for the extraction task you exported.
AWS SCT gets the extraction task's parameters from the file, creates the task, and adds the
task to the extracting agents.
9. Repeat these steps to export and import additional data extraction tasks.
Exporting and importing a data extraction task Version 1.0.672 427

AWS Schema Conversion Tool User Guide
At the end of this process, your export and import are complete and your data extraction tasks are
ready for use.
Data extraction using an AWS Snowball Edge device
The process of using AWS SCT and AWS Snowball Edge has several steps. The migration involves
a local task, where AWS SCT uses a data extraction agent to move the data to the AWS Snowball
Edge device, then an intermediate action where AWS copies the data from the AWS Snowball Edge
device to an Amazon S3 bucket. The process finishes AWS SCT loading the data from the Amazon
S3 bucket to Amazon Redshift.
The sections following this overview provide a step-by-step guide to each of these tasks. The
procedure assumes that you have AWS SCT installed and that you have configured and registered a
data extraction agent on a dedicated machine.
Perform the following steps to migrate data from a local data store to an AWS data store using
AWS Snowball Edge.
1. Create an AWS Snowball Edge job using the AWS Snowball console.
2. Unlock the AWS Snowball Edge device using the local, dedicated Linux machine.
3. Create a new project in AWS SCT.
4. Install and configure your data extraction agents.
5. Create and set permissions for the Amazon S3 bucket to use.
6. Import an AWS Snowball job to your AWS SCT project.
7. Register your data extraction agent in AWS SCT.
8. Create a local task in AWS SCT.
9. Run and monitor the data migration task in AWS SCT.
Step-by-step procedures for migrating data using AWS SCT and AWS
Snowball Edge
The following sections provide detailed information on the migration steps.
Step 1: Create an AWS Snowball Edge job
Create an AWS Snowball job by following the steps outlined in the section Creating an AWS
Snowball Edge Job in the AWS Snowball Edge Developer Guide.
Data extraction using an AWS Snowball Edge device Version 1.0.672 428

AWS Schema Conversion Tool User Guide
Step 2: Unlock the AWS Snowball Edge device
Run the commands that unlock and provide credentials to the Snowball Edge device from the
machine where you installed the AWS DMS agent. By running these commands, you can be sure
that the AWS DMS agent call connects to the AWS Snowball Edge device. For more information
about unlocking the AWS Snowball Edge device, see Unlocking the Snowball Edge.
aws s3 ls s3://<bucket-name> --profile <Snowball Edge profile> --endpoint http://
<Snowball IP>:8080 --recursive
Step 3: Create a new AWS SCT project
Next, create a new AWS SCT project.
To create a new project in AWS SCT
1. Start the AWS Schema Conversion Tool. On the File menu, choose New project. The New
project dialog box appears.
2. Enter a name for your project, which is stored locally on your computer.
3. Enter the location for your local project file.
4. Choose OK to create your AWS SCT project.
5. Choose Add source to add a new source database to your AWS SCT project.
6. Choose Add target to add a new target platform in your AWS SCT project.
7. Choose the source database schema in the left panel.
8. In the right panel, specify the target database platform for the selected source schema.
9. Choose Create mapping. This button becomes active after you choose the source database
schema and the target database platform.
Step 4: Install and configure your data extraction agent
AWS SCT uses a data extraction agent to migrate data to Amazon Redshift. The .zip file that you
downloaded to install AWS SCT, includes the extraction agent installer file. You can install the
data extraction agent in Windows, Red Hat Enterprise Linux, or Ubuntu. For more information, see
Installing extraction agents.
To configure your data extraction agent, enter your source and target database engines. Also, make
sure that you downloaded JDBC drivers for your source and target databases on the computer
Step-by-step procedures for migrating data using AWS SCT and AWS Snowball Edge Version 1.0.672 429

AWS Schema Conversion Tool User Guide
where you run your data extraction agent. Data extraction agents use these drivers to connect
to your source and target databases. For more information, see Installing JDBC drivers for AWS
Schema Conversion Tool.
In Windows, the data extraction agent installer launches the configuration wizard in the command
prompt window. In Linux, run the sct-extractor-setup.sh file from the location where you
installed the agent.
Step 5: Configure AWS SCT to access the Amazon S3 bucket
For information on configuring an Amazon S3 bucket, see Buckets overview in the Amazon Simple
Storage Service User Guide.
Step 6: Import an AWS Snowball job to your AWS SCT project
To connect your AWS SCT project with your AWS Snowball Edge device, import your AWS Snowball
job.
To import your AWS Snowball job
1. Open the Settings menu, and then choose Global settings. The Global settings dialog box
appears.
2. Choose AWS service profiles, and then choose Import job.
3. Choose your AWS Snowball job.
4. Enter your AWS Snowball IP. For more information, see Changing Your IP Address in the AWS
Snowball User Guide.
5. Enter your AWS Snowball Port. For more information, see Ports Required to Use AWS Services
on an AWS Snowball Edge Device in the AWS Snowball Edge Developer Guide.
6. Enter your AWS Snowball access key and AWS Snowball secret key. For more information,
see Authorization and Access Control in AWS Snowball in the AWS Snowball User Guide.
7. Choose Apply, and then choose OK.
Step 7: Register a data extraction agent in AWS SCT
In this section, you register the data extraction agent in AWS SCT.
To register a data extraction agent
1. On the View menu, choose Data migration view (other), and then choose Register.
Step-by-step procedures for migrating data using AWS SCT and AWS Snowball Edge Version 1.0.672 430

AWS Schema Conversion Tool User Guide
2. For Description, enter a name for your data extraction agent.
3. For Host name, enter the IP address of the computer where you run your data extraction
agent.
4. For Port, enter the listening port that you configured.
5. Choose Register.
Step 8: Creating a local task
Next, you create the migration task. The task includes two subtasks. One subtask migrates data
from the source database to the AWS Snowball Edge appliance. The other subtask takes the data
that the appliance loads into an Amazon S3 bucket and migrates it to the target database.
To create the migration task
1. On the View menu, and then choose Data migration view (other).
2. In the left panel that displays the schema from your source database, choose a schema object
to migrate. Open the context (right-click) menu for the object, and then choose Create local
task.
3. For Task name, enter a descriptive name for your data migration task.
4. For Migration mode, choose Extract, upload, and copy.
5. Choose Amazon S3 settings.
6. Select Use Snowball.
7. Enter folders and subfolders in your Amazon S3 bucket where the data extraction agent can
store data.
8. Choose Create to create the task.
Step 9: Running and monitoring the data migration task in AWS SCT
To start your data migration task, choose Start. Make sure that you established connections to the
source database, the Amazon S3 bucket, the AWS Snowball device, as well as the connection to the
target database on AWS.
You can monitor and manage the data migration tasks and their subtasks in the Tasks tab. You can
see the data migration progress, as well as pause or restart your data migration tasks.
Step-by-step procedures for migrating data using AWS SCT and AWS Snowball Edge Version 1.0.672 431

AWS Schema Conversion Tool User Guide
Data extraction task output
After your migration tasks complete, your data is ready. Use the following information to
determine how to proceed based on the migration mode you chose and the location of your data.
Migration
mode
Data location
Extract,
upload and
copy
The data is already in your Amazon Redshift data warehouse. You can verify
that the data is there, and start using it. For more information, see Connecting
to clusters from client tools and code.
Extract and
upload
The extraction agents saved your data as files in your Amazon S3 bucket. You
can use the Amazon Redshift COPY command to load your data to Amazon
Redshift. For more information, see Loading data from Amazon S3 in the
Amazon Redshift documentation.
There are multiple folders in your Amazon S3 bucket, corresponding to the
extraction tasks that you set up. When you load your data to Amazon Redshift,
specify the name of the manifest file created by each task. The manifest file
appears in the task folder in your Amazon S3 bucket as shown following.
Data extraction task output Version 1.0.672 432
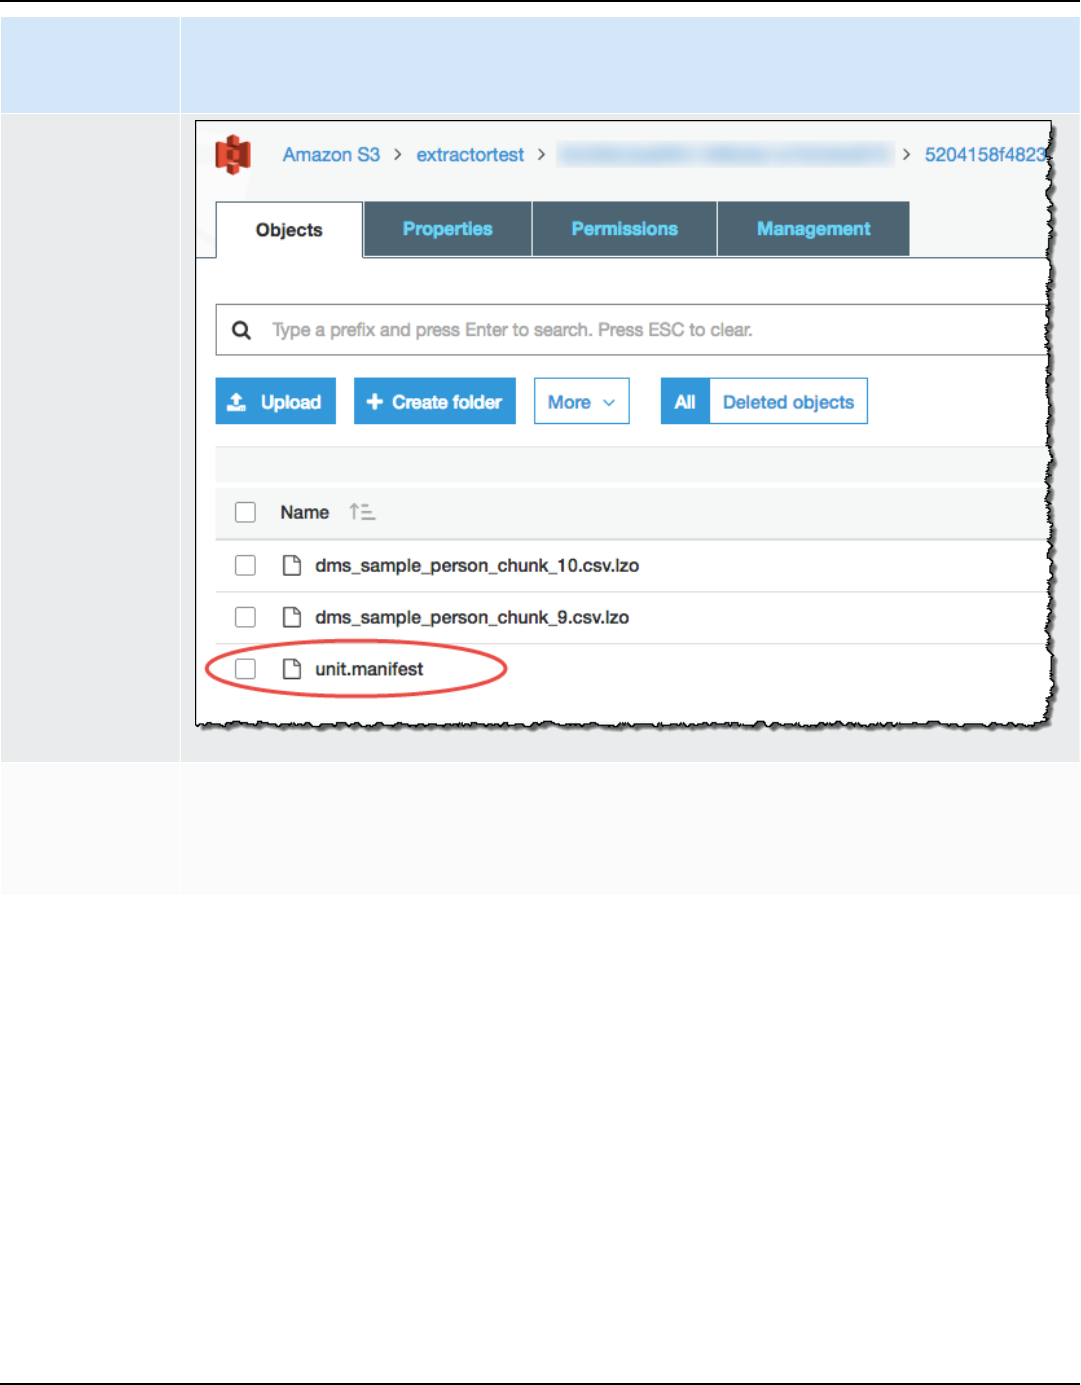
AWS Schema Conversion Tool User Guide
Migration
mode
Data location
Extract only The extraction agents saved your data as files in your working folder. Manually
copy your data to your Amazon S3 bucket, and then proceed with the instructi
ons for Extract and upload.
Using virtual partitioning with AWS Schema Conversion Tool
You can often best manage large non-partitioned tables by creating subtasks that create virtual
partitions of the table data using filtering rules. In AWS SCT, you can create virtual partitions for
your migrated data. There are three partition types, which work with specific data types:
• The RANGE partition type works with numeric and date and time data types.
• The LIST partition type works with numeric, character, and date and time data types.
• The DATE AUTO SPLIT partition type works with numeric, date, and time data types.
Using virtual partitioning Version 1.0.672 433

AWS Schema Conversion Tool User Guide
AWS SCT validates the values you provide for creating a partition. For example, if you attempt to
partition a column with data type NUMERIC but you provide values of a different data type, AWS
SCT throws an error.
Also, if you are using AWS SCT to migrate data to Amazon Redshift, you can use native partitioning
to manage the migration oif large tables. For more information, see Using native partitioning.
Limits when creating virtual partitioning
These are limitations to creating a virtual partition:
• You can only use virtual partitioning only for nonpartitioned tables.
• You can use virtual partitioning only in the data migration view.
• You can't use the option UNION ALL VIEW with virtual partitioning.
RANGE partition type
The RANGE partition type partitions data based on a range of column values for numeric and date
and time data types. This partition type creates a WHERE clause, and you provide the range of
values for each partition. To specify a list of values for the partitioned column, use the Values box.
You can load value information by using a .csv file.
The RANGE partition type creates default partitions at both ends of the partition values. These
default partitions catch any data that is less than or greater than the specified partition values.
For example, you can create multiple partitions based on a value range that you provide. In the
following example, the partitioning values for LO_TAX are specified to create multiple partitions.
Partition1: WHERE LO_TAX <= 10000.9
Partition2: WHERE LO_TAX > 10000.9 AND LO_TAX <= 15005.5
Partition3: WHERE LO_TAX > 15005.5 AND LO_TAX <= 25005.95
To create a RANGE virtual partition
1. Open AWS SCT.
2. Choose Data Migration view (other) mode.
3. Choose the table where you want to set up virtual partitioning. Open the context (right-click)
menu for the table, and choose Add virtual partitioning.
Limits when creating virtual partitioning Version 1.0.672 434
AWS Schema Conversion Tool User Guide
4. In the Add virtual partitioning dialog box, enter the information as follows.
Option Action
Partition type Choose RANGE. The dialog box UI changes depending on the type
you choose.
Column name Choose the column that you want to partition.
Column type Choose the data type for the values in the column.
Values Add new values by typing each value in the New Value box, then
choosing the plus sign to add the value.
Load from file (Optional) Enter the name of a .csv file that contains the partition
values.
5. Choose OK.
LIST partition type
The LIST partition type partitions data based on column values for numeric, character, and date
and time data types. This partition type creates a WHERE clause, and you provide the values for
each partition. To specify a list of values for the partitioned column, use the Values box. You can
load value information by using a .csv file.
For example, you can create multiple partitions based on a value you provide. In the following
example, the partitioning values for LO_ORDERKEY are specified to create multiple partitions.
Partition1: WHERE LO_ORDERKEY = 1
Partition2: WHERE LO_ORDERKEY = 2
Partition3: WHERE LO_ORDERKEY = 3
…
PartitionN: WHERE LO_ORDERKEY = USER_VALUE_N
You can also create a default partition for values not included in the ones specified.
You can use the LIST partition type to filter the source data if you want to exclude particular values
from the migration. For example, suppose that you want to omit rows with LO_ORDERKEY = 4. In
LIST partition type Version 1.0.672 435

AWS Schema Conversion Tool User Guide
this case, don't include the value 4 in the list of partition values and make sure that Include other
values isn't chosen.
To create a LIST virtual partition
1. Open AWS SCT.
2. Choose Data Migration view (other) mode.
3. Choose the table where you want to set up virtual partitioning. Open the context (right-click)
menu for the table, and choose Add virtual partitioning.
4. In the Add virtual partitioning dialog box, enter the information as follows.
Option Action
Partition type Choose LIST. The dialog box UI changes depending on the type you
choose.
Column name Choose the column that you want to partition.
New value Type a value here to add it to the set of partitioning values.
Include other
values
Choose this option to create a default partition where all values that
don’t meet the partitioning criteria are stored.
Load from file (Optional) Enter the name of a .csv file that contains the partition
values.
5. Choose OK.
DATE AUTO SPLIT partition type
The DATE AUTO SPLIT partition type is an automated way of generating RANGE partitions. With
DATA AUTO SPLIT, you tell AWS SCT the partitioning attribute, where to start and end, and the size
of the range between the values. Then AWS SCT calculates the partition values automatically.
DATA AUTO SPLIT automates a lot of the work that is involved with creating range partitions. The
tradeoff between using this technique and range partitioning is how much control you need over
the partition boundaries. The automatic split process always creates equal size (uniform) ranges.
DATE AUTO SPLIT partition type Version 1.0.672 436

AWS Schema Conversion Tool User Guide
Range partitioning enables you to vary the size of each range as needed for your particular data
distribution. For example, you can use daily, weekly, biweekly, monthly, and so on.
Partition1: WHERE LO_ORDERDATE >= ‘1954-10-10’ AND LO_ORDERDATE < ‘1954-10-24’
Partition2: WHERE LO_ORDERDATE >= ‘1954-10-24’ AND LO_ORDERDATE < ‘1954-11-06’
Partition3: WHERE LO_ORDERDATE >= ‘1954-11-06’ AND LO_ORDERDATE < ‘1954-11-20’
…
PartitionN: WHERE LO_ORDERDATE >= USER_VALUE_N AND LO_ORDERDATE <= ‘2017-08-13’
To create a DATE AUTO SPLIT virtual partition
1. Open AWS SCT.
2. Choose Data Migration view (other) mode.
3. Choose the table where you want to set up virtual partitioning. Open the context (right-click)
menu for the table, and choose Add virtual partitioning.
4. In the Add virtual partitioning dialog box, enter information as follows.
Option Action
Partition type Choose DATE AUTO SPLIT. The dialog box UI changes depending on
the type you choose.
Column name Choose the column that you want to partition.
Start date Type a start date.
End date Type an end date.
Interval Enter the interval unit, and choose the value for that unit.
5. Choose OK.
Using native partitioning
To speed up data migration, your data extraction agents can use native partitions of tables on
your source data warehouse server. AWS SCT supports native partitioning for migrations from
Greenplum, Netezza, and Oracle to Amazon Redshift.
Using native partitioning Version 1.0.672 437

AWS Schema Conversion Tool User Guide
For example, after you create a project, you might collect statistics on a schema and analyze the
size of the tables selected for migration. For tables that exceed the size specified, AWS SCT triggers
the native partitioning mechanism.
To use native partitioning
1. Open AWS SCT, and choose New project for File. The New project dialog box appears.
2. Create a new project, add your source and target servers, and create mapping rules. For more
information, see Starting and managing Projects in AWS SCT.
3. Choose View, and then choose Main view.
4. For Project settings, choose the Data migration tab. Choose Use automatic partitioning.
For Greenplum and Netezza source databases, enter the minimal size of supported tables in
megabytes (for example, 100). AWS SCT automatically creates separate migration subtasks
for each native partition that isn't empty. For Oracle to Amazon Redshift migrations, AWS SCT
creates subtasks for all partitioned tables.
5. In the left panel that displays the schema from your source database, choose a schema. Open
the context (right-click) menu for the object, and chose Collect statistics. For data migration
from Oracle to Amazon Redshift, you can skip this step.
6. Choose all tables to migrate.
7. Register the required number of agents. For more information, see Registering extraction
agents with the AWS Schema Conversion Tool.
8. Create a data extraction task for the selected tables. For more information, see Creating,
running, and monitoring an AWS SCT data extraction task.
Check if large tables are split into subtasks, and that each subtask matches the dataset that
presents a part of the table located on one slice in your source data warehouse.
9. Start and monitor the migration process until AWS SCT data extraction agents complete the
migration of data from your source tables.
Migrating LOBs to Amazon Redshift
Amazon Redshift doesn't support storing large binary objects (LOBs). However, if you need to
migrate one or more LOBs to Amazon Redshift, AWS SCT can perform the migration. To do so, AWS
SCT uses an Amazon S3 bucket to store the LOBs and writes the URL for the Amazon S3 bucket
into the migrated data stored in Amazon Redshift.
Working with LOBs Version 1.0.672 438

AWS Schema Conversion Tool User Guide
To migrate LOBs to Amazon Redshift
1. Open an AWS SCT project.
2. Connect to the source and target databases. Refresh metadata from the target database, and
make sure that the converted tables exist there.
3. For Actions, choose Create local task.
4. For Migration mode, choose one of the following:
• Extract and upload to extract your data, and upload your data to Amazon S3.
• Extract, upload and copy to extract your data, upload your data to Amazon S3, and copy it
into your Amazon Redshift data warehouse.
5. Choose Amazon S3 settings.
6. For Amazon S3 bucket LOBs folder, enter the name of the folder in an Amazon S3 bucket
where you want the LOBs stored.
If you use AWS service profile, this field is optional. AWS SCT can use the default settings from
your profile. To use another Amazon S3 bucket, enter the path here.
7. Turn on the Use proxy option to use a proxy server to upload data to Amazon S3. Then choose
the data transfer protocol, enter the host name, port, user name, and password.
8. For Endpoint type, choose FIPS to use the Federal Information Processing Standard (FIPS)
endpoint. Choose VPCE to use the virtual private cloud (VPC) endpoint. Then for VPC
endpoint, enter the Domain Name System (DNS) of your VPC endpoint.
9. Turn on the Keep files on Amazon S3 after copying to Amazon Redshift option to keep
extracted files on Amazon S3 after copying these files to Amazon Redshift.
10. Choose Create to create the task.
Best practices and troubleshooting for data extraction agents
The following are some best practices and troubleshooting suggestions for using extraction agents.
Issue Troubleshooting suggestions
Performance is slow To improve performance, we recommend the following:
• Install multiple agents.
Best practices and troubleshooting Version 1.0.672 439

AWS Schema Conversion Tool User Guide
Issue Troubleshooting suggestions
• Install agents on computers close to your data warehouse.
• Don't run all tables on a single agent task.
Contention delays Avoid having too many agents accessing your data warehouse
at the same time.
An agent goes down
temporarily
If an agent is down, the status of each of its tasks appears as
failed in AWS SCT. If you wait, in some cases the agent can
recover. In this case, the status of its tasks updates in AWS SCT.
An agent goes down
permanently
If the computer running an agent goes down permanently, and
that agent is running a task, you can substitute a new agent
to continue the task. You can substitute a new agent only if
the working folder of the original agent was not on the same
computer as the original agent. To substitute a new agent, do
the following:
• Install an agent on a new computer.
• Configure the new agent with the same settings, including
port number and working folder, as the original agent.
• Start the agent. After the agent starts, the task discovers
the new available agent and continues running on the new
agent.
Best practices and troubleshooting Version 1.0.672 440

AWS Schema Conversion Tool User Guide
Converting application SQL using AWS SCT
When you convert your database schema from one engine to another, you also need to update the
SQL code in your applications to interact with the new database engine instead of the old one. You
can view, analyze, edit, and save the converted SQL code.
You can use the AWS Schema Conversion Tool (AWS SCT) to convert the SQL code in your C++, C#,
Java, or other application code. For an Oracle to PostgreSQL conversion, you can use AWS SCT to
convert SQL*Plus code to PSQL. Also, for an Oracle to PostgreSQL conversion, you can use AWS
SCT to convert SQL code embedded into C#, C++, Java, and Pro*C applications.
Topics
• Overview of converting application SQL
• Converting SQL code in your applications with AWS SCT
• Converting SQL code in C# applications with AWS Schema Conversion Tool
• Converting SQL code in C++ applications with AWS Schema Conversion Tool
• Converting SQL code in Java applications with AWS Schema Conversion Tool
• Converting SQL code in Pro*C applications with AWS Schema Conversion Tool
Overview of converting application SQL
To convert the SQL code in your application, take the following high-level steps:
• Create an application conversion project – The application conversion project is a child of
the database schema conversion project. Each database schema conversion project can have
one or more child application conversion projects. For more information, see Creating generic
application conversion projects in AWS SCT.
• Analyze and convert your SQL code – AWS SCT analyzes your application, extracts the SQL
code, and creates a local version of the converted SQL for you to review and edit. The tool
doesn't change the code in your application until you are ready. For more information, see
Analyzing and converting your SQL code in AWS SCT.
• Create an application assessment report – The application assessment report provides
important information about the conversion of the application SQL code from your source
database schema to your target database schema. For more information, see Creating and using
the AWS SCT assessment report in AWS SCT.
Overview of converting application SQL Version 1.0.672 441

AWS Schema Conversion Tool User Guide
• Edit, apply changes to, and save your converted SQL code – The assessment report includes
a list of SQL code items that can't be converted automatically. For these items, you can edit the
SQL code manually to perform the conversion. For more information, see Editing and saving your
converted SQL code with AWS SCT.
Converting SQL code in your applications with AWS SCT
You can use AWS SCT to convert SQL code embedded into your applications. The generic AWS SCT
application converter treats your application code as plain text. It scans your application code and
extracts SQL code with regular expressions. This converter supports different types of source code
files and works with application code that is written in any programming language.
The generic application converter has the following limitations. It doesn't dive deep into the
application logic that is specific for the programming language of your application. Also, the
generic converter doesn't support SQL statements from different application objects, such as
functions, parameters, local variables, and so on.
To improve your application SQL code conversion, use language-specific application SQL code
converters. For more information, see SQL code in C# applications, SQL code in Java, and SQL code
in Pro*C.
Creating generic application conversion projects in AWS SCT
In the AWS Schema Conversion Tool, the application conversion project is a child of the database
schema conversion project. Each database schema conversion project can have one or more child
application conversion projects.
Note
AWS SCT does not support conversion between the following sources and targets:
• Oracle to Oracle
• PostgreSQL to PostgreSQL or Aurora PostgreSQL
• MySQL to MySQL
• SQL Server to SQL Server
• Amazon Redshift to Amazon Redshift
• SQL Server to Babelfish
SQL code Version 1.0.672 442
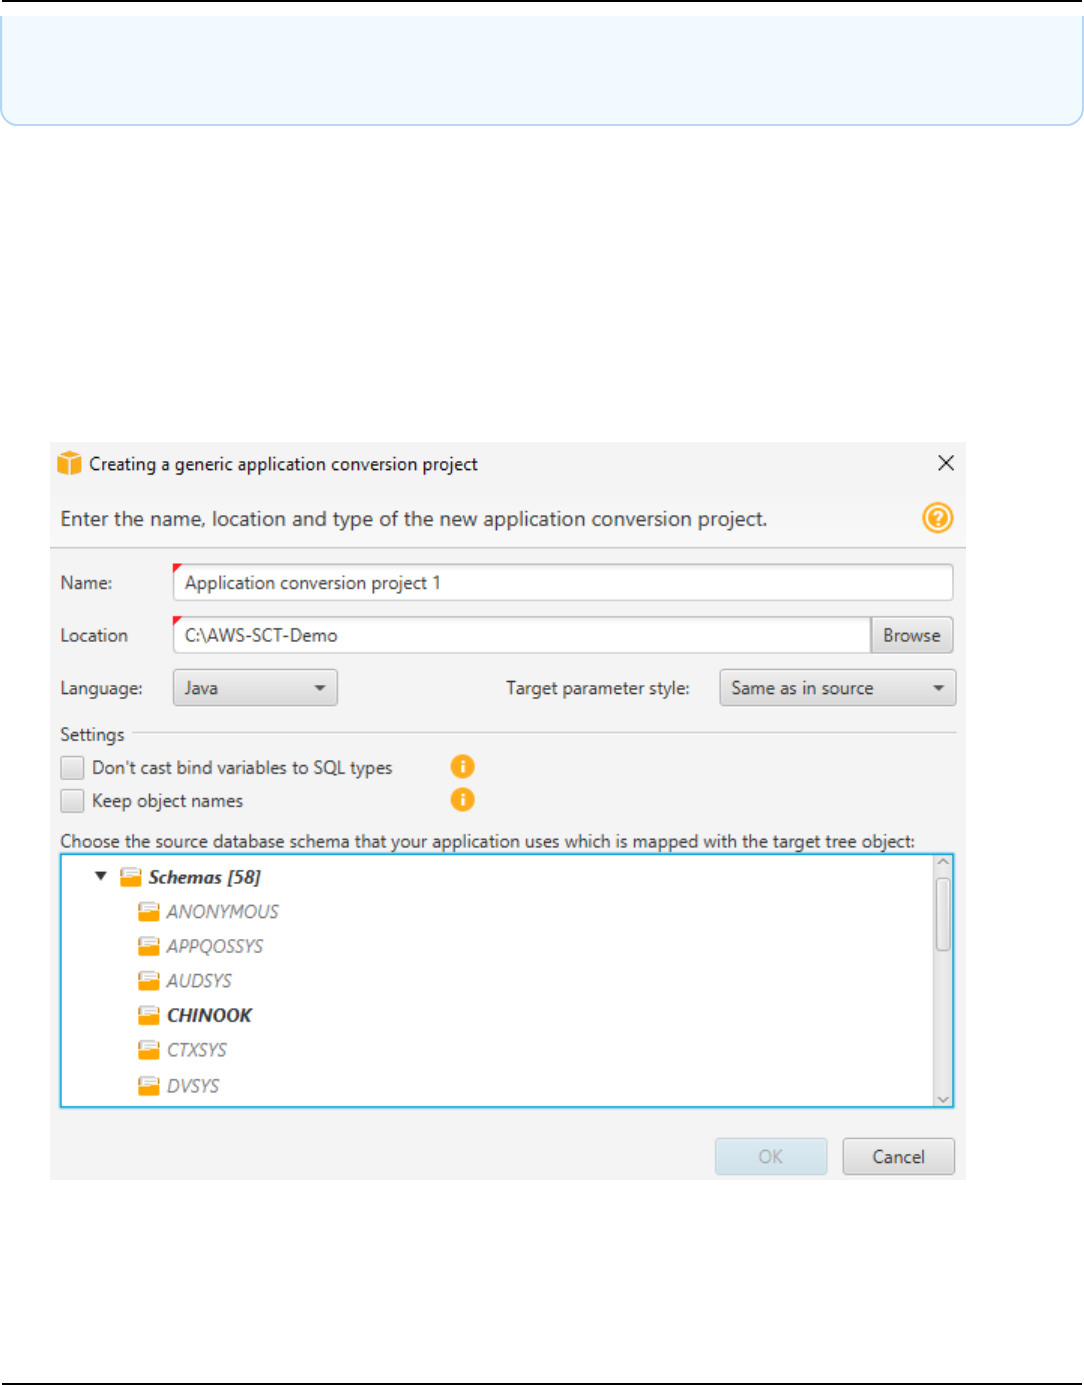
AWS Schema Conversion Tool User Guide
• SQL Server Integration Services to AWS Glue
• Apache Cassandra to Amazon DynamoDB
Use the following procedure to create a generic application conversion project.
To create an application conversion project
1. In the AWS Schema Conversion Tool, choose New generic application on the Applications
menu.
The New application conversion project dialog box appears.
2. Add the following project information.
Creating generic application conversion projects Version 1.0.672 443

AWS Schema Conversion Tool User Guide
For this parameter Do this
Name Enter a name for your application conversion project. Each
database schema conversion project can have one or more
child application conversion projects, so choose a name that
makes sense if you add more projects later.
Location Enter the location of the source code for your application.
Language Choose one of the following:
• Java
• C++
• C#
• Any
Target parameter style Choose the syntax to use for bind variables in the converted
code. Different database platforms use different syntax for
bind variables. Choose one of the following options:
• Same as in source
• Positional (?)
• Indexed (:1)
• Indexed ($1)
• Named (@name)
• Named (:name)
• Named (&name)
• Named ($name)
• Named (#name)
• Named (!name!)
Choose the source database
schema
In the source tree, choose the schema that your application
uses. Make sure that this schema is part of a mapping rule.
Creating generic application conversion projects Version 1.0.672 444

AWS Schema Conversion Tool User Guide
3. Select Don't cast bind variables to SQL types to avoid conversion of bind variables types to
SQL types. This option is available only for an Oracle to PostgreSQL conversion.
For example, your source application code includes the following Oracle query:
SELECT * FROM ACCOUNT WHERE id = ?
When you select Don't cast bind variables to SQL types, AWS SCT converts this query as
shown following.
SELECT * FROM account WHERE id = ?
When you clear Don't cast bind variables to SQL types, AWS SCT changes the bind variable
type to the NUMERIC data type. The conversion result is shown following.
SELECT * FROM account WHERE id = (?)::NUMERIC
4. Select Keep object names to avoid adding the schema name to the name of the converted
object. This option is available only for an Oracle to PostgreSQL conversion.
For example, suppose that your source application code includes the following Oracle query.
SELECT * FROM ACCOUNT
When you select Keep object names, AWS SCT converts this query as shown following.
SELECT * FROM account
When you clear Keep object names, AWS SCT adds the schema name to the name of the table.
The conversion result is shown following.
SELECT * FROM schema_name.account
If your source code includes the names of the parent objects in the names of the objects, AWS
SCT uses this format in the converted code. In this case, ignore the Keep object names option
because AWS SCT adds the names of the parent objects in the converted code.
5. Choose OK to create your application conversion project.
Creating generic application conversion projects Version 1.0.672 445
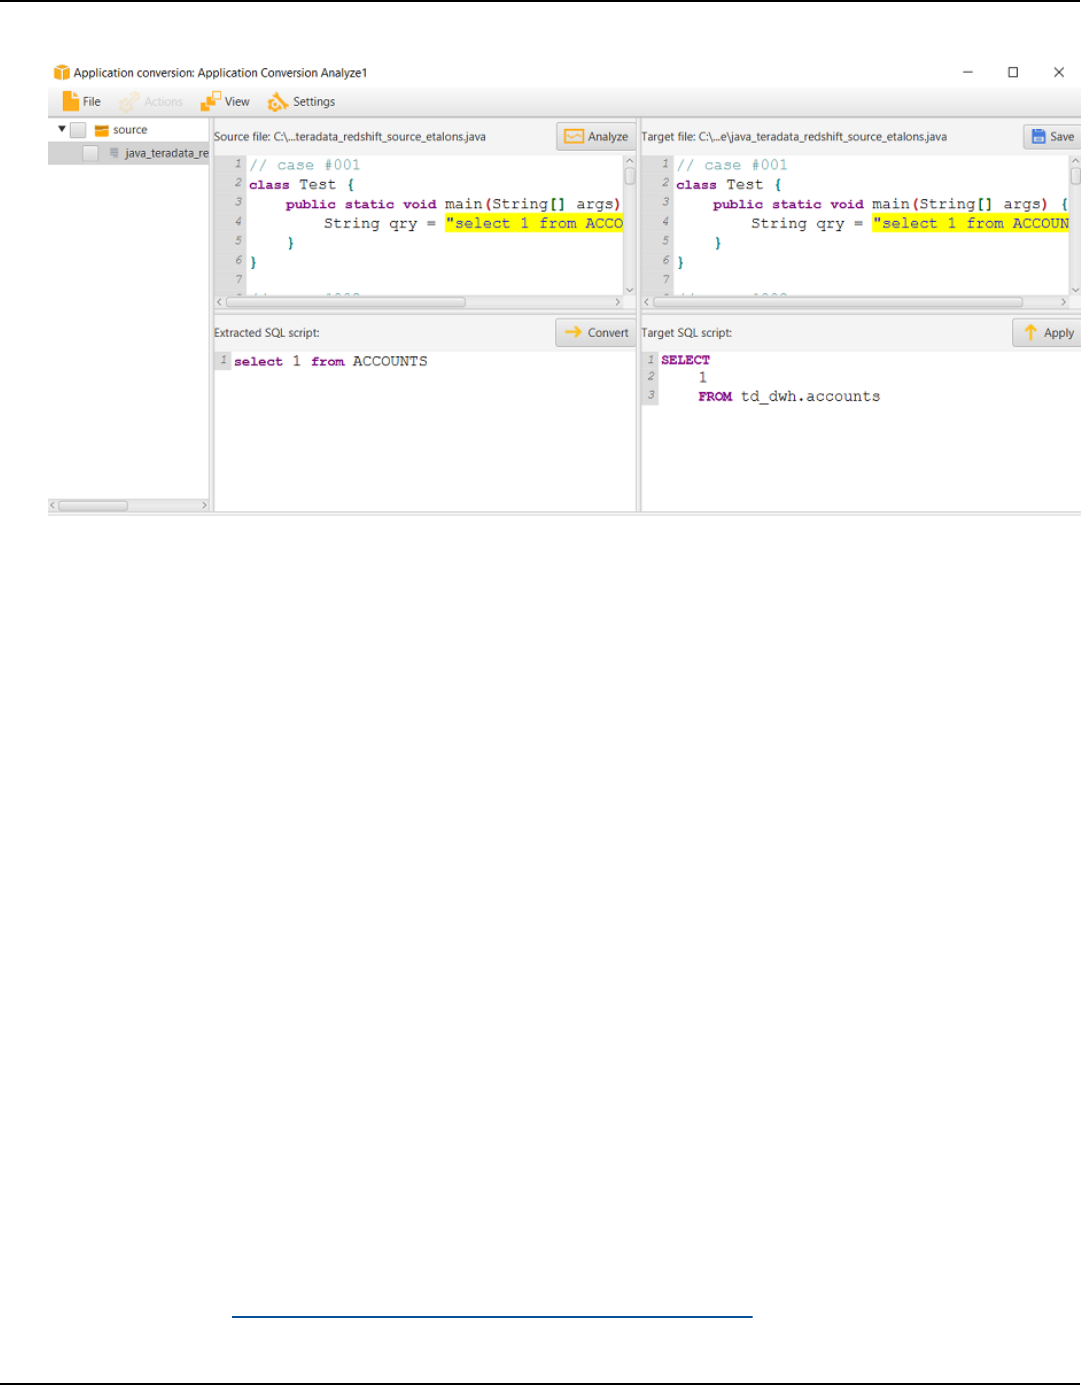
AWS Schema Conversion Tool User Guide
The project window opens.
Managing application conversion projects in AWS SCT
You can open an existing application conversion project and add multiple application conversion
projects.
After you create an application conversion project, the project window opens automatically. You
can close the application conversion project window and get back to it later.
To open an existing application conversion project
1. In the left panel, choose the application conversion project node, and open the context (right-
click) menu.
2. Choose Manage application.
To add an additional application conversion project
1. In the left panel, choose the application conversion project node, and open the context (right-
click) menu.
2. Choose New application.
3. Enter the information that is required to create a new application conversion project. For more
information, see Creating generic application conversion projects.
Managing application conversion projects Version 1.0.672 446
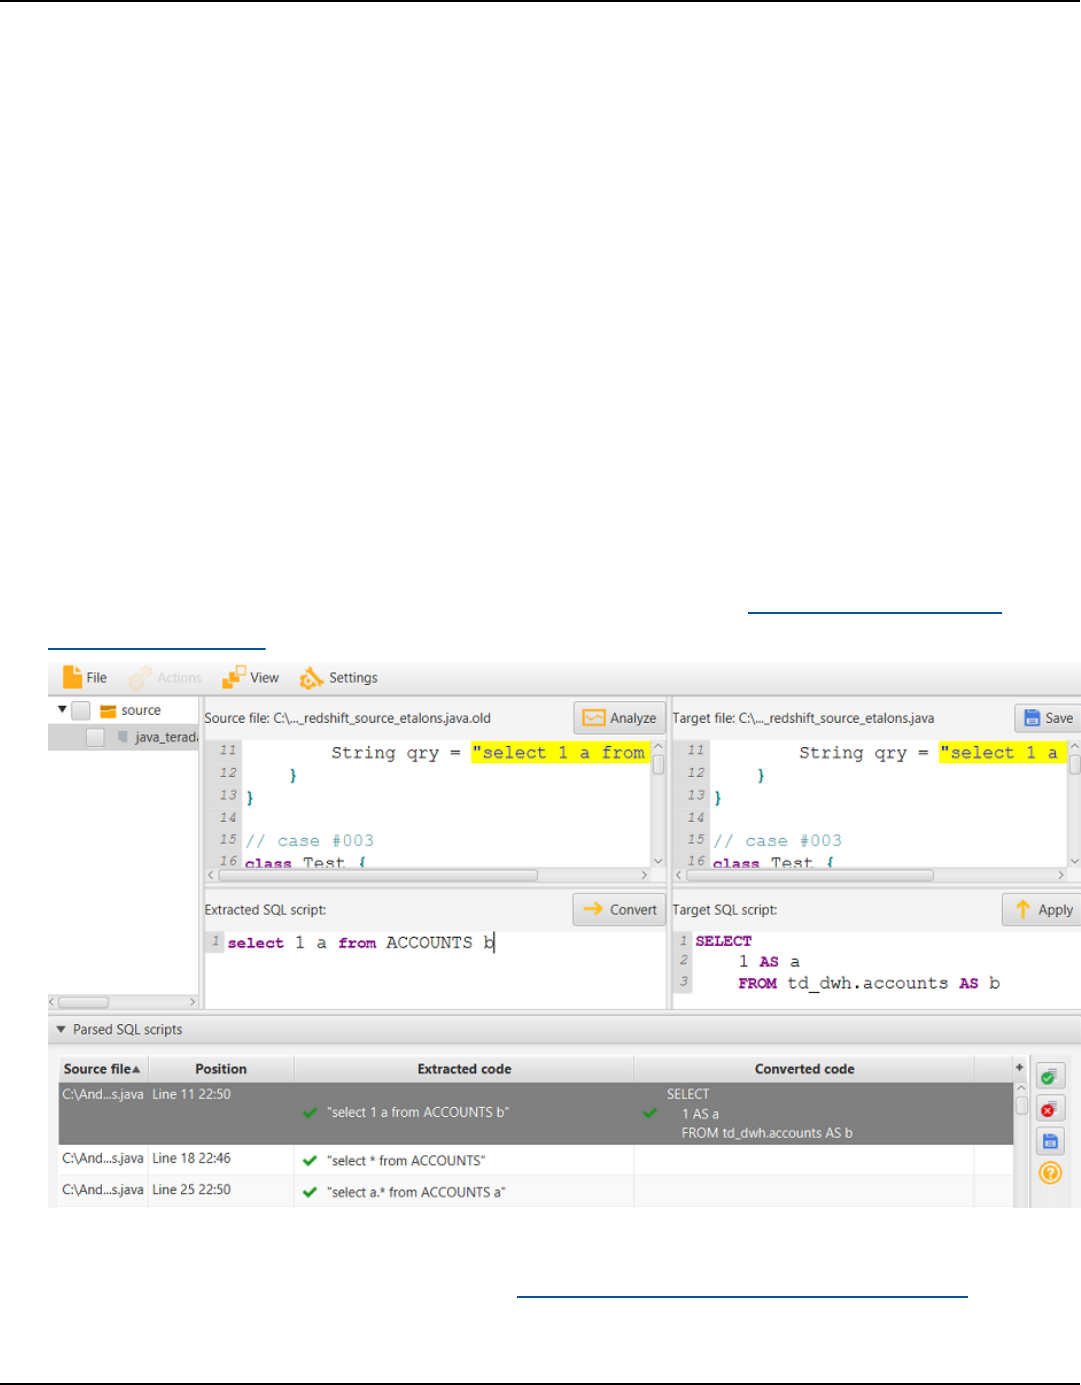
AWS Schema Conversion Tool User Guide
Analyzing and converting your SQL code in AWS SCT
Use the following procedure to analyze and convert your SQL code in the AWS Schema Conversion
Tool.
To analyze and convert your SQL code
1. Open an existing application conversion project, and choose Analyze.
AWS SCT analyzes your application code and extracts the SQL code. AWS SCT displays the
extracted SQL code in the Parsed SQL scripts list.
2. For Parsed SQL scripts, choose an item to review its extracted SQL code. AWS SCT displays the
code of the selected item in the Extracted SQL script pane.
3. Choose Convert to convert the SQL code the Extracted SQL script pane. AWS SCT converts
the code to a format compatible with your target database.
You can edit the converted SQL code. For more information, see Editing and saving your
converted SQL code.
4. When you create an application conversion assessment report, AWS SCT converts all extracted
SQL code items. For more information, see Creating and using the assessment report.
Analyzing and converting your SQL code Version 1.0.672 447
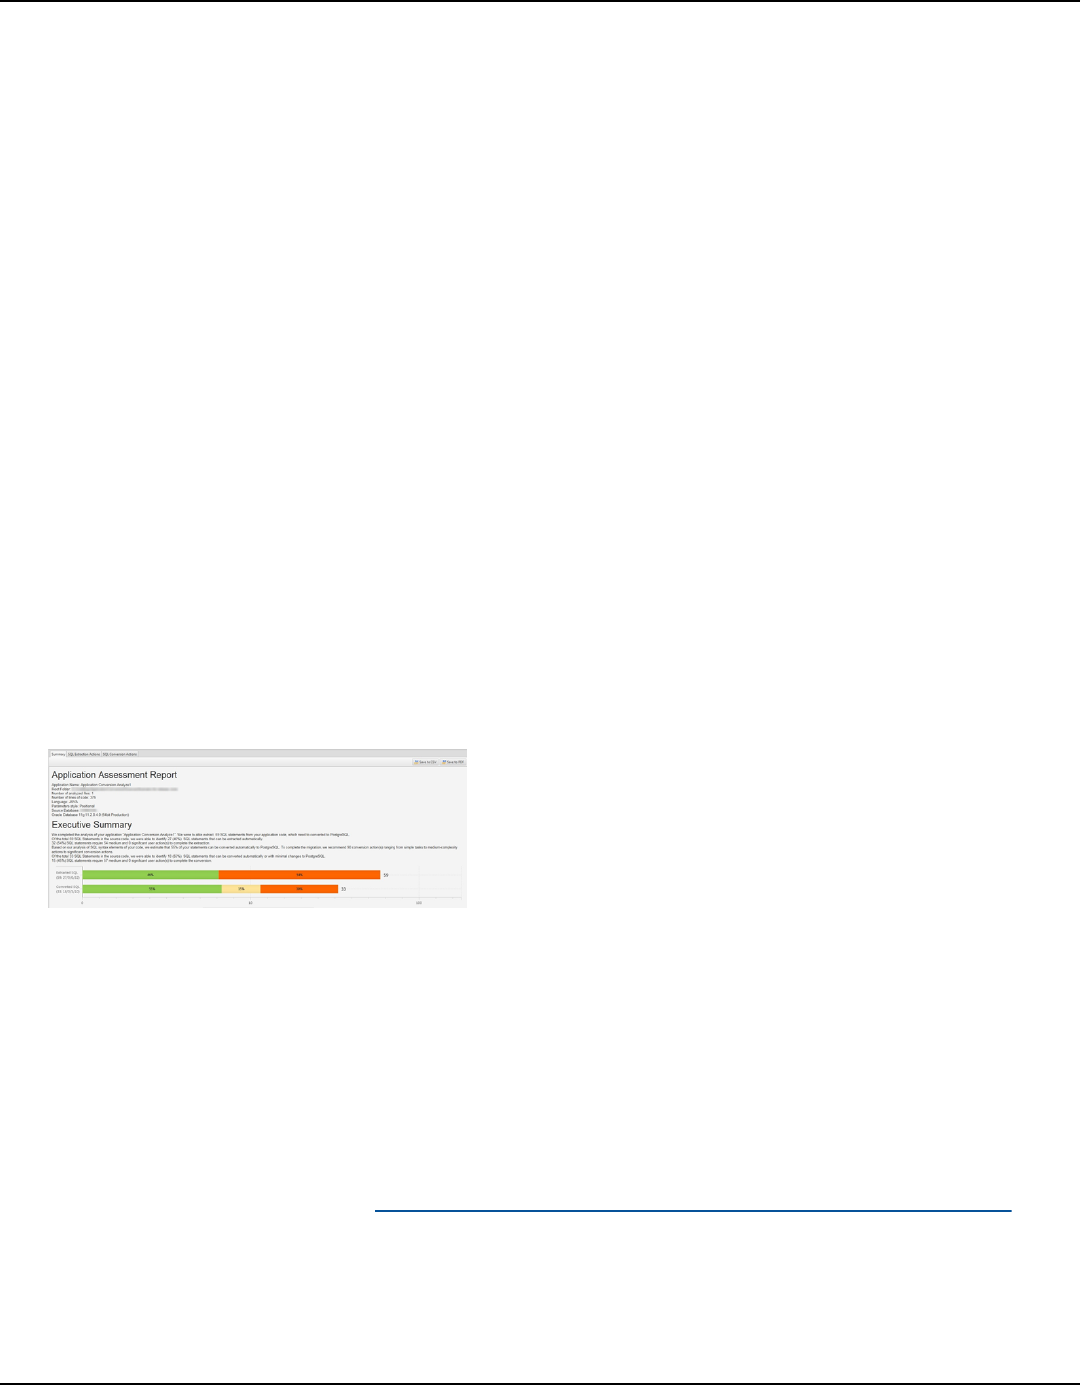
AWS Schema Conversion Tool User Guide
Creating and using the AWS SCT assessment report in AWS SCT
The application conversion assessment report provides information about converting the application
SQL code to a format compatible with your target database. The report details all extracted SQL
code, all converted SQL code, and action items for SQL code that AWS SCT can't convert.
Creating an application conversion assessment report
Use the following procedure to create an application conversion assessment report.
To create an application conversion assessment report
1. In the application conversion project window, choose Create report on the Actions menu.
AWS SCT creates the application conversion assessment report and opens it in the application
conversion project window.
2. Review the Summary tab.
The Summary tab, shown following, displays the summary information from the application
assessment report. It shows the SQL code items that were converted automatically, and items
that were not converted automatically.
3. Choose SQL extraction actions.
Review the list of SQL code items that AWS SCT can't extract from your source code.
4. Choose SQL conversion actions.
Review the list of SQL code items that AWS SCT can't convert automatically. Use
recommended actions to manually convert the SQL code. For information about how to edit
your converted SQL code, see Editing and saving your converted SQL code with AWS SCT.
5. (Optional) Save a local copy of the report as either a PDF file or a comma-separated values
(CSV) file:
• Choose Save to PDF at upper right to save the report as a PDF file.
Creating and using the assessment report Version 1.0.672 448

AWS Schema Conversion Tool User Guide
The PDF file contains the executive summary, action items, and recommendations for
application conversion.
• Choose Save to CSV at upper right to save the report as a CSV file.
The CSV file contains action items, recommended actions, and an estimated complexity of
manual effort required to convert the SQL code.
Editing and saving your converted SQL code with AWS SCT
The assessment report includes a list of SQL code items that AWS SCT can't convert. For each item,
AWS SCT creates an action item on the SQL conversion actions tab. For these items, you can edit
the SQL code manually to perform the conversion.
Use the following procedure to edit your converted SQL code, apply the changes, and then save
them.
To edit, apply changes to, and save your converted SQL code
1. Edit your converted SQL code directly in the Target SQL script pane. If there is no converted
code shown, you can click in the pane and start typing.
2. After you are finished editing your converted SQL code, choose Apply. At this point, the
changes are saved in memory, but not yet written to your file.
3. Choose Save to save your changes to your file.
When you choose Save, you overwrite your original file. Make a copy of your original file
before saving so you have a record of your original application code.
Converting SQL code in C# applications with AWS Schema
Conversion Tool
For an Oracle to PostgreSQL conversion, you can use AWS Schema Conversion Tool (AWS SCT)
to convert SQL code embedded into your C# applications. This specific C# application converter
understands the application logic. It collects statements that are located in different application
objects, such as functions, parameters, local variables, and so on.
Editing and saving your converted SQL code Version 1.0.672 449

AWS Schema Conversion Tool User Guide
Because of this deep analysis, the C# application SQL code converter provides better conversion
results than the generic converter.
Creating C# application conversion projects in AWS SCT
You can create a C# application conversion project only for converting Oracle database schemas to
PostgreSQL database schemas. Make sure that you add a mapping rule in your project that includes
a source Oracle schema and a target PostgreSQL database. For more information, see Mapping
data types in the AWS Schema Conversion Tool.
You can add multiple application conversion projects in a single AWS SCT project. Use the following
procedure to create a C# application conversion project.
To create a C# application conversion project
1. Create a database conversion project, and add a source Oracle database. For more information,
see Starting and managing Projects in AWS SCT and Adding servers to project in AWS SCT.
2. Add a mapping rule that includes your source Oracle database and a target PostgreSQL
database. You can add a target PostgreSQL database or use a virtual PostgreSQL target
database platform in a mapping rule. For more information, see Mapping data types in the
AWS Schema Conversion Tool and Mapping to virtual targets in the AWS Schema Conversion
Tool.
3. On the View menu, choose Main view.
4. On the Applications menu, choose New C# application.
The Creating a C# application conversion project dialog box appears.
Creating C# application conversion projects Version 1.0.672 450
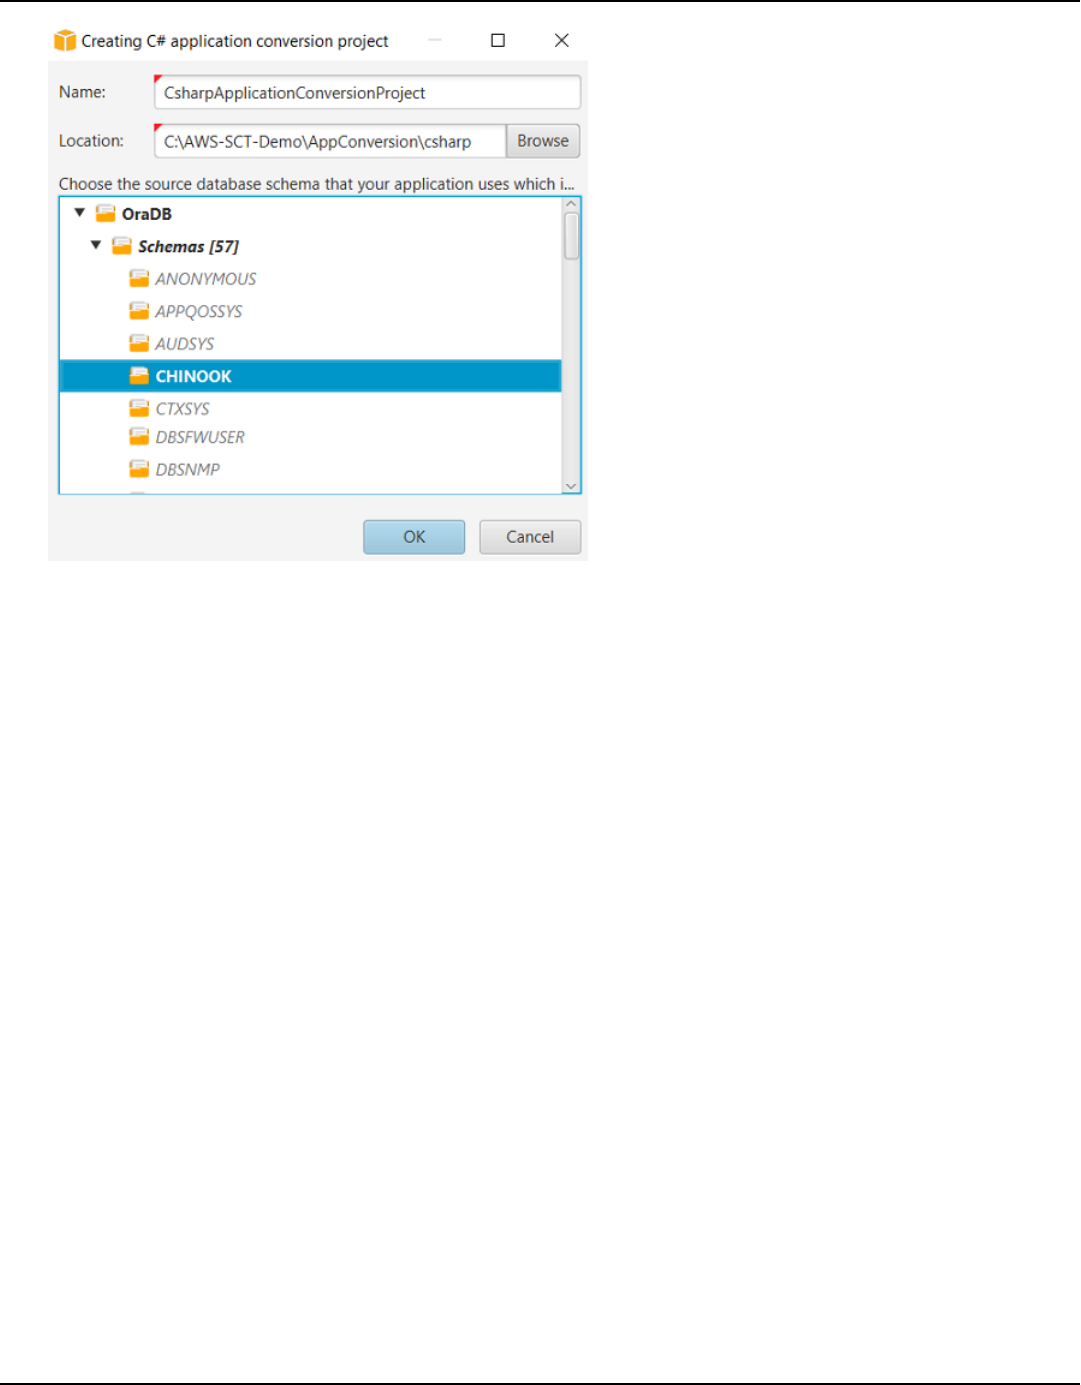
AWS Schema Conversion Tool User Guide
5. For Name, enter a name for your C# application conversion project. Because each database
schema conversion project can have one or more child application conversion projects, choose
a name that makes sense if you add multiple projects.
6. For Location, enter the location of the source code for your application.
7. In the source tree, choose the schema that your application uses. Make sure that this schema
is part of a mapping rule. AWS SCT highlights the schemas that are part of a mapping rule in
bold.
8. Choose OK to create your C# application conversion project.
9. Find your C# application conversion project in the Applications node in the left panel.
Converting your C# application SQL code in AWS SCT
After you add your C# application to the AWS SCT project, convert SQL code from this application
to a format compatible with your target database platform. Use the following procedure to analyze
and convert the SQL code embedded in your C# application in the AWS Schema Conversion Tool.
To convert your SQL code
1. Expand the C# node under Applications in the left panel.
2. Choose the application to convert, and open the context (right-click) menu.
Converting your C# application SQL code Version 1.0.672 451
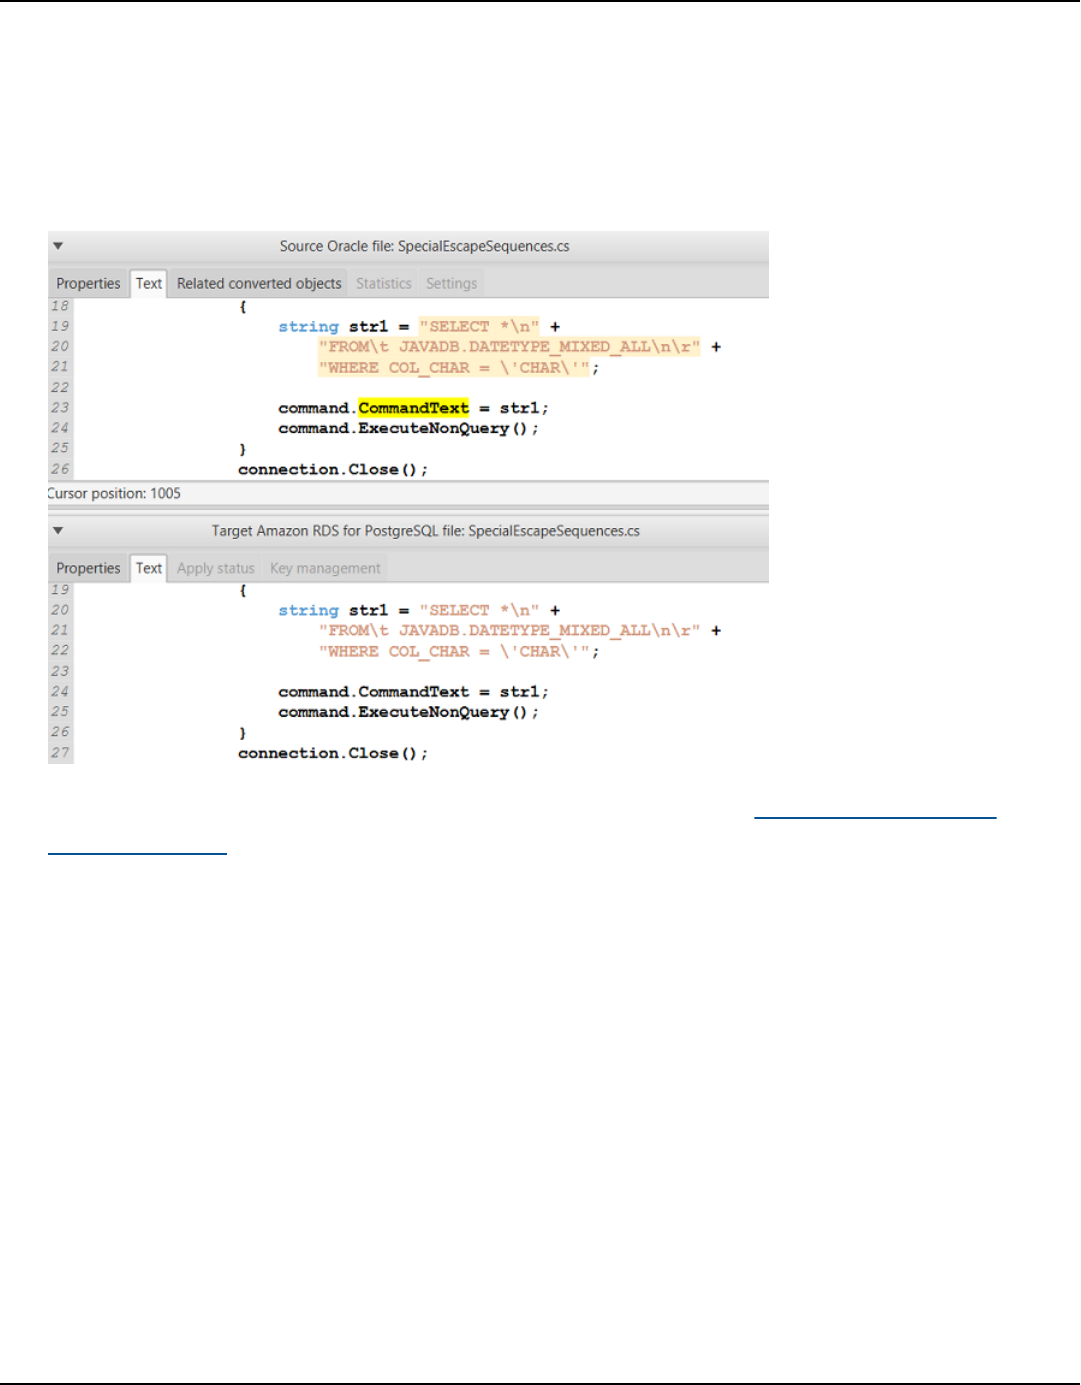
AWS Schema Conversion Tool User Guide
3. Choose Convert. AWS SCT analyzes your source code files, determines the application logic,
and loads code metadata into the project. This code metadata includes C# classes, objects,
methods, global variables, interfaces, and so on.
In the target database panel, AWS SCT creates the similar folders structure to your source
application project. Here you can review the converted application code.
4. Save your converted application code. For more information, see Saving your converted
application code.
Your C# applications might include SQL code that interacts with different source databases. You
can migrate to PostgreSQL several of these source databases. In this case, make sure that you don't
convert SQL code that interacts with databases which you excluded from the migration scope. You
can exclude source files of your C# application from the conversion scope. To do so, clear the check
boxes for the names of files that you want to exclude from the conversion scope.
After you change the conversion scope, AWS SCT still analyzes SQL code all source files of your C#
applications. Then, AWS SCT copies to the target folder all source files that you excluded from the
conversion scope. This operation makes it possible to build your application after you save your
converted application files.
Converting your C# application SQL code Version 1.0.672 452

AWS Schema Conversion Tool User Guide
Saving your converted application code with AWS SCT
Use the following procedure to save your converted application code.
To save your converted application code
1. Expand the C# node under Applications in the target database panel.
2. Choose your converted application, and choose Save.
3. Enter the path to the folder to save the converted application code, and choose Select folder.
Managing C# application conversion projects in AWS SCT
You can add multiple C# application conversion projects, update the application code in the AWS
SCT project, or remove a C# conversion project from your AWS SCT project.
To add an additional C# application conversion project
1. Expand the Applications node in the left panel.
2. Choose the C# node, and open the context (right-click) menu.
3. Choose New application.
4. Enter the information that is required to create a new C# application conversion project. For
more information, see Creating C# application conversion projects.
After you make changes in your source application code, upload it into the AWS SCT project.
To upload the updated application code
1. Expand the C# node under Applications in the left panel.
2. Choose the application to update, and open the context (right-click) menu.
3. Choose Refresh and then choose Yes.
AWS SCT uploads your application code from the source files and removes conversion results.
To keep code changes that you made in AWS SCT and the conversion results, create a new C#
conversion project.
Saving your converted application code Version 1.0.672 453

AWS Schema Conversion Tool User Guide
To remove a C# application conversion project
1. Expand the C# node under Applications in the left panel.
2. Choose the application to remove, and open the context (right-click) menu.
3. Choose Delete and then choose OK.
Creating a C# application conversion assessment report in AWS SCT
The C# application conversion assessment report provides information about converting the SQL
code embedded in your C# application to a format compatible with your target database. The
assessment report provides conversion details for all SQL execution points and all source code files.
The assessment report also includes action items for SQL code that AWS SCT can't convert.
Use the following procedure to create a C# application conversion assessment report.
To create a C# application conversion assessment report
1. Expand the C# node under Applications in the left panel.
2. Choose the application to convert, and open the context (right-click) menu.
3. Choose Convert.
4. On the View menu, choose Assessment report view.
5. View the Summary tab.
The Summary tab, shown following, displays the executive summary information from the C#
application assessment report. It shows conversion results for all SQL execution points and all
source code files.
Creating a C# application conversion assessment report Version 1.0.672 454

AWS Schema Conversion Tool User Guide
6. Choose Save statements to JSON to save the extracted SQL code from your C# application as
a JSON file.
7. (Optional) Save a local copy of the report as either a PDF file or a comma-separated values
(CSV) file:
• Choose Save to PDF at upper right to save the report as a PDF file.
The PDF file contains the executive summary, action items, and recommendations for
application conversion.
• Choose Save to CSV at upper right to save the report as a CSV file.
The CSV file contains action items, recommended actions, and an estimated complexity of
manual effort required to convert the SQL code.
Converting SQL code in C++ applications with AWS Schema
Conversion Tool
For an Oracle to PostgreSQL conversion, you can use AWS SCT to convert SQL code embedded into
your C++ applications. This specific C++ application converter understands the application logic. It
collects statements that are located in different application objects, such as functions, parameters,
local variables, and so on.
Because of this deep analysis, the C++ application SQL code converter provides better conversion
results than the generic converter.
Creating C++ application conversion projects in AWS SCT
You can create a C++ application conversion project only for converting Oracle database schemas
to PostgreSQL database schemas. Make sure that you add a mapping rule in your project that
includes a source Oracle schema and a target PostgreSQL database. For more information, see
Mapping data types in the AWS Schema Conversion Tool.
You can add multiple application conversion projects in a single AWS SCT project.
To create a C++ application conversion project
1. Create a database conversion project, and add a source Oracle database. For more information,
see Starting and managing Projects in AWS SCT and Adding servers to project in AWS SCT.
SQL code in C++ Version 1.0.672 455
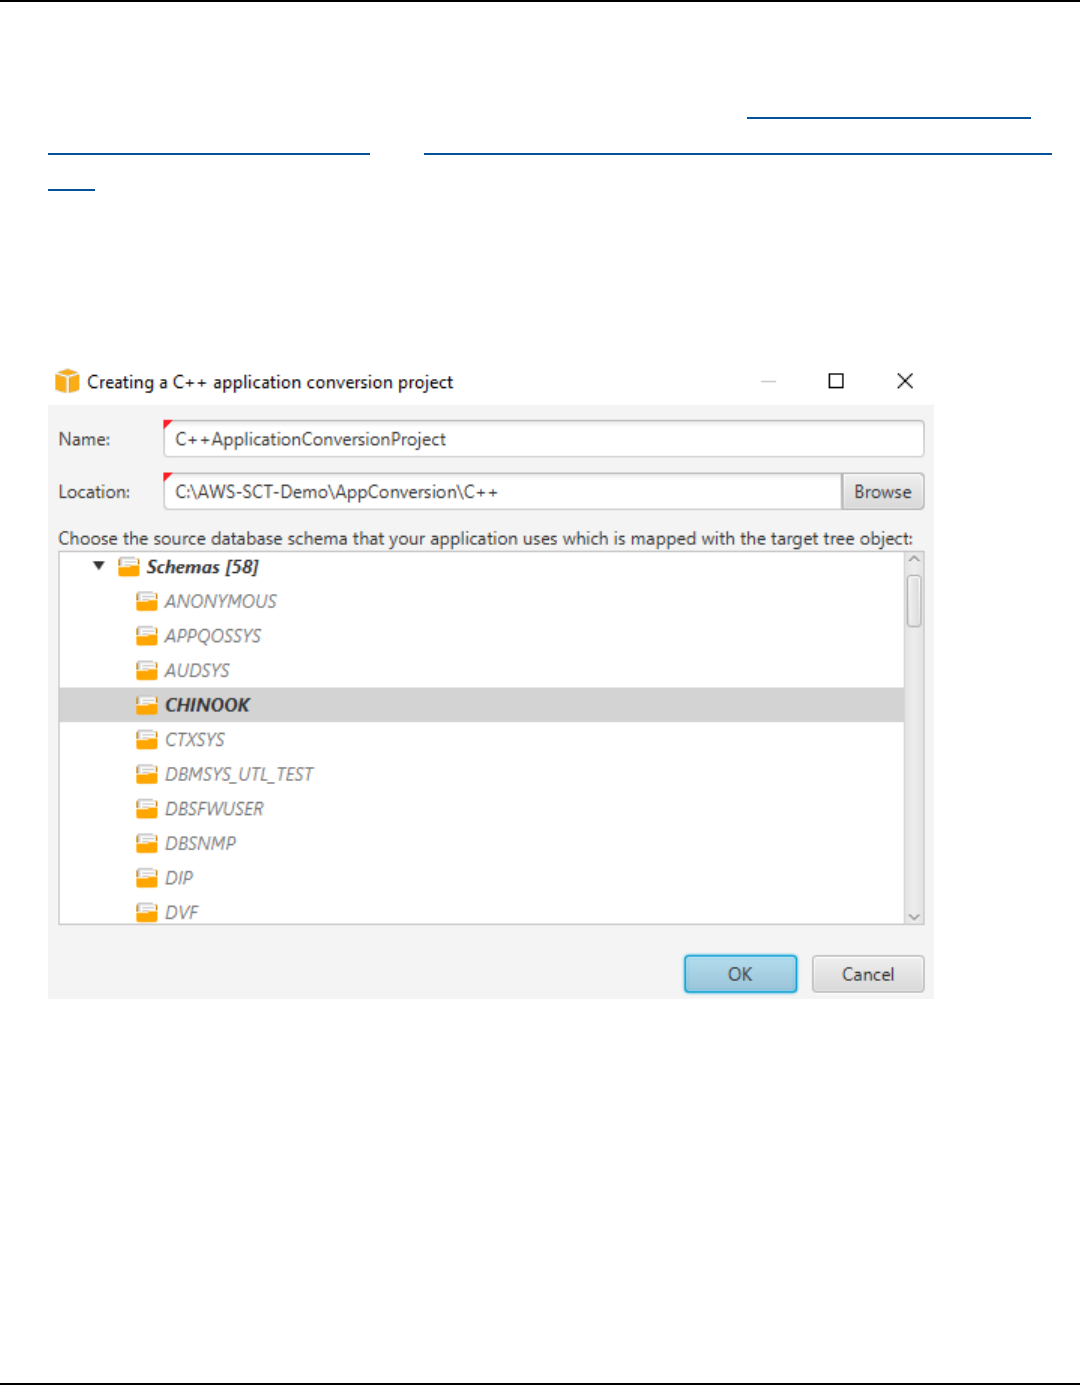
AWS Schema Conversion Tool User Guide
2. Add a mapping rule that includes your source Oracle database and a target PostgreSQL
database. You can add a target PostgreSQL database or use a virtual PostgreSQL target
database platform in a mapping rule. For more information, see Mapping data types in the
AWS Schema Conversion Tool and Mapping to virtual targets in the AWS Schema Conversion
Tool.
3. On the View menu, choose Main view.
4. On the Applications menu, choose New C++ application.
The Creating a C++ application conversion project dialog box appears.
5. For Name, enter a name for your C++ application conversion project. Because each database
schema conversion project can have one or more child application conversion projects, choose
a name that makes sense if you add multiple projects.
6. For Location, enter the location of the source code for your application.
7. In the source tree, choose the schema that your application uses. Make sure that this schema
is part of a mapping rule. AWS SCT highlights the schemas that are part of a mapping rule in
bold.
8. Choose OK to create your C++ application conversion project.
Creating C++ application conversion projects Version 1.0.672 456

AWS Schema Conversion Tool User Guide
9. Find your C++ application conversion project in the Applications node in the left panel.
Converting your C++ application SQL code in AWS SCT
After you add your C++ application to the AWS SCT project, convert SQL code from this application
to a format compatible with your target database platform. Use the following procedure to analyze
and convert the SQL code embedded in your C++ application in AWS SCT.
To convert your SQL code
1. Expand the C++ node under Applications in the left panel, and choose the application to
convert.
2. In the Source Oracle application project, choose Settings. Review and edit the conversion
settings for the selected C++ application. You can also specify the conversion settings for all C
++ applications that you added to your AWS SCT project. For more information, see Managing
C++ application conversion projects.
3. For Compiler type, choose the compiler that you use for the source code of your C++
application. AWS SCT supports the following C++ compilers: Microsoft Visual C++, GCC, the
GNU Compiler Collection, and Clang. The default option is Microsoft Visual C++.
4. For User-defined macros, enter the path to the file that includes user-defined macros from
your C++ project. Make sure that this file has the following structure: #define name value.
In the preceding example, value is an optional parameter. The default value for this optional
parameter is 1.
To create this file, open your project in Microsoft Visual Studio, and then choose Project,
Properties, C/C++, and Preprocessor. For Preprocessor definitions, choose Edit and copy
names and values to a new text file. Then, for each string in the file, add the following prefix:
#define .
5. For External include directories, enter the paths to the folders that include external libraries
that you use in your C++ project.
6. In the left pane, choose the application to convert, and open the context (right-click) menu.
7. Choose Convert. AWS SCT analyzes your source code files, determines the application logic,
and loads code metadata into the project. This code metadata includes C++ classes, objects,
methods, global variables, interfaces, and so on.
Converting your C++ application SQL code Version 1.0.672 457
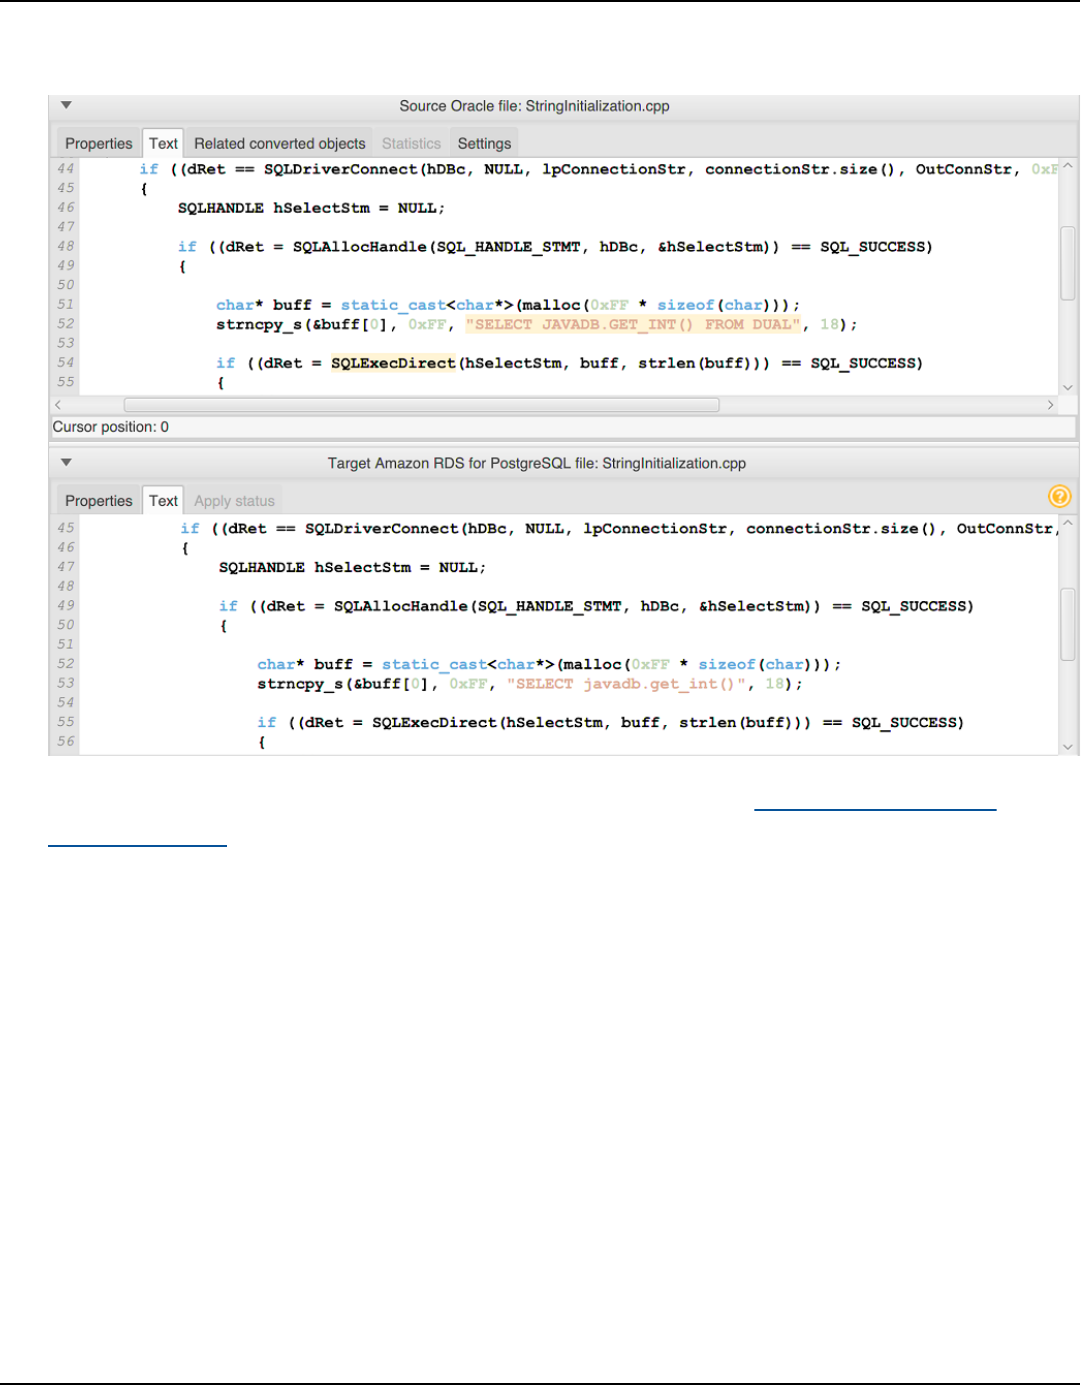
AWS Schema Conversion Tool User Guide
In the target database panel, AWS SCT creates the similar folders structure to your source
application project. Here you can review the converted application code, as shown following.
8. Save your converted application code. For more information, see Saving your converted
application code.
Saving your converted application code with AWS SCT
Use the following procedure to save your converted application code.
To save your converted application code
1. Expand the C++ node under Applications in the target database panel.
2. Choose your converted application, and choose Save.
3. Enter the path to the folder to save the converted application code, and choose Select folder.
Saving your converted application code Version 1.0.672 458

AWS Schema Conversion Tool User Guide
Managing C++ application conversion projects in AWS SCT
You can add multiple C++ application conversion projects, edit conversion settings, update the C++
application code, or remove a C++ conversion project from your AWS SCT project.
To add an additional C++ application conversion project
1. Expand the Applications node in the left panel.
2. Choose the C++ node, and open the context (right-click) menu.
3. Choose New application.
4. Enter the information that is required to create a new C++ application conversion project. For
more information, see Creating C++ application conversion projects.
You can specify conversion settings for all C++ application conversion projects in your AWS SCT
project.
To edit conversion settings for all C++ applications
1. On the Settings menu, choose Project settings, and then choose Application conversion.
2. For Compiler type, choose the compiler that you use for the source code of your C++
application. AWS SCT supports the following C++ compilers: Microsoft Visual C++, GCC, the
GNU Compiler Collection, and Clang . The default option is Microsoft Visual C++.
3. For User-defined macros, enter the path to the file that includes user-defined macros from
your C++ project. Make sure that this file has the following structure: #define name value.
In the preceding example, value is an optional parameter. The default value for this optional
parameter is 1.
To create this file, open your project in Microsoft Visual Studio, and then choose Project,
Properties, C/C++, and Preprocessor. For Preprocessor definitions, choose Edit and copy
names and values to a new text file. Then, for each string in the file, add the following prefix:
#define .
4. For External include directories, enter the paths to the folders that include external libraries
that you use in your C++ project.
5. Choose OK to save the project settings and close the window.
Managing C++ application conversion projects Version 1.0.672 459

AWS Schema Conversion Tool User Guide
Or you can specify conversion settings for each C++ application conversion project. For more
information, see Converting your C++ application SQL code.
After you make changes in your source application code, upload it into the AWS SCT project.
To upload the updated application code
1. Expand the C++ node under Applications in the left panel.
2. Choose the application to update, and open the context (right-click) menu.
3. Choose Refresh and then choose Yes.
AWS SCT uploads your application code from the source files and removes conversion results.
To keep code changes that you made in AWS SCT and the conversion results, create a new C++
conversion project.
Also, AWS SCT removes the application conversion settings that you specified for the selected
application. After you upload the updated application code, AWS SCT applies the default
values from the project settings.
To remove a C++ application conversion project
1. Expand the C++ node under Applications in the left panel.
2. Choose the application to remove, and open the context (right-click) menu.
3. Choose Delete and then choose OK.
Creating a C++ application conversion assessment report in AWS SCT
The C++ application conversion assessment report provides information about converting the SQL
code embedded in your C++ application to a format compatible with your target database. The
assessment report provides conversion details for all SQL execution points and all source code files.
The assessment report also includes action items for SQL code that AWS SCT can't convert.
To create a C++ application conversion assessment report
1. Expand the C++ node under Applications in the left panel.
2. Choose the application to convert, and open the context (right-click) menu.
3. Choose Convert.
Creating a C++ application conversion assessment report Version 1.0.672 460

AWS Schema Conversion Tool User Guide
4. On the View menu, choose Assessment report view.
5. View the Summary tab.
The Summary tab displays the executive summary information from the C++ application
assessment report. It shows conversion results for all SQL execution points and all source code
files.
6. Choose Save statements to JSON to save the extracted SQL code from your Java application
as a JSON file.
7. (Optional) Save a local copy of the report as either a PDF file or a comma-separated values
(CSV) file:
• Choose Save to PDF at upper right to save the report as a PDF file.
The PDF file contains the executive summary, action items, and recommendations for
application conversion.
• Choose Save to CSV at upper right to save the report as a CSV file.
The CSV file contains action items, recommended actions, and an estimated complexity of
manual effort required to convert the SQL code.
Converting SQL code in Java applications with AWS Schema
Conversion Tool
For an Oracle to PostgreSQL conversion, you can use AWS Schema Conversion Tool to convert SQL
code embedded into your Java applications. This specific Java application converter understands
the application logic. It collects statements that are located in different application objects, such as
functions, parameters, local variables, and so on.
Because of this deep analysis, the Java application SQL code converter provides better conversion
results compared to the generic converter.
If your Java application uses the MyBatis framework to interact with databases, then you can
use AWS SCT to convert SQL statements embedded into MyBatis XML files and annotations. To
understand the logic of these SQL statements, AWS SCT uses the MyBatis configuration file. AWS
SCT can automatically discover this file in your application folder, or you can enter the path to this
file manually.
SQL code in Java Version 1.0.672 461

AWS Schema Conversion Tool User Guide
Creating Java application conversion projects in AWS SCT
You can create a Java application conversion project only for converting Oracle database schemas
to PostgreSQL database schemas. Make sure that you add a mapping rule in your project that
includes a source Oracle schema and a target PostgreSQL database. For more information, see
Mapping data types in the AWS Schema Conversion Tool.
You can add multiple application conversion projects in a single AWS SCT project. Use the following
procedure to create a Java application conversion project.
To create a Java application conversion project
1. Create a database conversion project, and add a source Oracle database. For more information,
see Starting and managing Projects in AWS SCT and Adding servers to project in AWS SCT.
2. Add a mapping rule that includes your source Oracle database and a target PostgreSQL
database. You can add a target PostgreSQL database or use a virtual PostgreSQL target
database platform in a mapping rule. For more information, see Mapping data types in the
AWS Schema Conversion Tool and Mapping to virtual targets in the AWS Schema Conversion
Tool.
3. On the View menu, choose Main view.
4. On the Applications menu, choose New Java application.
The Creating a Java application conversion project dialog box appears.
Creating Java application conversion projects Version 1.0.672 462
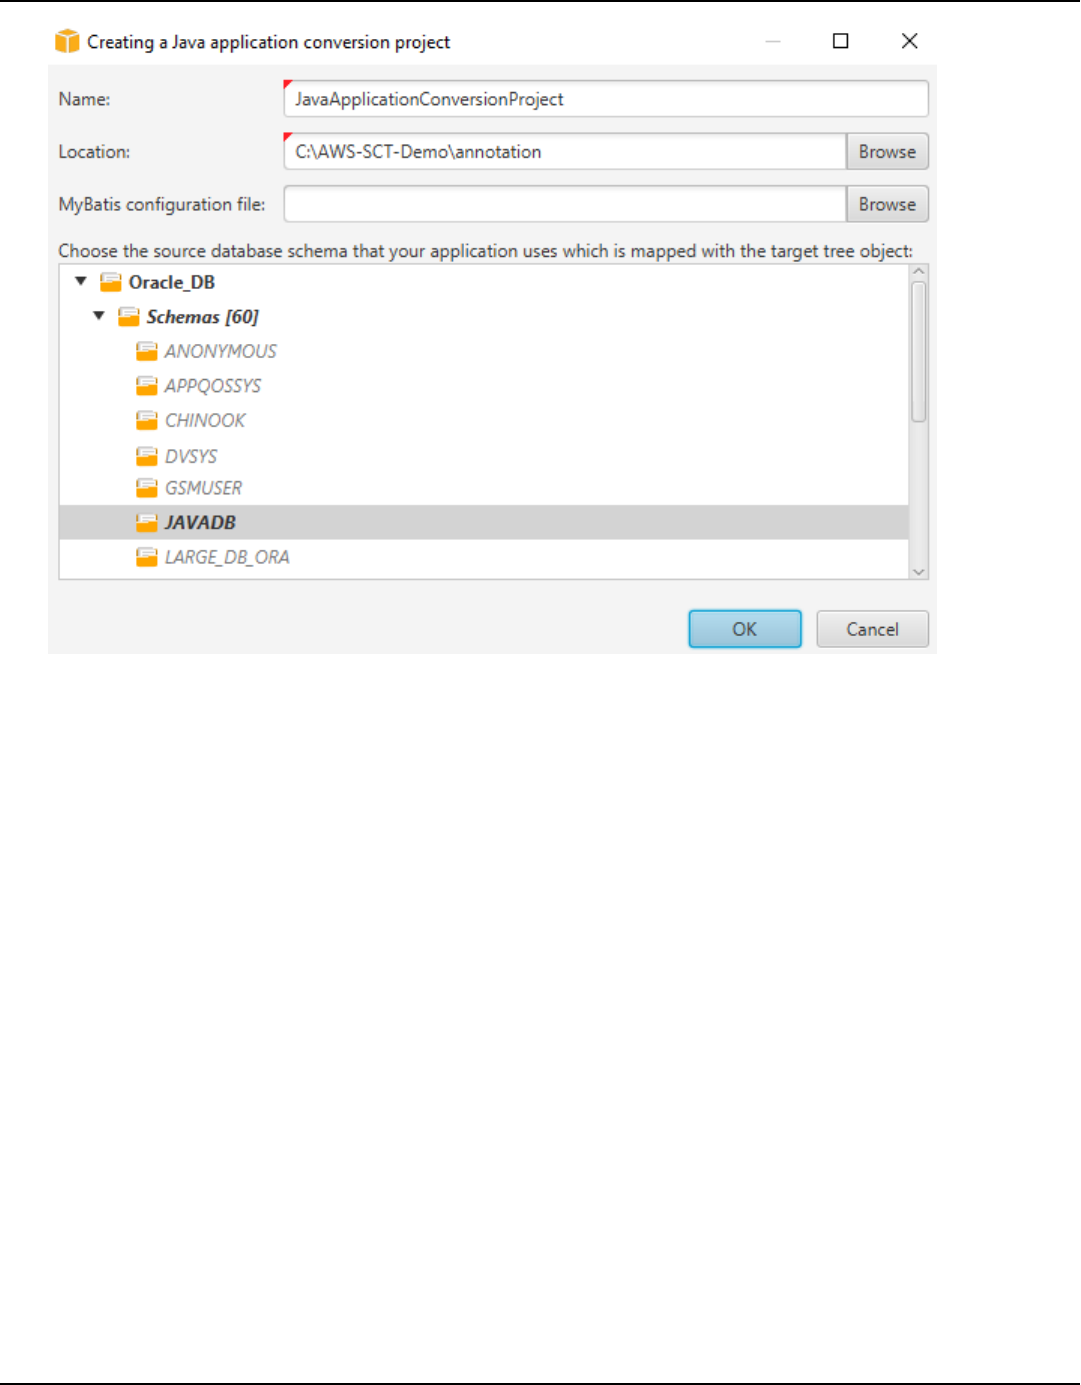
AWS Schema Conversion Tool User Guide
5. For Name, enter a name for your Java application conversion project. Because each database
schema conversion project can have one or more child application conversion projects, choose
a name that makes sense if you add multiple projects.
6. For Location, enter the location of the source code for your application.
7. (Optional) For MyBatis configuration file, enter the path to the MyBatis configuration file.
AWS SCT scans your application folder to discover this file automatically. If this file isn't
located in your application folder, or if you use several configuration files, then enter the path
manually.
8. In the source tree, choose the schema that your application uses. Make sure that this schema
is part of a mapping rule. AWS SCT highlights the schemas that are part of a mapping rule in
bold.
9. Choose OK to create your Java application conversion project.
10. Find your Java application conversion project in the Applications node in the left panel.
Creating Java application conversion projects Version 1.0.672 463
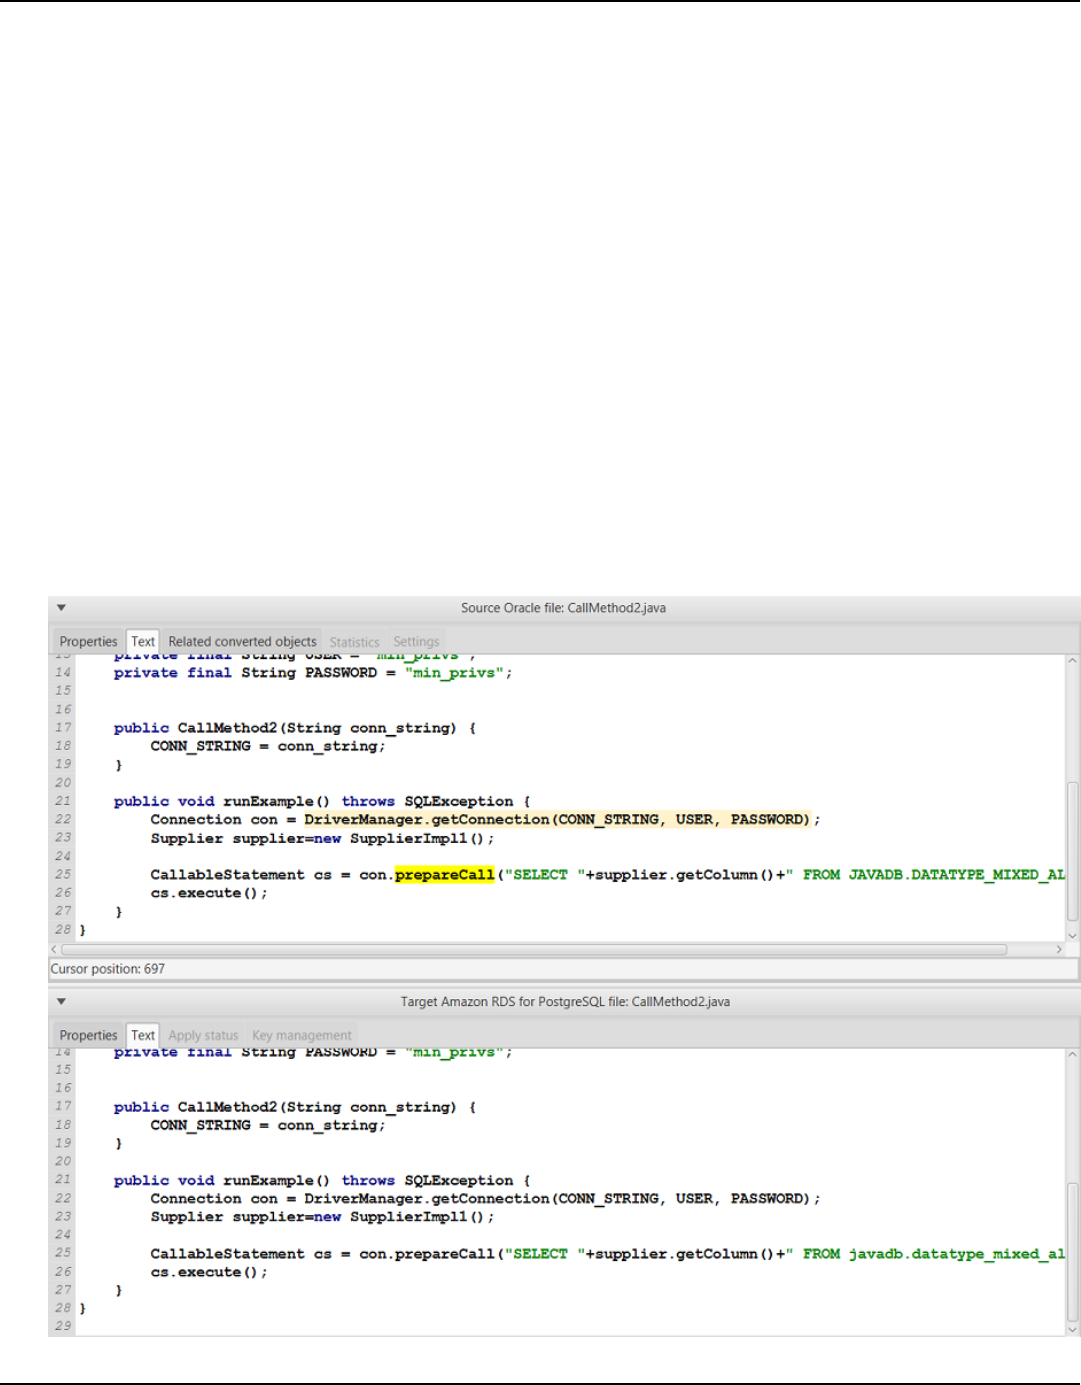
AWS Schema Conversion Tool User Guide
Converting your Java application SQL code in AWS SCT
After you add your Java application to the AWS SCT project, convert SQL code from this application
to a format compatible with your target database platform. Use the following procedure to analyze
and convert the SQL code embedded in your Java application in the AWS Schema Conversion Tool.
To convert your SQL code
1. Expand the Java node under Applications in the left panel.
2. Choose the application to convert, and open the context (right-click) menu.
3. Choose Convert. AWS SCT analyzes your source code files, determines the application logic,
and loads code metadata into the project. This code metadata includes Java classes, objects,
methods, global variables, interfaces, and so on.
In the target database panel, AWS SCT creates the similar folders structure to your source
application project. Here you can review the converted application code.
Converting your Java application SQL code Version 1.0.672 464

AWS Schema Conversion Tool User Guide
4. Save your converted application code. For more information, see Saving your converted
application code.
Your Java applications might include SQL code that interacts with different source databases. You
can migrate to PostgreSQL several of these source databases. In this case, make sure that you don't
convert SQL code that interacts with databases which you excluded from the migration scope. You
can exclude source files of your Java application from the conversion scope. To do so, clear the
check boxes for the names of files that you want to exclude from the conversion scope.
After you change the conversion scope, AWS SCT still analyzes SQL code all source files of your
Java applications. Then, AWS SCT copies to the target folder all source files that you excluded from
the conversion scope. This operation makes it possible to build your application after you save your
converted application files.
Saving your converted application code with AWS SCT
Use the following procedure to save your converted application code.
To save your converted application code
1. Expand the Java node under Applications in the target database panel.
2. Choose your converted application, and choose Save.
3. Enter the path to the folder to save the converted application code, and choose Select folder.
If your source Java application uses the MyBatis framework, make sure that you update your
configuration file to work with your new database.
Managing Java application conversion projects in AWS SCT
You can add multiple Java application conversion projects, update the application code in the AWS
SCT project, or remove a Java conversion project from your AWS SCT project.
To add an additional Java application conversion project
1. Expand the Applications node in the left panel.
2. Choose the Java node, and open the context (right-click) menu.
3. Choose New application.
Saving your converted application code Version 1.0.672 465

AWS Schema Conversion Tool User Guide
4. Enter the information that is required to create a new Java application conversion project. For
more information, see Creating Java application conversion projects.
After you make changes in your source application code, upload it into the AWS SCT project.
To upload the updated application code
1. Expand the Java node under Applications in the left panel.
2. Choose the application to update, and open the context (right-click) menu.
3. Choose Refresh and then choose Yes.
AWS SCT uploads your application code from the source files and removes conversion results.
To keep code changes that you made in AWS SCT and the conversion results, create a new Java
conversion project.
If your source Java application uses the MyBatis framework, AWS SCT uses the MyBatis
configuration file to parse your SQL code. After you change this file, upload it into the AWS SCT
project.
To edit the path to the MyBatis configuration file
1. Expand the Java node under Applications in the left panel.
2. Choose your application, and then choose Settings.
3. Choose Browse, and then choose the MyBatis configuration file.
4. Choose Apply.
5. In the left panel, choose your application, open the context (right-click) menu, and choose
Refresh.
To remove a Java application conversion project
1. Expand the Java node under Applications in the left panel.
2. Choose the application to remove, and open the context (right-click) menu.
3. Choose Delete and then choose OK.
Managing Java application conversion projects Version 1.0.672 466
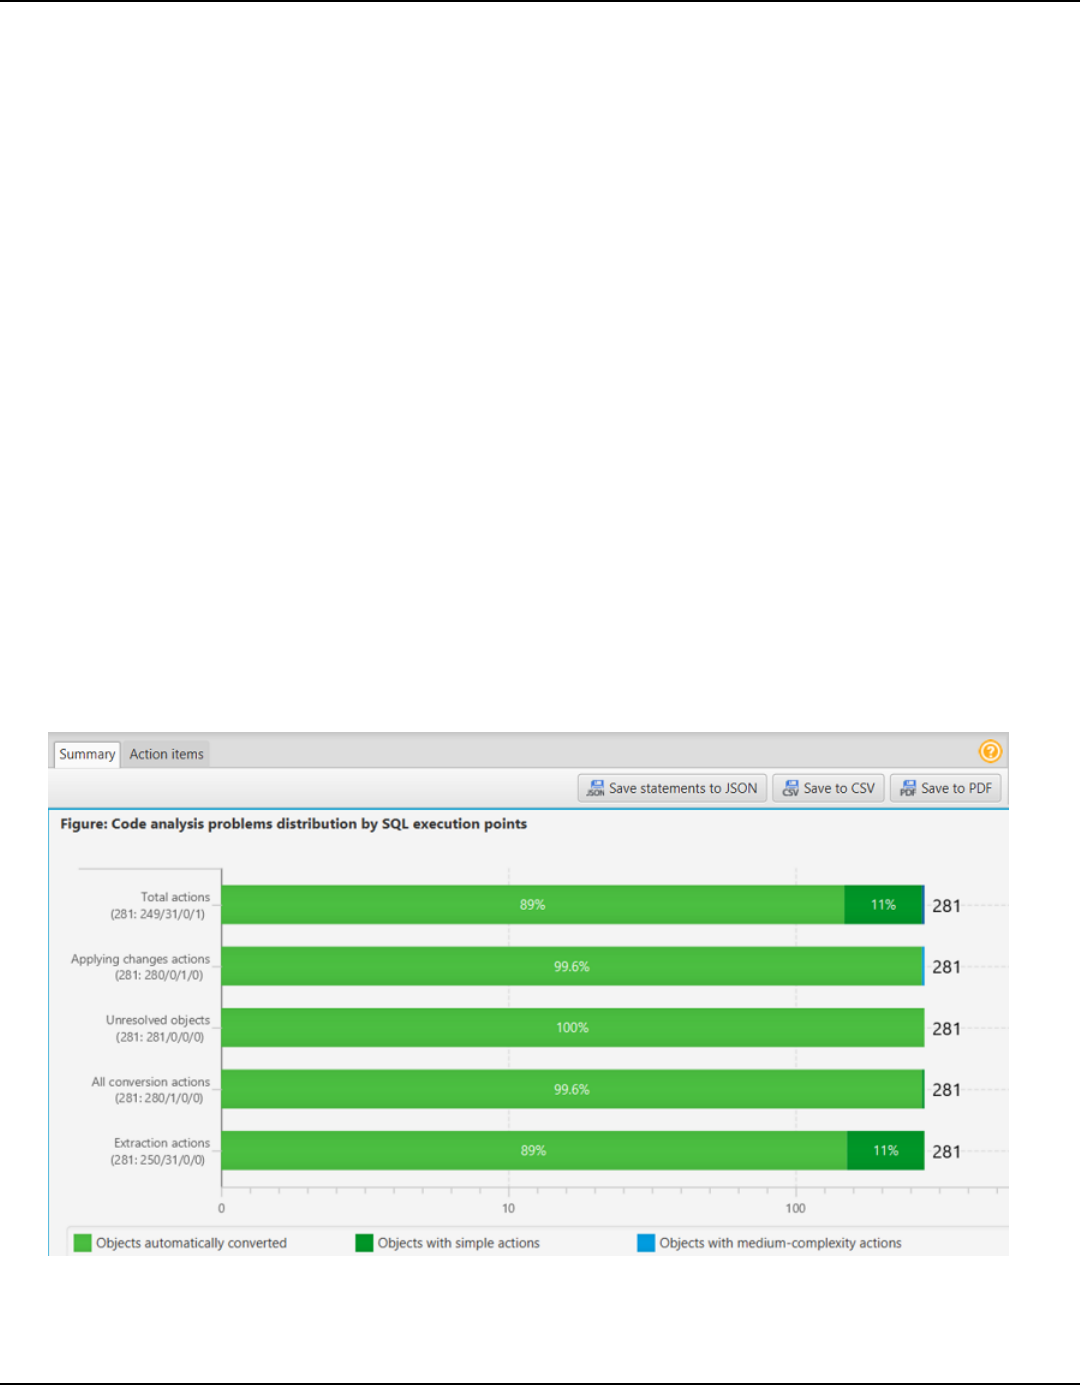
AWS Schema Conversion Tool User Guide
Creating a Java application conversion assessment report in AWS SCT
The Java application conversion assessment report provides information about converting the SQL
code embedded in your Java application to a format compatible with your target database. The
assessment report provides conversion details for all SQL execution points and all source code files.
The assessment report also includes action items for SQL code that AWS SCT can't convert.
Use the following procedure to create a Java application conversion assessment report.
To create a Java application conversion assessment report
1. Expand the Java node under Applications in the left panel.
2. Choose the application to convert, and open the context (right-click) menu.
3. Choose Convert.
4. On the View menu, choose Assessment report view.
5. Review the Summary tab.
The Summary tab, shown following, displays the executive summary information from the
Java application assessment report. It shows conversion results for all SQL execution points
and all source code files.
6. Choose Save statements to JSON to save the extracted SQL code from your Java application
as a JSON file.
Creating a Java application conversion assessment report Version 1.0.672 467

AWS Schema Conversion Tool User Guide
7. (Optional) Save a local copy of the report as either a PDF file or a comma-separated values
(CSV) file:
• Choose Save to PDF at upper right to save the report as a PDF file.
The PDF file contains the executive summary, action items, and recommendations for
application conversion.
• Choose Save to CSV at upper right to save the report as a CSV file.
The CSV file contains action items, recommended actions, and an estimated complexity of
manual effort required to convert the SQL code.
Converting SQL code in Pro*C applications with AWS Schema
Conversion Tool
For an Oracle to PostgreSQL conversion, you can use the AWS Schema Conversion Tool (AWS
SCT) to convert SQL code embedded into your Pro*C applications. This specific Pro*C application
converter understands the application logic. It collects statements that are located in different
application objects, such as functions, parameters, local variables, and so on.
Because of this deep analysis, the Pro*C application SQL code converter provides better conversion
results compared to the generic converter.
Creating Pro*C application conversion projects in AWS SCT
You can create a Pro*C application conversion project only for converting Oracle database schemas
to PostgreSQL database schemas. Make sure that you add a mapping rule in your project that
includes a source Oracle schema and a target PostgreSQL database. For more information, see
Mapping data types in the AWS Schema Conversion Tool.
You can add multiple application conversion projects in a single AWS SCT project. Use the following
procedure to create a Pro*C application conversion project.
To create a Pro*C application conversion project
1. Create a database conversion project, and add a source Oracle database. For more information,
see Starting and managing Projects in AWS SCT and Adding servers to project in AWS SCT.
SQL code in Pro*C Version 1.0.672 468
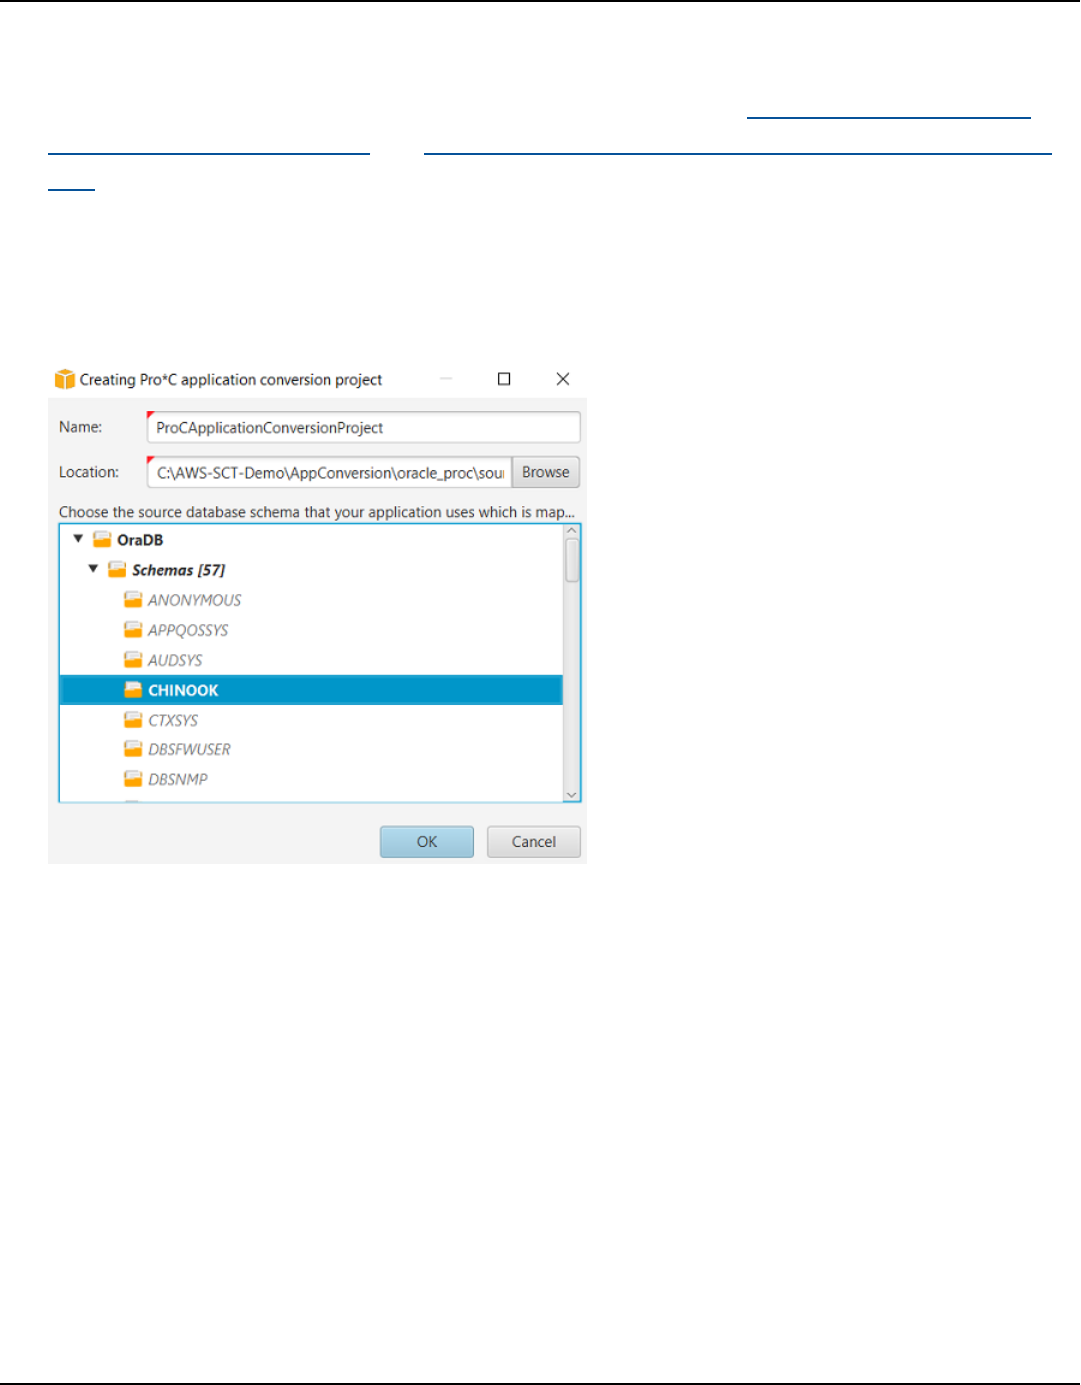
AWS Schema Conversion Tool User Guide
2. Add a mapping rule that includes your source Oracle database and a target PostgreSQL
database. You can add a target PostgreSQL database or use a virtual PostgreSQL target
database platform in a mapping rule. For more information, see Mapping data types in the
AWS Schema Conversion Tool and Mapping to virtual targets in the AWS Schema Conversion
Tool.
3. On the View menu, choose Main view.
4. On the Applications menu, choose New Pro*C application.
The Creating a Pro*C application conversion project dialog box appears.
5. For Name, enter a name for your Pro*C application conversion project. Because each database
schema conversion project can have one or more child application conversion projects, choose
a name that makes sense if you add multiple projects.
6. For Location, enter the location of the source code for your application.
7. In the source tree, choose the schema that your application uses. Make sure that this schema
is part of a mapping rule. AWS SCT highlights the schemas that are part of a mapping rule in
bold.
8. Choose OK to create your Pro*C application conversion project.
9. Find your Pro*C application conversion project in the Applications node in the left panel.
Creating Pro*C application conversion projects Version 1.0.672 469

AWS Schema Conversion Tool User Guide
Converting your Pro*C application SQL code in AWS SCT
After you add your Pro*C application to the AWS SCT project, convert SQL code from this
application to a format compatible with your target database platform. Use the following
procedure to analyze and convert the SQL code embedded in your Pro*C application in the AWS
Schema Conversion Tool.
To convert your SQL code
1. Expand the Pro*C node under Applications in the left panel.
2. Choose the application to convert and then choose Settings.
a. For Global header file path, enter the path to the header files that your application
project uses.
b. Choose Interpret all unresolved host variables as to see all unresolved variables in the
converted code.
c. Choose Use fixed-width string conversion function from the extension pack to use the
extension pack functions in the converted SQL code. AWS SCT includes the extension pack
files in your application project.
d. Choose Transform anonymous PL/SQL blocks to standalone SQL calls or stored
functions to create stored procedures in your target database for all anonymous PL/
SQL blocks. AWS SCT then includes the runs of these stored procedures in the converted
application code.
e. Choose Use custom cursor flow to improve the conversion of Oracle database cursors.
3. In the left panel, choose the application to convert, and open the context (right-click) menu.
4. Choose Convert. AWS SCT analyzes your source code files, determines the application logic,
and loads code metadata into the project. This code metadata includes Pro*C classes, objects,
methods, global variables, interfaces, and so on.
In the target database panel, AWS SCT creates the similar folders structure to your source
application project. Here you can review the converted application code.
Converting your Pro*C application SQL code Version 1.0.672 470
AWS Schema Conversion Tool User Guide
5. Save your converted application code. For more information, see Editing and saving your
converted application code.
Editing and saving your converted application code with AWS SCT
You can edit the converted SQL statements and use AWS SCT to embed this edited code into the
converted Pro*C application code. Use the following procedure to edit your converted SQL code.
To edit your converted SQL code
1. Expand the Pro*C node under Applications in the left panel.
2. Choose the application to convert, open the context (right-click) menu, and choose Convert.
3. On the View menu, choose Assessment report view.
4. Choose Save statements to CSV to save the extracted SQL code from your Pro*C application as
a CSV file.
5. Enter the name of the CSV file to save the extracted SQL code, and choose Save.
6. Edit the extracted SQL code.
7. On the View menu, choose Main view.
8. Expand the Pro*C node under Applications in the target database panel.
Editing and saving your converted application code Version 1.0.672 471

AWS Schema Conversion Tool User Guide
9. Choose your converted application, open the context (right-click) menu, and choose Import
statements from CSV.
10. Choose Yes, then choose the file with your edited SQL code, and choose Open.
AWS SCT breaks the converted SQL statements into parts and places them into the appropriate
objects of your source application code. Use the following procedure to save your converted
application code.
To save your converted application code
1. Expand the Pro*C node under Applications in the target database panel.
2. Choose your converted application, and choose Save.
3. Enter the path to the folder to save the converted application code, and choose Select folder.
Managing Pro*C application conversion projects in AWS SCT
You can add multiple Pro*C application conversion projects, update the application code in the
AWS SCT project, or remove a Pro*C conversion project from your AWS SCT project.
To add an additional Pro*C application conversion project
1. Expand the Applications node in the left panel.
2. Choose the Pro*C node, and open the context (right-click) menu.
3. Choose New application.
4. Enter the information that is required to create a new Pro*C application conversion project. For
more information, see Creating Pro*C application conversion projects.
After you make changes in your source application code, upload it into the AWS SCT project.
To upload the updated application code
1. Expand the Pro*C node under Applications in the left panel.
2. Choose the application to update, and open the context (right-click) menu.
3. Choose Refresh and then choose Yes.
Managing Pro*C application conversion projects Version 1.0.672 472

AWS Schema Conversion Tool User Guide
AWS SCT uploads your application code from the source files and removes conversion results.
To keep code changes that you made in AWS SCT and the conversion results, create a new
Pro*C conversion project.
To remove a Pro*C application conversion project
1. Expand the Pro*C node under Applications in the left panel.
2. Choose the application to remove, and open the context (right-click) menu.
3. Choose Delete and then choose OK.
Creating a Pro*C application conversion assessment report in AWS SCT
The Pro*C application conversion assessment report provides information about converting the SQL
code embedded in your Pro*C application to a format compatible with your target database. The
assessment report provides conversion details for all SQL execution points and all source code files.
The assessment report also includes action items for SQL code that AWS SCT can't convert.
Use the following procedure to create a Pro*C application conversion assessment report.
To create a Pro*C application conversion assessment report
1. Expand the Pro*C node under Applications in the left panel.
2. Choose the application to convert, and open the context (right-click) menu.
3. Choose Convert.
4. On the View menu, choose Assessment report view.
5. Review the Summary tab.
The Summary tab, shown following, displays the executive summary information from the
Pro*C application assessment report. It shows conversion results for all SQL execution points
and all source code files.
Creating a Pro*C application conversion assessment report Version 1.0.672 473
AWS Schema Conversion Tool User Guide
6. Choose Save statements to CSV to save the extracted SQL code from your Pro*C application as
a comma-separated values (CSV) file.
7. (Optional) Save a local copy of the report as either a PDF file or a comma-separated values
(CSV) file:
• Choose Save to PDF at upper right to save the report as a PDF file.
The PDF file contains the executive summary, action items, and recommendations for
application conversion.
• Choose Save to CSV at upper right to save the report as a CSV file.
The CSV file contains action items, recommended actions, and an estimated complexity of
manual effort required to convert the SQL code.
Creating a Pro*C application conversion assessment report Version 1.0.672 474

AWS Schema Conversion Tool User Guide
Using extension packs with AWS Schema Conversion Tool
An AWS SCT extension pack is an add-on module that emulates functions present in a source
database that are required when converting objects to the target database. Before you can install
an AWS SCT extension pack, you convert your database schema.
Each AWS SCT extension pack includes the following components:
• DB schema – Includes SQL functions, procedures, and tables for emulating certain online
transaction processing (OLTP) and online analytical processing (OLAP) database objects such as
sequences. Also, emulates unsupported built-in-functions from the source database. The name
of this schema has the following format: aws_database_engine_name_ext.
• AWS Lambda functions (for certain OLTP databases) – Includes AWS Lambda functions that
emulate complex database functionality, such as job scheduling and sending emails.
• Custom libraries for OLAP databases – Includes a set of Java and Python libraries that that you
can use to migrate Microsoft SQL Server Integration Services (SSIS) extract, transform, and load
(ETL) scripts to AWS Glue or AWS Glue Studio.
Java libraries include the following modules:
•
spark-excel_2.11-0.13.1.jar – To emulate the functionality of Excel source and target
components.
•
spark-xml_2.11-0.9.0.jar, poi-ooxml-schemas-4.1.2.jar, and
xmlbeans-3.1.0.jar – To emulate the functionality of the XML source component.
Python libraries include the following modules:
•
sct_utils.py – To emulate source data types and prepare parameters for the Spark SQL
query.
•
ssis_datetime.py – To emulate date and time built-in functions.
•
ssis_null.py – To emulate the ISNULL and REPLACENULL built-in functions.
•
ssis_string.py – To emulate string built-in functions.
For more information about these libraries, see Using custom libraries for AWS SCT extension
packs.
You can apply AWS SCT extension packs in two ways:
Version 1.0.672 475

AWS Schema Conversion Tool User Guide
• AWS SCT can automatically apply an extension pack when you apply a target database script by
choosing Apply to database from the context menu. AWS SCT applies the extension pack before
it applies all other schema objects.
• To manually apply an extension pack, choose the target database and then choose Apply
extension pack for from the context (right-click) menu. In most situations, automatic application
is sufficient. However, you might want to apply the pack manually if it's accidentally deleted.
Each time that you apply an AWS SCT extension pack to a target data store, the components are
overwritten, and AWS SCT displays a notification about this. To turn off these notifications, choose
Settings, Global settings, Notifications, and then select Hide the extension pack replacement
alert.
For a conversion from Microsoft SQL Server to PostgreSQL, you can use the SQL Server to
PostgreSQL extension pack in AWS SCT. This extension pack emulates SQL Server Agent and SQL
Server Database Mail. For more information, see Emulating SQL Server Agent in PostgreSQL with
an extension pack and Emulating SQL Server Database Mail in PostgreSQL with an extension pack.
Following, you can find more information about working with AWS SCT extension packs.
Topics
• Permissions for using the AWS SCT extension pack
• Using the extension pack schema
• Using custom libraries for AWS SCT extension packs
• Using the AWS Lambda functions from the AWS SCT extension pack
• Configuring functions for the AWS SCT extension pack
Permissions for using the AWS SCT extension pack
The AWS SCT extension pack for Amazon Aurora emulates mail sending, job scheduling, queueing,
and other operations using AWS Lambda functions. When you apply the AWS SCT extension pack
to your target Aurora database, AWS SCT creates a new AWS Identity and Access Management
(IAM) role and an inline IAM policy. Next, AWS SCT creates a new Lambda function, and configures
your Aurora DB cluster for outbound connections to AWS Lambda. To run these operations, make
sure that you grant the following required permissions to your IAM user:
•
iam:CreateRole – to create a new IAM role for your AWS account.
Permissions for using the extension pack Version 1.0.672 476

AWS Schema Conversion Tool User Guide
•
iam:CreatePolicy – to create a new IAM policy for your AWS account.
•
iam:AttachRolePolicy – to attach the specified policy to your IAM role.
•
iam:PutRolePolicy – to update an inline policy document that is embedded in your IAM role.
•
iam:PassRole – to pass the specified IAM role to the rules engine.
•
iam:TagRole – to add tags to an IAM role.
•
iam:TagPolicy – to add tags to an IAM policy.
•
lambda:ListFunctions – to see the list of your Lambda functions.
•
lambda:ListTags – to see the list of tags of your Lambda functions.
•
lambda:CreateFunction – to create a new Lambda function.
•
rds:AddRoleToDBCluster – to associate an IAM role with your Aurora DB cluster.
The AWS SCT extension pack for Amazon Redshift emulates source data warehouse base functions
that are required when applying converted objects to Amazon Redshift. Before you apply your
converted code to Amazon Redshift, you must apply the extension pack for Amazon Redshift. To
do so, include the iam:SimulatePrincipalPolicy action in your IAM policy.
AWS SCT uses the IAM Policy Simulator to check the required permissions for installing the
Amazon Redshift extension pack. The IAM Policy Simulator can display an error message
even if you have correctly configured your IAM user. This is a known issue of the IAM Policy
Simulator. Also, the IAM Policy Simulator displays an error message when you don't have the
iam:SimulatePrincipalPolicy action in your IAM policy. In these cases, you can ignore
the error message and apply the extension pack using the extension pack wizard. For more
information, see Applying the extension pack.
Using the extension pack schema
When you convert your database or data warehouse schema, AWS SCT adds an additional schema
to your target database. This schema implements SQL system functions of the source database
that are required when writing your converted schema to your target database. This additional
schema is called the extension pack schema.
The extension pack schema for OLTP databases is named according to the source database as
follows:
•
Microsoft SQL Server: AWS_SQLSERVER_EXT
Using the extension pack schema Version 1.0.672 477

AWS Schema Conversion Tool User Guide
•
MySQL: AWS_MYSQL_EXT
•
Oracle: AWS_ORACLE_EXT
•
PostgreSQL: AWS_POSTGRESQL_EXT
The extension pack schema for OLAP data warehouse applications is named according to the
source data store as follows:
•
Greenplum: AWS_GREENPLUM_EXT
•
Microsoft SQL Server: AWS_SQLSERVER_EXT
•
Netezza: AWS_NETEZZA_EXT
•
Oracle: AWS_ORACLE_EXT
•
Teradata: AWS_TERADATA_EXT
•
Vertica: AWS_VERTICA_EXT
Using custom libraries for AWS SCT extension packs
In some cases, AWS SCT can't convert source database features to equivalent features in your
target database. The relevant AWS SCT extension pack contains custom libraries that emulate
some source database functionality on in your target database.
If you are converting a transactional database, see Using the AWS Lambda functions from the AWS
SCT extension pack .
Applying the extension pack
You can apply the AWS SCT extension pack using the extension pack wizard or when you apply the
converted code to your target database.
To apply the extension pack using the extension pack wizard
1. In the AWS Schema Conversion Tool, in the target database tree, open the context (right-click)
menu, choose Apply extension pack for, and then choose your source database platform.
Custom libraries for extension packs Version 1.0.672 478
AWS Schema Conversion Tool User Guide
The extension pack wizard appears.
2. Read the Welcome page, and then choose Next.
3. On the AWS profile settings page, do the following:
• If you are reinstalling the extension pack schema only, choose Skip this step for now, and
then choose Next. The Skip this step for now option is only available for online transaction
processing (OLTP) databases.
• If you are uploading a new library, then provide the credentials to connect to your AWS
account. Use this step only when you convert OLAP databases or ETL scripts. You can use
your AWS Command Line Interface (AWS CLI) credentials if you have the AWS CLI installed.
You can also use credentials that you previously stored in a profile in the global application
settings and associated with the project. If necessary, choose Navigate to global settings to
configure of associate a different profile with your AWS SCT project. For more information,
see Managing Profiles in the AWS Schema Conversion Tool.
4. If you are uploading a new library, then choose I need to upload a library on the Library
upload page. Use this step only when you convert OLAP databases or ETL scripts. Next,
provide the Amazon S3 path, and then choose Upload library to S3.
If you have already uploaded the library, then choose I already have libraries uploaded, use
my existing S3 bucket on the Library upload page. Next, provide the Amazon S3 path.
When you are done, choose Next.
5. On the Function emulation page, choose Create extension pack. Messages appear with the
status of the extension pack operations.
When you are done, choose Finish.
Applying the extension pack Version 1.0.672 479

AWS Schema Conversion Tool User Guide
To apply the extension pack when applying the converted code
1. Specify the Amazon S3 bucket in your AWS service profile. Use this step only when you convert
OLAP databases or ETL scripts. For more information, see Managing Profiles in the AWS
Schema Conversion Tool.
Make sure that your Amazon S3 bucket policy includes the following permissions:
{
"Version": "2012-10-17",
"Statement": [
{
"Effect": "Allow",
"Action": ["s3:ListBucket"],
"Resource": ["*"]
},
{
"Effect": "Allow",
"Action": ["s3:PutObject"],
"Resource": ["*"]
},
{
"Effect": "Allow",
"Action": ["iam:SimulatePrincipalPolicy"],
"Resource": ["*"]
},
{
"Effect": "Allow",
"Action": ["iam:GetUser"],
"Resource": ["arn:aws:iam::111122223333:user/DataExtractionAgentName"]
}
]
}
In the preceding example, replace 111122223333:user/DataExtractionAgentName with
the name of your IAM user.
2. Convert your source data warehouse schemas. For more information, see Converting data
warehouse schemas.
3. In the right pane, choose the converted schema.
4. Open the context (right-click) menu for the schema element, and then choose Apply to
database.
Applying the extension pack Version 1.0.672 480
AWS Schema Conversion Tool User Guide
5. AWS SCT generates extension packs with the required components and adds the
aws_database_engine_name_ext schema in the target tree. Next, AWS SCT applies the
converted code and the extension pack schema to your target data warehouse.
When you use a combination of Amazon Redshift and AWS Glue as your target database
platform, AWS SCT adds an additional schema in the extension pack.
Using the AWS Lambda functions from the AWS SCT extension
pack
AWS SCT provides an extension pack that contains Lambda functions for email, job scheduling, and
other features for databases hosted on Amazon EC2.
Using AWS Lambda functions to emulate database functionality
In some cases, database features can't be converted to equivalent Amazon RDS features. For
example, Oracle sends email calls that use UTL_SMTP, and Microsoft SQL Server can use a job
scheduler. If you host and self-manage a database on Amazon EC2, you can emulate these features
by substituting AWS services for them.
The AWS SCT extension pack wizard helps you install, create, and configure Lambda functions to
emulate email, job scheduling, and other features.
Applying the extension pack to support Lambda functions
You can apply the extension pack to support Lambda functions using the extension pack wizard or
when you apply the converted code to your target database.
Important
The AWS service emulation features are supported only for databases installed and self-
managed on Amazon EC2. Don't install the service emulation features if your target
database is on an Amazon RDS DB instance.
To apply the extension pack using the extension pack wizard
1. In the AWS Schema Conversion Tool, in the target database tree, open the context (right-click)
menu, choose Apply extension pack for, and then choose your source database platform.
Using the Lambda functions from the AWS SCT extension pack Version 1.0.672 481

AWS Schema Conversion Tool User Guide
The extension pack wizard appears.
2. Read the Welcome page, and then choose Next.
3. On the AWS profile settings page, do the following:
• If you are reinstalling the extension pack schema only, choose Skip this step for now, and
then choose Next.
• If you are installing AWS services, provide the credentials to connect to your AWS account.
You can use your AWS CLI credentials if you have the AWS CLI installed. You can also use
credentials that you previously stored in a profile in the global application settings and
associated with the project. If necessary, choose Navigate to Project Settings to associate
a different profile with the project. If necessary, choose Global Settings to create a new
profile. For more information, see Managing Profiles in the AWS Schema Conversion Tool.
4. On the Email Sending Service page, do the following:
• If you are reinstalling the extension pack schema only, choose Skip this step for now, and
then choose Next.
• If you are installing AWS services and you have an existing Lambda function, you can provide
it. Otherwise, the wizard creates it for you. When you are done, choose Next.
5. On the Job Emulation Service page, do the following:
• If you are reinstalling the extension pack schema only, choose Skip this step for now, and
then choose Next.
• If you are installing AWS services and you have an existing Lambda function, you can provide
it. Otherwise, the wizard creates it for you. When you are done, choose Next.
6. On the Function emulation page, choose Create extension pack. Messages appear with the
status of the extension pack operations.
Applying the extension pack to support Lambda functions Version 1.0.672 482

AWS Schema Conversion Tool User Guide
When you are done, choose Finish.
Note
To update an extension pack and overwrite the old extension pack components, make
sure that you use the latest version of AWS SCT. For more information, see Installing and
Configuring AWS Schema Conversion Tool.
Configuring functions for the AWS SCT extension pack
The extension pack contains functions that you must configure before use. The constant
CONVERSION_LANG defines the language that the service pack uses. The functions are available for
English and German.
To set the language to English or German, make the following change in the function code. Find
the following constant declaration:
CONVERSION_LANG CONSTANT VARCHAR := '';
To set CONVERSION_LANG to English, change the line to the following:
CONVERSION_LANG CONSTANT VARCHAR := 'English';
To set CONVERSION_LANG to English, change the line to the following:
CONVERSION_LANG CONSTANT VARCHAR := 'Deutsch';
Set this setting for the following functions:
•
aws_sqlserver_ext.conv_datetime_to_string
•
aws_sqlserver_ext.conv_date_to_string
•
aws_sqlserver_ext.conv_string_to_date
•
aws_sqlserver_ext.conv_string_to_datetime
•
aws_sqlserver_ext.conv_string_to_datetime
Configuring extension pack functions Version 1.0.672 483

AWS Schema Conversion Tool User Guide
•
aws_sqlserver_ext.parse_to_date
•
aws_sqlserver_ext.parse_to_datetime
•
aws_sqlserver_ext.parse_to_time
Configuring extension pack functions Version 1.0.672 484

AWS Schema Conversion Tool User Guide
Best practices for using AWS Schema Conversion Tool
Find information on best practices and options for using the AWS Schema Conversion Tool (AWS
SCT).
Configuring additional memory
To convert large database schemas, such as a database with 3,500 stored procedures, you can
configure the amount of memory available to the AWS Schema Conversion Tool.
To modify the amount of memory that AWS SCT consumes
1. On the Settings menu, choose Global settings, and then choose JVM options.
2. Choose Edit config file and choose the text editor to open the configuration file.
3.
Edit the JavaOptions section to set the minimum and maximum memory available. The
following example sets the minimum to four GB and the maximum to 40 GB.
[JavaOptions]
-Xmx40960M
-Xms4096M
We recommend that you set the minimum memory available to at least four GB.
4. Save the configuration file, choose OK, and restart AWS SCT to apply changes.
Configuring the default project folder
AWS SCT uses the project folder to store the project files, save assessment reports, and store
converted code. By default, AWS SCT stores all files in the application folder. You can specify
another folder as the default project folder.
To change the default project folder
1. On the Settings menu, choose Global settings, and then choose File path.
2. For Default project file path, enter the path to the default project folder.
3. Choose Apply, and then choose OK.
Configuring additional memory Version 1.0.672 485

AWS Schema Conversion Tool User Guide
Increasing the data migration speed
To migrate large data sets, such as a set of tables with more than 1 TB of data, you might want to
increase the migration speed. When you use data extraction agents, the speed of data migrations
depends on various factors. These factors include the number of slices in your target Amazon
Redshift cluster, size of a chunk file in your migration task, available RAM on the PC where you run
your data extraction agents, and so on.
To increase the data migration speed, we recommend running several test migration sessions with
small data sets of your production data. Also, we recommend that you run your data extraction
agents on a PC with an SSD that has at least 500 GB of size. During these test sessions, change
different migration parameters monitor your disk utilization to find out the configuration that
ensures the maximum data migration speed. Then, use this configuration to migrate your whole
data set.
Increasing logging information
You can increase the logging information produced by AWS SCT when converting your databases,
scripts, and application SQL. Although increasing logging information might slow conversion, the
changes can help you provide robust information to AWS Support if errors arise.
AWS SCT stores logs in your local environment. You can view these log files and share them with
AWS Support or AWS SCT developers for troubleshooting.
To change logging settings
1. On the Settings menu, choose Global settings, and then choose Logging.
2. For Log folder path, enter the folder to store logs from the user interface.
3. For Console log folder path, enter the folder to store logs of the AWS SCT command line
interface (CLI).
4. For Maximum log file size (MB), enter the size, in MB, of a single log file. After your file
reaches this limit, AWS SCT creates a new log file.
5. For Maximum number of log files, enter the number of log files to store. After the number of
log files in the folder reaches this limit, AWS SCT deletes the oldest log file.
6. For Extractors log download path, enter the folder to store data extraction agents logs.
7. For Cassandra extractor log path, enter the folder to store Apache Cassandra data extraction
agents logs.
Increasing the data migration speed Version 1.0.672 486

AWS Schema Conversion Tool User Guide
8. Select Ask for a path before loading to make sure that AWS SCT asks where to store logs
every time you use data extraction agents.
9. For Debug mode, choose True. Use this option to log additional information when standard
AWS SCT logs don't include any issues.
10. Choose key application modules to increase the logging information. You can increase the
logging information for the following application modules:
• General
• Loader
• Parser
• Printer
• Resolver
• Telemetry
• Converter
• Type mapping
• User interface
• Controller
• Compare schema
• Clone data center
• Application analyzer
For each of the preceding application modules, choose one of the following logging levels:
• Trace – Most detailed information.
• Debug – Detailed information on the flow through the system.
• Info – Runtime events, such as startup or shutdown.
• Warning – Use of deprecated APIs, poor use of API, other runtime situations that are
undesirable or unexpected.
• Error – Runtime errors or unexpected conditions.
• Critical – Errors that lead to the application shutting down.
• Mandatory – The highest possible level of errors.
Increasing logging information Version 1.0.672 487

AWS Schema Conversion Tool User Guide
By default, after you turn on Debug mode, AWS SCT sets the Info logging level for all
application modules.
For example, to help with key problem areas during conversion, set Parser, Type mapping, and
User interface to Trace.
If information becomes too verbose for the file system where logs are streaming, change to a
location with sufficient space to capture logs.
To transmit logs to AWS Support, go to the directory where the logs are stored, and compress all
the files into a manageable single .zip file. Then upload the .zip file with your support case. When
the initial analysis is completed and ongoing development resumes, return Debug mode to false to
eliminate the verbose logging. Then increase conversion speed.
Tip
To manage the log size and streamline reporting issues, remove the logs or move them
to another location after a successful conversion. Doing this task ensures that only the
relevant errors and information are transmitted to AWS Support and keeps the log file
system from filling.
Increasing logging information Version 1.0.672 488

AWS Schema Conversion Tool User Guide
Troubleshooting issues with AWS Schema Conversion
Tool
Following, you can find information about troubleshooting issues with the AWS Schema
Conversion Tool (AWS SCT).
Cannot load objects from an Oracle source database
When you attempt to load schema from an Oracle database, you might encounter one of the
following errors.
Cannot load objects tree.
ORA-00942: table or view does not exist
These errors occur because the user whose ID you used to connect to the Oracle database doesn't
have sufficient permissions to read the schema, as required by AWS SCT.
You can resolve the issue by granting the user select_catalog_role permission and also
permission to any dictionary in the database. These permissions provide the read-only access to
the views and system tables that is required by AWS SCT. The following example creates a user ID
named min_privs and grants the user with this ID the minimum permissions required to convert
schema from an Oracle source database.
create user min_privs identified by min_privs;
grant connect to min_privs;
grant select_catalog_role to min_privs;
grant select any dictionary to min_privs;
Assessment report warning message
To assess the complexity of converting to another database engine, AWS SCT requires access to
objects in your source database. When AWS SCT encounters problems during scanning and can’t
perform an assessment, a warning message is issued. This message indicates that the overall
conversion percentage is reduced. Following are reasons why AWS SCT might encounter problems
during scanning:
Cannot load objects from an Oracle source database Version 1.0.672 489

AWS Schema Conversion Tool User Guide
• Your database user doesn’t have access to all of the needed objects. For more information about
AWS SCT required security permissions and privileges for your database, see Connecting to
source databases with the AWS Schema Conversion Tool for the appropriate source database
section in this guide.
• An object cited in the schema no longer exists in the database. To help resolve the issue, you can
connect with SYSDBA permissions and check if the object is present in the database.
• SCT is trying to assess an object that is encrypted.
Warning message Version 1.0.672 490

AWS Schema Conversion Tool User Guide
CLI Reference for AWS Schema Conversion Tool
This section describes how to get started with the AWS SCT command line interface (CLI). Also, this
section provides information about the key commands and usage modes. For a full reference of
AWS SCT CLI commands, see Reference material.
Topics
• Prerequisites for using the AWS SCT command line interface
• AWS SCT CLI interactive mode
• Getting AWS SCT CLI scenarios
• Editing AWS SCT CLI scenarios
• AWS SCT CLI script mode
• AWS SCT CLI reference material
Prerequisites for using the AWS SCT command line interface
Download and install the latest version of Amazon Corretto 11. For more information, see
Downloads for Amazon Corretto 11 in the Amazon Corretto 11 User Guide.
Download and install the latest version of AWS SCT. For more information, see Installing AWS
Schema Conversion Tool.
AWS SCT CLI interactive mode
You can use the AWS SCT command line interface in interactive mode. In this mode, you enter
commands into the console one by one. You can use this interactive mode to learn more about CLI
commands or download the most commonly used CLI scenarios.
To convert your source database schema in AWS SCT, run a sequence operation: create a new
project, connect to source and target databases, create mapping rules, and convert database
objects. Because this workflow can be complex, we recommend using scripts in the AWS SCT CLI
mode. For more information, see Script mode.
You can run the AWS SCT CLI commands from the app folder of your AWS SCT installation path. In
Windows, the default installation path is C:\Program Files\AWS Schema Conversion Tool
\. Make sure that this folder includes the AWSSchemaConversionToolBatch.jar file.
Prerequisites Version 1.0.672 491
AWS Schema Conversion Tool User Guide
To enter the AWS SCT CLI interactive mode, use the following command after you complete the
prerequisites.
java -jar AWSSchemaConversionToolBatch.jar -type interactive
Now you can run AWS SCT CLI commands. Make sure that you end your commands with / in a new
line. Also, make sure that you use straight single quotation marks (') before and after the values of
command parameters.
Note
If the preceding command returns Unexpected error, try the following:
java -Djdk.jar.maxSignatureFileSize=20000000 -jar
AWSSchemaConversionToolBatch.jar
To see the list of available commands in AWS SCT CLI interactive mode, run the following
command.
help
/
To view information about an AWS SCT CLI command, use the following command.
help -command: 'command_name'
/
In the preceding example, replace command_name with the name of a command.
To view information about parameters of an AWS SCT CLI command, use the following command.
help -command: 'command_name' -parameters: 'parameters_list'
/
In the preceding example, replace command_name with the name of a command. Then, replace
parameters_list with a list of parameter names separated by a comma.
To run a script from a file in AWS SCT CLI interactive mode, use the following command.
Interactive mode Version 1.0.672 492

AWS Schema Conversion Tool User Guide
ExecuteFile -file: 'file_path'
/
In the preceding example, replace file_path with the path to your file with a script. Make sure
that your file has an .scts extension.
To exit AWS SCT CLI interactive mode, run the quit command.
Examples
The following example displays the information about the Convert command.
help -command: 'Convert'
/
The following example displays the information about two parameters of the Convert command.
help -command: 'Convert' -parameters: 'filter, treePath'
/
Getting AWS SCT CLI scenarios
To get the most commonly used AWS SCT scenarios, you can use the GetCliScenario command.
You can run this command in interactive mode, then edit the downloaded templates. Use the
edited files in script mode.
The GetCliScenario command saves the selected template or all available templates to the
specified directory. The template contains the complete set of commands to run a script. Make sure
that you edit the file paths, database credentials, object names, and other data in these templates.
Also, make sure that you remove the commands that you don't use and add new commands to the
script where needed.
To run the GetCliScenario command, complete the prerequisites and enter AWS SCT CLI
interactive mode. For more information, see Interactive mode.
Next, use the following syntax to run the GetCliScenario command and get the AWS SCT
scenarios.
GetCliScenario -type: 'template_type' -directory: 'file_path'
Examples Version 1.0.672 493
AWS Schema Conversion Tool User Guide
/
In the preceding example, replace template_type with one of the template types from the
following table. Next, replace file_path with the path the folder where you want to download
scripts. Make sure that AWS SCT can access this folder without requesting admin rights. Also, make
sure that you use straight single quotation marks (') before and after the values of command
parameters.
To download all AWS SCT CLI templates, run the preceding command without the -type option.
The following table includes the types of AWS SCT CLI templates that you can download. For each
template, the table includes the file name and the description of operations that you can run using
the script.
Template type File name Description
BTEQScriptConversion
BTEQScriptConversi
onTemplate.scts
Converts Teradata Basic
Teradata Query (BTEQ),
FastExport, FastLoad, and
MultiLoad scripts to Amazon
Redshift RSQL. For more
information, see Converting
Data Using ETL.
ConversionApply
ConversionTemplate
.scts
Converts source database
schemas and applies the
converted code to the target
database. Optionally, saves
the converted code as a
SQL script, and saves the
assessment report. For more
information, see Converting
schemas.
GenericAppConversion
GenericApplication
ConversionTemplate
.scts
Converts SQL code embedded
into your applications with
the generic AWS SCT applicati
Getting CLI scenarios Version 1.0.672 494

AWS Schema Conversion Tool User Guide
Template type File name Description
on converter. For more
information, see SQL code.
HadoopMigration
HadoopMigrationTem
plate.scts
Migrates your on-premises
Hadoop cluster to Amazon
EMR. For more information,
see Connecting to Apache
Hadoop databases with the
AWS Schema Conversion Tool.
HadoopResumeMigration
HadoopResumeMigrat
ionTemplate.scts
Resumes an interrupted
migration of your on-premis
es Hadoop cluster to Amazon
EMR. For more information,
see Connecting to Apache
Hadoop databases with the
AWS Schema Conversion Tool.
Informatica
InformaticaConvers
ionTemplate.scts
Converts SQL code embedded
into your Informatica extract,
transform, and load (ETL)
scripts. Configures connectio
ns to your source and target
databases in your ETL scripts,
and saves converted scripts
after the conversion. For more
information, see Informatica
ETL scripts.
LanguageSpecificAppConversi
on
LanguageSpecificAp
pConversionTemplat
e.scts
Converts SQL code embedded
into your C#, C++, Java,
and Pro*C applications with
the AWS SCT application
converter. For more informati
on, see Converting applicati
on SQL.
Getting CLI scenarios Version 1.0.672 495

AWS Schema Conversion Tool User Guide
Template type File name Description
OozieConversion
OozieConversionTem
plate.scts
Converts your Apache Oozie
workflows to AWS Step
Functions. For more informati
on, see Connecting to Apache
Oozie workflows with the
AWS Schema Conversion Tool.
RedshiftAgent
DWHDataMigrationTe
mplate.scts
Converts source data
warehouse schemas and
applies the converted code to
the target Amazon Redshift
database. Then registers a
data extraction agent, creates
and starts a data migration
task. For more information,
see Migrating from a data
warehouse.
ReportCreation
ReportCreationTemp
late.scts
Creates a database migration
report for several source
database schemas. Then saves
this report as a CSV of PDF
file. For more information, see
Assessment report.
SQLScriptConversion
SQLScriptConversio
nTemplate.scts
Converts SQL*Plus or TSQL
scripts to PL/SQL and saves
converted scripts. Also, saves
an assessment report.
After you download the AWS SCT CLI template, use the text editor to configure the script to run
on your source and target databases. Next, use the AWS SCT CLI script mode to run your script. For
more information, see AWS SCT CLI script mode.
Getting CLI scenarios Version 1.0.672 496

AWS Schema Conversion Tool User Guide
Examples
The following example downloads all templates into the C:\SCT\Templates folder.
GetCliScenario -directory: 'C:\SCT\Templates'
/
The following example downloads the template for the ConversionApply operation into the C:
\SCT\Templates folder.
GetCliScenario -type: 'ConversionApply' -directory: 'C:\SCT\Templates'
/
Editing AWS SCT CLI scenarios
After you downloaded scenario templates, configure them to get working scripts that can run on
your databases.
For all templates, make sure that you provide the path to the drivers for your source and target
databases. For more information, see Installing JDBC drivers for AWS Schema Conversion Tool.
Make sure that you include the database credentials for source and target databases. Also, make
sure that you set up mapping rules to describe a source-target pair for your conversion project. For
more information, see Data type mapping.
Next, configure the scope of the operations to run. You can remove the commands that you don't
use or add new commands to the script.
For example, suppose that you plan to convert all schemas in your source Oracle database to
PostgreSQL. Then you plan to save your database migration assessment report as a PDF and
apply the converted code to the target database. In this case, you can use the template for the
ConversionApply operation. Use the following procedure to edit your AWS SCT CLI template.
To edit the AWS SCT CLI template for the ConversionApply operation
1.
Open the ConversionTemplate.scts that you downloaded. For more information, see
Examples.
2. Remove CreateFilter, Convert -filter, ApplyToTarget -filter, SaveTargetSQL,
SaveTargetSQLbyStatement, and SaveReportCSV operations from your script.
Examples Version 1.0.672 497

AWS Schema Conversion Tool User Guide
3. For oracle_driver_file in the SetGlobalSettings operation, enter the path to your Oracle
driver. Then, for postgresql_driver_file, enter the path to your PostgreSQL driver.
If you use other database engines, use appropriate names for the settings. For a full list of
global settings that you can set in the SetGlobalSettings operation, see Global settings
matrix in the Reference material.
4. (Optional) For CreateProject, enter the name of your project and the location for your local
project file. If you choose to proceed with the default values, make sure that AWS SCT can
create files in the C:\temp folder without requesting admin rights.
5. For AddSource, enter the IP address of your source database server. Also, enter the user name,
password, and port to connect to your source database server.
6. For AddTarget, enter the IP address of your target database server. Also, enter the user name,
password, and port to connect to your target database server.
7. (Optional) For AddServerMapping, enter the source and target database objects that you want
to add to a mapping rule. You can use sourceTreePath and targetTreePath parameters
to specify the path to the database objects. Optionally, you can use sourceNamePath and
targetNamePath to specify the names of the database objects. For more information, see
Server mapping commands in the Reference material.
The default values of the AddServerMapping operation map all source schemas with your
target database.
8. Save the file and then use the script mode to run it. For more information, see Script mode.
AWS SCT CLI script mode
After you create an AWS SCT CLI script or edit a template, you can run it with the RunSCTBatch
command. Make sure that you save your file with the CLI script as an .scts extension.
You can run AWS SCT CLI scripts from the app folder of your AWS SCT installation path. In
Windows, the default installation path is C:\Program Files\AWS Schema Conversion Tool
\. Make sure that this folder includes the RunSCTBatch.cmd or RunSCTBatch.sh file. Also, this
folder should include the AWSSchemaConversionToolBatch.jar file.
Alternatively, you can add the path to the RunSCTBatch file in the PATH environment variable on
your operating system. After you update the PATH environment variable, you can run AWS SCT CLI
scripts from any folder.
Script mode Version 1.0.672 498

AWS Schema Conversion Tool User Guide
To run an AWS SCT CLI script, use the following command in Windows.
RunSCTBatch.cmd --pathtoscts "file_path"
In the preceding example, replace file_path with the path to your file with a script.
To run an AWS SCT CLI script, use the following command in Linux.
RunSCTBatch.sh --pathtoscts "file_path"
In the preceding example, replace file_path with the path to your file with a script.
You can provide optional parameters in this command, such as database credentials, the level of
details in the console output, and others. For more information, download the AWS SCT command
line interface reference at Reference material.
Examples
The following example runs the ConversionTemplate.scts script in the C:\SCT\Templates
folder. You can use this example in Windows.
RunSCTBatch.cmd --pathtoscts "C:\SCT\Templates\ConversionTemplate.scts"
The following example runs the ConversionTemplate.scts script in the /home/user/SCT/
Templates directory. You can use this example in Linux.
RunSCTBatch.sh --pathtoscts "/home/user/SCT/Templates/ConversionTemplate.scts"
AWS SCT CLI reference material
You can find reference material about the AWS Schema Conversion Tool command line interface
(CLI) in the following guide: AWS Schema Conversion Tool CLI Reference.
Examples Version 1.0.672 499
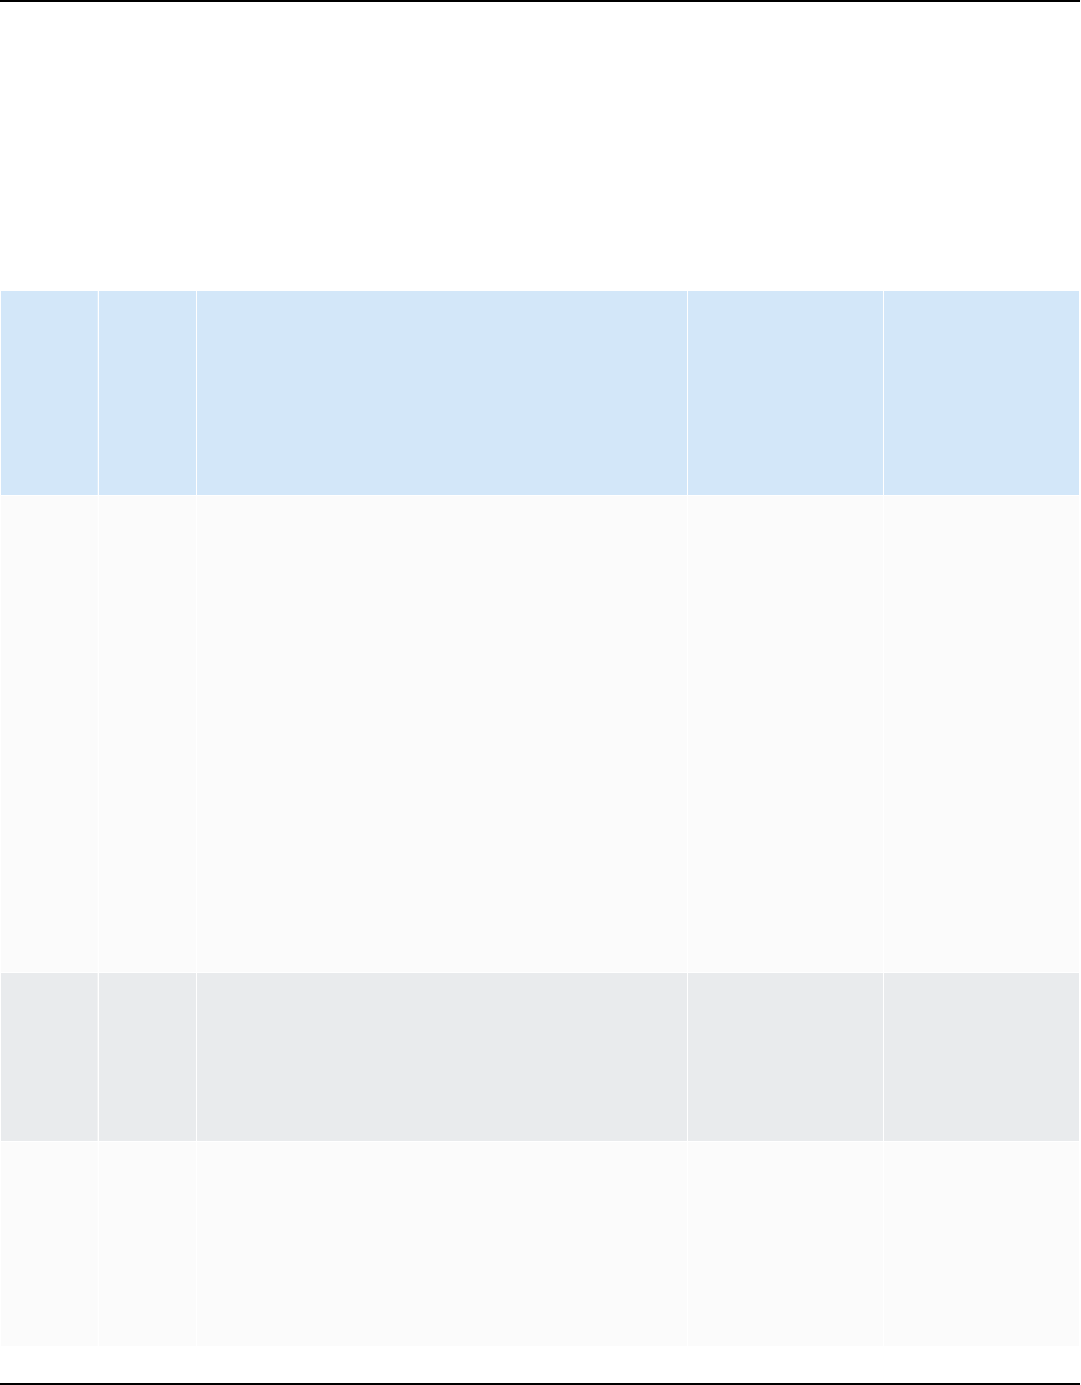
AWS Schema Conversion Tool User Guide
Release notes for AWS Schema Conversion Tool
This section contains release notes for AWS SCT, starting with version 1.0.640.
Release notes for AWS SCT Build 676
Source Target What's new, enhanced, or fixed Availabil
ity in AWS
DMS Schema
Conversion
Tool (SCT)
Availabil
ity in AWS
DMS Schema
Conversion
Oracle PostgreSQ
L/
Aurora
PostgreSQ
L
New built-in function emulation for the
following functions:
•
SYS.UTL_RAW.BIT_AND(RAW,RAW
)
•
XDB.DBMS_XSLPROCESSOR.CLOB2
FILE(CLOB)
•
XDB.DBMS_XSLPROCESSOR.READ2
CLOB(VARCHAR2)
•
SYS.UTL_RAW.BIT_OR(RAW,RAW)
•
SYS.UTL_RAW.BIT_COMPLEMENT(
RAW)
No Yes
MS
SQL
Server
Amazon
RDS
SQL
Server
Removed Database Mail not
supported message from PDF report
Yes Yes
Oracle PostgreSQ
L/
Aurora
PostgreSQ
L
Implemented constraints conversion for
partitioned tables.
Yes Yes
Release notes – 676 Version 1.0.672 500

AWS Schema Conversion Tool User Guide
Source Target What's new, enhanced, or fixed Availabil
ity in AWS
DMS Schema
Conversion
Tool (SCT)
Availabil
ity in AWS
DMS Schema
Conversion
Oracle MySQL Review of AI-602 applicability in table
conversion
Yes Yes
MS
SQL
Server
PostgreSQ
L/
Aurora
PostgreSQ
L
now supports the MERGE Statement in
PostgreSQL 15.x
Yes Yes
All All Implemented JDBC Connections:
Advanced properties
Yes No
All All
CLI: Fixed PrintOLAPTaskStatus
command failure
Yes No
TeradataAmazon
Redshift
Implemented Teradata-style data type
cast.
Yes No
TeradataAmazon
Redshift
Fixed Incorrect MERGE conversion in SQL/
BTEQ.
Yes No
TeradataAmazon
Redshift
Implemented Teradata-style data type
cast.
Yes No
TeradataAmazon
Redshift
Implemented LEAD/LAG function
conversions.
Yes No
TeradataAmazon
Redshift
Fixed error AI-9996 Transformer
error occurred in statement .
Yes No
TeradataAmazon
Redshift
Fixed error AI-9996 Transformer
error in selectItem .
Yes No
Release notes – 676 Version 1.0.672 501

AWS Schema Conversion Tool User Guide
Source Target What's new, enhanced, or fixed Availabil
ity in AWS
DMS Schema
Conversion
Tool (SCT)
Availabil
ity in AWS
DMS Schema
Conversion
TeradataAmazon
Redshift
Implemented conversion for partial
stored procedure: XbiDQM.Sp
CmprsnDly
Yes No
TeradataAmazon
Redshift
Implmented UNPIVOT statement with
alias.
Yes No
TeradataAmazon
Redshift
Implemented Delete statement with
several source tables.
Yes No
TeradataAmazon
Redshift
Fix for AI-9996 Transformer error
occurred in functionCallExpres
sion .
Yes No
TeradataAmazon
Redshift
Implemented NORMALIZE clause
conversion.
Yes No
TeradataAmazon
Redshift
Fixed incorrect conversion in DELETE
statements with subqueries.
Yes No
TeradataAmazon
Redshift
Fixed error AI-9996 Transformer
error occurred in tableOper
atorSource .
Yes No
TeradataAmazon
Redshift
Fixed error AI-9996 Transformer
error occurred in additiveE
xpression .
Yes No
TeradataAmazon
Redshift
Implemented DBC system object
conversion.
Yes No
TeradataAmazon
Redshift
Implemented workaround of update with
implicit join predicates.
Yes No
Release notes – 676 Version 1.0.672 502

AWS Schema Conversion Tool User Guide
Source Target What's new, enhanced, or fixed Availabil
ity in AWS
DMS Schema
Conversion
Tool (SCT)
Availabil
ity in AWS
DMS Schema
Conversion
Netezza Amazon
Redshift
Fixed CREATE MATERIALIZED VIEW
statement conversion error.
Yes No
Db2luw PostgreSQ
L/
Aurora
PostgreSQ
L
JDBC Extended Options connection:
Added additional connection options.
Yes No
Db2luw PostgreSQ
L/
Aurora
PostgreSQ
L
Added support for MERGE Statement in
PostgreSQL 15.x
Yes No
Db2luw PostgreSQ
L/
Aurora
PostgreSQ
L
Implemented GLOBAL TEMPORARY
TABLE conversion.
Yes No
Db2luw PostgreSQ
L/
Aurora
PostgreSQ
L
Implemented USER DEFINED TYPES
conversion.
Yes No
Db2luw MySQL
Implemented GLOBAL TEMPORARY
TABLE conversion.
Yes No
Db2luw MySQL
Implemented USER DEFINED TYPES
conversion.
Yes No
Release notes – 676 Version 1.0.672 503

AWS Schema Conversion Tool User Guide
Source Target What's new, enhanced, or fixed Availabil
ity in AWS
DMS Schema
Conversion
Tool (SCT)
Availabil
ity in AWS
DMS Schema
Conversion
Db2luw MySQL
Implemented USER DEFINED
FUNCTIONS conversion.
Yes No
Db2luw MariaDB
Implemented GLOBAL TEMPORARY
TABLE conversion.
Yes No
Db2luw MariaDB
Implemented USER DEFINED TYPES
conversion.
Yes No
Sybase All Added support for Kerberos authentic
ation
Yes No
Db2luw PostgreSQ
L/
Aurora
PostgreSQ
L
Added support for multi-version
conversion for the targets
Yes No
Azure
SQL/
Microsoft
SQL
Server
PostgreSQ
L/
Aurora
PostgreSQ
L
Added support for multi-version
conversion for the targets
Yes No
Db2luw PostgreSQ
L/
Aurora
PostgreSQ
L
Added support for MERGE statement in
PostgreSQL 15.x.
Yes No
TeradataAmazon
Redshift
Fixed unsupported function change
conversion.
Yes No
Release notes – 676 Version 1.0.672 504
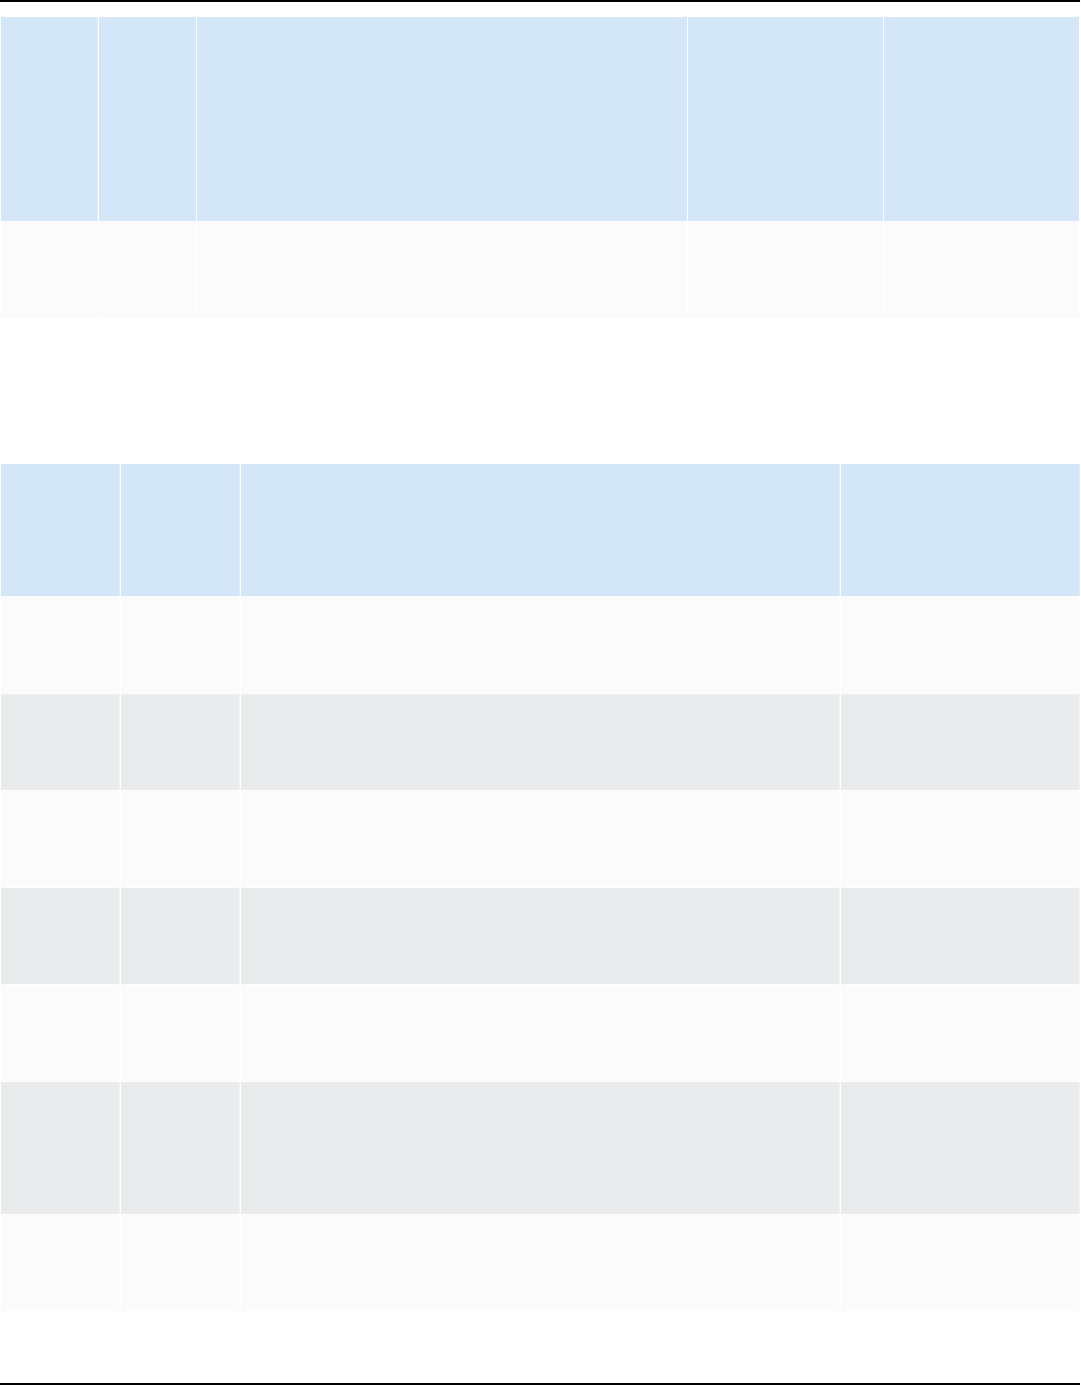
AWS Schema Conversion Tool User Guide
Source Target What's new, enhanced, or fixed Availabil
ity in AWS
DMS Schema
Conversion
Tool (SCT)
Availabil
ity in AWS
DMS Schema
Conversion
All Amazon
Redshift
Data Extractors: Implemented partition
ing by an indexed column.
Yes No
Release notes for AWS SCT Build 675
Source Target What's new, enhanced, or fixed Availability in
AWS DMS Schema
Conversion
Cassandra DynamoDBFixed a bug where Cassandra installation would fail
on the target Datacenter.
No
DB2
LUW
PostgreSQ
L
DYNAMIC SQL: PREPARE statement: Resolve and
Conversion without Dynamic SQL.
No
DB2
LUW
PostgreSQ
L
Added support for SPECIAL REGISTER. No
DB2
LUW
PostgreSQ
L
Extension pack update No
Hadoop Amazon
EMR
Added support for connecting to a Hadoop cluster
via the rsa-sha2 protocol.
No
Microsoft
SQL
Server
Amazon
Redshift
Fix for JDBC Driver forcing TLS despite not being
configured.
No
Netezza Amazon
Redshift
Added support for Materialized views conversion. No
Release notes – 675 Version 1.0.672 505

AWS Schema Conversion Tool User Guide
Source Target What's new, enhanced, or fixed Availability in
AWS DMS Schema
Conversion
Oracle Amazon
Redshift
Added support for recursive queries in Amazon
Redshift.
Yes
Oracle PostgreSQ
L,
Aurora
PostgreSQ
L
Fix for incorrect conversion of NUMBER datatype. Yes
Oracle Amazon
Redshift
Data migration. Oracle auto-partitioning. Added
expiration time for the table fragments value.
Expiration time is 72h. When expiration occurs, data
fagments are rebuilt when a data migration task is
created.
No
Oracle Amazon
Redshift
SCT Data Extractor: Changed the approach of
uploading data to Amazon Redshift. By default, the
extractor doesn't create staged tables. Instead, after
all the data files are in the Amazon S3 bucket, the
extractor copies them to the target table using a
single COPY command.
No
Oracle Amazon
Redshift
Added migration of RAW data type to VARBYTE
column.
No
Oracle PostgreSQ
L,
Aurora
PostgreSQ
L
Multi-version conversion No
Oracle PostgreSQ
L
Added support for MERGE Statement in PostgreSQL
15.x.
Yes
Release notes – 675 Version 1.0.672 506
AWS Schema Conversion Tool User Guide
Source Target What's new, enhanced, or fixed Availability in
AWS DMS Schema
Conversion
Oracle PostgreSQ
L
Added support for new regular expression functions
in PostgreSQL 15.x.
Yes
Oracle PostgreSQ
L,
Aurora
PostgreSQ
L
ON CONFLICT DO UPDATE statement is converted
without excluded alias.
Yes
Teradata Amazon
Redshift
Added conversion support for LEAD/LAG functions. No
Teradata Amazon
Redshift
Enhanced data type casting with explicit indication
of data format.
No
Teradata Amazon
Redshift
Improved conversion of AT 'TIME ZONE' clause in
time/timestamp expressions.
No
Teradata Amazon
Redshift
AI-9996 during conversion procedures with MERGE
statements.
No
Release notes for AWS SCT Build 674
Source Target What's new, enhanced, or fixed Availability in
AWS DMS Schema
Conversion
All All Various bug fixes and performance improvements Partial (only for
supported source
and target pairs)
Release notes – 674 Version 1.0.672 507

AWS Schema Conversion Tool User Guide
Source Target What's new, enhanced, or fixed Availability in
AWS DMS Schema
Conversion
Azure
SQL/
Microsoft
SQL
Server
Amazon
Redshift
Removed "AI 18066: Unable to convert schema
name" message that was misleading users during
schema assessment/conversion
No
Azure
SQL/
Microsoft
SQL
Server
Amazon
RDS for
MySQL /
Amazon
Aurora
MySQL
Incorrect conversion of the procedure without
assigning a return code
Partial (Schema
Conversion does
not currently
support Azure SQL
as a source)
Azure
SQL/
Microsoft
SQL
Server
Amazon
RDS for
PostgreSQ
L /
Amazon
Aurora
PostgreSQ
L
Fixed AI9997 for some cases of FOR XML PATH
clause conversion
Partial (Schema
Conversion does
not currently
support Azure SQL
as a source)
Azure
SQL/
Microsoft
SQL
Server
Amazon
RDS for
PostgreSQ
L /
Amazon
Aurora
PostgreSQ
L
Value is rounded to original scale in procedure/
function body
Partial (Schema
Conversion does
not currently
support Azure SQL
as a source)
Release notes – 674 Version 1.0.672 508

AWS Schema Conversion Tool User Guide
Source Target What's new, enhanced, or fixed Availability in
AWS DMS Schema
Conversion
Azure
SQL/
Microsoft
SQL
Server
Amazon
RDS for
PostgreSQ
L /
Amazon
Aurora
PostgreSQ
L
Various improvements to the conversion of
EXECUTE statements
Partial (Schema
Conversion does
not currently
support Azure SQL
as a source)
Azure
SQL/
Microsoft
SQL
Server/
Azure
Synapse
Amazon
Redshift
Improved conversion of the following statements
and modes:
• EXCEPTION BLOCK
• AUTOCOMMIT
• NONATOMIC
• GROUPING SET
• CUBE
• ROLLUP
No
DB2
LUW
Amazon
RDS for
PostgreSQ
L /
Amazon
Aurora
PostgreSQ
L
Various fixes in metadata load sql-queries No
Release notes – 674 Version 1.0.672 509

AWS Schema Conversion Tool User Guide
Source Target What's new, enhanced, or fixed Availability in
AWS DMS Schema
Conversion
DB2
LUW
Amazon
RDS for
PostgreSQ
L /
Amazon
Aurora
PostgreSQ
L
AI 9996 is not expected on triggers No
DB2 z/
OS
Amazon
RDS for
PostgreSQ
L /
Amazon
Aurora
PostgreSQ
L
ROWNUMBER analytic function No
DB2 z/
OS
Amazon
RDS for
PostgreSQ
L /
Amazon
Aurora
PostgreSQ
L
Hexadecimal string constant support No
Release notes – 674 Version 1.0.672 510

AWS Schema Conversion Tool User Guide
Source Target What's new, enhanced, or fixed Availability in
AWS DMS Schema
Conversion
DB2 z/
OS
Amazon
RDS for
PostgreSQ
L /
Amazon
Aurora
PostgreSQ
L
Various fixes in metadata load sql-queries. No
DB2 z/
OS
Amazon
RDS for
PostgreSQ
L /
Amazon
Aurora
PostgreSQ
L
NEXT VALUE FOR sequence reference support No
DB2 z/
OS
Amazon
RDS for
PostgreSQ
L /
Amazon
Aurora
PostgreSQ
L
GET DIAGNOSTICS statement DB2_NUMBER_ROWS
option support
No
Release notes – 674 Version 1.0.672 511

AWS Schema Conversion Tool User Guide
Source Target What's new, enhanced, or fixed Availability in
AWS DMS Schema
Conversion
DB2 z/
OS
Amazon
RDS for
PostgreSQ
L /
Amazon
Aurora
PostgreSQ
L
GET DIAGNOSTICS Multiple statements No
DB2 z/
OS
Amazon
RDS for
PostgreSQ
L /
Amazon
Aurora
PostgreSQ
L
Fixed bugs in FOR statement conversion. No
Oracle Amazon
RDS for
MySQL /
Amazon
Aurora
MySQL
Fixed bug when package function's parameter node
is not defined.
Yes
Oracle Amazon
RDS for
PostgreSQ
L /
Amazon
Aurora
PostgreSQ
L
Fixed bugs in extension pack's function AWS_ORACL
E_EXT.NEXT_DAY
Yes
Release notes – 674 Version 1.0.672 512

AWS Schema Conversion Tool User Guide
Source Target What's new, enhanced, or fixed Availability in
AWS DMS Schema
Conversion
Oracle Amazon
RDS for
PostgreSQ
L /
Amazon
Aurora
PostgreSQ
L
Fixed various bugs with conversion "(+)" in Oracle's
outer joins
Yes
Oracle Support Kerberos Authentication No
SAP
ASE
Amazon
RDS for
PostgreSQ
L /
Amazon
Aurora
PostgreSQ
L
Fixed bug when converting more than one identifier
in FROM clause in UPDATE statement
No
SAP
ASE
Amazon
RDS for
PostgreSQ
L /
Amazon
Aurora
PostgreSQ
L
Fixed bug with multi-line comments and statement
s conversion
No
SAP
ASE
Added support for the ENCRYPT_PASSWORD
parameter when connecting
No
Teradata Amazon
Redshift
Improved convertion of VOLATILE table with
specified schema name
No
Release notes – 674 Version 1.0.672 513
AWS Schema Conversion Tool User Guide
Source Target What's new, enhanced, or fixed Availability in
AWS DMS Schema
Conversion
Teradata Amazon
Redshift
Incorrect conversion WHERE CLAUSE in complex
CTE
No
Teradata Amazon
Redshift
Added support for the INTERVAL datatype when
migrating data using SCT Data Extraction Agents.
No
Teradata
BTEQ
scripts
Amazon
Redshift
RSQL
scripts
Incorrect conversion out parameters in procedure
executed by BTEQ
No
Release notes for AWS SCT Build 673
Source Target What's new, enhanced, or fixed
All All General bug fixes and performance improvements
Azure
SQL/
Microsoft
SQL Server
Aurora
PostgreSQ
L/ Amazon
RDS
PostgreSQ
L
Fixed incorrect function call conversion
Azure
SQL/
Microsoft
SQL Server
Aurora
PostgreSQ
L/ Amazon
RDS
PostgreSQ
L
Implemented conversion of FOR XML clause
Azure
SQL/
Aurora
PostgreSQ
Conversion of FOR XML clause with wrong alias.
Release notes – 673 Version 1.0.672 514

AWS Schema Conversion Tool User Guide
Source Target What's new, enhanced, or fixed
Microsoft
SQL Server
L/ Amazon
RDS
PostgreSQ
L
Azure
SQL/
Microsoft
SQL Server
Aurora
PostgreSQ
L/ Amazon
RDS
PostgreSQ
L
Fixed bug when AWS SCT doesn't convert EXECUTE statements that
run a character string with procedure parameters.
Azure
SQL/
Microsoft
SQL Server
Aurora
PostgreSQ
L/ Amazon
RDS
PostgreSQ
L
Improved conversion of UPDATE statements with inner joins.
Azure
Synapse
Amazon
Redshift
Fixed incorrect conversion of the OBJECT_ID built-in function.
IBM DB2
for z/OS
Aurora
PostgreSQ
L/ Amazon
RDS
PostgreSQ
L
Implemented the conversion of the following statements and
objects:
•
DECLARE TEMPORARY TABLE statement
•
DROP TABLE statement
•
PK and UNIQUE constraints on partitioned tables
•
TIMESTAMPDIFF function
•
TO_DATE function
•
EBCDIC_STR function
•
VARCHAR_FORMAT function
Release notes – 673 Version 1.0.672 515

AWS Schema Conversion Tool User Guide
Source Target What's new, enhanced, or fixed
IBM DB2
for z/OS
Aurora
PostgreSQ
L/ Amazon
RDS
PostgreSQ
L
Fixed bug when function based index skips the functions after
conversion.
IBM DB2
for z/OS
Aurora
PostgreSQ
L/ Amazon
RDS
PostgreSQ
L
Fixed bug where the REPEAT statement closed with AI 9996 after
conversion
IBM DB2
for z/OS
Aurora
PostgreSQ
L/ Amazon
RDS
PostgreSQ
L
Fixed bug where the FINAL TABLE clause closed with 9996.
IBM DB2
for z/OS
Aurora
PostgreSQ
L/ Amazon
RDS
PostgreSQ
L
LOADER | Partitioning key in references constraint. AWS SCT can
now convert primary keys and unique constraints in partitioned
tables as secondary indexes.
IBM DB2
for z/OS
Aurora
PostgreSQ
L/ Amazon
RDS
PostgreSQ
L
PostgreSQL.VARCHAR_FORMAT function support
Release notes – 673 Version 1.0.672 516

AWS Schema Conversion Tool User Guide
Source Target What's new, enhanced, or fixed
IBM DB2
for z/OS
Aurora
PostgreSQ
L/ Amazon
RDS
PostgreSQ
L
Implemented the collation change in CreateTransformati
onRule and ModifyTransformationRule SCT CLI
commands.
Greenplum Amazon
Redshift
Fixed bug with incorrect call of stored procedure after conversion
Hadoop Amazon
EMR
Added support for connecting to a Hadoop cluster using the rsa-
sha2 protocol.
Hadoop Amazon
EMR
Added support for Amazon EMR with non-Glue Hive metastore,
Oracle Amazon
Redshift
Fixed bug with incorrect conversion of recursive query where PRIOR
column was not in the SELECT list.
Oracle Aurora
PostgreSQ
L/ Amazon
RDS
PostgreSQ
L
Implemented returning an element of an associative array
Oracle Aurora
PostgreSQ
L/ Amazon
RDS
PostgreSQ
L
Fixed unexpected AI 9996 in UNPIVOT with brackets
Release notes – 673 Version 1.0.672 517

AWS Schema Conversion Tool User Guide
Source Target What's new, enhanced, or fixed
Oracle Aurora
PostgreSQ
L/ Amazon
RDS
PostgreSQ
L
Fixed unexpected AI 9996 in UNPIVOT with UNION ALL
Oracle Aurora
PostgreSQ
L/ Amazon
RDS
PostgreSQ
L
improvements for Number data type conversions
Oracle Amazon
Redshift
Data
Extractor
Support for auto-partitioning for Oracle tables. Optimization for
creating migration tasks.
Teradata Amazon
Redshift
Implement conversion of EXCEPTION BLOCK statement
Teradata Amazon
Redshift
Support for conversion of ALL, ANY, and SOME predicates to
Amazon Redshift.
Teradata Amazon
Redshift
Added native support for QUALIFY predicate.
Teradata Amazon
Redshift
Improved conversion of the following:
• Recursive queries
•
GROUPING SET
•
CUBE
•
ROLLUP
•
UPDATE statement with implicit join
Release notes – 673 Version 1.0.672 518

AWS Schema Conversion Tool User Guide
Source Target What's new, enhanced, or fixed
OLAP
sources
Amazon
Redshift
Data
Extractor
Implemented CLI commands for Stop/Resume for Amazon Redshift
Data Extractor tasks.
OLAP
sources
Amazon
Redshift
Data
Extractor
Added the ability to select the table columns that need to be
migrated during configuration of the migration task.
Release notes for AWS SCT Build 672
Source Target What's new, enhanced, or fixed
All Amazon
RDS for
PostgreSQ
L
Implemented support of PostgreSQL major version 15 as a
migration target.
All Amazon
Redshift
Added a new PrintTaskStatus command in the AWS SCT
command line interface (CLI) to display the status of the data
migration task.
All Amazon
Redshift
Improved the configuration flow for the data extraction agents.
All Amazon
Redshift
Resolved an error where the data extraction agents didn't display
the information about subtasks.
Apache
Oozie
AWS Step
Functions
Added an option to save state machine definitions as a script in the
converted code.
Azure SQL
Database
Aurora
PostgreSQ
L
Implemented the conversion of COALESCE, DATEADD, GETDATE, a
nd SUM functions.
Release notes – 672 Version 1.0.672 519

AWS Schema Conversion Tool User Guide
Source Target What's new, enhanced, or fixed
Microsoft
SQL Server
PostgreSQ
L
Azure SQL
Database
Microsoft
SQL Server
Aurora
PostgreSQ
L
PostgreSQ
L
Improved the conversion of UPDATE statements with JOIN and
OUTPUT clauses.
Azure SQL
Database
Microsoft
SQL Server
Aurora
PostgreSQ
L
PostgreSQ
L
Resolved an error that occurred during the conversion of the
SELECT TOP 1 WITH TIES statement.
Azure SQL
Database
Microsoft
SQL Server
Aurora
PostgreSQ
L
PostgreSQ
L
Resolved multiple issues that occurred during the conversion of the
FOR XML clauses in built-in functions.
Greenplum Amazon
Redshift
Implemented the conversion of GET DIAGNOSTICS and RAISE s
tatements by using a native Amazon Redshift EXCEPTION block.
Greenplum Amazon
Redshift
Improved the conversion of stored procedures by adding support of
an EXCEPTION block in the converted code.
IBM Db2
for z/OS
Aurora
PostgreSQ
L
PostgreSQ
L
Fixed an error where TO_CHAR function with time format templates
were incorrectly converted.
Release notes – 672 Version 1.0.672 520

AWS Schema Conversion Tool User Guide
Source Target What's new, enhanced, or fixed
IBM Db2
for z/OS
Aurora
PostgreSQ
L
PostgreSQ
L
Implemented the conversion of nested table expressions.
IBM Db2
for z/OS
Aurora
PostgreSQ
L
PostgreSQ
L
Implemented the conversion of the GOTO, MERGE, REPEAT, and
SIGNAL statements.
IBM Db2
for z/OS
Aurora
PostgreSQ
L
PostgreSQ
L
Implemented the conversion of FETCH statements with BEFORE a
nd AFTER orientation keywords.
IBM Db2
for z/OS
Aurora
PostgreSQ
L
PostgreSQ
L
Implemented the conversion of the FINAL TABLE and OLD TABLE
table references.
Release notes – 672 Version 1.0.672 521

AWS Schema Conversion Tool User Guide
Source Target What's new, enhanced, or fixed
IBM Db2
for z/OS
Aurora
PostgreSQ
L
PostgreSQ
L
Implemented the conversion of the following functions.
•
ADD_MONTHS
•
DAY with parameters of the character data type
•
DAYOFWEEK
•
DAYS
•
DECODE
•
HOUR
•
LAST_DAY
•
LOCATE_IN_STRING
•
MICROSECOND
•
MINUTE
•
MONTH
•
ROUND
•
TIME
•
TIMESTAMP
•
TIMESTAMP_FORMAT
•
TRANSLATE
•
UNICODE_STR
•
XMLCAST
•
XMLELEMENT
•
XMLQUERY
•
XMLSERIALIZE
•
YEAR
IBM Db2
for z/OS
Aurora
PostgreSQ
L
PostgreSQ
L
Improved the conversion of an alias of a subquery in JOIN clauses.
Release notes – 672 Version 1.0.672 522

AWS Schema Conversion Tool User Guide
Source Target What's new, enhanced, or fixed
IBM Db2
for z/OS
Aurora
PostgreSQ
L
PostgreSQ
L
Improved the conversion of COALESCE functions.
IBM Db2
for z/OS
Aurora
PostgreSQ
L
PostgreSQ
L
Improved the conversion of EXPLICIT indexes.
IBM Db2
for z/OS
Aurora
PostgreSQ
L
PostgreSQ
L
Improved the conversion of column names in compound expressio
ns to resolve an issue where action item 9997 unexpectedly appears
during the conversion.
IBM Db2
for z/OS
Aurora
PostgreSQ
L
PostgreSQ
L
Improved the conversion of primary keys and unique constraints.
IBM Db2
for z/OS
Aurora
PostgreSQ
L
PostgreSQ
L
Improved the conversion of XMLTABLE statements in INSERT
statements to resolve an issue where action item 9996 unexpecte
dly appears during the conversion.
Release notes – 672 Version 1.0.672 523

AWS Schema Conversion Tool User Guide
Source Target What's new, enhanced, or fixed
IBM Db2
for z/OS
Aurora
PostgreSQ
L
PostgreSQ
L
Resolved an issue where action item 9996 unexpectedly appears
during the conversion of functions with the SUBSTR argument.
IBM Db2
for z/OS
Aurora
PostgreSQ
L
PostgreSQ
L
Resolved an issue where action item 9996 unexpectedly appears
during the conversion of the CURRENT TIMESTAMP special
register.
IBM Db2
for z/OS
Aurora
PostgreSQ
L
PostgreSQ
L
Resolved an issue where action item 9996 unexpectedly appears
during the conversion of MERGE statements, unsupported
statements, and unsupported built-in functions.
Microsoft
SQL Server
All Added support of Microsoft SQL Server version 2022 as a source.
Microsoft
SQL Server
Aurora
PostgreSQ
L
PostgreSQ
L
Improved the conversion of SELECT statements that use string
concatenation operators. AWS SCT uses the STRING_AGG function
in the converted code.
Microsoft
SQL Server
Babelfish
for Aurora
PostgreSQ
L
Implemented support of the new version 3.1.0 of the Babelfish
features configuration file. This file defines SQL features that are
supported and not supported by specific Babelfish versions.
Release notes – 672 Version 1.0.672 524

AWS Schema Conversion Tool User Guide
Source Target What's new, enhanced, or fixed
Netezza Amazon
Redshift
Resolved an issue where the data extraction agents didn't start data
migration from the specified CDC point.
Oracle All Updated the assessment report for Oracle databases version 19 as a
source.
Oracle Aurora
PostgreSQ
L
PostgreSQ
L
Implemented the conversion of the DBMS_OUTPUT package by
adding new functions to the AWS SCT extension pack.
Oracle Aurora
PostgreSQ
L
PostgreSQ
L
Implemented the conversion of functions and procedures that use
associative arrays as arguments or parameters.
Oracle Aurora
PostgreSQ
L
PostgreSQ
L
Improved the conversion of DISTINCT clauses in SELECT s
tatements.
Oracle Aurora
PostgreSQ
L
PostgreSQ
L
Improved the conversion of tables where the primary key constraint
has the same name as the table.
Release notes – 672 Version 1.0.672 525

AWS Schema Conversion Tool User Guide
Source Target What's new, enhanced, or fixed
Oracle Aurora
PostgreSQ
L
PostgreSQ
L
Improved the conversion of the RAISE_APPLICATION_ERROR
procedure with the third parameter.
Oracle Aurora
PostgreSQ
L
PostgreSQ
L
Resolved an issue where the migration rule didn't automatically
change the NUMERIC data type to INTEGER where applicable.
Oracle DW Amazon
Redshift
Implemented support of native Amazon Redshift CONNECT BY
clauses in the converted code.
Oracle DW Amazon
Redshift
Improved the data migration by automatically adding a subtask
for each table or partition in the migration scope. This approach
prevents data loss for inserted data after partitioning.
Teradata Amazon
Redshift
Implemented the conversion of recursive views.
Teradata Amazon
Redshift
Improved the conversion of stored procedures that use BTET and
ANSI transaction modes by adding support of native Amazon
Redshift AUTOCOMMIT transaction mode.
Teradata Amazon
Redshift
Improved the conversion of stored procedures that use TERADATA
transaction semantic by adding the NONATOMIC keyword in the
converted code.
Teradata Amazon
Redshift
RSQL
Resolved an issue where the converted code included the AWS
access key ID and secret access key.
Release notes – 672 Version 1.0.672 526

AWS Schema Conversion Tool User Guide
Release notes for AWS SCT Build 671
Source Target What's new, enhanced, or fixed
All All Fixed an error where AWS SCT didn't have permissions to save a
project file in Windows.
All All Updated the following AWS SCT command line interface (CLI)
templates.
• BTEQScriptConversion
• ConversionApply
• HadoopMigration
• HadoopResumeMigration
• Informatica
For more information about the AWS SCT CLI templates, see
Getting CLI scenarios.
All Amazon
Redshift
Fixed an error where AWS SCT didn't create an extension pack in the
command line interface (CLI).
All Amazon
Redshift
Resolved an issue where AWS SCT data extraction agents didn't use
the AWS Snowball configuration in the command line interface
(CLI).
Apache
Oozie
AWS Step
Functions
Implemented support for the migration from Apache Oozie to AWS
Step Functions in the command line interface (CLI) mode. After
migrating your Hadoop workloads to Amazon EMR, you can now
migrate the workflow scheduling system to the AWS Cloud. For
more information, see Converting Oozie workflows;.
Azure SQL
Database
Microsoft
SQL Server
Aurora
PostgreSQ
L
Fixed a resolver error that occurred for tables and aliases.
Release notes – 671 Version 1.0.672 527

AWS Schema Conversion Tool User Guide
Source Target What's new, enhanced, or fixed
PostgreSQ
L
Azure SQL
Database
Microsoft
SQL Server
Aurora
PostgreSQ
L
PostgreSQ
L
Implemented the conversion of INDEX ON clauses.
Azure SQL
Database
Microsoft
SQL Server
Aurora
PostgreSQ
L
PostgreSQ
L
Improved the conversion of the following objects to avoid
unexpected action items.
• Batch statements
• Lists of expressions
• Table aliases
• Temporary tables
• Triggers
• User variables
Azure SQL
Database
Microsoft
SQL Server
Aurora
PostgreSQ
L
PostgreSQ
L
Resolved a parsing error that occurred for procedures.
Azure SQL
Database
Microsoft
SQL Server
Aurora
PostgreSQ
L
PostgreSQ
L
Fixed an error where AWS SCT used incorrect names of temporary
tables in the converted code for OBJECT_ID functions.
Release notes – 671 Version 1.0.672 528

AWS Schema Conversion Tool User Guide
Source Target What's new, enhanced, or fixed
Azure SQL
Database
Microsoft
SQL Server
Aurora
PostgreSQ
L
PostgreSQ
L
Resolved issues where action item 9996 unexpectedly appears
during the conversion of the following code elements.
•
CONVERT functions
•
DATEADD functions
•
DELETE statements inside inline functions
•
IF statements
•
INSERT or UPDATE actions on a column
•
RETURN statements
•
UPDATE statements with complex queries or functions
BigQuery Amazon
Redshift
Added support for BigQuery as a source for the multiserver
assessment process. For more information, see Multiserver
assessment report.
Hadoop Amazon
EMR
Updated the version of the supported Apache Hive JDBC driver that
you use to connect to your source databases. For more information,
see Installing JDBC drivers for AWS Schema Conversion Tool.
IBM Db2
for z/OS
Aurora
PostgreSQ
L
PostgreSQ
L
Enhanced the source metadata loader to make sure that AWS
SCT loads source database objects such as primary keys, implicit
indexes, and so on.
IBM Db2
for z/OS
Aurora
PostgreSQ
L
PostgreSQ
L
Fixed a resolver error that occurred for columns in implicit cursors.
Release notes – 671 Version 1.0.672 529

AWS Schema Conversion Tool User Guide
Source Target What's new, enhanced, or fixed
IBM Db2
for z/OS
Aurora
PostgreSQ
L
PostgreSQ
L
Implemented the ability to keep the formatting of column names,
expressions, and clauses in DML statements in the converted code.
IBM Db2
for z/OS
Aurora
PostgreSQ
L
PostgreSQ
L
Implemented the conversion of cross schema foreign keys.
IBM Db2
for z/OS
Aurora
PostgreSQ
L
PostgreSQ
L
Implemented the conversion of LENGTH and VARCHAR functions.
IBM Db2
for z/OS
Aurora
PostgreSQ
L
PostgreSQ
L
Implemented the conversion of LABEL ON and DECLARE
CONDITION statements.
IBM Db2
for z/OS
Aurora
PostgreSQ
L
PostgreSQ
L
Implemented the conversion of SELECT statements with OPTIMIZE
FOR clauses.
Release notes – 671 Version 1.0.672 530

AWS Schema Conversion Tool User Guide
Source Target What's new, enhanced, or fixed
IBM Db2
for z/OS
Aurora
PostgreSQ
L
PostgreSQ
L
Improved the conversion of CREATE TABLE statements by adding
default values for all supported data types.
IBM Db2
for z/OS
Aurora
PostgreSQ
L
PostgreSQ
L
Improved the conversion of INCREMENT BY attributes.
IBM Db2
for z/OS
Aurora
PostgreSQ
L
PostgreSQ
L
Improved the conversion of partitioned tables by adding the ability
to exclude table partitions from the conversion scope.
IBM Db2
for z/OS
Aurora
PostgreSQ
L
PostgreSQ
L
Improved the conversion of primary key definitions with INCLUDE
columns.
IBM Db2
for z/OS
Aurora
PostgreSQ
L
PostgreSQ
L
Improved the conversion of the SUBSTRING function.
Release notes – 671 Version 1.0.672 531

AWS Schema Conversion Tool User Guide
Source Target What's new, enhanced, or fixed
IBM Db2
for z/OS
Aurora
PostgreSQ
L
PostgreSQ
L
Improved the conversion of SET and DECLARE HANDLER FOR
statements.
IBM Db2
for z/OS
Aurora
PostgreSQ
L
PostgreSQ
L
Improved the conversion of variable data types.
IBM Db2
for z/OS
Aurora
PostgreSQ
L
PostgreSQ
L
Improved the conversion of XMLTABLE functions.
IBM Db2
for z/OS
Aurora
PostgreSQ
L
PostgreSQ
L
Improved the migration flow by implementing the following order
of applying converted objects to the target database: tables,
partitions, indexes, constraints, foreign keys, and triggers.
IBM Db2
for z/OS
Aurora
PostgreSQ
L
PostgreSQ
L
Resolved an issue where action item 9996 unexpectedly appears
during the conversion of comments in the source code.
Release notes – 671 Version 1.0.672 532

AWS Schema Conversion Tool User Guide
Source Target What's new, enhanced, or fixed
IBM Db2
for z/OS
Aurora
PostgreSQ
L
PostgreSQ
L
Resolved an issue where action item 9997 unexpectedly appears
during the conversion of aliases in FROM clauses.
IBM Db2
for z/OS
Aurora
PostgreSQ
L
PostgreSQ
L
Resolved an issue where action item 9997 unexpectedly appears
during the conversion of cursor aliases.
Microsoft
SQL Server
Aurora
PostgreSQ
L
PostgreSQ
L
Fixed an error where the converted code returned different results
for SELECT statements with ORDER BY clauses. Because SQL Server
and PostgreSQL treat NULL values differently, the converted code
now includes NULLS FIRST or NULLS LAST clauses that make sure
that your converted code returns results in the same order as your
source code.
Microsoft
SQL Server
Aurora
PostgreSQ
L
PostgreSQ
L
Resolved an issue where data types in table functions were incorrect
ly converted.
MySQL Amazon
RDS for
MySQL
Resolved an issue where single quotation marks (' ') unexpectedly
appeared around the database object names in the converted code.
Release notes – 671 Version 1.0.672 533

AWS Schema Conversion Tool User Guide
Source Target What's new, enhanced, or fixed
Oracle Aurora
PostgreSQ
L
PostgreSQ
L
Added new views to the extension pack to emulate Oracle system
views that you use to display information about partitions and
subpartitions.
Oracle Aurora
PostgreSQ
L
PostgreSQ
L
Updated two functions in the extension pack to add schema names
as arguments in the converted code.
Oracle Aurora
PostgreSQ
L
PostgreSQ
L
Fixed an error where AWS SCT didn't use the correct parameters for
the conversion of C++ applications after refreshing the application
code in the user interface.
Oracle Aurora
PostgreSQ
L
PostgreSQ
L
Improved the conversion of CREATE TYPE statements to avoid
unexpected exceptions.
Oracle Aurora
PostgreSQ
L
PostgreSQ
L
Improved the conversion of nested tables.
Release notes – 671 Version 1.0.672 534

AWS Schema Conversion Tool User Guide
Source Target What's new, enhanced, or fixed
Oracle Aurora
PostgreSQ
L
PostgreSQ
L
Resolved a parsing error that occurred for package objects.
Oracle Aurora
PostgreSQ
L
PostgreSQ
L
Resolved an issue where AWS SCT unexpectedly trimmed object
names in the converted code when the name length exceeds 60
characters.
Oracle Aurora
PostgreSQ
L
PostgreSQ
L
Resolved an issue where row-level triggers for partitioned tables
were incorrectly converted.
Oracle DW Amazon
Redshift
Implemented support of automatic table partitioning for data
migration. To speed up data migration, AWS SCT can automatically
partition large tables or partitions based on the values in the ROWID
pseudocolumn. For more information, see Using native partitioning.
Teradata Amazon
Redshift
Implemented support of native MERGE commands in the converted
Amazon Redshift code. For more information about the MERGE
command in Amazon Redshift, see MERGE in the Amazon Redshift
Database Developer Guide.
Teradata Amazon
Redshift
Improved the conversion of DELETE and UPDATE statements that d
on't use explicit table names.
Teradata Amazon
Redshift
Resolved an issue where IN and NOT IN statements were incorrectl
y converted.
Release notes – 671 Version 1.0.672 535

AWS Schema Conversion Tool User Guide
Release notes for AWS SCT Build 670
Source Target What's new, enhanced, or fixed
Azure SQL
Database
Microsoft
SQL Server
Aurora
PostgreSQ
L
PostgreSQ
L
Resolved issues where action item 9996 unexpectedly appears
during the conversion of the following code elements.
•
CREATE INDEX statements inside INCLUDE statements
•
DECLARE statements
•
DECLARE ... TABLE statements
•
DECLARE with default values inside LOOP statements
•
DELETE statements
•
DROP CONSTRAINT statements inside ALTER TABLE statement
s
•
EXECUTE AS CALLER and REVERT
•
IIF statements
• Lists of expressions
•
MONTH() functions
•
UPDATE statements
•
YEAR() functions
Azure
Synapse
Analytics
Amazon
Redshift
Added support for Azure Synapse Analytics as a source for the
multiserver assessment process. For more information, see
Multiserver assessment report.
Hadoop Amazon
EMR
Implemented support for the migration of Hadoop clusters to
Amazon EMR in the command line interface (CLI) mode. For more
information, see Migrating big data frameworks.
IBM Db2
for z/OS
Aurora
PostgreSQ
L
PostgreSQ
L
Fixed a resolver error that occurred for source tables and columns.
Release notes – 670 Version 1.0.672 536

AWS Schema Conversion Tool User Guide
Source Target What's new, enhanced, or fixed
IBM Db2
for z/OS
Aurora
PostgreSQ
L
PostgreSQ
L
Implemented the conversion of CASE expressions.
IBM Db2
for z/OS
Aurora
PostgreSQ
L
PostgreSQ
L
Implemented the conversion of CURRENT_DATE references to
special registers. A reference to a special register in Db2 for z/OS is
a reference to a value provided by the current server.
IBM Db2
for z/OS
Aurora
PostgreSQ
L
PostgreSQ
L
Implemented the conversion of DATE and POSSTR functions.
IBM Db2
for z/OS
Aurora
PostgreSQ
L
PostgreSQ
L
Improved the conversion of datetime constants.
IBM Db2
for z/OS
Aurora
PostgreSQ
L
PostgreSQ
L
Improved the conversion of default values for columns of the
following data types: DATE, TIME, TIMESTAMP , and TIMESTAMP
WITH TIME ZONE.
Release notes – 670 Version 1.0.672 537

AWS Schema Conversion Tool User Guide
Source Target What's new, enhanced, or fixed
IBM Db2
for z/OS
Aurora
PostgreSQ
L
PostgreSQ
L
Resolved an issue where action item 9996 unexpectedly appears
during the conversion of SELECT INTO statements.
Microsoft
SQL Server
Aurora
PostgreSQ
L
PostgreSQ
L
Improved the conversion of DATEDIFF functions.
Microsoft
SQL Server
Aurora
PostgreSQ
L
PostgreSQ
L
Fixed an error where ISNULL functions were converted to NULLIF.
As a result, the converted code produced different results compared
to the source code. Now, AWS SCT converts ISNULL functions to
COALESCE.
Netezza Amazon
Redshift
Improved data extraction agents to resolve an issue where the
failed status was set for tasks that were completed successfully.
Netezza Amazon
Redshift
Added the ability to change endpoints in subtasks after starting a
data migration with data extraction agents.
Microsoft
SQL Server
MySQL
Oracle
PostgreSQ
L
Aurora
MySQL
Aurora
PostgreSQ
L
MySQL
PostgreSQ
L
Added the ability to connect to databases using an IPv6 address
protocol.
Release notes – 670 Version 1.0.672 538

AWS Schema Conversion Tool User Guide
Source Target What's new, enhanced, or fixed
Oracle Amazon
RDS for
Oracle
Implemented conversion of the DBMS_JOB package which
schedules and manages jobs in the job queue.
Oracle Aurora
PostgreSQ
L
PostgreSQ
L
Added new functions to the extension pack to improve the
conversion of the global nested tables. These new functions
emulate DELETE, EXTEND, and TRIM functions in your source
Oracle code.
Oracle Aurora
PostgreSQ
L
PostgreSQ
L
Added the ability to specify the conversion scope for SQL code that
is embedded in Java applications. You can now exclude the subsets
of the source application project from the conversion scope. For
more information, see Converting your Java application SQL code
in AWS SCT.
Oracle Aurora
PostgreSQ
L
PostgreSQ
L
Improved conversion of concatenation operators (||) inside
functional indexes.
Oracle Aurora
PostgreSQ
L
PostgreSQ
L
Improved conversion of IN conditions where your source code
doesn't include parentheses for a single expression.
Release notes – 670 Version 1.0.672 539

AWS Schema Conversion Tool User Guide
Source Target What's new, enhanced, or fixed
Oracle Aurora
PostgreSQ
L
PostgreSQ
L
Improved conversion of MERGE statements to INSERT ON
CONFLICT in PostgreSQL.
Oracle Aurora
PostgreSQ
L
PostgreSQ
L
Resolved a parsing error that occurred for packages of procedures.
Oracle Aurora
PostgreSQ
L
PostgreSQ
L
Resolved an issue where action item 5072 unexpectedly appears
during the conversion of packages.
Oracle DW Amazon
Redshift
Fixed an error where AWS SCT didn't apply the extension pack when
applying the converted code to the target database.
Oracle DW Amazon
Redshift
Fixed an error where AWS SCT didn't apply some of the extension
pack files when using the extension pack wizard.
Oracle DW Amazon
Redshift
Resolved an issue where AWS SCT couldn't process the data
migration to AWS Snowball with more than 500 tasks running in
parallel.
Oracle DW Amazon
Redshift
Resolved an issue where user-defined functions with user-defined
types were incorrectly converted.
Release notes – 670 Version 1.0.672 540

AWS Schema Conversion Tool User Guide
Release notes for AWS SCT Build 669
Source Target What's new, enhanced, or fixed
All All Improved the multiserver assessment process, which helps
determine the optimal target database platform for your source
databases. Now, AWS SCT ignores the AWS Secrets Manager key
if you provide database credentials in the input comma separated
values (CSV) file. For more information, see Multiserver assessment
report.
All All Resolved an issue where the multiserver assessment report included
the IP address of your source database when using a secret from
AWS Secrets Manager to connect to the database.
All Amazon
Redshift
Implemented automatic configuration of Java virtual machine
(JVM) settings depending on the operating system and available
RAM. AWS SCT uses this JVM to run data extraction agents work.
All Amazon
Redshift
Resolved an issue where the data extraction agents don't start in
Ubuntu.
All Amazon
Redshift
Resolved an issue where the data extraction tasks don't start after
running the StartAgent.bat file in Windows.
Azure SQL
Database
Microsoft
SQL Server
Aurora
PostgreSQ
L
PostgreSQ
L
Resolved an issue where column names were incorrectly converted
with the Generate unique names for indexes option turned on.
Greenplum Amazon
Redshift
Implemented conversion of functions that return VOID to p
rocedures.
Greenplum Amazon
Redshift
Resolved an issue where data migration failed when the source
database included not a numeric (NaN) values in numeric columns.
Release notes – 669 Version 1.0.672 541

AWS Schema Conversion Tool User Guide
Source Target What's new, enhanced, or fixed
AWS SCT data extraction agents now replace NaN values with
NULL.
IBM Db2
for z/OS
Aurora
PostgreSQ
L
PostgreSQ
L
Added a new conversion setting to specify the DATE FORMAT and
TIME FORMAT options during the conversion of CHAR built-in f
unctions.
IBM Db2
for z/OS
Aurora
PostgreSQ
L
PostgreSQ
L
Added an action item 8534 for the conversion of predefined cursors
that were declared with the WITHOUT RETURN clause. If your cursor
doesn't return result sets, AWS SCT assigns a NULL value to your
cursor name in the converted code and raises an action item.
IBM Db2
for z/OS
Aurora
PostgreSQ
L
PostgreSQ
L
Edited the CURRENT CLIENT_APPLNAME property that identifies
AWS SCT during the connection to the source database.
IBM Db2
for z/OS
Aurora
PostgreSQ
L
PostgreSQ
L
Implemented a new conversion setting to specify the DATE
FORMAT and TIME FORMAT options during the conversion of CHAR
built-in functions.
IBM Db2
for z/OS
Aurora
PostgreSQ
L
PostgreSQ
L
Implemented conversion of LEAVE statements in BEGIN...END b
lock statements.
Release notes – 669 Version 1.0.672 542

AWS Schema Conversion Tool User Guide
Source Target What's new, enhanced, or fixed
IBM Db2
for z/OS
Aurora
PostgreSQ
L
PostgreSQ
L
Implemented conversion of XMLPARSE, XMLTABLE, and XMLNAMESP
ACES functions.
IBM Db2
for z/OS
Aurora
PostgreSQ
L
PostgreSQ
L
Improved conversion of CHAR built-in functions.
IBM Db2
for z/OS
Aurora
PostgreSQ
L
PostgreSQ
L
Improved conversion of cursors.
IBM Db2
for z/OS
Aurora
PostgreSQ
L
PostgreSQ
L
Resolved an issue where action item 9996 unexpectedly appears
during the conversion of FOR loop statements.
Microsoft
SQL Server
Aurora
PostgreSQ
L
PostgreSQ
L
Improved conversion of the table types usage in SELECT s
tatements.
Release notes – 669 Version 1.0.672 543

AWS Schema Conversion Tool User Guide
Source Target What's new, enhanced, or fixed
Microsoft
SQL Server
Babelfish
for Aurora
PostgreSQ
L
Implemented support of the new version 2.2.0 of the Babelfish
features configuration file. This file defines SQL features that are
supported and not supported by specific Babelfish versions.
Netezza Amazon
Redshift
Improved data extraction agents to resolve an issue where one row
wasn't deleted from the target table during ongoing data replicati
on.
Oracle Amazon
RDS for
Oracle
Improved conversion of Oracle Database Enterprise Edition
features.
Oracle Aurora
PostgreSQ
L
PostgreSQ
L
Implemented conversion of GROUPING_ID functions.
Oracle Aurora
PostgreSQ
L
PostgreSQ
L
Improved SQL code conversion in C# applications by adding support
of custom data type mapping in the command line interface (CLI)
mode.
Oracle Aurora
PostgreSQ
L
PostgreSQ
L
Improved conversion of nested tables to avoid an unexpected
action item 9996.
Release notes – 669 Version 1.0.672 544

AWS Schema Conversion Tool User Guide
Source Target What's new, enhanced, or fixed
Oracle Aurora
PostgreSQ
L
PostgreSQ
L
Resolved an issue where the call of an object constructor was
incorrectly converted.
Oracle DW Amazon
Redshift
Implemented support of existing table partitions for data migration
. To speed up data migration, AWS SCT creates subtasks for each
partition of the source table that isn't empty. For more information,
see Using native partitioning.
Teradata Amazon
Redshift
Improved conversion of CAST functions with TIME WITH TIME
ZONE AS TIMESTAMP , TIME WITH TIME ZONE AS CHAR, and
TIMESTAMP AS TIME WITH TIME ZONE arguments.
Teradata Amazon
Redshift
Improved conversion of CAST functions with the FORMAT option.
Teradata Amazon
Redshift
Resolved an issue where CEIL functions weren't converted.
Teradata Amazon
Redshift
Resolved an issue where MERGE statements with DELETE clauses
were incorrectly converted.
Teradata Amazon
Redshift
Resolved an issue where TO_CHAR functions with date and format a
rguments were incorrectly converted.
Release notes for AWS SCT Build 668
Source Target What's new, enhanced, or fixed
All Amazon
Redshift
Resolved an issue where multiplication operators in migration rules
didn't work correctly. These operators make it possible to change
Release notes – 668 Version 1.0.672 545

AWS Schema Conversion Tool User Guide
Source Target What's new, enhanced, or fixed
the length of char, varchar, nvarchar, and string data types.
For more information, see Creating migration rules.
Azure
Synapse
Analytics
Amazon
Redshift
Implemented support of CONVERT functions with VARCHAR
arguments.
Azure
Synapse
Analytics
Amazon
Redshift
Improved conversion of SELECT statements with NOLOCK clauses.
Azure
Synapse
Analytics
Amazon
Redshift
Improved conversion of UPDATE statements with aliases or with
SET and FROM clauses.
Greenplum Amazon
Redshift
Implemented automatic virtual partitioning for data migration.
AWS SCT uses the GP_SEGMENT_ID system column to create p
artitions.
Greenplum Amazon
Redshift
Implemented support of RETURN QUERY and RETURN SETOF
clauses.
Greenplum Amazon
Redshift
Implemented support of SUBSTRING functions with three
parameters.
IBM Db2
for z/OS
Aurora
PostgreSQ
L
PostgreSQ
L
Improved conversion of SUBSTR functions with LOCATE parameters.
Release notes – 668 Version 1.0.672 546

AWS Schema Conversion Tool User Guide
Source Target What's new, enhanced, or fixed
IBM Db2
for z/OS
Aurora
PostgreSQ
L
PostgreSQ
L
Added an option to use an array of REFCURSOR variables to
return dynamic result sets. When you select this option in conversio
n settings, AWS SCT adds an additional OUT parameter in the
converted code.
IBM Db2
for z/OS
Aurora
PostgreSQ
L
PostgreSQ
L
Implemented support of FOR loop statements.
IBM Db2
for z/OS
Aurora
PostgreSQ
L
PostgreSQ
L
Implemented support of XMLPARSE functions. Added an action
item 8541 for the white space striping in XMLPARSE functions.
IBM Db2
for z/OS
Aurora
PostgreSQ
L
PostgreSQ
L
Improved the conversion of multiple exception handlers in a single
BEGIN ... END block.
Microsoft
SQL Server
Aurora
PostgreSQ
L
PostgreSQ
L
Improved conversion of INSERT and DELETE triggers.
Release notes – 668 Version 1.0.672 547

AWS Schema Conversion Tool User Guide
Source Target What's new, enhanced, or fixed
Microsoft
SQL Server
Aurora
PostgreSQ
L
PostgreSQ
L
Improved conversion of nested procedure calls.
Microsoft
SQL Server
Aurora
PostgreSQ
L
PostgreSQ
L
Improved conversion of table types.
Microsoft
SQL Server
Aurora
PostgreSQ
L
PostgreSQ
L
Resolved an issue where bitwise logical NOT operations were
incorrectly converted for integer values.
Microsoft
SQL Server
Aurora
PostgreSQ
L
PostgreSQ
L
Resolved an issue where local arrays were not initialized in
PostgreSQL version 8.0.2 and lower.
Microsoft
SQL Server
Aurora
PostgreSQ
L
PostgreSQ
L
Resolved an issue where MERGE statements with WHEN NOT
MATCHED BY SOURCE clauses were incorrectly converted.
Release notes – 668 Version 1.0.672 548

AWS Schema Conversion Tool User Guide
Source Target What's new, enhanced, or fixed
MySQL Aurora
MySQL
Resolved an issue where AWS SCT incorrectly determined the user
permissions that were granted by the rds_superuser_role
role.
Netezza Amazon
Redshift
Enhanced the source metadata loader to ensure that AWS SCT
correctly loads database objects with names in lowercase.
Oracle Aurora
PostgreSQ
L
PostgreSQ
L
Added new functions to the extension pack to improve conversion
of local nested tables. These new functions emulate PRIOR, NEXT,
LIMIT, FIRST, LAST, EXISTS, EXTEND, TRIM, DELETE, and SET
functions in your source Oracle code. For more information, see
Extension packs.
Oracle Aurora
PostgreSQ
L
PostgreSQ
L
Added the ability to specify the conversion scope for C# applicati
ons. Users can now exclude the subsets of the source application
project from the conversion scope.
Oracle Aurora
PostgreSQ
L
PostgreSQ
L
Implemented support of COUNT methods in collections.
Oracle Aurora
PostgreSQ
L
PostgreSQ
L
Implemented support of variables and constructors in nested
tables.
Release notes – 668 Version 1.0.672 549

AWS Schema Conversion Tool User Guide
Source Target What's new, enhanced, or fixed
Oracle Aurora
PostgreSQ
L
PostgreSQ
L
Implemented support of RATIO_TO_REPORT and STANDARD_
HASH functions.
Oracle Aurora
PostgreSQ
L
PostgreSQ
L
Improved conversion of large objects (LOBs) as part of the AWS SCT
extension pack.
Oracle Aurora
PostgreSQ
L
PostgreSQ
L
Improved conversion of local collections.
Oracle Aurora
PostgreSQ
L
PostgreSQ
L
Improved conversion of JOIN statements with USING clauses where
column names don't include the table name.
Oracle Aurora
PostgreSQ
L
PostgreSQ
L
Implemented conversion of EMPTY_BLOB and EMPTY_CLOB f
unctions.
Release notes – 668 Version 1.0.672 550

AWS Schema Conversion Tool User Guide
Source Target What's new, enhanced, or fixed
Oracle Aurora
PostgreSQ
L
PostgreSQ
L
Implemented conversion of positional bind variables in C# applicati
ons.
SAP ASE Aurora
PostgreSQ
L
PostgreSQ
L
Implemented conversion of multi-event triggers.
SAP ASE Aurora
PostgreSQ
L
PostgreSQ
L
Implemented conversion of recursive triggers.
SAP ASE Aurora
PostgreSQ
L
PostgreSQ
L
Improved conversion of triggers with the @@rowcount global v
ariable.
SAP ASE Aurora
PostgreSQ
L
PostgreSQ
L
Resolved an issue where aggregate functions in the SET clause of
UPDATE statements were incorrectly converted.
Release notes – 668 Version 1.0.672 551

AWS Schema Conversion Tool User Guide
Source Target What's new, enhanced, or fixed
SAP ASE Aurora
PostgreSQ
L
PostgreSQ
L
Resolved an issue where action item 42702 unexpectedly appears
during the conversion of UPDATE statements.
SAP ASE Aurora
PostgreSQ
L
PostgreSQ
L
Resolved an issue where CONVERT functions with CHAR arguments
were incorrectly converted.
Snowflake Amazon
Redshift
Added support of Snowflake as a source for data migration w
ith AWS SCT data extraction agents. For more information, see
Migrating data from on-premises data warehouse to Amazon
Redshift with AWS Schema Conversion Tool.
Teradata Amazon
Redshift
Improved conversion of CAST functions with TIMESTAMP AS TIME
WITH TIMEZONE arguments.
Release notes for AWS SCT Build 667
Source Target What's new, enhanced, or fixed
All All Implemented support of Informatica extract, transform, and load
(ETL) scripts in the command line interface (CLI) mode. AWS SCT
automatically redirects your Informatica ETL scripts to the new
target database. Also, AWS SCT converts object names and SQL
code that is embedded in your Informatica objects. For more
information, see Informatica ETL scripts.
Release notes – 667 Version 1.0.672 552

AWS Schema Conversion Tool User Guide
Source Target What's new, enhanced, or fixed
All Amazon
Redshift
Increased the minimum supported driver version for Amazon
Redshift to 2.1.0.9. For more information, see Installing JDBC
drivers for AWS Schema Conversion Tool.
Azure
Synapse
Analytics
Amazon
Redshift
Added a new function to the extension pack to improve conversion
of the CONVERT function with three date and time arguments.
Azure
Synapse
Analytics
Amazon
Redshift
Improved conversion of the DATEDIFF function.
Azure
Synapse
Analytics
Microsoft
SQL Server
DW
Amazon
Redshift
Updated the extension pack version. Make sure that you apply
the latest version of the extension pack in your existing AWS SCT
projects. For more information, see Extension packs.
BigQuery Amazon
Redshift
Resolved an issue where the filtered objects weren't converted in t
he command line interface (CLI) mode.
Greenplum Amazon
Redshift
Fixed an error where AWS SCT didn't convert temporary tables that
are declared in a stored procedure.
Greenplum Amazon
Redshift
Fixed an error where column encoding attributes were missing in
the converted code.
Microsoft
SQL Server
Aurora
PostgreSQ
L
PostgreSQ
L
Implemented conversion of UPDATE statements for self-referencing
tables that have more than one INNER JOIN clauses.
Release notes – 667 Version 1.0.672 553

AWS Schema Conversion Tool User Guide
Source Target What's new, enhanced, or fixed
Microsoft
SQL Server
Aurora
PostgreSQ
L
PostgreSQ
L
Implemented support of inserted and deleted temporary tables
that SQL Server uses for DML triggers.
Microsoft
SQL Server
Aurora
PostgreSQ
L
PostgreSQ
L
Improved conversion of user-defined types in stored procedures
that were created in different database schemas. Resolved an issue
where AWS SCT couldn't find the data type and displayed an action
item 9996.
Microsoft
SQL Server
Aurora
PostgreSQ
L
PostgreSQ
L
Resolved an issue where square brackets ([ ]) unexpectedly a
ppeared around the database object names in the converted code.
Microsoft
SQL Server
Aurora
PostgreSQ
L
PostgreSQ
L
Resolved an issue where @@ROWCOUNT functions were incorrectly c
onverted.
Microsoft
SQL Server
DW
Amazon
Redshift
Implemented support of geometry and geography data types.
Microsoft
SQL Server
DW
Amazon
Redshift
Implemented support of the MAX keyword in data type declarations
in the converted code.
Release notes – 667 Version 1.0.672 554

AWS Schema Conversion Tool User Guide
Source Target What's new, enhanced, or fixed
Microsoft
SQL Server
DW
Amazon
Redshift
Improved conversion of DATEADD functions.
Oracle Aurora
PostgreSQ
L
PostgreSQ
L
Improved SQL code conversion in Java applications by adding
support for the MyBatis framework. For more information, see SQL
code in Java.
Oracle Aurora
PostgreSQ
L
PostgreSQ
L
Improved SQL code conversion in Java applications that use the
MyBatis framework. Added an action item 30411 for SQL code with
unsupported syntax.
Oracle Aurora
PostgreSQ
L
PostgreSQ
L
Improved SQL code conversion in Pro*C applications by adding
support for typedef struct declarations.
Oracle Aurora
PostgreSQ
L
PostgreSQ
L
Implemented support of CROSS JOIN and LEFT JOIN statements.
Release notes – 667 Version 1.0.672 555
AWS Schema Conversion Tool User Guide
Source Target What's new, enhanced, or fixed
Oracle Aurora
PostgreSQ
L
PostgreSQ
L
Improved conversion of MERGE statements. Resolved an issue where
values to insert were missing in the converted code.
Teradata Amazon
Redshift
Changed the default column compression encoding settings that
AWS SCT uses in the converted code to match the default Amazon
Redshift settings. For more information, see Compression encodings
in the Amazon Redshift Database Developer Guide.
Teradata Amazon
Redshift
Resolved an issue where mathematical operations that use the
TIME data type were incorrectly converted.
Teradata Amazon
Redshift
RSQL
Implemented conversion of FastExport code that is inside shell
scripts.
Teradata
BTEQ
Amazon
Redshift
RSQL
Fixed an error where AWS SCT didn't convert COALESCE and %data
statements.
Vertica Amazon
Redshift
Improved conversion optimization suggestions when a user selects
one optimization strategy.
Release notes for AWS SCT Build 666
Source Target What's new, enhanced, or fixed
Azure SQL
Database
Microsoft
SQL Server
Aurora
PostgreSQ
L
Resolved a parsing error that occurred for ON clauses that are inside
JOIN statements.
Release notes – 666 Version 1.0.672 556

AWS Schema Conversion Tool User Guide
Source Target What's new, enhanced, or fixed
PostgreSQ
L
Azure
Synapse
Analytics
Amazon
Redshift
Added three new functions to the extension pack to improve
conversion of the CONVERT function with date and time arguments.
Azure
Synapse
Analytics
Amazon
Redshift
Enhanced the source metadata loader to ensure that AWS SCT loads
system database schemas.
Azure
Synapse
Analytics
Amazon
Redshift
Fixed a resolver error that occurred for columns of temporary
tables.
Azure
Synapse
Analytics
Amazon
Redshift
Implemented conversion of BINARY and VARBINARY data types to
the VARBYTE data type.
Azure
Synapse
Analytics
Amazon
Redshift
Implemented support of the TIME data type in the converted code.
Azure
Synapse
Analytics
Amazon
Redshift
Improved conversion of COLLATE clauses. Resolved an issue where
action item 31141 unexpectedly appears during the conversion of
columns with the default database collation.
BigQuery Amazon
Redshift
Implemented conversion of procedures that change input
parameters.
Greenplum Amazon
Redshift
Resolved an issue where AWS SCT used a query that isn't compatibl
e with Greenplum 6.x databases.
Release notes – 666 Version 1.0.672 557

AWS Schema Conversion Tool User Guide
Source Target What's new, enhanced, or fixed
IBM Db2
for z/OS
Aurora
PostgreSQ
L
PostgreSQ
L
Improved conversion of EXCEPTION sections by transferring e
xception handlers from Db2 for z/OS to PostgreSQL.
IBM Db2
for z/OS
Aurora
PostgreSQ
L
PostgreSQ
L
Improved conversion of OPEN CURSOR statements.
Microsoft
SQL Server
Aurora
PostgreSQ
L
PostgreSQ
L
Implemented conversion of IIF functions by using CASE expression
s.
Microsoft
SQL Server
Aurora
PostgreSQ
L
PostgreSQ
L
Resolved an issue where procedures with table-valued parameter
s were incorrectly converted when the CREATE PROCEDURE
statement didn't include a BEGIN...END block.
Microsoft
SQL Server
Aurora
PostgreSQ
L
PostgreSQ
L
Resolved an issue where the SCOPE_IDENTITY function was i
ncorrectly converted.
Release notes – 666 Version 1.0.672 558

AWS Schema Conversion Tool User Guide
Source Target What's new, enhanced, or fixed
Oracle Amazon
RDS for
Oracle
Fixed a loader error that occurred with the SELECT_CATALOG_ROL
E role when using Oracle 10g as a source.
Oracle Amazon
RDS for
Oracle
Improved the loader to support Oracle Scheduler jobs.
Oracle Aurora
PostgreSQ
L
PostgreSQ
L
Implemented conversion of JOIN statements with USING clauses.
Oracle Aurora
PostgreSQ
L
PostgreSQ
L
Improved performance of the converted code where the source
code includes global variables in WHERE clauses.
Oracle Aurora
PostgreSQ
L
PostgreSQ
L
Improved SQL code conversion in Java applications by adding
support for the MyBatis framework. For more information, see SQL
code in Java.
Oracle DW Amazon
Redshift
Implemented conversion of the PIVOT and UNPIVOT relational
operators.
Teradata Amazon
Redshift
Fixed an error where source code that uses JSON objects wasn't
converted.
Teradata Amazon
Redshift
Fixed an error where the tables created by a dropped user weren't
correctly loaded.
Release notes – 666 Version 1.0.672 559

AWS Schema Conversion Tool User Guide
Source Target What's new, enhanced, or fixed
Teradata Amazon
Redshift
Implemented conversion of INSTR functions to native Amazon
Redshift STRPOS functions.
Teradata Amazon
Redshift
Implemented conversion of the NVP and TRANSLATE functions.
Teradata Amazon
Redshift
Improved conversion of COALESCE expressions.
Teradata Amazon
Redshift
Improved conversion of DECLARE CONDITION statements.
Teradata Amazon
Redshift
Improved conversion of EXTRACT functions with the SECOND syntax
element.
Teradata Amazon
Redshift
Improved conversion of the SQLSTATE and SQLCODE variables i
nside the LOOP statements.
Teradata Amazon
Redshift
Improved conversion of unique indexes.
Teradata Amazon
Redshift
Resolved an issue where action item 9996 unexpectedly appears
during the conversion of CURRENT_TIMESTAMP statements with
fractional precision set to 3.
Teradata Amazon
Redshift
Resolved an issue where backslashes were incorrectly converted in
string literals.
Teradata Amazon
Redshift
Resolved an issue where converted EXEC statements included an
incorrect field name in the ADD CONSTRAINT statement.
Teradata Amazon
Redshift
Resolved an issue where converted QUALIFY subqueries included a
n incorrect subquery name.
Teradata Amazon
Redshift
Resolved an issue where converted views weren't applied. Added an
explicit cast to a specific data type for NULL values in the converted
code.
Release notes – 666 Version 1.0.672 560
AWS Schema Conversion Tool User Guide
Source Target What's new, enhanced, or fixed
Teradata Amazon
Redshift
Resolved an issue where date and time functions were incorrectly
converted.
Teradata Amazon
Redshift
Resolved an issue where hexadecimal string literals weren't
converted.
Release notes for AWS SCT Build 665
Source Target What's new, enhanced, or fixed
Azure
Synapse
Analytics
Amazon
Redshift
Implemented conversion of CONCAT functions with VARCHAR a
rguments.
Azure
Synapse
Analytics
Amazon
Redshift
Improved conversion of CREATE TABLE statements that create
temporary tables and don't include the schema name. AWS SCT
creates the dbo schema to store these temporary tables in the
target database.
Azure
Synapse
Analytics
Amazon
Redshift
Improved conversion of DROP TABLE statements that you run on
temporary tables.
Azure
Synapse
Analytics
Amazon
Redshift
Improved conversion of OBJECT_ID statements with the
BEGIN...END blocks.
Azure
Synapse
Analytics
Amazon
Redshift
Resolved an error where the AWS SCT couldn't convert stored
procedures with block comments.
BigQuery Amazon
Redshift
Implemented conversion of BigQuery data warehouses to Amazon
Redshift. For more information, see Connecting to Google BigQuery
with AWS Schema Conversion Tool.
Release notes – 665 Version 1.0.672 561
AWS Schema Conversion Tool User Guide
Source Target What's new, enhanced, or fixed
Microsoft
SQL Server
Aurora
PostgreSQ
L
PostgreSQ
L
Improved conversion of triggers that handle multiple events and
work with inserted and deleted system tables in SQL Server.
Microsoft
SQL Server
Aurora
PostgreSQ
L
PostgreSQ
L
Fixed a resolver error that occurred for inserted and deleted
system tables in SQL Server.
Microsoft
SQL Server
Babelfish
for Aurora
PostgreSQ
L
Implemented support of the new version 2.1.0 of the Babelfish
features configuration file. This file defines SQL features that are
supported and not supported by specific Babelfish versions.
Oracle Aurora
MySQL
MariaDB
MySQL
Resolved an issue where the varchar2 data type was incorrectly c
onverted.
Release notes – 665 Version 1.0.672 562

AWS Schema Conversion Tool User Guide
Source Target What's new, enhanced, or fixed
Oracle Aurora
MySQL
Aurora
PostgreSQ
L
MariaDB
MySQL
PostgreSQ
L
For Oracle databases version 12c and higher, AWS SCT supports the
following extended data types:
•
VARCHAR2
•
NVARCHAR2
•
RAW
AWS SCT increased the maximum supported column length from
8,000 to 32,767 bytes for these data types.
Oracle Aurora
PostgreSQ
L
PostgreSQ
L
Resolved a parsing error that occurred for the Oracle Event
Processing package.
Teradata Amazon
Redshift
Added an action item 13214 for multiple RESET WHEN clauses in a
single SELECT statement.
Teradata Amazon
Redshift
Added an action item for SQLSTATE variables that are located
outside of an exception handling block.
Teradata Amazon
Redshift
Implemented conversion of ACTIVITY_COUNT variables to
ROW_COUNT .
Teradata Amazon
Redshift
Implemented conversion of the built-in geometry ST_TRANSFORM
function.
Teradata Amazon
Redshift
Improved conversion of delete statements in views without the
WHERE clause.
Teradata Amazon
Redshift
Improved conversion of CAST operators in expressions.
Release notes – 665 Version 1.0.672 563

AWS Schema Conversion Tool User Guide
Source Target What's new, enhanced, or fixed
Teradata Amazon
Redshift
Improved conversion of GROUP BY clauses.
Teradata Amazon
Redshift
Improved conversion of INSTR and REGEXP_INSTR built-in
functions.
Teradata Amazon
Redshift
Resolved an issue where lateral column alias references were
incorrectly converted.
Teradata Amazon
Redshift
Resolved an issue where column names were incorrectly converted
in the QUALIFY subquery.
Teradata Amazon
Redshift
Implemented conversion of .QUIT commands with the ERRORCODE
status value keyword.
Teradata
BTEQ
Amazon
Redshift
RSQL
Resolved an issue where action item 9996 unexpectedly appears
during the conversion of CREATE statements.
Teradata
BTEQ
Amazon
Redshift
RSQL
Resolved an issue where action item 9998 unexpectedly appears
during the conversion of END statements.
Release notes for AWS SCT Build 664
Source Target What's new, enhanced, or fixed
All All Added support of Amazon Redshift Serverless as a source and
target for database migration projects in AWS SCT. To connect to
Amazon Redshift Serverless, make sure that you use the Amazon
Redshift JDBC driver version 2.1.0.9 or higher.
All All Improved the user interface of the Conversion settings window.
AWS SCT now displays settings only for database conversion pairs
Release notes – 664 Version 1.0.672 564

AWS Schema Conversion Tool User Guide
Source Target What's new, enhanced, or fixed
with created mapping rules. For more information, see Data type
mapping.
All All Updated the assessment report to remove duplicate information
about the line and position of the action item.
All Amazon
Redshift
Implemented automatic memory balancing in data extracting tasks.
All Amazon
Redshift
Resolved an error where the data extraction agents couldn't
connect to AWS Snowball devices.
Azure SQL
Database
IBM Db2
for z/OS
IBM Db2
LUW
Microsoft
SQL Server
MySQL
Oracle
PostgreSQ
L
SAP ASE
Aurora
MySQL
Aurora
PostgreSQ
L
MariaDB
MySQL
PostgreSQ
L
Implemented support of SUSE Linux 15.3 as a platform to run data
extraction agents.
Azure
Synapse
Analytics
Amazon
Redshift
Improved conversion of DATEADD functions.
Release notes – 664 Version 1.0.672 565

AWS Schema Conversion Tool User Guide
Source Target What's new, enhanced, or fixed
IBM Db2
for z/OS
Aurora
PostgreSQ
L
PostgreSQ
L
Added the ability to change column collation in migration rules.
Microsoft
SSIS
AWS Glue
AWS Glue
Studio
Resolved an unexpected error that occurred when users select a
source script.
Oracle Aurora
MySQL
MariaDB
MySQL
Implemented conversion of the usage of stored functions as
generated column expressions. AWS SCT creates triggers to emulate
this behavior because MySQL doesn't support the usage of stored
functions as generated column expressions.
Oracle Aurora
PostgreSQ
L
PostgreSQ
L
Implemented conversion of functions from the UTL_MATCH
package as part of the AWS SCT extension pack.
Oracle Aurora
PostgreSQ
L
PostgreSQ
L
Implemented conversion of the REGEXP_LIKE function with the
NULL parameter.
Release notes – 664 Version 1.0.672 566
AWS Schema Conversion Tool User Guide
Source Target What's new, enhanced, or fixed
Oracle Aurora
PostgreSQ
L
PostgreSQ
L
Improved conversion of the SYS_EXTRACT_UTC function.
Oracle Aurora
PostgreSQ
L
PostgreSQ
L
Improved SQL code conversion in C++ applications by implementing
support of Wcscats, Wcscpys, and Wcsncats functions. For more
information, see Converting SQL code in C++ applications with AWS
Schema Conversion Tool.
Oracle DW
Snowflake
Amazon
Redshift
Resolved an issue where converted statements don't include explicit
conversion of values to the column data type. This issue occurred in
statements that use query results from other tables.
Teradata Amazon
Redshift
Added the ability to change column collation between case
sensitive and case insensitive in migration rules. For
more information, see Applying migration rules.
Teradata Amazon
Redshift
Fixed a resolver error that occurred for CREATE TABLE AS s
tatements.
Teradata Amazon
Redshift
Fixed an error where the built-in P_INTERSECT function with a
COALESCE expression wasn't converted.
Teradata Amazon
Redshift
Implemented conversion of columns named OID to _OID to avoid
the usage of a reserved keyword in Amazon Redshift.
Teradata Amazon
Redshift
Implemented conversion of RENAME statements for functions,
procedures, views, and macros.
Teradata Amazon
Redshift
Implemented conversion of the STROKE function to the SPLIT_PAR
T function in Amazon Redshift.
Release notes – 664 Version 1.0.672 567
AWS Schema Conversion Tool User Guide
Source Target What's new, enhanced, or fixed
Teradata Amazon
Redshift
Improved conversion of the INSTR and REGEXP_INSTR system
functions.
Teradata Amazon
Redshift
Improved conversion of the TIME data type.
Teradata Amazon
Redshift
Improved emulation of the SET and MULTISET tables by i
mplementing conversion of primary and secondary unique indexes.
Teradata Amazon
Redshift
Resolved a parsing error that occurred for the CHARACTER f
unction.
Teradata
BTEQ
Amazon
Redshift
RSQL
Resolved an error that occurred when users removed Teradata Basic
Teradata Query (BTEQ) scripts from the AWS SCT project.
Release notes for AWS SCT Build 663
Source Target What's new, enhanced, or fixed
All All
Added the ability to change the length of char, varchar,
nvarchar, and string data types using the multiplication
operator in a migration rule. For more information, see Applying
migration rules.
All All Implemented support of three new columns in the multiserver
assessment report and updated the format of the input file. Make
sure that you use the updated template of the input file with the
latest version of AWS SCT. For more information, see Creating a
multiserver assessment report in AWS Schema Conversion Tool.
Azure
Synapse
Analytics
Amazon
Redshift
Improved conversion of OBJECT_ID statements.
Release notes – 663 Version 1.0.672 568

AWS Schema Conversion Tool User Guide
Source Target What's new, enhanced, or fixed
Microsoft
SQL Server
Babelfish
for Aurora
PostgreSQ
L
Added support for Babelfish for Aurora PostgreSQL 1.2.0 as a target
platform for database migration assessment reports. For more
information, see Supported functionality in Babelfish by version in
the Amazon Aurora User Guide.
Microsoft
SQL Server
DW
Amazon
Redshift
Added support for AT TIME ZONE clauses.
Microsoft
SQL Server
DW
Amazon
Redshift
Resolved an issue where a statement outside the BEGIN/END b
lock was incorrectly converted.
Netezza Amazon
Redshift
Improved conversion of the TIME data type and implemented c
onversion of related built-in functions, expressions, and literals.
Oracle Aurora
PostgreSQ
L
PostgreSQ
L
Fixed a loader error that occurred when using Oracle 10g as a
source.
Oracle Aurora
PostgreSQ
L
PostgreSQ
L
Improved conversion of OFFSET and FETCH clauses.
Oracle Aurora
PostgreSQ
L
PostgreSQ
L
Resolved an issue where procedures with OUT parameters with
default values were incorrectly converted.
Release notes – 663 Version 1.0.672 569

AWS Schema Conversion Tool User Guide
Source Target What's new, enhanced, or fixed
Oracle DW Amazon
Redshift
Improved conversion of Oracle functions to Amazon Redshift user-
defined functions.
Snowflake Amazon
Redshift
Improved conversion of WITH clauses.
Teradata Amazon
Redshift
Added a new action item 13209 for unsupported multibyte
characters for the CHAR data type.
Teradata Amazon
Redshift
Fixed a loader error where the tables weren't fully loaded.
Teradata Amazon
Redshift
Fixed a transformer error where the built-in P_INTERSECT f
unction in a JOIN condition wasn't converted.
Teradata Amazon
Redshift
Fixed an issue where the name of a view was converted in wrong
case when the SELECT statement was run on a table with special
characters in its name.
Teradata Amazon
Redshift
Improved conversion of INSERT statements with the UNTIL_CHA
NGED value in the PERIOD(DATE) data type.
Teradata Amazon
Redshift
Improved conversion of the built-in FORMAT function using the
TO_CHAR function in Amazon Redshift.
Teradata Amazon
Redshift
Improved conversion of the built-in RANK function to make sure
that the converted code returns NULL values in the same order as
the source code.
Teradata Amazon
Redshift
Improved conversion of unique constraints such as primary or
secondary unique indexes.
Release notes – 663 Version 1.0.672 570

AWS Schema Conversion Tool User Guide
Release notes for AWS SCT Build 662
Source Target What's new, enhanced, or fixed
All All Added the ability to automatically create AWS SCT projects for
each source database when creating the multiserver assessment
report. With this option turned on, AWS SCT can add mapping rules
to these projects and save conversion statistics for offline use. For
more information, see Creating a multiserver assessment report in
AWS Schema Conversion Tool.
All All
Implemented support of the percent (%) as a wildcard in database
and schema names when creating the multiserver assessment
report.
All Aurora
MySQL
Aurora
PostgreSQ
L
Updated the runtime of all AWS Lambda functions to Python
version 3.9.
All Amazon
Redshift
Upgraded all data extraction agents to use AWS SDK for Java 2.x.
Azure SQL
Database
Microsoft
SQL Server
Aurora
PostgreSQ
L
PostgreSQ
L
Improved conversion of DELETE statements with NON EXISTS
clauses.
Azure
Synapse
Analytics
Amazon
Redshift
Resolved an error where the connection to a source database failed.
IBM Db2
for z/OS
Aurora
PostgreSQ
L
Resolved an error where the converted code of a trigger included
two mentions of the object alias.
Release notes – 662 Version 1.0.672 571

AWS Schema Conversion Tool User Guide
Source Target What's new, enhanced, or fixed
PostgreSQ
L
Microsoft
SQL Server
Aurora
PostgreSQ
L
PostgreSQ
L
Improved conversion of objects with names in mixed case when the
Treat database object name as case sensitive option is turned on.
Microsoft
SQL Server
DW
Teradata
Amazon
Redshift
Implemented conversion of the PIVOT and UNPIVOT relational
operators.
Netezza Amazon
Redshift
Implemented conversion of the TIME data type.
Oracle Aurora
MySQL
Aurora
PostgreSQ
L
MySQL
PostgreSQ
L
Implemented the UTL_TCP.CRLF package constant conversion.
Oracle Aurora
PostgreSQ
L
PostgreSQ
L
Fixed an extension pack issue where the length of data types for
columns of variable length wasn't maintained during conversion.
Release notes – 662 Version 1.0.672 572

AWS Schema Conversion Tool User Guide
Source Target What's new, enhanced, or fixed
Oracle Aurora
PostgreSQ
L
PostgreSQ
L
Implemented SQL code conversion in C++ applications. For more
information, see Converting SQL code in C++ applications with AWS
Schema Conversion Tool.
Oracle Aurora
PostgreSQ
L
PostgreSQ
L
Implemented support of case sensitive naming for the conversion
of global variables and associative arrays.
Oracle Aurora
PostgreSQ
L
PostgreSQ
L
Improved conversion of the TO_CHAR, TO_DATE, and TO_NUMBER
functions in the extension pack.
Oracle Aurora
PostgreSQ
L
PostgreSQ
L
Improved conversion of the TABLE() operator.
Oracle DW Amazon
Redshift
Added support for conversion of primary keys and other constrain
ts.
Oracle DW Amazon
Redshift
Fixed a problem where action item 12054 doesn't appear during the
conversion of conditional statements.
Release notes – 662 Version 1.0.672 573

AWS Schema Conversion Tool User Guide
Source Target What's new, enhanced, or fixed
SAP ASE Aurora
PostgreSQ
L
PostgreSQ
L
Resolved an error when an object with an empty name was created
in the target tree during the conversion of tables with columns of
user-defined type.
SAP ASE Aurora
PostgreSQ
L
PostgreSQ
L
Fixed a loader error for stored objects such as scripts, routines, and
so on.
Snowflake Amazon
Redshift
Fixed a problem where action item 22152 doesn't appear when
required and AWS SCT displays the conversion result as a comment.
Snowflake Amazon
Redshift
Improved conversion of the date and time functions; implemented
support of time zones.
Snowflake Amazon
Redshift
Resolved an issue where non-recursive common table expressions
(CTEs) with a WITH clause were converted as recursive CTEs.
Teradata Amazon
Redshift
Improved conversion of UPDATE statements with table links in
condition.
Teradata Amazon
Redshift
Improved conversion of RENAME TABLE statements.
Teradata Amazon
Redshift
Resolved an issue where empty columns appeared in the comma-
separated value (CSV) file with an assessment report.
Teradata Amazon
Redshift
RSQL
Fixed an error where a semicolon was missing in the end of the
converted a Basic Teradata Query (BTEQ) macro.
Release notes – 662 Version 1.0.672 574

AWS Schema Conversion Tool User Guide
Source Target What's new, enhanced, or fixed
Teradata Amazon
Redshift
RSQL
Improved conversion of multiple data type values in CASE
statements.
Teradata Amazon
Redshift
RSQL
Improved conversion of the LIKE ANY clause with an ESCAPE
character.
Teradata Amazon
Redshift
RSQL
Improved conversion of the CAST function in INSERT statements.
Teradata Amazon
Redshift
RSQL
Improved conversion of the time zones, implemented time zone
region mapping.
Teradata Amazon
Redshift
RSQL
Resolved an issue where action item 9998 unexpectedly appears
during the conversion of shell scripts with BTEQ scripts.
Teradata Amazon
Redshift
RSQL
AWS Glue
Implemented the limit of 500 characters for the values of substituti
on variables.
Vertica Amazon
Redshift
Implemented conversion of the BINARY, VARBINARY , LONG
BINARY, BYTEA, and RAW data types to the VARBYTE data type.
Vertica Amazon
Redshift
Improved conversion of the built-in functions and literals.
Release notes – 662 Version 1.0.672 575
AWS Schema Conversion Tool User Guide
Release notes for AWS SCT Build 661
Source Target What's new, enhanced, or fixed
All All Added filters to search for mapping rules in the mapping view.
When you apply a filter, AWS SCT displays rules that match
the filtering conditions in the Server mappings list. For more i
nformation, see Editing data type mappings in the AWS Schema
Conversion Tool.
All All Upgraded Apache Log4j to version 2.17.1.
All Amazon
Redshift
Added support of data migration to Amazon Redshift using the
ENCRYPTED clause in the COPY command.
All Amazon
Redshift
Enhanced the REST API of the data extraction agents. The updated
REST API adds support of new properties such as encryption key,
encryption type, and so on.
All Amazon
Redshift
Implemented role assuming in the data extraction agents. This
update improves the distribution of subtasks, and enables AWS SCT
to assign tasks to free agents of the specified role.
All Amazon
Redshift
Implemented a check that all required components are installed b
efore the extension pack is applied to Amazon Redshift.
Azure
Synapse
Analytics
Microsoft
SQL Server
DW
Amazon
Redshift
Improved conversion of the ERROR_LINE , ERROR_MESSAGE ,
ERROR_NUMBER , ERROR_PROCEDURE , ERROR_SEVERITY , and
ERROR_STATE system functions for error handling.
IBM Db2
for z/OS
Aurora
MySQL
Added support of IBM Db2 for z/OS version 12 as a source for
database migration projects in AWS SCT. For more information, see
Connecting to IBM DB2 for z/OS.
Release notes – 661 Version 1.0.672 576

AWS Schema Conversion Tool User Guide
Source Target What's new, enhanced, or fixed
Aurora
PostgreSQ
L
MySQL
PostgreSQ
L
IBM Db2
LUW
All Enhanced the source metadata loader to ensure that AWS SCT loads
routine parameters that duplicate column names.
Microsoft
Azure SQL
Database
Microsoft
SQL Server
Aurora
PostgreSQ
L
PostgreSQ
L
Fixed a transformer error for procedures with the SET NOCOUNT
ON set statement.
Microsoft
Azure SQL
Database
Microsoft
SQL Server
Aurora
PostgreSQ
L
PostgreSQ
L
Improved conversion of the CONCAT function when an input value is
a variable of the user-defined type.
Microsoft
Azure SQL
Database
Microsoft
SQL Server
Aurora
PostgreSQ
L
PostgreSQ
L
Resolved an issue where the DATEPART function was incorrectly
converted.
Microsoft
SQL Server
Babelfish
for Aurora
PostgreSQ
L
Implemented support of the new version of the Babelfish features
configuration file. This file defines SQL features that are supported
and not supported by specific Babelfish versions.
Release notes – 661 Version 1.0.672 577

AWS Schema Conversion Tool User Guide
Source Target What's new, enhanced, or fixed
Microsoft
SQL Server
DW
Amazon
Redshift
Resolved an issue where procedures with an EXECUTE statement
were incorrectly converted.
Microsoft
SSIS
AWS Glue Improved the user interface of the job configuration wizard. AWS
SCT now displays only available connections in the connection
configuration section.
Microsoft
SSIS
AWS Glue Resolved an issue where the transformation rules weren't applied to
package tasks and variable rules.
Microsoft
SSIS
AWS Glue
AWS Glue
Studio
Added a new action item 25042 for unsupported components.
Microsoft
SSIS
AWS Glue
Studio
Implemented conversion of Microsoft SQL Server Integration S
ervices (SSIS) extract, transform, and load (ETL) packages to AWS
Glue Studio. For more information, see SSIS to AWS Glue Studio.
Oracle MariaDB
Fixed a problem with conversion of the MINUS operator.
Oracle MariaDB
Improved conversion of the ROWNUM, SYS_GUID, TO_CHAR, and
ADD_MONTHS functions when the sql_mode system variable in
MariaDB is to Oracle.
Oracle PostgreSQ
L
Added an option to avoid conversion of bind variables types to SQL
types in generic application conversion projects.
Oracle PostgreSQ
L
Added an option to avoid adding the schema name to the name of
the converted object in generic application conversion projects.
Oracle PostgreSQ
L
Added support of the ?x bind variable format for application SQL
code conversion.
Oracle DW Amazon
Redshift
Implemented conversion of the RAW data type to the VARBYTE data
type.
Release notes – 661 Version 1.0.672 578

AWS Schema Conversion Tool User Guide
Source Target What's new, enhanced, or fixed
Teradata Amazon
Redshift
Added an option to emulate SET tables in the converted code. For
this emulation, AWS SCT supports MIN and MAX conditions.
Teradata Amazon
Redshift
Improved conversion of join operations that have parameters
of different data types. This update enables AWS SCT to apply
transformation rules during conversion of such operations.
Teradata Amazon
Redshift
Resolved an issue where the GROUP BY clause was incorrectly
converted.
Teradata Amazon
Redshift
Resolved an issue where the QUALIFY clause was incorrectly
converted.
Teradata Amazon
Redshift
Resolved an unexpected error occurred during FastExport scripts i
mport.
Teradata Amazon
Redshift
RSQL
Implemented the ability to edit the values of variables in Teradata
BTEQ and shell scripts.
Teradata Amazon
Redshift
RSQL
Resolved an issue where the manifest script was missing for the
converted Teradata FastLoad sessions.
Teradata Amazon
Redshift
RSQL
Resolved an issue where the extension of the manifest file was
missing in the uniform resource locator (URL) for the converted F
astLoad scripts.
Teradata
BTEQ
Amazon
Redshift
RSQL
Fixed a loader error for scripts with substitution variables.
Teradata
BTEQ
Amazon
Redshift
RSQL
Fixed a problem where action item 27022 doesn't appear when r
equired.
Release notes – 661 Version 1.0.672 579

AWS Schema Conversion Tool User Guide
Release notes for AWS SCT Build 660
Source Target What's new, enhanced, or fixed
All All Added support of AWS Secrets Manager and Secure Sockets Layer
(SSL) in the multiserver assessment report. For more informati
on, see Creating a multiserver assessment report in AWS Schema
Conversion Tool.
All All Improved statistics collection for converted objects.
All PostgreSQ
L
Implemented support of PostgreSQL major version 14 and MariaDB
10.6 as migration targets.
Azure
Synapse
Analytics
Amazon
Redshift
Improved transformation logic for the names of converted objects.
Microsoft
Azure SQL
Database
Microsoft
SQL Server
Aurora
PostgreSQ
L
Improved conversion of the XML data type.
Microsoft
Azure SQL
Database
Microsoft
SQL Server
Aurora
PostgreSQ
L
PostgreSQ
L
Resolved an issue where NOT LIKE clauses were incorrectly
converted.
Microsoft
Azure SQL
Database
Microsoft
SQL Server
Aurora
PostgreSQ
L
PostgreSQ
L
Fixed a transformer error for procedures with INSERT, DELETE, and
UPDATE statements that include the OUTPUT clause.
Release notes – 660 Version 1.0.672 580

AWS Schema Conversion Tool User Guide
Source Target What's new, enhanced, or fixed
Microsoft
Azure SQL
Database
Microsoft
SQL Server
Aurora
PostgreSQ
L
PostgreSQ
L
Fixed a transformer error for procedures with the RETURN
@@ROWCOUNT statement.
Microsoft
SQL Server
All Improved conversion of procedures that use linked servers.
Microsoft
SQL Server
All Added support of Microsoft Windows Authentication in the
multiserver assessment report.
Microsoft
SQL Server
Aurora
PostgreSQ
L
PostgreSQ
L
Fixed a transformer error for table value constructors.
Microsoft
SQL Server
DW
Amazon
Redshift
and AWS
Glue
Improved conversion of extract, transform, and load (ETL) scripts to
include the correct path to the converted scripts.
Microsoft
SQL Server
DW
Amazon
Redshift
Resolved an issue where different converted scripts were generated
for virtual and real target database platforms.
Oracle PostgreSQ
L
Aurora
PostgreSQ
L
Added support for conversion of indexes for materialized views.
Release notes – 660 Version 1.0.672 581

AWS Schema Conversion Tool User Guide
Source Target What's new, enhanced, or fixed
Oracle PostgreSQ
L
Aurora
PostgreSQ
L
Fixed a problem where action item 5982 doesn't appear when
converting PRIMARY KEY and UNIQUE constraints with the
NOVALIDATE option.
Oracle DW Amazon
Redshift
Resolved an issue where additional categories were displayed in the
converted schema.
Teradata Amazon
Redshift
Fixed a problem where action item 13185 doesn't appear when
converting an unresolved column as an argument of the CAST
function.
Teradata Amazon
Redshift
Improved conversion of DELETE and DELETE ALL statements to
use the TRUNCATE command in the converted code.
Teradata Amazon
Redshift
Improved conversion of SET tables.
Teradata Amazon
Redshift
Improved conversion of NORMALIZE condition.
Teradata Amazon
Redshift
Updated the assessment report to remove the database schema
conversion statistics from the list of database storage objects.
Teradata Amazon
Redshift
Improved conversion of the UPDATE statement without the FROM c
lause.
Teradata Amazon
Redshift
Implemented support of the VARBYTE data type in the converted
code.
Teradata
BTEQ
AWS Glue Resolved an issue where the Convert to AWS Glue option was d
eactivated in the context menu.
Release notes – 660 Version 1.0.672 582

AWS Schema Conversion Tool User Guide
Source Target What's new, enhanced, or fixed
Teradata
BTEQ
Amazon
Redshift
RSQL
Resolved an issue where data types were missing in the converted
code.
Teradata
BTEQ
Amazon
Redshift
RSQL
Resolved an issue where substitution variables were incorrectly
quoted in the converted code.
Teradata
BTEQ
Amazon
Redshift
RSQL
Fixed a problem with conversion of substitution variables with
values in FastLoad scripts.
Vertica Amazon
Redshift
Implemented support of the TIME data type in the converted code.
Vertica Amazon
Redshift
Improved conversion of SELECT DISTINCT and ORDER BY e
xpressions.
Vertica Amazon
Redshift
Added support for conversion of constraints.
Vertica Amazon
Redshift
Resolved an error where an assessment report wasn't saved as a
comma-separated value (CSV) file.
Release notes for AWS SCT Build 659
Source Target What's new, enhanced, or fixed
All All Improved the New project wizard that generates a combined
assessment report for multiple source databases.
All All Fixed an issue where the extension pack wasn't created in projects
that include multiple source and target databases.
Release notes – 659 Version 1.0.672 583

AWS Schema Conversion Tool User Guide
Source Target What's new, enhanced, or fixed
All All Improved conversion of SQL code that is embedded in application
source code.
All All Added the ability to run scripts from different folders in the AWS
SCT command-line interface.
All Amazon
Redshift
Improved the warning message provided when users choose Run
optimization in migration projects with the Amazon Redshift
virtual target database platform.
All Aurora
PostgreSQ
L
Implemented support of PostgreSQL major version 13 on Aurora
PostgreSQL-Compatible Edition as a migration target.
All Amazon
RDS for
MySQL
Implemented the case insensitive code conversion by default.
Azure
Synapse
Analytics
Amazon
Redshift
Resolved an error where the connection to a source database failed
in the command-line interface.
Microsoft
SQL Server
PostgreSQ
L
Aurora
PostgreSQ
L
Improved conversion of procedures that include UPDATE statements
with join conditions.
Microsoft
SQL Server
PostgreSQ
L
Aurora
PostgreSQ
L
Improved conversion of triggers, stored procedures, and functions
that include the value after the equal sign.
Release notes – 659 Version 1.0.672 584

AWS Schema Conversion Tool User Guide
Source Target What's new, enhanced, or fixed
Microsoft
SQL Server
PostgreSQ
L
Aurora
PostgreSQ
L
Fixed a transformer error for procedures with the DELETE
statement and the OR operator.
Microsoft
SQL Server
PostgreSQ
L
Aurora
PostgreSQ
L
Improved conversion of the OUTPUT clause.
Microsoft
SQL Server
DW
Amazon
Redshift
and AWS
Glue
Improved conversion of the NUMERIC data type.
Microsoft
SQL Server
DW
Amazon
Redshift
Improved conversion of views which have a table alias with same
name as the original table.
Microsoft
SSIS
AWS Glue Fixed an issue where the AWS Glue connection credentials weren't
displayed in the Configure connections window.
Netezza Amazon
Redshift
Added the ability to repeat the run of change data capture (CDC) d
ata migration tasks every day.
Netezza Amazon
Redshift
Fixed an issue where the Tasks tab becomes inactive after unregiste
ring a data extraction agent.
Netezza Amazon
Redshift
Fixed an issue where the confirmation of the registration of the
data migration agent didn't display in the user interface.
Netezza Amazon
Redshift
Fixed an issue where a connection to a source database failed with a
Loader error.
Release notes – 659 Version 1.0.672 585

AWS Schema Conversion Tool User Guide
Source Target What's new, enhanced, or fixed
Netezza Amazon
Redshift
Resolved an error where data migration agents failed to run after
opening a saved project.
Oracle Amazon
RDS for
Oracle
Implemented support of Oracle Unified Auditing.
Oracle PostgreSQ
L
Aurora
PostgreSQ
L
Implemented SQL code conversion in C# applications. For more
information, see SQL code in C# applications.
Oracle PostgreSQ
L
Aurora
PostgreSQ
L
Implemented a new transformation logic for case-sensitive object
names to improve the visibility of code conversion changes. AWS
SCT converts object names in uppercase to lowercase. The opposite
is also true; AWS SCT converts object names in lowercase to
uppercase. Other object names and reserved words are converted
without changes.
Oracle PostgreSQ
L
Aurora
PostgreSQ
L
Improved conversion of hash partitions without the NOT NULL
constraint.
Oracle Aurora
PostgreSQ
L
Added support for conversion of Oracle CHECK, FOREIGN KEY, and
NOT NULL constraints with the ENABLE NOVALIDATE clause.
Oracle DW Amazon
Redshift
Fixed an issue where the incorrect values for floating point numbers
were migrated.
Release notes – 659 Version 1.0.672 586

AWS Schema Conversion Tool User Guide
Source Target What's new, enhanced, or fixed
Oracle DW Amazon
Redshift
and AWS
Glue
Resolved an issue with empty columns in the database migration
assessment report in a comma-separated value (CSV) file.
SAP ASE PostgreSQ
L
Aurora
PostgreSQ
L
Fixed an issue with an unexpected conversion interruption.
Snowflake Amazon
Redshift
Improved conversion of the VARIANT data type.
Teradata Amazon
Redshift
Improved conversion of the COLLECT STATISTICS statement.
Teradata Amazon
Redshift
Fixed a problem where action item 9998 doesn't appear when
converting nested views with PERIOD columns.
Teradata Amazon
Redshift
and AWS
Glue
Fixed an issue where a virtual AWS Glue target platform didn't
display in the UI after opening a saved project.
Teradata
BTEQ
AWS Glue Fixed an issue where the conversion to a virtual AWS Glue target
platform wasn't supported after opening a saved project.
Teradata
BTEQ
Amazon
Redshift
RSQL
Improved syntax highlighting of the converted code.
Teradata
BTEQ
Amazon
Redshift
RSQL
Implemented checking parameter values after upload. Unsupported
values are highlighted on the Variables tab.
Release notes – 659 Version 1.0.672 587

AWS Schema Conversion Tool User Guide
Source Target What's new, enhanced, or fixed
Vertica Amazon
Redshift
Implemented conversion of aggregate functions.
Vertica Amazon
Redshift
Implemented conversion of projections to materialized views and
improved the UI that displays the source code of projections.
Release notes for AWS SCT Build 658
Source Target What's new, enhanced, or fixed
All All Provided integration with AWS Secrets Manager. You can now
use database connection credentials that are stored in Secrets
Manager.
All All Added support for scripts in the YAML format in the AWS SCT
command-line interface.
All Amazon
Redshift
Implemented support of Amazon S3 interface endpoints (VPCE) in
data extraction agents.
All Amazon
Redshift
Added support for the Amazon Redshift virtual target database
platform in addition to the already supported Amazon Redshift
and AWS Glue combination.
Greenplum Amazon
Redshift
Fixed an issue where the Save as SQL option didn't save converted
SQL code to a file.
IBM Db2
LUW
Microsoft
Azure SQL
Database
Microsoft
SQL Server
Aurora
MySQL
Improved conversion to support new features of Amazon Aurora
MySQL-Compatible Edition with MySQL 8.0 compatibility.
Release notes – 658 Version 1.0.672 588

AWS Schema Conversion Tool User Guide
Source Target What's new, enhanced, or fixed
Oracle
SAP ASE
Microsoft
SQL Server
Aurora
MySQL
Aurora
PostgreSQ
L
MySQL
PostgreSQ
L
Fixed a problem where action item 810 doesn't appear when
required.
Microsoft
SQL Server
Aurora
PostgreSQ
L
PostgreSQ
L
Improved conversion of procedures with UPDATE, DELETE, and
INSERT statements.
Microsoft
SQL Server
Aurora
PostgreSQ
L
PostgreSQ
L
Fixed a problem where action item 7810 doesn't appear when
required.
Microsoft
SQL Server
Aurora
PostgreSQ
L
PostgreSQ
L
Improved conversion of an EXEC statement that is nested inside an
IF...ELSE statement.
Release notes – 658 Version 1.0.672 589

AWS Schema Conversion Tool User Guide
Source Target What's new, enhanced, or fixed
Microsoft
SQL Server
Aurora
PostgreSQ
L
PostgreSQ
L
Improved conversion of indexed views.
Netezza Amazon
Redshift
Improved data migration agents by tracking live transactions during
full load in the change data capture (CDC) operation. You can now
stop data migration tasks if the CDC session is scheduled to start
at a certain time. Also, you can see the error logging level in the
console after you stop a task with CDC.
Oracle All Enhanced the table loader to ensure that AWS SCT loads objects w
ith sharing options.
Oracle Aurora
PostgreSQ
L
PostgreSQ
L
Improved conversion of the SYSDATE function and added the ability
to change the time zone in Conversion settings.
Oracle Aurora
PostgreSQ
L
PostgreSQ
L
Resolved an issue where dynamic statements weren't converted.
Oracle Aurora
PostgreSQ
L
PostgreSQ
L
Fixed an issue where the converted code doesn't include system-
generated names.
Release notes – 658 Version 1.0.672 590

AWS Schema Conversion Tool User Guide
Source Target What's new, enhanced, or fixed
Oracle
Oracle DW
Aurora
PostgreSQ
L
PostgreSQ
L
Improved conversion of SELECT statements that are nested inside
triggers.
Oracle DW Amazon
Redshift
Improved conversion of the TO_DATE, TO_TIMESTAMP , and
TO_TIMESTAMP_TZ functions in the extension pack.
Snowflake Amazon
Redshift
Added an option to save converted SQL code in different files for
each object or for each statement.
Teradata Amazon
Redshift
Improved conversion of the CONCAT function.
Teradata Amazon
Redshift
Improved conversion of a SELECT statement that is nested inside a
WHERE clause.
Teradata Amazon
Redshift
Resolved an issue when SET and MULTISET tables were incorrectly
converted after users drop and recreate a table.
Teradata Amazon
Redshift
Improved conversion of the procedures that include a WITH clause.
Teradata Amazon
Redshift
Improved conversion of the DATE data type.
Teradata Amazon
Redshift
RSQL
Resolved an issue where an unexpected transformer error occurred
during FastExport scripts conversion.
Teradata
BTEQ
Amazon
Redshift
RSQL
Added support for conversion of a join index to a materialized view.
Release notes – 658 Version 1.0.672 591

AWS Schema Conversion Tool User Guide
Source Target What's new, enhanced, or fixed
Teradata
BTEQ
Amazon
Redshift
RSQL
Added support for conversion of a TITLE definition that includes m
ultiple lines.
Teradata
BTEQ
Amazon
Redshift
RSQL
Resolved an issue where the size of a geospatial data type wasn't
converted.
Teradata
BTEQ
Amazon
Redshift
RSQL
Fixed a problem where the parameter names were converted to
lowercase characters.
Teradata
BTEQ
Amazon
Redshift
RSQL
Fixed an issue when a stored procedure that is nested inside a
MACRO statement wasn't converted.
Vertica Amazon
Redshift
Improved conversion of the ALL operator.
Vertica Amazon
Redshift
Resolved an issue where the Use Union all view? option in
Conversion settings wasn't applied.
Vertica Amazon
Redshift
Improved conversion of the TIME and TIME WITH TIMEZONE data
types.
Vertica Amazon
Redshift
Resolved an issue with loading of flex tables.
Issues resolved:
• General improvements.
Release notes – 658 Version 1.0.672 592

AWS Schema Conversion Tool User Guide
Release notes for AWS SCT Build 657
Source Target What's new, enhanced, or fixed
All All Upgraded Apache Log4j to version 2.17 to address security
vulnerability issues.
All Amazon
Redshift
Improved schema optimization projects, where key management
statistics weren't saved in the AWS SCT project.
Amazon
Redshift
Amazon
Redshift
Fixed a problem with the server information update.
Apache
Cassandra
Amazon
DynamoDB
Fixed an issue with mapping rules when using the AWS SCT
command-line interface.
Apache
Cassandra
Amazon
DynamoDB
Resolved an issue when the migration task wasn't created because
of an updated title in the certificate.
Microsoft
SQL Server
Aurora
PostgreSQ
L
PostgreSQ
L
Fixed a problem so that action item 7672 doesn't appear during the
conversion of Microsoft SQL Server procedures with dynamic SQL.
Azure SQL
Database
Microsoft
SQL Server
Aurora
PostgreSQ
L
PostgreSQ
L
Improved conversion of table-valued functions.
Azure SQL
Database
Microsoft
SQL Server
Aurora
PostgreSQ
L
PostgreSQ
L
Resolved an issue where the OUT argument in a stored procedure
with the default return value wasn't converted to the INOUT
argument.
Release notes – 657 Version 1.0.672 593

AWS Schema Conversion Tool User Guide
Source Target What's new, enhanced, or fixed
Greenplum Amazon
Redshift
Improved optimization strategies by finding the most used tables
and columns from the QueryLog table.
Microsoft
SQL Server
Aurora
PostgreSQ
L
PostgreSQ
L
Fixed problems with conversion of the following:
•
String concatenation assignment operator (+=)
•
SCOPE_IDENTITY function
•
varchar(max) data type
Microsoft
SQL Server
Aurora
PostgreSQ
L
PostgreSQ
L
Improved conversion of views with unsupported functions.
Microsoft
SQL Server
Aurora
PostgreSQ
L
PostgreSQ
L
Fixed an issue where unsupported functions as an argument to
another function were incorrectly converted.
Microsoft
SQL Server
Babelfish
for Aurora
PostgreSQ
L
Improved conversion of transition table references.
Microsoft
SQL Server
DW
Amazon
Redshift
Added the aggregate functions category to the source database
metadata tree.
Release notes – 657 Version 1.0.672 594

AWS Schema Conversion Tool User Guide
Source Target What's new, enhanced, or fixed
Microsoft
SQL Server
DW
Amazon
Redshift
Improved conversion of the TIME data type.
Azure
Synapse
Analytics
Greenplum
Netezza
Microsoft
SQL Server
DW
Snowflake
Teradata
Amazon
Redshift
Fixed an issue where DROP and CREATE scripts weren't saved when
using a virtual target database platform.
Microsoft
SQL Server
Integration
Services
AWS Glue Resolved an issue where the scripts of source objects didn't display
in the UI.
Netezza Amazon
Redshift
Improved optimization strategies by choosing the fact table and
appropriate dimensions for collocation.
Oracle Aurora
PostgreSQ
L
PostgreSQ
L
Resolved an issue to correctly convert Oracle triggers, which use
sequence numbers.
Release notes – 657 Version 1.0.672 595

AWS Schema Conversion Tool User Guide
Source Target What's new, enhanced, or fixed
Oracle Aurora
PostgreSQ
L
PostgreSQ
L
Improved conversion of views with public database links.
Oracle DW Amazon
Redshift
Improved optimization strategies by analyzing the cardinality of
index columns.
Oracle DW Amazon
Redshift
Fixed an issue where custom user-defined scalar functions with
string concatenation were incorrectly converted.
Snowflake Amazon
Redshift
Fixed an issue where the Save as SQL option didn't display in the
UI.
Teradata Amazon
Redshift
Fixed an issue where statistic collection failed with the LOADER
ERROR exception.
Teradata Amazon
Redshift
Fixed an issue where the Create report option didn't display in the
UI.
Teradata Amazon
Redshift
Improved conversion of the CAST function.
Teradata Amazon
Redshift
Fixed a broken conversion for ST_Line_Interpolate_Point .
Teradata Amazon
Redshift
Removed an unexpected value from the Python library path.
Teradata Amazon
Redshift
RSQL
Fixed a resolver error that appeared during the conversion of
multiple FastLoad scripts.
Release notes – 657 Version 1.0.672 596

AWS Schema Conversion Tool User Guide
Source Target What's new, enhanced, or fixed
Teradata
BTEQ
Amazon
Redshift
RSQL
Improved conversion of the DATABASE command and geometry
data types.
Teradata
BTEQ
AWS Glue Fixed an issue with an incorrect synchronization of the source and
target scripts in the UI.
Issues resolved:
• General improvements.
Release notes for AWS SCT Build 656
Source Target What's new, enhanced, or fixed
All All Added support of multiple source and target databases within one
project. Users can now create mapping rules to match different
database schemas and target platforms in the same project.
All All Added support of virtual target database platforms. Users now
don't need to connect to a target database to see how AWS SCT
converts their source database schema.
All All UI improvements:
•
Added the Connect to the server and Disconnect from the
server options to the source and target metadata trees.
•
Added an option to remove a database server from the AWS SCT
project.
Release notes – 656 Version 1.0.672 597

AWS Schema Conversion Tool User Guide
Source Target What's new, enhanced, or fixed
Cassandra Amazon
DynamoDB
Resolved a search issue where the CASSANDRA_HOME variable
didn't include a slash (/) after cassandra.yaml or the conf
folder.
Cassandra Amazon
DynamoDB
Added support of the Amazon Machine Image (AMI) for Amazon
Linux 2.
Cassandra Amazon
DynamoDB
Improved error message provided when an incorrect key is given for
Cassandra.
Cassandra Amazon
DynamoDB
Improved conversion by changing a property in the cassandra-
env.yaml file depending on the version of the target database.
Cassandra Amazon
DynamoDB
Increased the Java version on the target Cassandra Datacenter to
1.8.0.
Greenplum Amazon
Redshift
Improved optimization strategies in Project Settings.
Greenplum Amazon
Redshift
Resolved a data migration issue where objects weren't applied
to database with this error: An I/O error occurred while
sending to the backend .
Greenplum
Microsoft
SQL Server
DW
Amazon
Redshift
Resolved an issue where the Apply RTRIM to string columns
option didn't display in the UI.
Microsoft
SQL Server
Babelfish
for Aurora
PostgreSQ
L
Added support for Babelfish for Aurora PostgreSQL as a target
platform. Users can now create an assessment report to estimate
the migration from SQL Server to Babelfish for Aurora PostgreSQL.
Netezza Amazon
Redshift
Improved optimization strategies in Project Settings.
Release notes – 656 Version 1.0.672 598

AWS Schema Conversion Tool User Guide
Source Target What's new, enhanced, or fixed
SAP ASE Aurora
PostgreSQ
L
PostgreSQ
L
Implemented the ability to generate unique names for indexes.
SAP ASE Aurora
PostgreSQ
L
PostgreSQ
L
Fixed an issue with a duplicate index column in the target script.
Snowflake Amazon
Redshift
Resolved a problem where Hide empty schemas, Hide empty
databases, and Hide system databases/schemas options weren't
displayed in the UI.
Teradata Amazon
Redshift
RSQL
Added support for conversion of Teradata MultiLoad job scripts to
Amazon Redshift RSQL scripts.
Teradata Amazon
Redshift
RSQL
Fixed a problem with conversion of substitution variables in
FastLoad and FastExport scripts.
Teradata Amazon
Redshift
RSQL
Fixed an issue where action items didn't display in the Action Items
tab after switching from the Summary tab.
Teradata Amazon
Redshift
RSQL
Resolved an issue where an error occurs after generating report
during FastExport scripts conversion.
Teradata Amazon
Redshift
RSQL
Resolved formatting issues after shell scripts conversion.
Release notes – 656 Version 1.0.672 599

AWS Schema Conversion Tool User Guide
Source Target What's new, enhanced, or fixed
Teradata Amazon
Redshift
RSQL
Fixed a problem so that AI 13177 is now commented in converted
script.
Teradata Amazon
Redshift
Fixed a broken conversion of temporal tables.
Teradata Amazon
Redshift
Improved conversion of the SET QUERY_BAND statement.
Teradata Amazon
Redshift
Fixed a broken conversion of the NORMALIZE operation.
Vertica Amazon
Redshift
Improved the description of AI 17008.
Issues resolved:
• General improvements.
Release notes for AWS SCT Build 655
Source Target What's new, enhanced, or fixed
Teradata Amazon
Redshift
RSQL
Fixed a problem to ensure all assessment issues appear in reports
when FastLoad or MultiLoad is used.
Teradata Amazon
Redshift
RSQL
Added support for conversion of Teradata FastExport job scripts to
Amazon Redshift RSQL scripts.
Teradata Amazon
Redshift
RSQL
Fixed a problem to ensure the Save manifest to S3 action is enabled
in offline mode when using FastLoad.
Release notes – 655 Version 1.0.672 600

AWS Schema Conversion Tool User Guide
Source Target What's new, enhanced, or fixed
Teradata Amazon
Redshift
RSQL
Fixed an issue to ensure mapping rules are applied for scripts like
FastLoad.
Greenplum Amazon
Redshift
Increased the minimum supported driver version for Greenplum to
42.2.5.
Greenplum Amazon
Redshift
Added a connection to Greenplum via SSL with driver version 42.2.5
or higher.
Oracle DW Amazon
Redshift
Improved support for executing custom user-defined scalar
functions (UDF) within another UDF.
Oracle DW Amazon
Redshift
Fixed an issue where functions weren't applied to database with this
error: Failed to compile udf .
Oracle DW Amazon
Redshift
Improved conversion by using appropriate type declarations such
as, pls-type for %ROWTYPE parameters.
Teradata Amazon
Redshift
RSQL
Resolved an issue where information type assessment issues didn't
display in the report.
Teradata Amazon
Redshift
RSQL
Resolved a transformer error after converting some scripts.
Teradata Amazon
Redshift
RSQL
Fixed a problem so that an issue is now commented in converted
script.
Teradata Amazon
Redshift
Resolved an issue where FastExport ->EXPORT -> 'null' displayed
instead 'CAST' after conversion.
Teradata Amazon
Redshift
Resolved a problem where some functions of an extension pack
failed when applied with Cause:[JDBC Driver]String
index out of range: 0 if using driver version 1.2.43
Release notes – 655 Version 1.0.672 601

AWS Schema Conversion Tool User Guide
Source Target What's new, enhanced, or fixed
Teradata Amazon
Redshift
SET table conversion—SET table emulation added for insert-select
statements.
Teradata Amazon
Redshift
CAST—support additional data type casting.
Teradata Amazon
Redshift
Fixed a broken conversion for "other_current_time_01"
Teradata Amazon
Redshift
Teradata FastExport – Amazon Redshift RSQL: Improved conversion
of Teradata FastExport commands—FIELD
Teradata Amazon
Redshift
Teradata FastExport – Amazon Redshift RSQL: Improved conversion
of Teradata FastExport commands—LAYOUT
Oracle PostgreSQ
L
Aurora
PostgreSQ
L
Resolved an issue where target script of objects with SAVE
EXCEPTIONS STATEMENT changed after reconversion.
Oracle PostgreSQ
L
Aurora
PostgreSQ
L
Resolved an issue where wrong field was specified in the ORDER BY
clause after proc_cursor_with_calc_columns conversion.
Oracle PostgreSQ
L
Aurora
PostgreSQ
L
Resolved: an extra aws_oracle_ext$array_id$temporary
variable declaration is required in an ASSOCIATIVE COLLECTION
conversion.
Release notes – 655 Version 1.0.672 602

AWS Schema Conversion Tool User Guide
Source Target What's new, enhanced, or fixed
Oracle PostgreSQ
L
Aurora
PostgreSQ
L
Resolved: the wrong conversion of a PRIMARY KEY with the same
name of an INDEX owned by the same table.
Issues resolved:
• General improvements.
Release notes for AWS SCT Build 654
Source Target What's new, enhanced, or fixed
Oracle PostgreSQ
L
Aurora
PostgreSQ
L
Resolved an issue with Hierarchical Query Pseudocolumns, PRIOR
columns parsing error.
Oracle PostgreSQ
L
Aurora
PostgreSQ
L
Resolved an issue to correctly convert a multi-line comment
containing a slash and asterisk (/*).
Oracle PostgreSQ
L
Aurora
PostgreSQ
L
Added system view USER_COL_COMMENTS emulation to the
extension pack.
Release notes – 654 Version 1.0.672 603

AWS Schema Conversion Tool User Guide
Source Target What's new, enhanced, or fixed
Oracle PostgreSQ
L
Aurora
PostgreSQ
L
Improved conversion of quoted literals.
DB2 LUW PostgreSQ
L
Aurora
PostgreSQ
L
Improved conversion of LABEL statements that add or replace
labels in the descriptions of tables, views, aliases, or columns.
Oracle None Substituted SYS.USER$ system table with DBA_USERS view, and
improved queries.
Oracle DW Amazon
Redshift
Updated Oracle DW metadata queries.
Teradata Amazon
Redshift
RSQL
Added support for conversion of shell, Teradata FastLoad, and T
eradata Basic Teradata Query (BTEQ) scripts to Amazon Redshift
RSQL scripts.
Teradata
BTEQ
Amazon
Redshift
RSQL
Resolved issue where "merge_01" was incorrectly converted.
Teradata
BTEQ
Amazon
Redshift
RSQL
Resolved issue so that End or Identify (EOI) appears at the end of a
script on a new line.
Azure
Synapse
Amazon
Redshift
Improved error message provided when an incorrect password
given for Azure Synapse.
Teradata Amazon
Redshift
Improved UPDATE statement conversion to carry forward the right
alias name per Teradata standard.
Release notes – 654 Version 1.0.672 604

AWS Schema Conversion Tool User Guide
Source Target What's new, enhanced, or fixed
Teradata Amazon
Redshift
Resolved a cursor conversion error where actions weren't received.
Teradata Amazon
Redshift
Resolved an issue where a TD_NORMALIZE_OVERLAP conversion
was dropping rows.
Teradata Amazon
Redshift
Now supports strict date checking for the enhanced TO_DATE
function.
Teradata Amazon
Redshift
Improved conversion of Built-in function TO_NUMBER(n).
Teradata Amazon
Redshift
Resolved an issue where the Schemas category was absent from
metadata tree.
Greenplum Amazon
Redshift
Added GP_SEGMENT_ID selection to list when creating virtual
partition for a Greenplum table.
Greenplum Amazon
Redshift
Resolved an issue where functions weren't applied on target.
MS SQL
Server DW
Amazon
Redshift
Resolved an issue where a transform error occurs after conversion
without AI 9996.
MS SQL
Server DW
Amazon
Redshift
Resolved an issue where an error was logged when opening the
extension pack wizard.
MS SQL
Server DW
Amazon
Redshift
Resolved an issue when an incorrect style of comments was used
for Redshift Python functions.
Netezza Amazon
Redshift
Resolved an issue where a Netezza–Redshift extension pack with an
AWS profile failed to create.
Teradata Amazon
Redshift
RSQL
Improved conversion of FastLoad SESSIONS command.
Release notes – 654 Version 1.0.672 605

AWS Schema Conversion Tool User Guide
Source Target What's new, enhanced, or fixed
Teradata Amazon
Redshift
RSQL
Improved FastLoad scripts assessment reports.
Teradata Amazon
Redshift
RSQL
Implemented FastLoad WRITER Save to S3 action.
Teradata Amazon
Redshift
RSQL
Resolved an issue where FastLoad Save Script\Save manifest to s3
buttons weren't active.
Teradata Amazon
Redshift
RSQL
Resolved an issue where FastLoad multifile_script only created one
manifest file after conversion instead of the expected three files.
Teradata Amazon
Redshift
RSQL
Resolved an issue where FastLoad had extra folders displayed in an
S3 path.
Teradata Amazon
Redshift
RSQL
Resolved an issue where FastLoad had the incorrect name of the
manifest file in an S3 path.
Issues resolved:
• General improvements.
Release notes for AWS SCT Build 653
Source Target What's new, enhanced, or fixed
Oracle PostgreSQ
L
Implemented the ability to convert dynamic SQL created in called
functions or procedures.
Release notes – 653 Version 1.0.672 606

AWS Schema Conversion Tool User Guide
Source Target What's new, enhanced, or fixed
Aurora
PostgreSQ
L
Oracle PostgreSQ
L
Aurora
PostgreSQ
L
Improved Dynamic SQL conversion: In-parameters as bind variables.
Oracle DW
18, 19
Amazon
Redshift
Oracle to Redshift conversion improvements implemented:
enhanced conversion built-ins. Aggregate LISTAGG; Analytic
LISTAGG.
Oracle DW
18,19
Amazon
Redshift
Oracle to Redshift conversion improvements implemented: Query
new features.
Vertica Amazon
Redshift
Vertica to Redshift conversion improvements implemented: SSL to
JDBC connection with SSL=true.
MS SQL
Server DW
Amazon
Redshift
MS SQL Server to Redshift conversion improvements: External
Tables.
Teradata Amazon
Redshift
Teradata to Redshift conversion improvements: INTERVAL data
types arithmetic operations.
Teradata Amazon
Redshift
Teradata to Redshift conversion improvements: Support for lateral
column aliases.
Release notes – 653 Version 1.0.672 607

AWS Schema Conversion Tool User Guide
Source Target What's new, enhanced, or fixed
Oracle None
The following Loader queries now use DBA_USERS instead of
SYS.USER$ :
•
get-tree-path-list-by-name-path.sql
•
estimate-table-or-view-constraints-by-schema.sql
•
estimate-table-or-view-constraints-by-selected-schemas.sql
Teradata Amazon
Redshift
Improved alignment of comments when SCT converts Teradata
macros to Redshift stored procedures.
Oracle DW Amazon
Redshift
Improved conversion of Date/Timestamp format elements:
TO_DATE, TO_TIMESTAMP , and TO_TIMESTAMP_TZ
Teradata Amazon
Redshift
Resolved Teradata cursor conversion error.
Teradata Amazon
Redshift
Resolved issue that caused attributes of TD_NORMALIZE_OVERL
AP to be dropped during conversion.
Teradata Amazon
Redshift
Resolved an issue where MAX function was ignored when SCT
converted a query.
Teradata Amazon
Redshift
SCT now converts Teradata CHARACTERS function to Redshift
LENGTH function.
Teradata Amazon
Redshift
SCT now supports conversion of FORMAT to TO_CHAR for most
commonly used formats.
All All Improved conversion of encrypted routines.
Issues resolved:
• General improvements.
Release notes – 653 Version 1.0.672 608

AWS Schema Conversion Tool User Guide
Release notes for AWS SCT Build 652
Source Target What's new, enhanced, or fixed
Microsoft
SQL Server
PostgreSQ
L
Added app locking for sp_getapplock and sp_releas
eapplock functions.
None Amazon
Redshift
Command Line Interface (CLI) improvement: implemented Script
Command mode.
Oracle PostgreSQ
L
Aurora
PostgreSQ
L
Implemented routine parameters sampling inside dynamic SQL.
Oracle PostgreSQ
L
Aurora
PostgreSQ
L
Conversion improvements to dynamic SQL created in called
functions or procedures.
Microsoft
SQL Server
Oracle
DB2 LUW
Aurora
PostgreSQ
L
Each lambda function is deployed and configured via policy only
once, and common lambda functions are reused for all possible
sources.
DB2 LUW PostgreSQ
L
Resolved issue that caused error message, "9996 — Severity critical
— Transformer error occurred" when using DB2 LUW as source.
Teradata Amazon
Redshift
Support for recursive table expressions in forthcoming Amazon
Redshift launch.
Azure
Synapse
Amazon
Redshift
Implemented schema optimization rules.
Release notes – 652 Version 1.0.672 609

AWS Schema Conversion Tool User Guide
Source Target What's new, enhanced, or fixed
Teradata Amazon
Redshift
Support Time Zone conversion from Teradata macros to Redshift
stored procedures.
Teradata Amazon
Redshift
Support arithmetic on PERIOD values.
Teradata Amazon
Redshift
Support conversion of Teradata recursive common table expressions
(RECURSIVE CTE).
Teradata Amazon
Redshift
Support case sensitive identifiers via the user setting, enable_ca
se_sensitive_identifier . So, "COLUMN_NAME" and
"Column_Name" become different column names.
Teradata Amazon
Redshift
Resolved Decimal data type issue so that Decimal fields convert
with the same precision.
Teradata Amazon
Redshift
Resolved issue with interval arithmetic conversion so that interval
arithmetic subtraction converts correctly.
Teradata Amazon
Redshift
Improved Teradata NUMBER to DATE type casting.
Teradata Amazon
Redshift
Improved Teradata DATE to NUMBER type casting
Teradata
BTEQ
Amazon
Redshift
Improved PERIOD data type conversion.
Teradata Amazon
Redshift
Resolved issue with loading metadata for a table with GEOMETRY
columns so that it now loads from Teradata correctly.
Teradata Amazon
Redshift
Support conversion of merge statements when converting Teradata
macros to Redshift stored procedures.
Teradata Amazon
Redshift
Improved conversion of simple macros when migrating from
Teradata to Redshift.
Release notes – 652 Version 1.0.672 610

AWS Schema Conversion Tool User Guide
Source Target What's new, enhanced, or fixed
Teradata Amazon
Redshift
Ensured the conversion of Teradata UPDATE statements carry
forward the right alias name per Teradata standard.
Issues resolved:
• General improvements.
Release notes for AWS SCT Build 651
Source Target What's new, enhanced, or fixed
All All Enhanced AWS SCT reports to update links to the recommended
conversion action items listed.
MS SQL
Server
PostgreSQ
L
Added support for conversion of STR() function.
MS SQL
Server
PostgreSQ
L
Added support for converting the bitwise EXOR operator (^ in
Microsoft SQL Server) to PostgreSQL as the # operator.
Oracle PostgreSQ
L
Resolved an issue where the AWS SCT extension pack aws_oracl
e_ext.UNISTR(null) function hung for NULL on a PostgreSQ
L target. AWS SCT now handles the NULL.
Teradata
BTEQ
Amazon
Redshift
RSQL
Conversion improvements made to resolve an issue where conversio
n of Amazon Redshift RSQL MERGE gave a transform error.
Oracle DW Amazon
Redshift
Implemented enhanced built-ins.
Oracle DW Amazon
Redshift
Added metadata feature driven enhancements, including Auto-List
partitioning (TBL_PART_LIST_AUTO), Multi-column List (TBL_PART
_MULTI_LIST) and Interval-Reference (TBL_PART_RANGE_IN
TVAL_REF).
Release notes – 651 Version 1.0.672 611

AWS Schema Conversion Tool User Guide
Source Target What's new, enhanced, or fixed
none Amazon
Redshift
Increased partition table limits of physical partitions used for
UNION ALL conversions.
Teradata Amazon
Redshift
Conversion improvements made to the scope of Assessment
reports.
Teradata Amazon
Redshift
Conversion improvements made to complex Teradata MACRO
conversions.
Teradata Amazon
Redshift
Improved conversion of Teradata macros to Amazon Redshift stored
procedures while commenting out unsupported SQL.
Teradata Amazon
Redshift
Resolved an issue where conversion of Teradata macros to Amazon
Redshift stored procedures resulted in the wrong alias name
references.
Teradata Amazon
Redshift
Improved conversion of Teradata QUALIFY statement.
Teradata Amazon
Redshift
Improved conversion to carry forward comments to Amazon
Redshift and retain a history of changes performed on the view.
Teradata Amazon
Redshift
Resolved an issue where the RESET WHEN clause didn't result in the
correct conversion.
Teradata
BTEQ
Amazon
Redshift
Improved conversion of BTEQ scripts that contain MERGE statement
s.
Teradata Amazon
Redshift
Added built-in functions to improve conversion of PERIOD data
type fields.
Microsoft
SQL Server
Amazon
Redshift
Enhanced transformation data type mapping for TIME data type.
All All Added access to the initial publication of the AWS Schema Conversio
n Tool CLI Reference manual in PDF format. See AWS Schema
Conversion Tool CLI Reference.
Release notes – 651 Version 1.0.672 612

AWS Schema Conversion Tool User Guide
Issues resolved:
• General improvements.
Release notes for AWS SCT Build 650
Source Target What's new, enhanced, or fixed
All All Updated and enhanced use of extractor agents, including:
•
A configuration for use with shared storage and a dedicated
copying agent.
•
Exporting and importing data extraction tasks from one project
to another.
•
Support for Azure SQL Data Warehouse (Azure Synapse) as
source.
•
Using native Netezza partitioning.
For more information, see Migrating data from on-premises data
warehouse to Amazon Redshift with AWS Schema Conversion Tool.
All Amazon
RDS
PostgreSQ
L 13
AWS SCT now supports Amazon RDS PostgreSQL 13 as target.
Microsoft
SQL Server
Aurora
PostgreSQ
L
Improved conversion of a result set from an Microsoft SQL Server
procedure to an Aurora PostgreSQL target.
Oracle DW Amazon
Redshift
Implemented Oracle to Amazon Redshift conversion improvements.
Release notes – 650 Version 1.0.672 613

AWS Schema Conversion Tool User Guide
Source Target What's new, enhanced, or fixed
Oracle DW Amazon
Redshift
Implemented improvements to converting dynamic SQL statement
s.
Oracle DW Amazon
Redshift
Implemented improvements to SQL UDF conversion.
Oracle DW Amazon
Redshift
Clarified message that AWS SCT doesn't support conversion of
EXTERNAL TABLES.
Oracle DW Amazon
Redshift
Enhanced built-in conversion functions.
Teradata
BTEQ
Amazon
Redshift
RSQL
Improved handling substitution parameters inside BTEQ scripts
while using AWS SCT GUI.
Microsoft
SQL Server
DW
Microsoft
SQL Server
Azure
Azure
Synapse
All Upgraded the minimum supported JDBC driver version for
Microsoft SQL Server, Azure, Azure Synapse.
Issues resolved:
• Teradata: Macro conversion additional improvements [RESOLVED]
• Special characters escaped in the target causing SQL errors and re-work needed to place them
back [RESOLVED]
• General improvements
Release notes – 650 Version 1.0.672 614

AWS Schema Conversion Tool User Guide
Release notes for AWS SCT Build 649
Source Target What's new, enhanced, or fixed
Microsoft
SQL Server
DW
Amazon
Redshift
MSSQL to Amazon Redshift conversion improvements to support
temporal tables.
Oracle DW Amazon
Redshift
Implemented built-in function enhancements, such as:
Conversion functions
•
TO_BINARY_DOUBLE
•
TO_BINARY_FLOAT
•
TO_NUMBER
•
TO_DATE
•
TO_TIMESTAMP
•
TO_TIMESTAMP_TZ
•
TO_DSINTERVAL
•
TO_YMINTERVAL
•
VALIDATE_CONVERSION
Oracle DW Amazon
Redshift
Implemented function enhancements for Approximate Query
Processing, such as:
Aggregate functions
•
ANY_VALUE
•
APPROX_COUNT_DISTINCT
Release notes – 649 Version 1.0.672 615

AWS Schema Conversion Tool User Guide
Source Target What's new, enhanced, or fixed
•
APPROX_COUNT_DISTINCT_DETAIL
•
APPROX_COUNT_DISTINCT_AGG
•
LISTAGG
•
TO_APPROX_COUNT_DISTINCT
Teradata Amazon
Redshift
Implemented conversion enhancements for Teradata auto sort
and distribution key selection. The DB engine automatically
selects distribution and sort keys. Introduced a radio button
labeled Use Amazon Redshift automatic table tuning to Current
projects settings > Optimization strategies > Initial Key Selection
Strategy dialog.
Teradata Amazon
Redshift
Enhanced AWS SCT table loader to ensure AWS SCT loads all tables
from Teradata.
Teradata Amazon
Redshift
Implemented conversion enhancements so that Amazon Redshift
supports correlated subquery patterns that include a simple WHERE
NOT EXISTS clause.
Teradata Amazon
Redshift
Added support for use of ECHO commands in macros.
DB2 LUW PostgreSQ
L
Aurora
PostgreSQ
L
Implemented support for DYNAMIC RESULTS SETS conversion,
including:
•
Cursor clause WITH RETURN/WITH RETURN TO CLIENT
•
DYNAMIC RESULT SETS routine clause conversion
Release notes – 649 Version 1.0.672 616

AWS Schema Conversion Tool User Guide
Source Target What's new, enhanced, or fixed
Microsoft
SQL Server
Oracle
DB2 LUW
SAP ASE
Aurora
PostgreSQ
L
Implemented support for current Aurora RDS PostgreSQL as target.
Microsoft
SQL Server
Oracle
DB2 LUW
SAP ASE
MariaDB Implemented support for MariaDB 10.5 as target.
Microsoft
SQL Server
MariaDB Implemented support of INSERT-RETURNING which returns a result
set of the inserted rows.
Oracle Aurora
PostgreSQ
L
Added support of the XMLFOREST function for converting from
Oracle to Aurora PostgreSQL.
Issues resolved:
• General improvements.
Release notes for AWS SCT Build 648
Source Target What's new, enhanced, or fixed
Oracle PostgreSQ
L
Aurora PostgreSQL extension pack custom apply mode implement
ed: operators for numeric/date and text types.
Release notes – 648 Version 1.0.672 617

AWS Schema Conversion Tool User Guide
Source Target What's new, enhanced, or fixed
Amazon
Aurora
PostgreSQ
L-Compati
ble Edition
Oracle
Microsoft
SQL Server
DB2 LUW
Aurora
PostgreSQ
L
Aurora PostgreSQL Lambda Invoke configuration implemented:
aws_lambda extension creation; IAM role assignment to the Aurora
PostgreSQL cluster.
•
Oracle—Emails, Jobs, WebAgent, Queues, Files
•
DB2—Emails, Tasks, Files
•
Microsoft SQL Server— Emails, Agent
Oracle PostgreSQ
L
FORALL statement conversion refactoring implemented:
•
FORALL statement
•
FORALL ... SAVE EXCEPTIONS
•
RETURNING INTO with BULK COLLECT
•
SQL%BULK_EXCEPTIONS system collection
Oracle DW
18, 19
Amazon
Redshift
Oracle to Amazon Redshift conversion improvements implement
ed: enhanced conversion built-ins. Aggregate LISTAGG; Analytic
LISTAGG.
Oracle DW
18,19
Amazon
Redshift
Oracle to Amazon Redshift conversion improvements implemented:
Query new features.
Release notes – 648 Version 1.0.672 618

AWS Schema Conversion Tool User Guide
Source Target What's new, enhanced, or fixed
Vertica Amazon
Redshift
Vertica to Amazon Redshift conversion improvements implement
ed: SSL to JDBC connection with SSL=true.
Microsoft
SQL Server
DW
Amazon
Redshift
Microsoft SQL Server to Redshift conversion improvements:
External Tables.
Teradata Amazon
Redshift
Teradata to Redshift conversion improvements: INTERVAL data
types arithmetic operations.
Teradata Amazon
Redshift
Teradata to Redshift conversion improvements: Support for lateral
column aliases.
Issues resolved:
• General improvements
Release notes for AWS SCT Build 647
Source Target What's new, enhanced, or fixed
Microsoft
SQL Server
Microsoft
SQL Server
RDS now supports Database Mail feature.
Microsoft
SQL Server
MySQL Implementing the maximum name of each type of identifier — The
maximum length of object names (for example, tables, constrain
ts, columns) in SQL Server is 128 characters. The maximum length
of object names in MySQL is 64 characters. To write converted
objects to the MySQL database you need to shorten their names. To
prevent duplicate names after cutting, you need to add "checksum"
of the original object name to the new names.
Cut names longer than 64 characters as follows:
[first N chars]() + "" + [checksum]()
Release notes – 647 Version 1.0.672 619

AWS Schema Conversion Tool User Guide
Source Target What's new, enhanced, or fixed
[first N chars] = 64 - 1 - [length of checksum
string]
For example:
example_of_a_test_schema_with_a_name_length_g
reater_than_64_characters ?? example_of_a_test
_schema_with_a_name_length_greater_than_64_97
03
Oracle MySQL/
Aurora
MySQL
Implemented load and conversion of comments on storage objects.
For example, processing of comments on Tables, and processing of
comments on Table/View columns.
Teradata Amazon
Redshift
Added support for TIME data type conversion.
Teradata Amazon
Redshift
Conversion improvements — TD_NORMALIZE_OVERLAP implement
ed.
Microsoft
SQL Server
DW
Amazon
Redshift
Conversion improvements — SELECT with WITH clause; SELECT
without FROM
All All AWS SCT Data Migration Service Assessor (DMSA) — This new
feature enables you to evaluate multiple servers and receive a
summary report that shows the best target direction for your
environment.
All All AWS SCT Wizard — Target comparison now shows differences
between targets in a single table view.
All All Tree Filter UI — Redesigned metadata filter handles more complex
filtering patterns.
All All Assessment Report — Redesigned Warning section provides a
better description and clearer understanding of an issue.
Release notes – 647 Version 1.0.672 620

AWS Schema Conversion Tool User Guide
Issues resolved:
• General improvements
• Data Extractors — Subtask failed with ConcurrentModificationException [RESOLVED].
• Microsoft SQL Server to MySQL — max identifier lengths [RESOLVED].
Release notes for AWS SCT Build 646
Source Target What's new, enhanced, or fixed
Oracle PostgreSQ
L
Improved TM format model implementation.
Oracle PostgreSQ
L
SP format mask implementation provides basic support for SP
suffix, only for the English language.
Oracle PostgreSQ
L
Oracle long object names handling — AWS SCT now handles
Oracle long object names according to target max identifier length
attribute.
Amazon
Redshift
Amazon Redshift encoding AZ64 with AWS SCT — Added compressi
on encoding AZ64 for some data types
Teradata Amazon
Redshift
Added support for Implicit transactions conversion.
Teradata Amazon
Redshift
Added support for Teradata geospatial built-in functions:
ST_LineString Methods
Greenplum Amazon
Redshift
Greenplum sequence conversion — Added the next items to the
Properties tabs: min value, max value, increment, cycle.
Greenplum Amazon
Redshift
Resolver — Added "char" data type resolving.
Greenplum Amazon
Redshift
Character conversion length — Updated PL/pgSQL conversion for
character type.
Release notes – 646 Version 1.0.672 621

AWS Schema Conversion Tool User Guide
Source Target What's new, enhanced, or fixed
Greenplum Amazon
Redshift
Resolved an issue with Greenplum distribution key selection where
a table had DISTRIBUTION KEY but AWS SCT couldn't recognise and
fetch table as RANDOMLY DISTRIBUTED.
Teradata Amazon
Redshift
Teradata cursor support — Added support for cursors conversion.
Teradata Amazon
Redshift
Identity columns — Added support for Identity columns conversion.
Teradata Amazon
Redshift
INTERVAL data types — Added support for INTERVAL data types
conversion.
Issues resolved:
• General improvements
• Greenplum: Unable to run conversion due to the error in the log [RESOLVED].
• MSSQL — PostgreSQL: Transformer error when converting LAG function [RESOLVED].
• MSSQL — PostgreSQL: SCOPE_IDENTITY [RESOLVED].
• AWS SCT hanging in DW projects [RESOLVED].
• Need mapping rule to remove additional space on the column name in AWS SCT [RESOLVED].
Release notes for AWS SCT Build 645
Source Target What's new, enhanced, or fixed
Teradata Amazon
Redshift
Provide solution to resolve Teradata non-fully qualified views (view
names or non-fully qualified objects within the view).
Teradata Amazon
Redshift
Added support of ASCII function to compute nodes.
Teradata Amazon
Redshift
When AWS SCT spots multi-byte data in a Teradata CHAR defined as
CHAR(N), it is converted to VARCHAR(3*N) in Amazon Redshift.
Release notes – 645 Version 1.0.672 622

AWS Schema Conversion Tool User Guide
Source Target What's new, enhanced, or fixed
Teradata Amazon
Redshift
Provide Teradata CAST conversion between dates and numbers.
•
SELECT Cast('2020-07-17' AS BIGINT)
•
SELECT Cast(20200630 - 19000000 AS DATE)
Teradata Amazon
Redshift
Support conversion of Teradata PERIOD data types into two
Amazon Redshift TIMESTAMP columns:
•
PERIOD(TIMESTAMP)
•
PERIOD(TIMESTAMP WITH TIMEZONE)
Teradata Amazon
Redshift
Support conversion of Teradata RANK function with RESET WHEN
clause.
Teradata Amazon
Redshift
Improved support of CAST in explicit data type conversions, and
implicit CASTs on expressions.
Teradata Amazon
Redshift
Report unsupported correlated subquery patterns. For more
information, see Correlated subqueries in the Amazon Redshift
Database Developer Guide.
none Amazon
Redshift
Improved tables limit support for RA3 node types.
Teradata Amazon
Redshift
Added support for Teradata geospatial data extraction. For more
information, see Querying spatial data in Amazon Redshift in the
Amazon Redshift Database Developer Guide.
Microsoft
SQL Server
PostgreSQ
L
Added the option, convert_procedures_to_function .
Release notes – 645 Version 1.0.672 623
AWS Schema Conversion Tool User Guide
Issues resolved:
• General improvements
Release notes for AWS SCT Build 644
Changes for AWS SCT releases 1.0.643 are merged into AWS SCT 1.0.644 release.
Source Target What's new, enhanced, or fixed
Teradata Amazon
Redshift
Multiple conversion improvements.
•
Improved conversions with QUALIFY with the table alias.
•
Improved conversions with the IN operator.
•
Improved conversion with the LIKE operator.
•
Improved conversions with highlighting issues in converted code.
•
Improved conversions with unusual order of WHERE, QUALIFY
clauses in SQL.
•
Fixed transformer errors occurred during JOIN() constructions
conversion of procedure UPD_FT_SVC_TRANS_BH_CBH_IND .
•
Improved conversion of macros to stored procedures.
Added special AWS SCT CLI commands that can parse the provided
sql/bteq scripts and generate a report on the number of syntax
structures encountered in the source code.
•
Count of BTEQ commands
•
Count of HANDLERS
•
Count of CAST cases
Release notes – 644 Version 1.0.672 624

AWS Schema Conversion Tool User Guide
Source Target What's new, enhanced, or fixed
•
Count of DML/DDL cases
•
Count of DMLs on updatable views
Added an assessment report action item: Teradata columns with
custom date formats are not supported in Amazon Redshift.
Oracle PostgreSQ
L/Aurora
PostgreSQ
L
Added functionality to save extension pack installation scripts.
Changed severity level for AI 5334.
Improved performance of using a record as package variable
IMPLEMENTATION .
Added XMLAGG aggregation function support
IBM Db2 PostgreSQ
L/Aurora
PostgreSQ
L
Added load and conversion of comments on storage objects
implementation.
MSSQLDW Amazon
Redshift
Conversion improvement: Resolved issue with PATINDEX.
UI improvements:
•
Save as SQL for source tree implementation.
•
Added additional logic to script generation for multiple files.
Vertica Amazon
Redshift
UI improvement: Save as SQL for source tree implementation.
Issues resolved:
• General improvements to conversions between Teradata and Amazon Redshift
• General bug fixing and UI improvements
Release notes – 644 Version 1.0.672 625

AWS Schema Conversion Tool User Guide
Release notes for AWS SCT Build 642
Changes for AWS Schema Conversion Tool release 1.0.642.
Note
AWS Schema Conversion Tool (AWS SCT) build 1.0.642 changes are applicable to Windows,
Ubuntu, and Fedora. There is no 1.0.642 build for macOS.
Source Target What's new, enhanced, or fixed
Microsoft
SSIS
AWS Glue Implemented conversion of Microsoft SQL Server Integration
Services (SSIS) ETL packages to AWS Glue. For more information,
see Converting SSIS to AWS Glue with AWS SCT.
Oracle MariaDB/S
QLMODE=ORAC
LE/
MySQL/
Amazon
Aurora
MySQL
Implemented the PL/SQL declaration section in the WITH clause.
Oracle PostgreSQ
L/Aurora
PostgreSQ
L
Added support for DBMS_SESSION.RESET_PACKAGE and
DBMS_SESSION.MODIFY_PACKAGE .
Vertica Amazon
Redshift
Enable exporting of SQL scripts from a Vertica database to Amazon
Redshift.
Issues resolved:
• Assessment Report Enhancement.
• Assessment Report UI Enhancement.
• Add the ability to change JVM settings from UI.
Release notes – 642 Version 1.0.672 626
AWS Schema Conversion Tool User Guide
• General improvements.
Release notes for AWS SCT build 641
Changes for AWS Schema Conversion Tool release 1.0.641.
Note
AWS Schema Conversion Tool (AWS SCT) build 1.0.641 changes are applicable to Windows,
Ubuntu, and Fedora. There is no 1.0.641 build for macOS.
Source Target What's new, enhanced, or fixed
Oracle/
MS SQL/
MySQL/
PostgreS
QL/Db2
LUW
All Produce Time Report calculations in the .csv file.
Teradata Amazon
Redshift
Added support for CSUM function.
Added support for Teradata geospatial data types.
Teradata All Added support for converting IDENTITY columns.
Greenplum Amazon
Redshift
Added support for distribution style AUTO during Greenplum table
conversion.
SAP ASE All Produce Time Report calculations in the .csv file.
Resolved:
• Various bug fixes.
• Various performance improvements.
Release notes – 641 Version 1.0.672 627
AWS Schema Conversion Tool User Guide
Release notes for AWS SCT Build 640
Changes for AWS SCT releases 1.0.633, 1.0.634, 1.0.635, 1.0.636, 1.0.637, 1.0.638, 1.0.639, and
1.0.640 are merged into AWS SCT 1.0.640 release.
Note
AWS SCT build 1.0.640 changes are applicable to Windows, Ubuntu, and Fedora. They don't
apply to macOS.
You can't install AWS SCT version 1.0.640 or higher on Apple macOS. AWS SCT version
1.0.632 was the last version to support installation on Apple macOS.
In the following tables, you can find lists of the features and bug fixes for the AWS Schema
Conversion Tool versions that have been combined into release 1.0.640. These tables group
features and bug fixes by the source engine.
Topics
• Release 1.0.640 Oracle changes
• Release 1.0.640 Microsoft SQL Server changes
• Release 1.0.640 MySQL Changes
• Release 1.0.640 PostgreSQL changes
• Release 1.0.640 Db2 LUW changes
• Release 1.0.640 Teradata changes
• Release 1.0.640 changes for other engines
Release 1.0.640 Oracle changes
The following table lists build 1.0.640 changes in which Oracle is the source engine.
Source Target What's new, enhanced, or fixed
Oracle PostgreSQ
L
Implemented SQL code conversion in Java and Pro*C applications.
Release notes – 640 Version 1.0.672 628

AWS Schema Conversion Tool User Guide
Source Target What's new, enhanced, or fixed
Aurora
PostgreSQ
L
Oracle PostgreSQ
L
Aurora
PostgreSQ
L
Improved performance of the following functions when used in a
WHERE clause:
• aws_oracle_ext.to_date
• aws_oracle_ext.to_char
• aws_oracle_ext.to_number
• aws_oracle_ext.sysdate
• aws_oracle_ext.sys_context
Oracle RDS
MariaDB
10.4
Added RDS MariaDB 10.4 support for all online transactional
processing (OLTP) vendors.
Oracle PostgreSQ
L/Aurora
PostgreSQ
L
Added support for DBMS_UTILITY.GET_TIME.
Added the following emulations:
• DBMS_UTILITY.GET_TIME
• DBMS_UTILITY.FORMAT_CALL_STACK
• DBMS_UTILITY.CURRENT_INSTANCE
Release 1.0.640 Oracle changes Version 1.0.672 629

AWS Schema Conversion Tool User Guide
Source Target What's new, enhanced, or fixed
Oracle MariaDB/M
ySQL/Auro
ra MySQL/
Microsoft
SQL Server
Mode=Orac
le/Postgr
eSQL/
Aurora
PostgreSQ
L/RDS
Oracle
Added sharing clause support for TABLE(DATA,EXTENDED DATA), VI
EW(DATA,EXTENDED DATA), and SEQUENCE(DATA)
Oracle
PostgreSQ
L/Aurora
PostgreSQ
L/Oracle
RDS
The DEFAULT definition of a column can be extended to have the
DEFAULT being applied for explicit NULL insertion.
The DEFAULT clause has a new ON NULL clause. This new clause
instructs the database to assign a specified default column value
when an INSERT statement attempts to assign a value that
evaluates to NULL.
Oracle MariaDB/
MariaDB
(SQL
MODE=ORAC
LE)
Added support for "Identity Columns," which automatically
increment at the time of insertion.
All All Upgrade to Amazon Corretto JDK 11 from JDK 8. For more
information, including download links, see What is Amazon
Corretto 11? in the Amazon Corretto 11 User Guide.
All All Added information to the assessment report about possible
inconsistencies in the user's database.
Release 1.0.640 Oracle changes Version 1.0.672 630

AWS Schema Conversion Tool User Guide
Source Target What's new, enhanced, or fixed
Oracle MariaDB
10.2/Mari
aDB 10.3/
MySQL/
Aurora
MySQL/
Pos
tgreSQL/
Aurora
PostgreSQ
L
The DEFAULT clause has a new ON NULL clause, which instructs
the database to assign a specified default column value when an
INSERT statement attempts to assign a value that evaluates to
NULL.
Oracle Oracle
RDS/
MySQL
/Aurora
MySQL/
Pos
tgreSQL/
Aurora
PostgreSQ
L
Added support for IDENTITY columns.
Oracle
MySQL 8.x Added support for CHECK constraint.
Release 1.0.640 Oracle changes Version 1.0.672 631

AWS Schema Conversion Tool User Guide
Source Target What's new, enhanced, or fixed
Oracle PostgreSQ
L/Aurora
PostgreSQ
L
Implemented checking ANYDATA IS NULL/IS NOT NULL using
extension pack routine.
Implemented the emulation of the VALUE function used in a query
based on the TABLE function of XMLSequence.
Added DBMS_LOB support for the following built-in routines:
•
DBMS_LOB.CREATETEMPORARY
•
DBMS_LOB.FREETEMPORARY
•
DBMS_LOB.APPEND
All SQL Server
SQL Server 2019: Added support for new index attribute OPTIMIZE
_FOR_SEQUENTIAL_KEY.
SQL Server 2017: Added support for Graph Databases Node and
Edge table types.
SQL Server 2016: Added support for TEMPORAL TABLES.
All All Implemented the ability to override physical partitions with virtual
partitions. Data warehouse extractors extract data according to
created virtual partitions.
Oracle Amazon
Redshift
Implemented conversion of cursor attributes in nested blocks.
Amazon Redshift doesn't support collections. Related variables
are converted as VARCHAR. All collection operations other than
assigning one variable to another are rejected, including initiation
and collection elements access.
Implemented Amazon Redshift distribution style = AUTO.
Release 1.0.640 Oracle changes Version 1.0.672 632

AWS Schema Conversion Tool User Guide
Source Target What's new, enhanced, or fixed
Oracle PostgreSQ
L/Aurora
PostgreSQ
L
If a nonreserved word in Oracle is reserved in PostgreSQL, then the
following is true:
•
If the word is quoted, it retains its case and stay quoted.
•
If the word is unquoted, it is cast to uppercase and quoted.
Implemented the ability to use functions as input to LTRIM, RTRIM,
and TRIM functions.
SELECT DISTINCT, ORDER BY expressions must appear in select list.
For cursor parameters that follow after a parameter with a DEFAULT
value, AWS SCT adds DEFAULT IS NULL clause
Source OUT cursor parameters are converted to IN cursor
parameters.
Reimplemented package variable by adding the "Package variables
logic implementation" option under "Conversion settings".
Available settings are: "session variables" and "plv8 global objects".
The default is "session variables".
Implemented AUTONOMOUS_TRANSACTION pragma support with
dblink and pg_background.
Oracle All Implemented view SYS_%_TAB_COMMENTS.
Oracle PostgreSQ
L
Variable inputs to filters aren't supported in PostgreSQL. When
converting from Oracle to PostgreSQL, if a variable filter is
encountered an exception is now reported.
Release 1.0.640 Oracle changes Version 1.0.672 633

AWS Schema Conversion Tool User Guide
Source Target What's new, enhanced, or fixed
Oracle Amazon
Redshift
Implemented stored code FOR..LOOP Cursor conversion improveme
nts.
Implemented stored code invocation of function/procedures with
default parameters.
Implemented stored code ability to UPDATE with alias without
WHERE clause.
Implemented stored code functions preform additional cases with
SELECT FROM dual.
Implemented stored code Table%ROWTYPE parameters and
package variables.
Implemented stored code used of JAVA and external procedures.
Implemented standard Oracle package in stored code.
Release 1.0.640 Microsoft SQL Server changes
The following table lists build 1.0.640 changes in which Microsoft SQL Server is the source engine.
Source Target What's new, enhanced, or fixed
Microsoft
Azure/
Microsoft
SQL Server
PostgreSQ
L/Aurora
PostgreSQ
L/MySQL/
Aurora
MySQL
Added support for COLUMN STORE indexes.
Microsoft
SQL Server
RDS
MariaDB
10.4
Added RDS MariaDB 10.4 support for all online transactional
processing (OLTP) vendors.
Release 1.0.640 Microsoft SQL Server changes Version 1.0.672 634

AWS Schema Conversion Tool User Guide
Source Target What's new, enhanced, or fixed
Azure/SQL
Server
MariaDB/M
ySQL/Auro
ra MySQL/
Pos
tgreSQL/
Aurora
PostgreSQ
L
Added support for the OPTIMIZE_FOR_SEQUENTIAL_KEY index
attribute.
Azure/SQL
Server
MySQL/
Aurora
MySQL/
Pos
tgreSQL/
Aurora
PostgreSQ
L
Added support for Databases Node and Edge table types.
Azure/SQL
Server
MariaDB/M
ySQL/Auro
ra MySQL/
Pos
tgreSQL/
Aurora
PostgreSQ
L
Added support for TEMPORAL TABLES.
All All Upgrade to Amazon Corretto JDK 11 from JDK 8. For more
information, including download links, see What is Amazon
Corretto 11? in the Amazon Corretto 11 User Guide.
All All Added information to the assessment report about possible
inconsistencies in the user's database.
Release 1.0.640 Microsoft SQL Server changes Version 1.0.672 635

AWS Schema Conversion Tool User Guide
Source Target What's new, enhanced, or fixed
Azure/SQL
Server
MySQL/
Aurora
MySQL/
Pos
tgreSQL/
Aurora
PostgreSQ
L/MariaDB
Added support for DML processing for SQL Server Graph Architect
ure.
SQL Server Aurora
PostgreSQ
L
Added option to convert parameters without the par_ prefix.
Azure/SQL
Server
MySQL 8.x Added support for CHECK constraint.
All SQL Server
SQL Server 2019: Added support for new index attribute OPTIMIZE
_FOR_SEQUENTIAL_KEY.
SQL Server 2017: Added support for Graph Databases Node and
Edge table types.
SQL Server 2016: Added support for TEMPORAL TABLES.
All All Implemented the ability to override physical partitions with virtual
partitions. Data warehouse extractors extract data according to
created virtual partitions.
Release 1.0.640 Microsoft SQL Server changes Version 1.0.672 636

AWS Schema Conversion Tool User Guide
Source Target What's new, enhanced, or fixed
SQL Server AWS Glue
(Python
shell)
Conversion improvements, including:
•
Implemented built-in functions conversion to Python.String.
•
Implemented EXECUTE and EXEC in stored code.
•
Implemented using table types.
Azure/SQL
Server
PostgreSQ
L/Aurora
PostgreSQ
L
Implemented making $TMP procedures optional.
SQL Server MySQL/
Aurora
MySQL
Extended arithmetic operations with dates.
Construction emulation 'TOP (expression) WITH TIES.
After calling procedures with the generated refcursor out, the refcu
rsor now closes.
Setting a GLOBAL isolation level isn't supported in Aurora MySQL.
Only the session scope can be changed. The default behavior of
transactions is to use REPEATABLE READ and consistent reads.
Applications designed for use with READ COMMITTED may need to
be modified. Alternatively, they can explicitly change the default to
READ COMMITTED.
Release 1.0.640 Microsoft SQL Server changes Version 1.0.672 637

AWS Schema Conversion Tool User Guide
Source Target What's new, enhanced, or fixed
SQL Server AWS Glue
(Python
shell)
SQL Server statements produce a complete result set, but there
are times when the results are best processed one row at a time.
Opening a cursor on a result set allows processing the result
set one row at a time. You can assign a cursor to a variable or
parameter with a cursor data type.
Implemented enclosing a series of Transact-SQL statements for
stored code so that a group of Transact-SQL statements can be run
even though Python doesn't support SQL Server's BEGIN and END
as control-of-flow.
SQL Server LABEL and GOTO statements aren't supported by AWS
Glue. If AWS SCT encounters a label in the code, it is skipped. If
AWS SCT encounters a GOTO statement, it is commented.
SQL Server Amazon
Redshift
Implemented conditional processing of Transact-SQL statements
for stored code by implementing the IF ... ELSE control.
Implemented enclosing a series of Transact-SQL statements for
stored code so that a group of Transact-SQL statements can be run
as a block. Supports nested BEGIN ... END blocks.
Implemented SET and SELECT in stored code.
Implemented CREATE INDEX in Amazon Redshift (which doesn't
support indexes) by creating a user-specified sort key on the tables.
Release 1.0.640 MySQL Changes
The following table lists build 1.0.640 changes in which MySQL is the source engine.
Release 1.0.640 MySQL Changes Version 1.0.672 638
AWS Schema Conversion Tool User Guide
Source Target What's new, enhanced, or fixed
MySQL
PostgreSQ
L 12.x
Added support for generated columns.
All All Upgrade to Amazon Corretto JDK 11 from JDK 8. For more
information, including download links, see What is Amazon
Corretto 11? in the Amazon Corretto 11 User Guide.
All All Added information to the assessment report about possible
inconsistencies in the user's database.
MySQL
PostgreSQ
L/Aurora
PostgreSQ
L 11.
Added support for the following:
• Embedded transactions inside SQL stored procedures.
• The ability to CALL SQL stored procedures.
• The ability to create SQL stored procedures.
All SQL Server
SQL Server 2019: Added support for new index attribute OPTIMIZE
_FOR_SEQUENTIAL_KEY.
SQL Server 2017: Added support for Graph Databases Node and
Edge table types.
SQL Server 2016: Added support for TEMPORAL TABLES.
All All Implemented the ability to override physical partitions with virtual
partitions. Data warehouse extractors extract data according to
created virtual partitions.
Release 1.0.640 PostgreSQL changes
The following table lists build 1.0.640 changes in which PostgreSQL is the source engine.
Release 1.0.640 PostgreSQL changes Version 1.0.672 639

AWS Schema Conversion Tool User Guide
Source Target What's new, enhanced, or fixed
PostgreSQ
L
MySQL 8.x
MySQL now supports creation of functional index key parts that
index expression values rather than column values. Functional key
parts enable indexing of values, such as JSON values, that can't be
indexed otherwise.
MySQL now supports Now CTE and Recursive CTE.
All All Upgrade to Amazon Corretto JDK 11 from JDK 8. For more
information, including download links, see What is Amazon
Corretto 11? in the Amazon Corretto 11 User Guide.
All All Added information to the assessment report about possible
inconsistencies in the user's database.
PostgreSQ
L 11.x
PostgreSQ
L/Aurora
PostgreSQ
L 11.
Added support for the following:
• Embedded transactions inside SQL stored procedures.
• The ability to CALL SQL stored procedures.
• The ability to create SQL stored procedures.
PostgreSQ
L
MySQL 8.x
Added MySQL support for descending indexes. DESC in an index
definition is no longer ignored, but causes storage of key values in
descending order.
Added MySQL support the use of expressions as default values in
data type specifications, including expressions as default values for
the BLOB, TEXT, GEOMETRY, and JSON data types.
Several existing aggregate functions can now be used as window
functions:
•
AVG()
•
BIT_AND()
•
BIT_OR()
Release 1.0.640 PostgreSQL changes Version 1.0.672 640

AWS Schema Conversion Tool User Guide
Source Target What's new, enhanced, or fixed
•
BIT_XOR()
•
COUNT()
•
JSON_ARRAYAGG()
•
JSON_OBJECTAGG()
•
MAX()
•
MIN()
•
STDDEV_POP()
•
STDDEV()
•
STD()
•
STDDEV_SAMP()
•
SUM()
•
VAR_POP()
•
VARIANCE()
•
VAR_SAMP()
MySQL supports window functions that, for each row from a query,
perform a calculation using rows related to that row.
•
CUME_DIST()
•
DENSE_RANK()
•
FIRST_VALUE()
•
LAG()
•
LAST_VALUE()
•
LEAD()
•
NTH_VALUE()
•
NTILE()
•
PERCENT_RANK()
•
RANK()
•
ROW_NUMBER()
Release 1.0.640 PostgreSQL changes Version 1.0.672 641

AWS Schema Conversion Tool User Guide
Source Target What's new, enhanced, or fixed
PostgreSQ
L
MySQL 8.x Added support for CHECK constraint.
All SQL Server
SQL Server 2019: Added support for new index attribute OPTIMIZE
_FOR_SEQUENTIAL_KEY.
SQL Server 2017: Added support for Graph Databases Node and
Edge table types.
SQL Server 2016: Added support for TEMPORAL TABLES.
All All Implemented the ability to override physical partitions with virtual
partitions. Data warehouse extractors extract data according to
created virtual partitions.
PostgreSQ
L/Aurora
PostgreSQ
L
All
Added system view sysindexes emulation.
If there is a SELECT statement in a procedure without specifying
INTO, the parameter INOUT p_refcur of type refcursor is created
for a procedure on the target.
Release 1.0.640 Db2 LUW changes
The following table lists build 1.0.640 changes in which DB2 LUW is the source engine.
Source Target What's new, enhanced, or fixed
DB2 LUW RDS
MariaDB
10.4
Added RDS MariaDB 10.4 support for all online transactional
processing (OLTP) vendors.
All All Upgrade to Amazon Corretto JDK 11 from JDK 8. For more
information, including download links, see What is Amazon
Corretto 11? in the Amazon Corretto 11 User Guide.
Release 1.0.640 Db2 LUW changes Version 1.0.672 642

AWS Schema Conversion Tool User Guide
Source Target What's new, enhanced, or fixed
All All Added information to the assessment report about possible
inconsistencies in the user's database.
DB2 LUW MySQL
8.0.17
Added CHECK constraint support.
All SQL Server
SQL Server 2019: Added support for new index attribute OPTIMIZE
_FOR_SEQUENTIAL_KEY.
SQL Server 2017: Added support for Graph Databases Node and
Edge table types.
SQL Server 2016: Added support for TEMPORAL TABLES.
All All Implemented the ability to override physical partitions with virtual
partitions. Data warehouse extractors extract data according to
created virtual partitions.
Release 1.0.640 Teradata changes
The following table lists build 1.0.640 changes Teradata source engines.
Source Target What's new, enhanced, or fixed
Teradata Amazon
Redshift
Added support for the MERGE and QUALIFY statements.
Removed LOCKING ROWS FOR ACCESS clause from Teradata
statements.
Added support for CAST function.
All All Upgrade to Amazon Corretto JDK 11 from JDK 8. For more
information, including download links, see What is Amazon
Corretto 11? in the Amazon Corretto 11 User Guide.
Release 1.0.640 Teradata changes Version 1.0.672 643

AWS Schema Conversion Tool User Guide
Source Target What's new, enhanced, or fixed
Teradata Teradata Implemented improvements in REGEXP_INSTR() and REGEXP_SU
BSTR().
All All Added information to the assessment report about possible
inconsistencies in the user's database.
All SQL Server
SQL Server 2019: Added support for new index attribute OPTIMIZE
_FOR_SEQUENTIAL_KEY.
SQL Server 2017: Added support for Graph Databases Node and
Edge table types.
SQL Server 2016: Added support for TEMPORAL TABLES.
Teradata All Added support for REGEXP_INSTR() and REGEXP_SUBSTR().
All All Implemented the ability to override physical partitions with virtual
partitions. Data warehouse extractors extract data according to
created virtual partitions.
Teradata Amazon
Redshift
Implemented the ability to save SQL of the source tree into single
file or multiple files by stage using the settings in Project Settings,
Save as SQL and Apply, Dropdown list: Single file/Multiple files.
Implemented improvements in views and procedures conversions.
Teradata All Added support for Teradata version 16.20
Release 1.0.640 changes for other engines
The following table lists build 1.0.640 changes for other source engines.
Release 1.0.640 changes for other engines Version 1.0.672 644

AWS Schema Conversion Tool User Guide
Source Target What's new, enhanced, or fixed
Sybase RDS
MariaDB
10.4
Added RDS MariaDB 10.4 support for all online transactional
processing (OLTP) vendors.
SAP ASE MariaDB
Implemented the following:
• MariaDB 10.4
• EXECUTE IMMEDIATE statement
• DEFAULT definitions
• CHECK constraint support
SAP ASE
PostgreSQ
L 12.x
Added support for generated columns.
All All Upgrade to Amazon Corretto JDK 11 from JDK 8. For more
information, including download links, see What is Amazon
Corretto 11? in the Amazon Corretto 11 User Guide.
All All Added information to the assessment report about possible
inconsistencies in the user's database.
SAP ASE MySQL
8.0.17
Added CHECK constraint support.
All SQL Server
SQL Server 2019: Added support for new index attribute OPTIMIZE
_FOR_SEQUENTIAL_KEY.
SQL Server 2017: Added support for Graph Databases Node and
Edge table types.
SQL Server 2016: Added support for TEMPORAL TABLES.
Vertica Amazon
Redshift
Added support for distribution style = AUTO.
Release 1.0.640 changes for other engines Version 1.0.672 645

AWS Schema Conversion Tool User Guide
Source Target What's new, enhanced, or fixed
All All Implemented the ability to override physical partitions with virtual
partitions. Data warehouse extractors extract data according to
created virtual partitions.
Amazon
Redshift
Amazon
Redshift
Unsupported built-in functions in DML statements are replaced
with NULL as a placeholder.
Sybase PostgreSQ
L
Added support for native functions.
SAP ASE MySQL/
Aurora
MySQL
The default isolation level for Aurora MySQL is REPEATABLE READ.
Setting a GLOBAL isolation level isn't supported in Aurora MySQL.
Only session scope can be changed. The default behavior of
transactions is to use REPEATABLE READ and consistent reads.
Applications designed to run with READ COMMITTED may need
to be modified. Or you can explicitly change the default to READ
COMMITTED.
SAP ASE PostgreSQ
L
Added support for the CONVERT function(optimistic) without the
extension pack.
SAP ASE
All
Added system view sysindexes emulation.
If there is a SELECT statement in a procedure without specifying
INTO, the parameter INOUT p_refcur of type refcursor is created
for a procedure on the target.
Greenplum Amazon
Redshift
Implemented CREATE TEMPORARY TABLE as follows:
Release 1.0.640 changes for other engines Version 1.0.672 646

AWS Schema Conversion Tool User Guide
New Features in the AWS Schema Conversion Tool
The following table describes the important changes to the AWS Schema Conversion Tool (AWS
SCT) user guide after January 2018.
You can subscribe to an RSS feed to be notified of updates to this documentation.
Change Description Date
AWS SCT build #1.0.672 Build 1.0.672 provides
support of Amazon RDS for
PostgreSQL 15 as a target
and Microsoft SQL Server
version 2022 as a source. It
also adds support for new
Amazon Redshift features
in the converted code, imp
lements multiple conversio
n improvements for IBM Db2
for z/OS source, and resolves
a number of conversion
issues.
May 8, 2023
AWS SCT build #1.0.671 Build 1.0.671 provides
support of migrations from
Apache Oozie to AWS Step
Functions. It also adds
support for BigQuery as
a source for the multiserv
er assessment process.
In addition, it adds new
conversion settings for IBM
Db2 for z/OS as a source
and resolves a number of
conversion issues.
March 8, 2023
Version 1.0.672 647

AWS Schema Conversion Tool User Guide
AWS SCT build #1.0.670 Build 1.0.670 provides
support of migrations from
Hadoop to Amazon EMR. It
also adds support for Azure
Synapse Analytics as a source
for the multiserver assessmen
t process. In addition, it
improves the conversion of
SQL code that is embedded
in Java applications and res
olves a number of conversion
issues.
January 23, 2023
AWS SCT build #1.0.669 Build 1.0.669 implements
support of native partition
ing for data migration from
Oracle data warehouses. It
also improves the multiserv
er assessment process, adds
new features in data extractio
n agents, and resolves a
number of conversion issues.
December 19, 2022
AWS SCT build #1.0.668 Build 1.0.668 implements
automatic virtual partition
ing for data migration from
Greenplum databases,
and adds support of data
migration from Snowflake
databases to Amazon
Redshift. It also improves the
conversion of SQL code that
is embedded in C# applicati
ons and resolves a number of
conversion issues.
November 16, 2022
Version 1.0.672 648

AWS Schema Conversion Tool User Guide
AWS SCT build #1.0.667 Build 1.0.667 provides
support for the Informati
ca extract, transform, and
load (ETL) engine as a
migration source. It also
updates the extension pack
version, increases the min
imum supported driver
version for Amazon Redshift,
and resolves a number of
conversion issues.
October 13, 2022
AWS SCT build #1.0.666 Build 1.0.666 improves the
conversion of Java applicati
ons by adding support for
the MyBatis framework. It
also adds new functions into
extension packs, enhances
the source metadata loader,
and resolves a number of
conversion issues.
September 20, 2022
AWS SCT build #1.0.665 Build 1.0.665 provides
support of BigQuery as a
migration source. It also
implements support of the
new version of the Babelfish
features configuration file. In
addition, it improves the con
version of data warehouse
s to Amazon Redshift,
and resolves a number of
conversion issues.
August 29, 2022
Version 1.0.672 649

AWS Schema Conversion Tool User Guide
AWS SCT build #1.0.664 Build 1.0.664 provides
support of Amazon Redshift
Serverless as a migration
source or target. It also imp
lements automatic memory
balancing in data extracting
tasks, and fixes an error where
AWS SCT couldn't connect
to AWS Snowball devices. In
addition, it adds the ability to
change column collation in
migration rules, improves the
user interface, and resolves a
number of conversion issues.
July 14, 2022
AWS SCT build #1.0.663 Build 1.0.663 adds support
for Babelfish for Aurora
PostgreSQL 1.2.0 and
improves the multiserver ass
essment report capabilities.
It also adds new features in
the migration rules, fixes two
loader errors, and resolves a
number of conversion issues.
June 20, 2022
AWS SCT build #1.0.662 Build 1.0.662 implements
SQL code conversion in C#
applications and improves
the multiserver assessment
report workflow. It also
adds multiple conversion
improvements and resolves a
number of conversion issues.
May 19, 2022
Version 1.0.672 650

AWS Schema Conversion Tool User Guide
AWS SCT build #1.0.661 Build 1.0.661 provides
support of IBM Db2 for z/OS
as a migration source. It also
adds support for conversio
n of extract, transform, and
load (ETL) scripts to AWS Glue
Studio and resolves a number
of conversion issues.
April 21, 2022
AWS SCT build #1.0.660 Build 1.0.660 provides
support of PostgreSQL major
version 14 and MariaDB 10.6
as migration targets. It also
adds support for conversio
n of Oracle indexes for mat
erialized views, and resolves a
number of conversion issues.
March 21, 2022
AWS SCT build #1.0.659 Build 1.0.659 provides
support of PostgreSQL
major version 13 on Aurora
PostgreSQL-Compatible
Edition as a migration target.
It implements SQL code
conversion in C# applicati
ons, adds support of Oracle
Unified Auditing, and resolves
a number of conversion
issues.
February 21, 2022
Version 1.0.672 651

AWS Schema Conversion Tool User Guide
AWS SCT build #1.0.658 Build 1.0.658 provides
integration with AWS Secrets
Manager and adds support
of Amazon Redshift virtual
target database platform. It
also adds a number of con
version improvements and
bug fixes.
January 20, 2022
AWS SCT build #1.0.657 Build 1.0.657 improves
conversion from Microsoft
SQL Server to Aurora
PostgreSQL-Compatible
Edition, Amazon RDS for
PostgreSQL, and other
migration destinations. It
also adds a number of user
interface improvements and
bug fixes.
December 20, 2021
AWS SCT build #1.0.656 Build 1.0.656 provides
support of multiple source
and target databases in one
project. It also adds conversio
n, optimization strategy, and
general improvements and a
number of bug fixes.
November 22, 2021
AWS SCT build #1.0.655 Build 1.0.655 implement
s conversion of Teradata
FastExport job scripts to
Amazon Redshift RSQL and
increases the minimum
supported driver version for
Greenplum to 42.2.5. It also
adds a number of improveme
nts and bug fixes.
October 18, 2021
Version 1.0.672 652

AWS Schema Conversion Tool User Guide
AWS SCT build #1.0.654 Build 1.0.654 implements
conversion of Shell, Teradata
FastLoad, and Teradata Basic
Teradata Query (BTEQ) scripts
to Amazon Redshift RSQL.
It also resolves a number of
conversion issues and adds a
number of improvements and
bug fixes.
September 16, 2021
AWS SCT build #1.0.653 Build 1.0.653 implements
conversion of dynamic SQL
created in called functions or
procedures. It also improves
conversion of encrypted
routines and adds a number
of improvements and bug
fixes.
August 10, 2021
AWS SCT build #1.0.652 Build 1.0.652 implements
script command mode in the
command-line interface and
implements schema optimizat
ion rules. It also adds a
number of conversion and
performance improvements
and bug fixes.
June 30, 2021
AWS SCT build #1.0.651 Build 1.0.651 adds a number
of improvements and bug
fixes. It also provides access
to the initial copy of the AWS
Schema Conversion Tool CLI
Reference.
June 4, 2021
Version 1.0.672 653

AWS Schema Conversion Tool User Guide
AWS SCT build #1.0.650 Build 1.0.650 implements
support of Amazon RDS for
PostgreSQL 13 as a target
database, updates extractor
agents. It also upgrades the
minimum supported JDBC
driver version for Microsoft
SQL Server, Azure, and Azure
Synapse. In addition, it adds
a number of conversion
improvements and bug fixes.
April 30, 2021
AWS SCT build #1.0.649 Build 1.0.649 implement
s support of MariaDB
10.5 as a target database
and implements function
enhancements for conversio
n of Oracle built-in functions
. It also adds a number of
conversion and performance
improvements and bug fixes.
March 29, 2021
AWS SCT build #1.0.648 Build 1.0.648 adds a number
of conversion improvements
and bug fixes.
February 22, 2021
Version 1.0.672 654

AWS Schema Conversion Tool User Guide
AWS SCT build #1.0.647 Build 1.0.647 adds support
of the Database Mail feature
on Amazon RDS, implement
s load and conversion of
comments on storage objects.
It also adds AWS SCT Data
Migration Service Assessor
and AWS SCT Wizard and
implements the tree filter
user interface. In addition, it
adds a redesigned section in
the Assessment Report and a
number of improvements and
bug fixes.
January 15, 2021
AWS SCT build #1.0.646 Build 1.0.646 adds support
for INTERVAL data types,
Identity columns, and cursors
conversion, and adds a
number of improvements and
bug fixes.
December 28, 2020
AWS SCT build #1.0.645 Build 1.0.645 adds support
for ETL SSIS to AWS Glue
conversion and a number of
improvements and bug fixes.
November 16, 2020
AWS SCT build #1.0.643-
1.0.644
Build 1.0.644 adds a number
of conversion, performance,
and user-interface improveme
nts and bug fixes.
October 14, 2020
Version 1.0.672 655

AWS Schema Conversion Tool User Guide
AWS SCT build #1.0.642 Build 1.0.642 implements
conversion of ETL packages
from Microsoft SQL Server
Integration Services to AWS
Glue and adds a number of
improvements and bug fixes.
August 28, 2020
AWS SCT build #1.0.641 Added SSL support for data
extractors. Build also includes
a number of improvements
and fixes.
July 17, 2020
AWS SCT builds #1.0.633-
1.0.640
Upgraded from JDK 8 to
Amazon Corretto JDK 11.
Added tables identifying
other upgrades, changes, and
fixes.
June 22, 2020
AWS WQF availability AWS SCT is no longer
providing the AWS Workload
Qualification Framework
(AWS WQF) tool for
download.
June 19, 2020
AWS SCT builds #1.0.632 SCT UI - Added new tab to
show errors that happen
when applying scripts. You
can now save the source tree
as SQL when converting from
SAP ASE. Improvements for
conversions to PostgreSQ
L or Aurora PostgreSQL or
Redshift.
November 19, 2019
Version 1.0.672 656

AWS Schema Conversion Tool User Guide
AWS SCT builds #1.0.631 and
#1.0.630 (combined)
Better support ROWIDs in
Oracle, and for system objects
in Microsoft SQL Server and
SAP ASE. Better handling
for missing specifiers of
SQL Server schemas. Better
support for conversions
from Greenplum to Redshift.
Improved support for
conversion of stored code
when moving to Amazon
Redshift, MariaDB, MySQL,
and PostgreSQL.
September 30, 2019
AWS SCT build #1.0.629 Support for stored procedure
s for conversions from
Netezza. Improved support
for conversions to Amazon
Redshift, DynamoDB, MySQL,
and PostgreSQL. Added
support for SAP ASE 12.5 as a
source.
August 20, 2019
AWS SCT build #1.0.628 Support for service emulation
for conversions from DB2,
SQL Server and Oracle.
Enhancements for conversio
ns to Amazon Redshift,
including more support for
cursors and stored procedure
s.
June 22, 2019
Version 1.0.672 657

AWS Schema Conversion Tool User Guide
AWS SCT build #1.0.627 Support for conversions
from SQL Server to stored
procedures in Amazon
Redshift. Enhancements for
converting to PostgreSQL 11
and MySQL 8.0.
May 31, 2019
AWS SCT build #1.0.626 PostgreSQL 11 and MySQL
8.0 are now supported as
targets. SAP ASE 15.5 is now
supported as a source.
April 26, 2019
AWS SCT build #1.0.625 Updates include the ability
to convert Teradata BTEQ
to AWS Glue, support for
conversions to MariaDB 10.3
with Oracle compatibility
mode support, support for
SAP ASE 15.7, and service sub
stitutions to emulate missing
functionality.
March 25, 2019
AWS SCT build #1.0.624 Updates include the ability
to convert Oracle ETL to
AWS Glue, and support for
conversions from Microsoft
SQL Server, Oracle, and IBM
Db2 LUW to Amazon RDS
for MariaDB. We also added
support for conversions from
SAP ASE to RDS for MySQL
and Amazon Aurora with
MySQL compatibility. In
addition, we added support
for the Orafce extension
during Oracle conversion to
PostgreSQL.
February 22, 2019
Version 1.0.672 658

AWS Schema Conversion Tool User Guide
AWS SCT build #1.0.623 Updates include the ability to
convert SAP ASE databases
, and the ability to convert
T-SQL scripts, DML, and
DDL to equivalent code or
components. We also added
Oracle and Microsoft SQL
Server emulations to improve
conversions.
January 25, 2019
AWS SCT build #1.0.622 Updates include the Workload
Qualification Framework,
which analyzes the workload
for an entire migration,
including database and app
modifications.
December 20, 2018
AWS SCT build #1.0.621 Updates include support for
Aurora PostgreSQL 10 as
a target, and the ability to
migrate from Netezza using
external table options.
November 21, 2018
AWS SCT build #1.0.620 Updates include the ability to
save SQL scripts, and support
for Oracle global cursors
when migrating to MySQL.
October 22, 2018
AWS SCT build #1.0.619 Updates include support
for migrating from Apache
Cassandra to DynamoDB,
and support for Vertica 9 as a
source.
September 20, 2018
Version 1.0.672 659

AWS Schema Conversion Tool User Guide
AWS SCT build #1.0.618 Updates include expanded
assessment reports, sup
port for converting Oracle
ROWIDs, and support for SQL
Server user-defined tables.
August 24, 2018
AWS SCT build #1.0.617 Updates include expanded
assessment reports, sup
port for converting Oracle
ROWIDs, and support for SQL
Server user-defined tables.
July 24, 2018
AWS SCT build #1.0.616 Updates include support for
RDS when converting from
Oracle to Amazon RDS for
Oracle, converting Oracle
schedule objects, and support
for Oracle jobs. partitioning,
and Db2 LUW version 10.1.
June 26, 2018
AWS SCT build #1.0.615 Updates include support for
SQL Server to PostgreSQL
GOTO statements, PostgreSQ
L 10 partitioning, and Db2
LUW version 10.1.
May 24, 2018
AWS SCT build #1.0.614 Updates include support
for Oracle to Oracle DB
Links, SQL Server to Pos
tgreSQL inline functions, and
emulation of Oracle system
objects.
April 25, 2018
Version 1.0.672 660
AWS Schema Conversion Tool User Guide
AWS SCT build #1.0.613 Updates include support
for Db2 LUW, conversion
of SQL*Plus files, and SQL
Server Windows Authentic
ation.
March 28, 2018
AWS SCT build #1.0.612 Updates include support for
custom data type mapping,
schema compare for Oracle
10, and Oracle to PostgreSQL
conversion of global variables.
February 22, 2018
AWS SCT build #1.0.611 Updates include support
for Oracle to PostgreSQL
dynamic statements, open
ing the log file by selecting an
error message, and the ability
to hide schemas in tree view.
January 23, 2018
Earlier updates
The following table describes the important changes to the AWS Schema Conversion Tool (AWS
SCT) user guide prior to January 2018.
Version Change Description Date changed
1.0.608 FIPS endpoint
support for
Amazon S3
You can now request AWS SCT to connect
to Amazon S3 and Amazon Redshift by
using FIPS endpoints to comply with
Federal Information Processing Standard
security requirements. For more informati
on, see Storing AWS credentials.
November 17,
2017
1.0.607 FIPS endpoint
support for
Amazon S3
You can now request AWS SCT to connect
to Amazon S3 and Amazon Redshift by
using FIPS endpoints to comply with
Federal Information Processing Standard
October 30,
2017
Earlier updates Version 1.0.672 661
AWS Schema Conversion Tool User Guide
Version Change Description Date changed
security requirements. For more informati
on, see Storing AWS credentials.
1.0.607 Data extractio
n tasks can
ignore LOBs
When you create data extraction tasks,
you can now choose to ignore large objects
(LOBs) to reduce the amount of data that
you extract. For more information, see
Creating, running, and monitoring an AWS
SCT data extraction task.
October 30,
2017
1.0.605 Data extractio
n agent task
log access
You can now access the data extraction
agent task log from a convenient link in
the AWS Schema Conversion Tool user
interface. For more information, see
Creating, running, and monitoring an AWS
SCT data extraction task.
August 28,
2017
1.0.604 Converter
enhancements
The AWS Schema Conversion Tool engine
has been enhanced to offer improved
conversions for heterogeneous migrations.
June 24, 2017
1.0.603 Data extractio
n agents
support filters
You can now filter the data that the
extraction agents extract from your data
warehouse. For more information, see
Creating data migration rules in AWS SCT.
June 16, 2017
1.0.603 AWS SCT
supports
additiona
l data
warehouse
versions
You can now use the AWS Schema
Conversion Tool to convert your Teradata
13 and Oracle Data Warehouse 10 schemas
to equivalent Amazon Redshift schemas.
For more information, see Converting data
warehouse schemas to Amazon RDS using
AWS SCT.
June 16, 2017
Earlier updates Version 1.0.672 662

AWS Schema Conversion Tool User Guide
Version Change Description Date changed
1.0.602 Data extractio
n agents
support
additiona
l data
warehouses
You can now use data extraction agents
to extract data from your Microsoft
SQL Server data warehouses. For more
information, see Migrating data from
on-premises data warehouse to Amazon
Redshift with AWS Schema Conversion
Tool.
May 11, 2017
1.0.602 Data extractio
n agents can
copy data
to Amazon
Redshift
Data extraction agents now have three
upload modes. You can now specify
whether to just extract your data, to extract
your data and just upload it to Amazon S3,
or to extract, upload, and copy your data
directly into Amazon Redshift. For more
information, see Creating, running, and
monitoring an AWS SCT data extraction
task.
May 11, 2017
1.0.601 AWS SCT
supports
additiona
l data
warehouses
You can now use the AWS Schema
Conversion Tool to convert your Vertica
and Microsoft SQL Server schemas to
equivalent Amazon Redshift schemas. Fo
r more information, see Converting data
warehouse schemas to Amazon RDS using
AWS SCT.
April 18, 2017
1.0.601 Data extractio
n agents
support
additiona
l data
warehouses
You can now use data extraction agents
to extract data from your Greenplum,
Netezza, and Vertica data warehouses. For
more information, see Migrating data from
on-premises data warehouse to Amazon
Redshift with AWS Schema Conversion
Tool.
April 18, 2017
Earlier updates Version 1.0.672 663

AWS Schema Conversion Tool User Guide
Version Change Description Date changed
1.0.601 Data extractio
n agents
support
additiona
l operating
systems
You can now install data extraction agents
on computers running the macOS and
Microsoft Windows operating systems. For
more information, see Installing extraction
agents.
April 18, 2017
1.0.601 Data extractio
n agents
upload to
Amazon S3
automatically
Data extraction agents now upload your
extracted data to Amazon S3 automatic
ally. For more information, see Data
extraction task output.
April 18, 2017
1.0.600 Data Extractio
n Agents
You can now install data extraction agents
that extract data from your data warehouse
and prepare it for use with Amazon
Redshift. You can use the AWS Schema
Conversion Tool to register the agents and
create data extraction tasks for them. For
more information, see Migrating data from
on-premises data warehouse to Amazon
Redshift with AWS Schema Conversion
Tool.
February 16,
2017
1.0.600 Customer
Feedback
You can now provide feedback about
the AWS Schema Conversion Tool. You
can file a bug report, you can submit a
feature request, or you can provide general
information. For more information, see
Providing feedback.
February 16,
2017
Earlier updates Version 1.0.672 664
AWS Schema Conversion Tool User Guide
Version Change Description Date changed
1.0.502 Integration
with AWS
DMS
You can now use the AWS Schema
Conversion Tool to create AWS DMS
endpoints and tasks. You can run and
monitor the tasks from AWS SCT. For
more information, see Integrating AWS
Database Migration Service with AWS
Schema Conversion Tool.
December 20,
2016
1.0.502 Amazon
Aurora with
PostgreSQ
L compatibi
lity as a target
database
The AWS Schema Conversion Tool now
supports Amazon Aurora with PostgreSQ
L compatibility as a target database. For
more information, see Converting database
schemas in AWS Schema Conversion Tool.
December 20,
2016
1.0.502 Support for
profiles
You can now store different profiles in
the AWS Schema Conversion Tool and
easily switch between them. For more
information, see Managing Profiles in the
AWS Schema Conversion Tool.
December 20,
2016
1.0.501 Support for
Greenplum
Database and
Netezza
You can now use the AWS Schema
Conversion Tool to convert your data
warehouse schemas from Greenplum
Database and Netezza to Amazon Redshift.
For more information, see Converting data
warehouse schemas to Amazon RDS using
AWS SCT.
November 17,
2016
1.0.501 Redshift
optimization
You can now use the AWS Schema
Conversion Tool to optimize your Amazon
Redshift databases. For more information,
see Converting data from Amazon Redshift
using AWS Schema Conversion Tool.
November 17,
2016
Earlier updates Version 1.0.672 665
AWS Schema Conversion Tool User Guide
Version Change Description Date changed
1.0.500 Mapping rules Before you convert your schema with the
AWS Schema Conversion Tool, you can now
set up rules that change the data type of
columns, move objects from one schema
to another, and change the names of
objects. For more information, see Creating
migration rules in AWS SCT.
October 4,
2016
1.0.500 Move to cloud You can now use the AWS Schema
Conversion Tool to copy your existing
on-premises database schema to an
Amazon RDS DB instance running the
same engine. You can use this feature to
analyze potential cost savings of moving
to the cloud and of changing your license
type. For more information, see Using
the assessment report in the AWS Schema
Conversion Tool.
October 4,
2016
1.0.400 Data
warehouse
schema
conversions
You can now use the AWS Schema
Conversion Tool to convert your data
warehouse schemas from Oracle and
Teradata to Amazon Redshift. For
more information, see Converting data
warehouse schemas to Amazon RDS using
AWS SCT.
July 13, 2016
1.0.400 Application
SQL conversio
ns
You can now use the AWS Schema
Conversion Tool to convert SQL in your C+
+, C#, Java, or other application code. For
more information, see Converting applicati
on SQL using AWS SCT.
July 13, 2016
Earlier updates Version 1.0.672 666

AWS Schema Conversion Tool User Guide
Version Change Description Date changed
1.0.400 New feature The AWS Schema Conversion Tool now
contains an extension pack and a wizard to
help you install, create, and configure AW
S Lambda functions and Python libraries
to provide email, job scheduling, and other
features. For more information, see Using
the AWS Lambda functions from the AWS
SCT extension pack and Using custom
libraries for AWS SCT extension packs.
July 13, 2016
1.0.301 SSL Support You can now use Secure Sockets Layer (SSL)
to connect to your source database when
you use the AWS Schema Conversion Tool.
May 19, 2016
1.0.203 New feature Adds support for MySQL and PostgreSQL
as source databases for conversions.
April 11, 2016
1.0.202 Maintenance
release
Adds support for editing the converted SQL
that was generated for the target database
engine. Adds improved selection capabilit
ies in the source database and target
DB instance tree views. Adds support for
connecting to an Oracle source database
using Transparent Network Substrate (TNS)
names.
March 2, 2016
1.0.200 Maintenance
release
Adds support for PostgreSQL as a target
database engine. Adds the ability to
generate converted schema as scripts and
to save the scripts to files prior to applying
the schema to the target DB instance.
January 14,
2016
1.0.103 Maintenance
release
Adds offline project capability, the ability to
check for new versions, and memory and
performance management.
December 2,
2015
Earlier updates Version 1.0.672 667

AWS Schema Conversion Tool User Guide
Version Change Description Date changed
1.0.101 Maintenance
release
Adds the Create New Database Migration
Project wizard. Adds the ability to save the
database migration assessment report as a
PDF file.
October 19,
2015
1.0.100 Preview
release
Provides the user guide for the AWS
Schema Conversion Tool preview release.
October 7,
2015
Earlier updates Version 1.0.672 668
